Stereo sound amplifier on TDA7262
Hi-Fi amplifier for two channels.
This microcircuit has a wide supply voltage range, and the output current reaches 3.5 amperes. A standby function and protection against short circuits and overheating during operation are also available.
Limit characteristics of the microcircuit
| Supply voltage Upit | 25 V |
| Output peak current | 4.5 A |
| Power dissipation Prass | 30 W |
| Working temperature Trab | -20…+85 °C |
Related materials
Pre-amplifier based on TDA7318 (TDA7313) audio processor and Arduino. Part 2... Completed project. Assembly will take you approximately 15 minutes. In the first part of the article we detail...
Using MK ATMega163, ATMega163L, ATMega16 in Arduino IDE... The popular development environment Arduino IDE attracts with a large number of ready-made libraries and...
The second life of the Philips 592LN tube radio (Holland, 1947). Part 5... In this part of the article we will talk about: - the pre-amplifier and its power supply, - the power supply of the FM module...
Amateur Radio High-End. 40 best designs of lamp UMZCH for 40 years.... Amateur Radio High-End. 40 best designs of lamp UMZCH for 40 years. Small encyclopedia…
Subwoofer channel processing unit: adder, subsonic, frequency and phase regulator... Photo of my unit, the unit is made according to the second version of the board. The device is designed to form...
The second life of the Philips 592LN tube radio (Holland, 1947). Part 4. BlueTooth OVC3860 module... Hello, Datagorians! In this part of my story we will talk about the BlueTooth OVC3860 module (more...
Pinwheel "Estonia 010". New control system based on Arduino UNO... Hello, dear Datagorians! I share with you my own experience in mastering the Arduino UNO board and...
Arduino shield: accelerometer on LIS302DL... I recently assembled an arduino on atmega8, blinked the diode, I wanted more. I started studying various...
Allegro is a headphone amplifier based on LT1259... I wanted to do it quickly, but as efficiently as possible. After a short search, from…
TDA8920… The TDA8920 is a high quality Class D power amplifier with very low dissipation….
The second life of the Philips 592LN tube radio (Holland, 1947). Part 2... Today I want to share with you, dear Datagorians, how in my Philips 592LN radio I...
DIY tube Hi-Fi amplifier. Toropkin M. V…. Toropkin M.V. Do-it-yourself tube Hi-Fi amplifier. - St. Petersburg: Science and Technology, 2005. - 240 p.: ill....
Amplifier 50 W
A simple single-channel circuit based on TDA1514.
Chip characteristics
| Parameter | Meaning |
| Upit1 | +10…+30 V |
| Upit2 | -10…-30 V |
| Iout | 5 A |
| Irest | 56 mA |
| Pout | 50 W |
| Rin | 20 kOhm |
| Gain | 30 dB |
| Frequency band | 20-25,000 Hz |
| Harmonic distortion | 0,01 % |
| Rload | 8 ohm |
Pin assignment
| Pin number | Purpose |
| 1 | Non-inverting input |
| 2 | Protection circuit output |
| 3 | Supply Voltage Shutdown Circuit Output |
| 4 | Supply voltage (-27.5 V) |
| 5 | Exit |
| 6 | Supply voltage (+27.5 V) |
| 7 | Power amplifier feedback and correction input |
| 8 | Output shutdown circuit output |
| 9 | Inverting input |
↑ Conclusions
Often, novice amateurs complain about low power, but this may not be the case at all, but rather an insufficient signal level from the source. For the microcircuits considered, the gain is 26 dB, i.e. 20 times, and for the TDA7297 it is 33 dB, i.e. 44 times. The difference is significant!
With the same input signal, which does not cause limitations, the power emitted by the speakers will be 4 times higher for the TDA7297! However, the maximum undistorted power (given sufficient input signal) will be higher with the TDA7379. At 8 ohms, the TDA7297 is preferable, and at 4 ohms, the TDA7379 is preferable. It’s funny that the cost of these and more powerful microcircuits is the same - “all for a dollar.”
TDA8567q 4x25 W
Hi-Fi class bridge amplifier for four channels.
There is protection against short circuit of the output stage and thermal protection with a reduction in output power when overheated. The microcircuit also has protection against voltage fluctuations and a shutdown mode. This microcircuit also has an on/off mode for the input signal (Mute mode), and protection against “clicking” when voltage is applied to the circuit.
Chip characteristics
| Parameter | Meaning |
| Upit | 6-18 V |
| Iout | 7.5 A |
| Irest | 230 mA |
| Pout | 4x25 W |
| Rin | 30 kOhm |
| Gain | 26 dB |
| Frequency band | 20-20000 Hz |
| Harmonic distortion | 0,05 % |
| Rload | 4 ohm |
Pin assignment
| Pin number | Purpose |
| 1 | Supply voltage |
| 2 | Exit 1+ |
| 3 | General |
| 4 | Output 1- |
| 5 | Output 2- |
| 6 | General |
| 7 | Exit 2+ |
| 8 | Supply voltage |
| 9 | Diagnostics |
| 10 | Input 1 |
| 11 | Entrance 2 |
| 12 | General signal |
| 13 | Entrance 3 |
| 14 | Entrance 4 |
| 15 | Mode selection |
| 16 | Supply voltage |
| 17 | Exit 3+ |
| 18 | General |
| 19 | Output 3- |
| 20 | Output 4- |
| 21 | General |
| 22 | Exit 4+ |
| 23 | Supply voltage |
↑ Analysis of datasheets and real measurements of TDA7379
TDA7379Ali
Dependence of TDA7379 output power on power supply into a 4 Ohm load
The power of the TDA7297 is in parentheses for comparison. It can be seen that with a load of 8 ohms the difference is minimal, and with a load of 4 ohms it is significant.
TDA7379
The declared 2×38W/4Ω @18V, 1KHz are possible if the power supply is stabilized. In addition, the power is specified at 10% distortion, which is unbearable distortion when limited significantly. In reality, at the threshold of the limitation, the undistorted power will be 20...30% lower, this is 25...30 W per channel, very good for such a chip. By the way, the limitation occurs very softly, according to the oscilloscope it is much better than in class D.
Stereo amplifier 12 dB
The TDA8199 can be used with both electronic volume controls and simple potentiometers of the appropriate sound class.
Characteristics
| Supply voltage Upit | 10.8 - 13.2 V |
| Current consumption Ipotr | 21 - 28 mA |
| Gain output/input | 12 dB |
| Audio input impedance Rin | 22 - 1000 Ohm |
| Harmonic coefficient Kr | 0,35 — 1 % |
| Audio output impedance Rout | 30 - 1000 Ohm |
| Output noise voltage Uout noise | 30 µV |
Chip Limits
| Supply voltage Upit | 16 V |
| Working temperature Trab | -55…+125 °C |
| Storage temperature | 0…+70 °C |
Stereo amplifier design and details
Most of the parts of the power supply are installed on a circuit board measuring 95x80 mm, Fig.Z. All components of the power supply are installed in the housing of one of the speakers with dimensions of 180x128x140 mm. The design can use fixed resistors of types S1-4, S1-14, MLT, RPM, S2-23, S2-33.
It is advisable to use a wirewound resistor R2 with a power of 2...5 W and a resistance of 10...33 Ohms. Variable resistor R10 type SPZ-Z0a or similar with a linear characteristic of the dependence of resistance on the angle of rotation of the moving contact. Instead of the MYG20-431 varistor, FNR-20K431, FNR-20K471, LF14K471, LF20K471, GNR20D431 K, TVR14-471 are suitable.
Non-polar capacitors C1 – C4, C15, C16 ceramic K10-17, K10-50 or imported. The remaining non-polar capacitors are small-sized film capacitors. Electrolytic capacitors are aluminum or tantalum oxide types K50-35, K50-68, K50-29, K53-19 or analogues.
Diodes FR155 can be replaced by any of 1 N5391 – 1 N5399, FR151 -FR157, FR201 – FR207, KD258, KD411. Schottky diodes 1N5822 can be replaced by SR360, SR306. Instead of the D815A zener diode, 1N5338 is suitable. Zener diodes BZV55C-5V6 can be replaced with 1N4734A, KS156G. LEDs can be any continuous glow with increased light output without built-in resistors, for example, the KIPD40, KIPD66 series.
The germanium pnp transistor MP26A can be replaced by MP26AB, MP25B, MP40A, MP21A, B. Instead of the AN7805 chip, KIA7805, MS7805, TL780-05C, KA7805, L7805CV are suitable. Domestic microcircuits such as KR142EN5A and KR142EN5V are not suitable for working in this design. The voltage stabilizer chip is installed on a ribbed duralumin heat sink with a cooling surface area of 70 cm2 (one side).
The UMZCH type TDA7496SA microcircuit in this design can be replaced with the TDA7496. The TDA7496S chip is not suitable for working in this design. The TDA7496SA chip is the most advanced in terms of built-in additional functions, but in the design described, only electronic volume control is used. This microcircuit is installed on a ribbed duralumin heat sink with a cooling surface area of 160 cm². Most of the UMZCH parts are installed on a circuit board measuring 95x80 mm, Fig. 4.
You can make a step-down transformer yourself. A W-shaped magnetic core with a central core area of 8.2...9 cm2 is suitable. The primary winding contains 1410 turns of winding wire (PEL or PEV type) with a diameter of 0.23...0.27 mm. Winding II contains 70 turns of winding wire with a diameter of 0.68 mm. Winding III - 120 turns of winding wire with a diameter of 0.68 mm. Several insulating layers of varnished fabric are laid between the windings. The no-load current of such a transformer will be only about 10 mA.
Instead of a homemade transformer, you can use a unified TTP-40. The IRS-101-3C switch can be replaced by the IRS-201-ВС, IRS-101-1АЗ, IRS101-12C. Switch SA2 type P2K with four groups of contacts connected in pairs in parallel can replace SDDF-3, KDC-A04, PKN-41-1-2. Chokes L1, L2 are wire jumpers with ferrite tubes 10...20 mm long placed on them. Fuse holder for 230V circuit type DP1-CM.
When assembling the elements of the UMZCH, you should carefully consider the layout of the signal and power circuits of the common wire. In the circuit diagram (Fig. 2), the power circuits of the UMZCH are shown with thick lines. Pins 11, 15, 8 DA1 and the corresponding pins BA1, BA2 must be connected to the common connection point of the negatives of capacitors C23, C24 using individual conductors or separate tracks.
Popular articles Clawed monster
The signal common wire originates from pin 8 of DA2. The speaker with the UMZCH module is connected to the speaker with the power module using a four-core cable 2...4 meters long, the copper cross-section of each core is 0.75...1.0 mm2. The appearance of the assembled structure is shown in the photo at the beginning of the article. The device, manufactured flawlessly from serviceable parts, starts working immediately and does not require adjustment.
ULF TDA8198 12 dB
The TDA8198 chip is manufactured in a DIP14 package and is used in high-end equipment.
The dynamic signal level is 90 dB.
There is protection of the output stage from short-circuit and static.
Chip characteristics
| Supply voltage Upit | 10.8 - 13.2 V |
| Current consumption Ipotr | 24 - 32 mA |
| Reference voltage Uref | 6.9 V |
| Output noise voltage Uout noise | 300 µV |
| Harmonic coefficient Kr | 0,3 — 1 % |
| Audio input impedance Rin | 22 kOhm |
| Audio output impedance Rout | 10 - 300 Ohm |
Chip Limits
| Supply voltage Upit | 16 V |
| Working temperature Trab | -55…+125 °C |
| Storage temperature | 0…+70 °C |
ULF TDA8196 12 dB
A simple power amplifier circuit using TDA8196. Scheme for a beginner radio amateur. Doesn't require many parts and is easy to assemble. Miniature bridge low frequency power amplifier with electronic volume control.
There is protection for the output stage against short circuits and thermal protection against overloads. And of course, protection against static. The amplifier can be adjusted either with a potentiometer or with a simple electronic volume control.
Specifications of TDA8196
| Supply voltage Upit | 10.8 - 13.2 V |
| Current consumption Ipotr | 12 mA |
| Reference voltage Uref | 6.6 V |
| Audio input impedance | 10 - 13 kOhm |
| Audio input impedance | 0.2 - 1 kOhm |
| Harmonic coefficient Kr | 0,4 — 1 % |
| Output noise voltage | 40 µV |
Chip Limits
| Supply voltage Upit | 16 V |
| Working temperature Trab | -55…+125 °C |
| Storage temperature | 0…+70 °C |
Operating principle of UMZCH on TDA7496SA
Audio frequency voltage is supplied to the inputs of the DA2 microcircuit through protective resistors R7, R8, R12, R13.
Series-connected low-power zener diodes VD13, VD14 and VD15, VD16 protect the microcircuit inputs from overload. The presence of protective circuits at the inputs of ULF microcircuits is mandatory if there are no relatively high-resistance resistors and a volume control at the UMZCH inputs. Capacitors C15, C16 prevent radio frequencies from entering the UMZCH input. This amplifier has two input jacks XS1, XS2 of different types, necessary for connecting various signal sources. Both two-channel inputs are connected in parallel, which allows you to use the device as a passive extender adapter. The electronic volume control is made using a variable resistor R10. From the moving contact of this resistor, the control voltage through resistor R14 is supplied to pin 3 of DA1. Capacitor C20 eliminates the “rustle” of the variable resistor. To power the volume control unit, a voltage of +5 V is sufficient, but in this design a voltage of +6.8 V is used, selected for the purpose of possible further modernization of the design, for example, equipping the power amplifier with a preliminary ULF.
The dynamic heads are connected to the DA2 outputs through isolation capacitors C27-C30, closed contacts of the switch SA2 and chokes L1, L2. Damping chains R15C25 and R16C26 eliminate possible self-excitation of DA2 at ultrasonic frequencies. Chokes L1, L2 reduce the influence on the operation of DA2 mobile telephones and radio modems. Headphones can be connected to the UMZCH output (XS3 socket). Resistors R19, R20 limit the power supplied to the headphones. Resistors R17, R18 are designed to eliminate the click when connecting dynamic phones or headphones to a working amplifier.
The headphones do not turn off when the speakers are connected, which is more convenient compared to when the speakers and headphones can only work alternately. Capacitor C22 is installed with a capacity ten times smaller than that recommended by the typical connection circuit of the TDA7496SA microcircuit; this is necessary to speed up the establishment of half the voltage on both outputs of DA2. The UMZCH module is powered by an unstabilized voltage of about 20V DC. With this supply voltage, the signal amplitude swing at the dynamic heads connected to the UMZCH output will be about 17 V.
The output power of the music signal on connected loads with a resistance of 8 Ohms will be honest (not “Chinese”) 2x2 W. For a small room, this will be much louder and better quality than the “Chinese-Kaliningrad” 2x10 W (sound power) of LED TVs with a screen of 32-42 inches.
TDA7265 and two inclusion options
There are two options for turning on the microcircuit.
- Large power range (+-25V);
- Bipolar power supply circuit;
- Power 2x25 W
- There is a silent mode and a standby function;
- Thermal protection against overheating during amplifier operation;
- There is short-circuit protection.
Bridge version of the amplifier on TDA7265
Chip characteristics
| Supply voltage Upit | 25 V |
| Output voltage in idle mode | 80 - 130 mV |
| Current consumption in idle mode Ipotr | 65 - 120 mA |
| Bias current at the non-inverting input Ibias | 500 nA |
| Output power Pout | 20 - 25 W |
| Harmonic coefficient Kr | 0,01 — 0,7 % |
| Gain (Open Loop) | 80 dB |
| Input resistance Rin | 15 - 20 kOhm |
| Shutdown temperature | 145 °C |
Limit parameters of the microcircuit
| Supply voltage Upit | 25 V |
| Output peak current | 4.5 A |
| Power dissipation Prass | 30 W |
| Operating temperature Trab | -20…+85 °C |
| Storage temperature Tstore | -40…+150 °C |
The TDA7293 microcircuit is a logical continuation of the TDA7294, and despite the fact that the pinout is almost the same, it has some differences that distinguish it from its predecessor. First of all, the supply voltage has been increased and now it can reach ±50V, protection against overheating of the crystal and short circuit in the load has been introduced, and the possibility of parallel connection of several microcircuits has been implemented, which allows the output power to be varied within a wide range. THD at 50W does not exceed 0.1% in the range of 20...15000Hz (typical value 0.05%). Supply voltage ±12…±50V, output stage current at peak reaches 10A. All this data was taken from the data book. However!!!
The endless upgrades of stationary power amplifiers have revealed some very interesting issues...
Picture 1
Figure 1 shows a typical TDA7293 connection diagram. Figure 2 shows a bridge circuit for connecting 2 microcircuits, which allows, at a low supply voltage, to receive power four times greater than with a standard one, however, it should be taken into account that the load on the microcircuit crystal will be 4 times greater and in any case it should not exceed 100W per TDA7293 chip package.
Figure 2
Figure 3 shows the TDA7293 parallel connection diagram. Here the upper microcircuit operates in “master” mode, and the lower one in “slave” mode. In this option, the output stages are unloaded, nonlinear distortions are noticeably reduced, and it is possible to increase the output power by n times, where n is the number of microcircuits used. However, it should be taken into account that at the moment of switching on, voltage surges may form at the outputs of the microcircuits, and since the protection systems have not yet reached operating mode, the entire line of microcircuits connected in parallel may fail. To avoid this trouble, it is strongly recommended to introduce a timer into the circuit that connects, using relay contacts, the output of the microcircuits no earlier than 2...3 seconds from the moment power is supplied to the microcircuits. Although the manufacturer is stubbornly silent on this topic and many have already fallen for the “bait” of unlimited capacity. However, tests of single variants of amplifiers on the TDA7293 show stable operation, but as soon as the single variants were switched to the “slave” mode and connected to the “master”... When turned on - not necessarily the first time - the microcircuit simply burst to the very heat sink flange, and the entire parallel ruler. And this happened with the TDA7293 more than once, so we can talk about a pattern, and if you don’t have extra money to repeat our experiments, then install a timer and relay. As for parallel connection, the datasheet is absolutely right - yes, indeed the TDA7293 can operate in this mode even when using 12 TDA7293 microcircuits, included in 6 pieces. in parallel and when these lines are connected to a bridge circuit, it is theoretically possible to obtain up to 600W of output power into a 4-ohm load. In reality, 3 microcircuits were tested in the bridge arm; with a power supply of ±35 V, about 260 W were obtained into a 4 Ohm load. The principle of parallel connection of the TDA7293 is based on the use of only the final stage of microcircuits operating in SLAVE mode. To switch the microcircuit to this mode, you need to connect the inverting, non-inverting input and common signal pins of the microcircuit to each other and apply MINUS supply voltage to them (pins 2, 3 and 4). In this case, the internal switch will turn off the primary amplifier stages. By applying an already amplified signal to pin 11, the output signal will be already amplified in current. Here you should pay attention to the fact that pin 11 of the microcircuit operating in MASTER mode is precisely used for wiring to cases operating in SLAVE mode. It is also necessary to connect the MUTE and STBY pins of the SLAVE chips to the corresponding pins of the MASTER chip. Of course, this assembly must consist of microcircuits from the same batch, since only in this case the transistors of the final stage will have the same parameters as possible, which will distribute the load evenly across all microcircuits. It’s also worth mentioning that the outputs of the microcircuits should be connected together 1…1.5 seconds after switching on, since it was at the moment of switching on that these assemblies quite often failed. But by and large, parallel connection is not recommended for widespread use, since such a circuit solution usually delights novice soldering workers. More experienced people, or those who really want to engage in audio engineering, will use amplifiers with discrete elements if a power of more than 70-80 W is needed, and to obtain a RELIABLE amplifier from a given microcircuit, it is not recommended to take more than 60 W. In this case, the likelihood of overheating of the crystal is minimized, and if you have an appropriate heatsink, the power amplifier on the TDA7293 will turn out to be really VERY reliable.
Figure 3
A more perverse use case is the bridging of parallel operating microcircuits. Of course, in this case you can get quite decent power relatively inexpensively, but the stingy pays twice - if at least one microcircuit fails, all TDA7293 microcircuits connected in parallel also burn out. In addition, there is a fairly high probability that the second arm of this bridge will also get it. Parallel-bridge connection is carried out in exactly the same way as a conventional bridge connection, only a garland of TDA7293 is used as one arm, operating in a non-inverting connection, and the second arm must operate in inverting mode (Figure 2, lower microcircuit). For this option, you can wire a special printed circuit board, or use a universal printed circuit board, which has all the necessary contact pads for switching to one or another operating mode. Read about the universal module HERE.
Specifications of TDA7293
Parameter
| Conditions | Meaning | |
| Output power when switched on once | Rn — 4 Ohms Uip — ±30V Rn — 8 Ohms Uip — ±45V | 80W (110W max) 110W (140W max) |
| Output power when connected in parallel | Rn — 4 Ohms Uip — ±27V Rn — 8 Ohms Uip — ±40V | 110W 125W |
| Output voltage slew rate | 15V/nS | |
| Frequency range at 3dB ripple | C1 not less than 1.5 µF | 6…200000Hz |
| Distortions | with a power of 5 W, a load of 8 Ohm and a frequency of 1 kHz from 0.1 to 50 W from 20 to 15000 Hz no more | 0,005% 0,1% |
| Supply voltage | ±12…±50V | |
| Current consumption in STBY mode | 0.5mA | |
| Quiescent current of the final stage | 35mA | |
| Threshold voltage for input and output stage blocking devices | "On Off" | +1.5 V +3.5 V |
| Thermal resistance crystal-case, deg. | 1.5C/W |
RECOMMENDATIONS FOR SELECTING A POWER SUPPLY for one channel
| Transformer secondary winding voltage, V | Voltage after rectifier, V | Minimum capacity of smoothing capacitors per power arm, µF (bridge) | Minimum transformer power for Rн 4 Ohm (bridge), VA | Minimum transformer power for Rn 8 Ohm, VA (bridge) | Output power of one case at 4 Ohm (bridge), W | Output power of one case at 8 Ohm (bridge), W | Output power of 2 cases connected in parallel at 4 Ohm (bridge), W | Output power of 2 cases connected in parallel at 8 Ohms (bridge), W |
| 2x12 | ±16 | 2200 (3300) | 27 (87) | 13 (43) | 19 (62) | 9 (31) | 24 (84) | 12 (42) |
| 2x14 | ±19 | 2200 (4700) | 39 (137) | 20 (69) | 28 (98) | 14 (49) | 35 (125) | 18 (62) |
| 2x16 | ±22 | 3300 (6800) | 56 (199) | 28 (99) | 40 | 20 (71) | 48 (173) | 24 (87) |
| 2x18 | ±24 | 3300 (6800) | 74 (270) | 38 (136) | 53 | 27 (97) | 63 (230) | 32 (115) |
| 2x20 | ±27 | 4700 (10000) | 97 (354) | 48 (176) | 69 | 34 (126) | 80 (295) | 40 (147) |
| 2x22 | ±30 | 4700 (10000) | 122 (448) | 60 (224) | 87 | 43 | 99 (368) | 49 (184) |
| 2x24 | ±33 | 6800 (10000) | 148 (554) | 74 (277) | 106 | 53 | 120 (448) | 60 (224) |
| 2x26 | ±35 | 10000 (15000) | 179 (672) | 90 (336) | 64 | 143 (537) | 71 (268) | |
| 2x28 | ±38 | 10000 (22000) | 211 (799) | 106 (400) | 76 | 167 (634) | 84 (317) | |
| 2x30 | ±41 | 15000 (47000) | 248 (939) | 123 (469) | 88 | 194 (738) | 97 (369) | |
| 2x32 | ±44 | 15000 (47000) | 287 (1089) | 143 (545) | 102 | 223 (851) | 112 (425) | |
| 2x34 | ±47 | 22000 (68000) | 328 (1252) | 164 (626) | 117 | 254 (972) | 127 (486) | |
| 2x35 | ±48,5 | 22000 (68000) | 350 (1337) | 175 (668) | 125 | 270 (1035) | 135 (518) | |
| ORANGE indicates modes that are close to overload, so we strongly do not recommend using them, go to the parallel connection option. BLUE DARK indicates modes for a board of two TDA7293 chips connected in parallel in one arm of the bridge. BLUE indicates modes for a board of three TDA7293 chips connected in parallel in one arm of the bridge LIGHT BLUE indicates modes for a board of four TDA7293 chips connected in parallel in one arm of the bridge GREEN DARK indicates modes for a board of five TDA7293 chips connected in parallel in one arm of the bridge GREEN indicates modes for a board of six TDA7293 chips connected in parallel in one arm of the bridge LIGHT GREEN indicates modes for a board of seven TDA7293 chips connected in parallel in one arm of the bridge DARK BROWN indicates modes for a board of eight TDA7293 chips connected in parallel in one arm of the bridge BROWN indicates modes for a board of nine TDA7293 chips connected in parallel in one arm of the bridge RED indicates the modes for a board of ten TDA7293 microcircuits connected in parallel in one arm of the bridge. Here we should immediately make a reservation - the microcircuit does not have a very good parameter such as crystal-case thermal resistance, so when using the microcircuits in the “should withstand” mode It’s better not to take risks, but to install another building in parallel with the existing ones, especially since it doesn’t require any “piping”... | ||||||||
And finally, tests were carried out on some more features of the TDA7293, but of Chinese (or maybe not Chinese... In short, this secret is shrouded in darkness) production: The short-circuit protection system worked the first time - a dry cotton sound was heard and the microcircuit acquired a completely protected appearance:
Comments are probably unnecessary. As for protection against overheating, the circuit was powered by ±30 volts, the TDA7293 chip was mounted on a heat sink of obviously insufficient area and loaded onto the RADIOTEHNIKA S-70 speaker system. For an hour and a half, the amplifier operated at maximum volume and as soon as the temperature of the heat sink flange (the temperature was measured by a digital device DT-838) reached 92 degrees Celsius, the thermal protection was activated. Thus, overheating of the environment did not occur, since intensive cooling of the open crystal of the microcircuit began:
The markings on these wonderful microcircuits were made with a laser, but the font of the inscription was slightly different, and while the amplifier was working, its performance was practically no different from the normally marked TDA7293 in all switching modes. By the way, these microcircuits have already practically replaced the old samples, so some suppliers have seriously increased the price for “rarities”. We are already selling “new” microcircuits and have not yet identified any complaints, since we strongly warn everyone that the “new” TDA7293 (as well as the TDA7294 - also already “new”) should not be tested for survivability, and in normal operation modes they behave very well They even feel good...
Normal markings.
| Some statistics on the “new” TDA7293, 50 pieces of each type were tested. | |||
| Consumption at idle is more than 3A with characteristic heating of the case | 4 | Consumption at idle is more than 3A with characteristic heating of the case | 0 |
| Consumption at idle is more than 1A with characteristic heating of the case | 1 | Consumption at idle is more than 1A with characteristic heating of the case | 0 |
| Refused to make a sound | 2 | Refused to make a sound | 1 |
| The results of the short circuit test are in the photo above. | Results of testing for short circuit - not yet checked | ||
| Additional signs include a slightly greenish tint to the case, orange stains on the flange and the absence of an icon next to the company logo. | Additional features include the blackish tint of the case, the laser markings on both the logo icon and the microcircuit itself are more voluminous and can be seen much more clearly at an angle to the light. | ||
As for the TDA7293 markings given below, these microcircuits are not even worth buying, since they are not useful for anything except for making key fobs, since they do not even consume current...
It would not be fair to keep silent about one more experiment, since it may be of interest to many - the TDA7293 works great on unipolar power supply; it only needs to imitate the midpoint with resistors. The wiring diagram is shown below:
The values are not marked as in the typical connection diagram.
Finally, it remains to add that the TDA7293 can be used with floating power, the circuit diagram is shown in Figure 4. This option allows you to develop up to 200 W at 4 Ohms with typical distortion.
Figure 4
Figure 5 shows the dimensions of the TDA7293 chip.
Figure 5
And finally, how can you attach the TDA7293 chip to the radiator. You can use insulating washers that will prevent the heat sink flange of the microcircuit with the radiator from shortening - after all, it has a “MINUS” supply voltage, or you can use “tails” from our KT818 type transistors. The “tail” must be placed between strips of fiberglass from which the foil has been removed, having previously lubricated them with well-mixed epoxy glue. If you don’t want to wait a long time for the glue to polymerize, then you can use a piece of cotton wool soaked in ANY “SUPER GLUE” - after 15 minutes. it will already be completely hardened. As soon as the glue hardens, file the edges, drill holes in the bracket strip and in the radiator, and it is better to cut an M3 thread in the radiator. Coat the mica with thermal paste on both sides! Well, you can see how it will look in Figure 6.
Figure 6.
TDA 7293.
This video shows how to independently assemble
an integrated power amplifier using the TDA7293 microcircuit
with explanations of the purpose of the elements. The video contains a description of the forced cooling fan speed control.
TEXT OPTION
You can see more details about how much power a power supply is needed for a power amplifier in the video below. The STONECOLD amplifier is taken as an example, but this measurement makes it clear that the power of the network transformer may be less than the power of the amplifier by about 30%.
You can buy a soldered board with a power amplifier based on the TDA7293 or the TDA7293 chip itself HERE. You can buy a soldered board with a power amplifier for the TDA7294 or the TDA7294 chip itself HERE. The modules (constructors) have different configurations, from a board with parts for one channel, but a soldered board with a power amplifier with a rectifier and smoothing capacitors for power supply.
Site administration address
DON'T FIND WHAT YOU WERE LOOKING FOR? GOOGLE:
| CUSTOM SEARCH STRING |
Bridge to TDA7240
A miniature but quite powerful low-frequency power amplifier, made using a bridge circuit.
The amplifier has:
- Protection of the output stage from short circuit;
- Thermal protection in case of overload;
- Reliable protection against surges up to 28 V.
Chip characteristics
| Upit | 6 - 18 V |
| Iout max | 4.5 A |
| Irest | 150 mA |
| Pout | 20 W |
| Rin | 50 kOhm |
| Gain | 40 dB |
| Frequency band | 30 - 25 kHz |
| Harmonic distortion | 0,5 % |
| Rload | 4 ohm |
Pin assignment
| Pin number | Purpose |
| 1 | Distortion Compensation Circuit Output |
| 2 | Output of correction scheme |
| 3 | Entrance |
| 4 | General |
| 5 | Output 1 |
| 6 | Supply voltage |
| 7 | Exit 2 |
Example of using TDA7294
This is a simple 70 watt amplifier circuit. Capacitors must be rated for at least 50 volts. For normal operation of the circuit, the TDA7294 chip must be installed on a radiator with an area of about 500 cm2. The installation is carried out on a single-sided board using LUT technology.
Printed circuit board and arrangement of elements on it:
ULF circuit on TDA7236
The microcircuit is in a minidip (4+4) package.
Chip characteristics
| Supply voltage Upit | 1.8 - 24 V |
| Current consumption with idle mode Ipotr | 5 mA |
| Output power Pout | 1.7 W |
| Harmonic coefficient Kr | 0,3 — 1 % |
| Gain (closed loop) | 38 dB |
| Input resistance Rin | 100 kOhm |
Limit parameters
| Supply voltage Upit | 28 V |
| Output current Iout | 1 A |
| Power dissipation Pdis | 500 mW (SZIP package), 800 mW (SSOP package) |
| Temperature Tb | 40…+150 °C |
Chip dimensions:
As mentioned above, the TDA7294 chip is available in the MULTIWATT15 package and has the following pinout arrangement:
- GND (common wire)
- Inverting Input
- Non Inverting Input
- In+Mute
- NC (not used)
- Bootstrap
- +Vs
- -Vs
- Stand-by
- Mute
- NC (not used)
- NC (not used)
- +Vs (plus power)
- Out
- -Vs (minus power)
You should pay attention to the fact that the microcircuit body is connected not to the common power line, but to the power supply minus (pin 15)
Amplifier based on TDA7052
Used in portable audio equipment
An amplifier assembled according to this scheme has a number of advantages:
- No external elements needed;
- Minimal interference when turning on and off;
- Sufficiently high stability of operation when amplified;
- Low power consumption;
- No need for an additional radiator
- There is short-circuit protection.
Chip characteristics
| Supply voltage Upit | 3 - 18 V |
| Current consumption in idle mode Ipotr | 4 - 8 mA |
| Gain factor Kusil | 38 - 40 dB |
| output power | 1.2 W |
| Harmonic coefficient Kr | 0,2 — 1 % |
Radio amplifier circuit, amplifier circuit for subwoofer and others
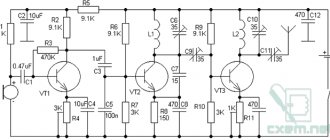
DIY 60W sound amplifier
DIY 60W sound amplifier
While there is some time, another brand new circuit appears on the site, we all know that the greater the power of the amplifier, the more expensive it is. But what can you do if you need an amplifier that is both powerful and at the same time not too expensive?
I would like to present to many a familiar circuit of a 25 or 60 watt permanent amplifier, the cost of which is pennies. As already mentioned, the power of the amplifier depends on the supply voltage and resistor values (60-watt values are indicated in parentheses).
A pair of amplifiers on the TDA7050 chip
The supply voltage is only 1.6 V and this circuit is excellent for operation on batteries and rechargeable batteries.
The circuits are simple enough to be assembled by novice radio amateurs. It can also be assembled on a breadboard.
Bridge version of the microcircuit amplifier
Advantages of the microcircuit:
- A small number of external elements necessary for the operation of the microcircuit;
- Low current consumption;
- Gain 26 dB;
- Floating differential input;
- The chip has stereo and bridge modes.
Chip characteristics
| Supply voltage (Upit) | 1.6 - 6 V |
| Current consumption in idle mode (I consumption) | 3.2 mA |
| Output power in bridge mode | 140 mW |
| Output power in stereo mode | 75 mW |
| Channel Separation | 40 dB |
Source of schematics
S. R. Bashirov, A. S. Bashirov Modern integrated amplifiers
Comrade, consider the datagor recommendations
Attention! 800 rubles for beginners on Aliexpress Register using our link. If you are new to Aliexpress, get 800.00₽ coupons for your first order.. Digital oscilloscope DSO138
Kit for assembly
Digital oscilloscope DSO138. Kit for assembly
Function generator. Kit for assembly
Adjustable holder for easy PCB soldering
Vladimir (vladimirm2) Haifa List of all articles
Profile: vladimirm2
I live in Israel, originally from Odessa, a former military psychologist, today an engineer of network computer technologies or simply a system administrator. About ten years ago I became interested in tube sound, and at that time I built my first amplifier. I listened and adjusted for six months, I’m happy. Since then, various devices have been built, some of them thanks to the materials and help of the people of this portal. I found a lot of useful information on your resource. With respect to everyone! )