We often have breakfast, lunch and dinner outside at the dacha. For this purpose, we have a separate open-air table next to the house. Our family often just relaxes behind it. We often play different games outdoors. To make spending time as comfortable as possible, I decided to build a canopy for relaxation over the table. Next, I will tell you the procedure for constructing the structure. You will find out how I realized my plans.
Source ks-zabor.ru
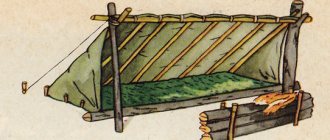
Bed with canopy
A more thoughtful design that is suitable for small summer cottages. Specially designed for a relaxing holiday in nature: reading, sunbathing, watching movies in a homemade outdoor cinema. The timber supports are secured either by casting special concrete pillars or on a rectangular wooden base.
The bed can be made from pallets, and all wooden elements must be coated with moisture-proof compounds.
Step-by-step instructions for building a country tent with a mosquito net
The construction of a tent can be carried out at any time of the year, but it is better to do it in warm, windless weather. The event is simple, but it must be carried out in a certain sequence, without missing any details. In addition to the estimate, you should draw up a plan that will indicate the detailed procedure for performing all actions.
Sizing and drawing
Drawing of a quadrangular tent
The shape varies between buildings with the number of corners from four to eight. The more sides, the more original the object looks. The slopes can be rounded or broken. Sloping structures have better aerodynamics, and inside buildings with smooth walls there is more free space.
The size is determined by the purpose of use of the structure. On average, one person needs 1.5 m² of space. If, in addition to the table and chairs, there are other objects under the canopy, their dimensions are added.
The following data should be shown on the drawings:
- bottom trim;
- vertical racks;
- roof;
- partitions;
- awning fragments;
- window slits;
- mechanisms for lifting, opening and fixing fabric;
- guy wires and how to attach them.
After checking the calculations, you can move on to the practical phase.
Preparing the base
To prevent water from flowing into the tent, it is recommended to lay out a platform.
In any case, the ground is wet in the spring and after rain. This is an objectivity that cannot be eliminated, but it is quite possible to reduce the influence to a minimum. To do this, you can lay out the site with concrete slabs, pallets, or simply fill it with crushed stone and sand, creating a slight elevation.
To prevent the lightweight structure from being overturned by the wind, it must be securely attached to the ground. It's better to do it from above and below. Secure the lower harness with clamps or bolts to stakes driven into the ground, and secure the top with at least four guy wires. If possible, tie the ropes to poles, fences or trees so that they do not interfere with people walking near the tent.
Universal canopy extension
The structure is made of wood, has several supports and is adjacent to the facade of the house. One side of the structure is completely closed, while the other three are open. To ensure that the extension visually forms a single whole with the building, use the same material to create the roof as for the roof.
You can park your car under the canopy, lay woodpile, or set up a recreation area.
Scope of application of structures
At the moment, household pipe structures based on metal profiles are the leading direction in the manufacture of frames and canopies with polycarbonate coating. Great success is due to the long service life achieved due to the additional invisible aluminum shell, which prevents the influence of oxygen on the metal.
It is worth understanding that the structure requires proper care and supervision, otherwise its service life may be reduced several times. Otherwise, the frame will last for at least 10 years.
The use of awnings made of profile pipes extends to the following areas of consumption:
- Parking lots and parking lots: the main purpose of operation is to create good and reliable protection from weather conditions; in clear weather, the construction of covered areas that prevent the negative impact of ultraviolet rays on cars.
- Suburban plots, cottages and the private residential sector: here the main emphasis is on creating structures that protect crops from external environmental influences. Another goal is to equip individual recreation areas with a roof that provides protection from both the hot sun and cold rain or snow.
- Public places: for the most part, these structures are needed here for recreation or shelter from bad weather. Often, you can gather here with a small group and relax.
Despite the fact that the purposes of using canopies made of profile pipes are completely different, the main goal in their construction is always the same - drawing up drawings. This is the main and vital stage, without which the construction of protective structures of this kind is impossible. In addition, diagramming is reinforced by additional complexities caused by application values.
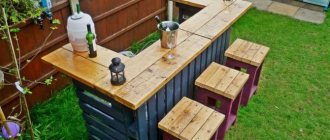
Polycarbonate canopy for dining room
The free-standing timber structure with a pitched roof is a simple but elegant addition to the garden area. All guests who come to an outdoor party can easily be accommodated here. The roof is made of transparent polycarbonate: it allows light to pass through, but protects from direct sunlight.
Also suitable for protecting personal vehicles from precipitation, prolonged exposure to the sun and falling leaves.
The nuances of preparing the base for a tent in the country
The tent should look organically on the site and be positioned in such a way that there are flower beds nearby or a picturesque view opens up. You can also place it on the green lawn next to the house.
The site for installing the tent must first be perfectly leveled and cleared of weeds, large roots and stones. For a stationary tent, you must first pour a strip foundation, and on top of it make a flooring made of wood, natural stone, rolled lawn or paving slabs.
For a collapsible structure, you must first mark the site, clear it of debris and roots, and remove up to 15 centimeters of soil. Then pour a 10 cm layer of sand, thoroughly pour it with water and compact it, and cover it with a 5 cm layer of granulation on top.
The site for installing the tent must be leveled
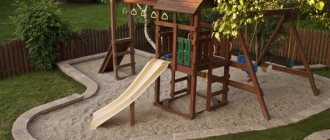
Sandbox canopy
Children playing outside need protection from the midday sun. If you have a wooden sandbox at your dacha, building a canopy will not be difficult: you will need four support beams, four crossbars, self-tapping screws and durable fabric to create a roof.
The sandbox can be protected from rays not only from above, but also from any side by hanging additional drapery on the crossbar.
Advantages of a tent over a gazebo
The tent can be installed anywhere, then assembled if necessary.
Traditionally, a gazebo is considered a mandatory accessory for your own site. Its construction is not an easy task, requiring considerable financial investments, physical effort and a lot of time. However, choosing a tent is much preferable in many respects.
Advantages over a gazebo:
- The price is much lower. There are no costs for foundations and powerful supporting structures.
- Easy to install. Even an untrained person can handle the process.
- Fast installation. If you think through the docking points well, assembly will only take a few minutes.
- Mobility. The gazebo is installed forever, and the covered canopy can be located anywhere, changing its location several times a season.
If necessary, the tent can be modernized in accordance with emerging needs by making partitions, hanging a hammock, attaching a banner, changing the blanket according to the weather and season.
Temporary canopy tent
Another option for a simple design, for the manufacture of which you will need wooden slats (4 pieces), one crossbar and fabric. It is necessary to drill holes in the bars and insert the crossbar into them. The edges of the fabric should be stitched and sewn onto each corner with an elastic band about 10 cm long, folded in half.
The folding house is very convenient: it can be removed during bad weather and taken outside on a hot day.
How to sew a camping awning yourself
Today you can buy tourist tents of various shapes and sizes, but you can also sew them yourself. And the point is not that it will be half the price, but that you can sew an awning to suit your needs and make it exactly the way you need. Well, I just like to do everything myself, because the process itself is interesting. And today we will talk about how to sew a camping awning with your own hands.
The first thing you need to do is find the right fabric. In small towns this can be a serious problem. You don't often find travel fabrics in stores. I had a hard time finding green, as I was told, “tent fabric” without a name. Most likely it was an Oxford. Price 75 rub. per linear meter was more than attractive and I bought 8 meters. The width of the fabric is 1.5 meters. If you sew two pieces of 4 meters each, you will get an awning of 3x4 meters , which is what I need.
Please note that in stores the fabric is often not cut, but rather torn from the roll along the fibers. But the weaving of the threads in the cut does not correspond to the parallel-perpendicular axes of the roll. This way, the torn edge of the fabric will not be perpendicular to the side of the cut. And, if you need the exact geometry of the finished product, take at least half a meter of fabric to spare and cut it strictly at right angles.
I cut my piece of fabric in half. Along the edges there is a strip with punctures and deformation of the fabric, which remains during production. All this needs to be cut off, at least from those sides that will be sewn together in the middle of the awning. If the fabric has a front side, then we fold the two pieces face to face. The bottom layer should protrude 5-6 millimeters from the top.
We wrap these 5 millimeters up and stitch them on a typewriter.
From metal profile
This canopy is a continuation of the roof and acts not only as a kind of porch, but also as protection for the car from atmospheric influences. The supports are made of steel, the roof is made of profiled sheets. The extension is architecturally simple, but reliable. The inclined plane of the roof does not allow water or large amounts of snow to accumulate.
Unlike polycarbonate, corrugated sheeting does not allow sunlight to pass through, therefore creating a completely shaded area.
Let's sum it up
Roofing material for a canopy should be beautiful, inexpensive, lightweight, withstand heavy weight and be mounted on a thin sheathing. It should also bend well if the roof is arched.
Considering these criteria, here is what is best to make a roof for a canopy from:
- Profiled polycarbonate is transparent, durable, easy to clean and bends.
- Profiled sheet is durable, hard, inexpensive.
- Metal tiles are the same as corrugated sheets, only more beautiful.
- Cellular polycarbonate is very cheap and transparent.
- Ondulin is flexible, cheap, and holds the load well.
Wooden sheds for firewood
Such protective structures can be either free-standing or adjacent to a fence or house. The roof of the shed must protect the firewood from moisture, so it is built with a single or gable roof.
The walls of the woodshed must be ventilated so that the fuel remains dry, so the lattice structure, which is often used to decorate the shed, plays not only a decorative, but also a practical role.
Tips for choosing a quality profile
Before erecting any structure, you should decide on the choice of material. When purchasing a metal profile or pipes, you should carefully inspect the workpieces to see if there are any cracks, cavities, sagging, inconsistencies along the seams, or a large number of dented and bent workpieces. When purchasing galvanized materials, it is advisable to check the quality of the coating - whether there are any peelings or sagging.
When purchasing, you must request a copy of the certificate and a receipt. It is imperative to ensure that the pipe wall thickness corresponds to that stated in the documents. You can’t make pipes in a garage on your knees, and there are no fakes, but you can come across poor quality material, so it’s better to buy in fairly large stores.
PVC pipe canopy
Plastic pipes are so convenient to use that craftsmen constantly find different uses for them. The material is also suitable for making a canopy: it is only important to secure the finished frame to the ground. For the roof and ceiling, ordinary tulle curtains with ready-made fastenings are suitable: they can be easily threaded through the pipes.
The structure will not protect from rain, but will provide pleasant coolness on a hot day. White transparent fabric looks picturesque and will decorate any summer cottage.
Do-it-yourself structure design
When independently building a lean-to canopy, if it does not have a permanent foundation and walls made of flammable materials, you can completely do without coordination with the architectural department and the VDPO. The main things you need to prepare:
- Select an acceptable project.
- Mark out the frame of the canopy from a profile pipe in a certain area.
- Make a preliminary calculation of the strength of the structure under the weight of a snow covering of maximum thickness.
- Prepare budget cost and step-by-step execution of operations.
IMPORTANT! When working with a project, you need to evaluate the most suitable option for supports that would support the heavy iron structure of the canopy made from a profile square pipe.
The size of the pipe profile directly depends on the size of the building, and primarily on the supporting beam of the supports. In order not to make a mistake in the assortment of components, you need to make a full calculation of all the elements and only then plan the estimate.
With retractable roof
Such purchased canopies are quite expensive, but if desired, you can make a folding fabric structure with your own hands. It can be opened to let in the sun and closed when shade is needed. You will need polypropylene pipes with plugs, a metal cable, fabric and screws with ears.
The awning is mounted on wooden supports and a crossbar in the form of a board. Choose fabric with water-repellent impregnation so as not to remove the canopy during rainfall.
A self-created canopy will not only be protection from the sun, but also a source of pride for the dacha owner.
Construction of the structure
Installation work is carried out in stages:
- Before making a canopy from pipes, first prepare the foundation.
- Then the materials listed in the drawing are measured and cut.
- Trusses are made.
- The side walls of the structure are assembled.
- Connect roof trusses and finished sections.
- Check the correct assembly of the elements using a level and tape measure.
- Mount and securely fasten the frame to a previously prepared area.
- Metal surfaces are treated with protective compounds.
- Prepare materials for roofing, install them and fix them.
- Trim off excess roofing.
- They restore order in the surrounding area.
When preparing the foundation for the structure, soil is removed from the places where the supports from the profile pipe will stand. A layer of crushed stone is poured onto the bottom of the dug holes. Then, in order to secure the racks, a mortgage is installed on which bolts are welded. If desired, reinforcement is used to add additional strength to the structure.
Construction stages
The construction of a canopy consists of the following stages.
Foundation
To achieve stability of the canopy structure, you must first take care of a solid foundation. Of course, the foundation for a shed will not be massive when compared with the foundation for a residential building.
However, in any case, you will need to make a few simple calculations to determine the size of the future foundation and the amount of consumables. The best option for a canopy foundation is to fill a hole with cement mortar under each frame post. The maximum depth of the base should not exceed 50 cm, this is enough to support the frame and roof.
The construction of the foundation involves the following steps.
- Excavation of holes up to 0.5 m deep in pre-marked places where the frame pillars will subsequently be located.
- Filling each hole with a small layer of crushed stone to create a cushion.
- Inserting a beam or pipe and filling the hole with cement.
When the main work is completed, you will need to wait until the concrete hardens. Only after this is it recommended to proceed with further assembly of the frame. Yes, the standard duration for concrete to gain strength is a month, however, after just a week you can start building the suspended structure again.
The next stage is assembling the frame. The process involves installing wooden beams or piping pipes around the perimeter of the suspended structure. The connection of elements is carried out through:
- self-tapping screws;
- bolts;
- welding
The choice of fastening method depends on the type of materials used and the capabilities of the site owner. Assembling the frame is an important stage, since the evenness and durability of the structure depends on how correctly the installation of horizontal elements is carried out. When the strapping is completed, you will need to install the rafters.
This is done quite simply if polycarbonate canopies or other available materials were chosen as the roof.
Types of outdoor clothes dryers
All existing models of outdoor dryers can be divided into several types, depending on certain criteria:
- forms;
- installation method;
- manufacturing material.
By shape
Based on the shape of dryers, there are several groups of such equipment for the home:
- folding - this is a classic option that folds out into a fairly large product for drying clothes. They are light in weight and transportable. When assembled, they do not take up much space;
- accordions - they are stationary: one part is attached to the wall, and the second part is movable and has hooks for clothes. This subgroup of dryers is characterized by a high degree of endurance and strength, and therefore can withstand significant weight loads. They are often used in bathrooms and laundries as a towel holder.