A. Pivovarchik DZ braid!
ABOUT KOSOVISHCHE ITSELF
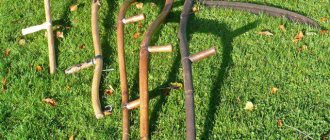
® Kosovischa (Fig. 1) are made in our area from young spruce. It is advisable to select a tree of such size that it requires less planing. They cut down a Christmas tree in winter (the tree is stronger). The spruce is dried in the bark and not in the sun, so that there are fewer cracks. They make braids from birch, and sometimes from pine. Less commonly planed from ash. These are already masters who respect their in-
For the handle of the scythe, select a rod (made of oak or buckthorn) of small length, but with a margin, so that the final size can be determined later according to the hand. The diameter of the rod is about 3 cm. A small depression is cut out in the middle of the rod (Fig. 2, a) in the form of a trough (the thickness of the part remaining after trimming is approximately 1/3 of the diameter of the rod). Before bending an oak rod, it is better to boil it (at least
tools and those who know how to hold a plane, choose ash for the scythe. The lower part of such braids is hexagonal, the upper part is round. Such braids are planed not from thin wood, but from blanks that are obtained by splitting the trunk of an adult ash tree.
The length of the mower depends on the height of the mower and is usually 15–20 cm greater than this height.
bend point) in water for 5 minutes. 10, and then bend it around a round mandrel with a diameter of about 3 cm.
A buckthorn rod can be heated (in the bark) over a fire by pouring a little water into the cut out trough. When the bark burns, the rod is ready for bending. If the pen doesn't work out the first time, don't despair! The second one will definitely come out better! When the curved handle dries, it is cut
How to do something yourself, with your own hands - home craftsman website
AN EXCELLENT TOOL FOR CRAFTS AND HANDCRAFTS AND EVERYTHING FOR THE GARDEN, HOME AND Cottage LITERALLY FOR FREE - SEE FOR YOURSELF. THERE ARE REVIEWS.
I started mowing by hand with a regular scythe at the age of 12 – my father taught me this art. Now I’m 75, I can no longer completely cultivate my plot in this way, and I switched to mowing with a lawn mower of my own design.
But he didn’t throw away the old lady’s braid!
From time to time, to remember my youth and warm up a little, I pick it up. I think it will always come in handy at the dacha, at least for mowing large weeds that neither a lawn mower nor a trimmer can handle. Therefore, I want to share my mowing experience.
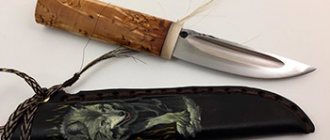
First of all, you need some basic information about the braid itself. This is a tool consisting of a knife, a scythe, a handle and a mounting device for the knife on the scythe (Fig. 1 and 2).
TOOLS FOR HOME AND GARDEN, HANDCRAFTS, ETC. PRICES VERY LOW
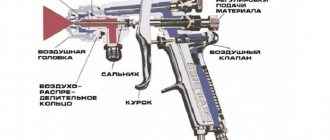
According to GOST (which, despite all the events of recent decades, no one has canceled), a knife must be made from tool steels of grades U7A, U8 and U8A. It must be heat treated. The knife itself includes the elements shown in Fig. 3. However, the quality of the knife is not always at its best (here they are, the results of modern times). Therefore, before purchasing, you need to carefully examine it. There should be no cracks, delaminations, depressions or protrusions on the surface.
The blade of the knife should be smooth and of equal thickness in sections.
This is checked by attaching some small even plates to the canvas, for example metal corners.
Next you need to check the heat treatment. Holding the knife by the heel, hit it on the butt with a solid wooden object. A clean, clear sound indicates good quality metal. If the ringing is dull and intermittent, then such a knife is unlikely to serve you well.
Another test: holding the knife by the heel, place its nose against a wooden surface and apply light pressure. If the canvas bends evenly and returns to its original shape after removing the load, then everything is in order. If there remains a deflection, it means that the heat treatment of the knife was done extremely poorly. You can also check it with a nail. Run it across the blade. If the metal is well-hardened, then small shavings will be removed from the nail. If it slides and there are no chips, then it is better not to take such a knife. Manufacturers can also save on blade sharpening.
This is easy to check: run a flat, finely grooved file along the blade. If everything is normal, the file slides; if not, it removes chips from the metal.
The scythe will not find the stone
The braid must be elastic and durable. When buying a ready-made product, make sure that there are no bends, knots or other defects on it. Its length should be 1700-2000 mm, cross-section – 40×40 with chamfers along the length to thickening. In the middle of the thickening, a handle is installed in the direction opposite to the bevel, under the installation of the knife - at the level of the mower’s navel, with a slight inclination to the right from the cutting plane (Fig. 4).
You can make a braid with your own hands
The best material is young spruce. It is dried in a vertical position in the shade. The wedge is made from durable dry wood (acacia or oak).
The handle can be made movable (Fig. 5). To do this, use a freshly cut willow or bird cherry branch. Then it is bent along a circular braid and secured with twine. At the bottom of the braid, a cut is made to install the heel of the knife.
Its slope is chosen in this way: place the mower on a level surface in the mowing position with a pre-installed knife. The blade lift should be 10-20 mm. After making the bevel, apply the heel of the knife and mark where the tenon should be recessed (Fig. 6 and 7).
Gripping the scythe is important. It depends on the hardness, density and juiciness of the grass and is installed using a cord (Fig. 8). For softer grasses, a positive grip is set between 0 and 20 mm. For hard grasses, the grip is set to negative. In this case, you can mow with less effort and with better quality.
Legislative prosecution of poaching
If you are interested in the question of who poachers are, then these are people who use barbaric methods and devices for catching fish, listed in legal acts. In Russia, liability for poaching is provided for in Articles 256, 258, 260 of the Criminal Code of the Russian Federation, as well as 8.28 and 8.37 of the Code of Administrative Offenses of the Russian Federation. Aggravating factors are:
- commission of a crime by a group of persons;
- damage on a large and especially large scale;
- use of official position.
In 2022, a fine of up to 300 thousand rubles will be imposed for illegal fishing that causes damage on a large scale. or correctional labor for up to 2 years, and by a court decision, 2 types of punishment can be imposed simultaneously. It is believed that poachers cause particular damage to rivers during spawning. The amount of the fine imposed depends on the type of fish:
- For catching carp, carp or pike during spawning, a poacher will pay 250 rubles. for each individual;
- for cancer - 42 rubles;
- for bream - 25 rubles;
- for each female the amount increases 2 times;
- for each individual whitefish or salmon species, the amount of the fine increases an additional 3 times.
The catch limit depends on the region and type of fish. Fishing gear, devices and vessels of poachers are subject to confiscation.
Sharpening, beating and attaching the braid
Fig. 1. Scythe device: 1-knife. 2-braid, 3-handle. 4-wedge, 5 – rings, 6 – thickening.
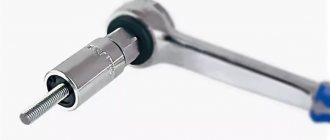
Option for attaching the knife to the brace with 2 screws and a bracket: 1 – brace, 2 – heel of the knife, 3 – bracket, 4 – M6 screw, 5 – M6 nut, b – spring washer.
Option for fastening the knife with a bracket: 1 – bracket, 2 – bar, 3 – screw MB -1. Rice. 2. Attaching the scythe knife
Rice. 3. Knife structure: 1 – blade, 2 – spine, 3 – blade, 4 – heel, 5 – nose, 6 – spine.
Rice. 4. Construction of the braid : 1 – braid, 2 – thickening, 3 – handle, 4 – bevel.
Rice. 5. Handle: 1 – straight handle, 2 – curved handle, 3 – twine, 4 – braid, 5 – chamfer, 6 – recess for twine, 7 – recess for bending.
Rice. 6. Blade lifting height: 1 – braid, 2 – knife blade, 3 – knife blade, 4 – supporting surface.
Fig. 7. Selection for the spine: 1 – braid, 2 – heel of the knife, 3 – spine, 4 – bevel of the braid, S – selection for the spine.
Fig. 8. Installation of the scythe grip: 1 – scythe, 2 – knife, 3 – handle, 4 – cord.
Fig 9. Tool for beating a braid : 1 – a headstock with a wide anvil, 2 – a hammer with narrow strikers, 3 – a container with water.
You need to sharpen the scythe blade in the field using a whetstone - an oblong sandpaper.
Sharpening is done diagonally from heel to toe, while the block should be at a slight angle to the plane of the blade, which must be processed alternately on both sides.
Braids, hands and motor
Above, the author wrote a lot of useful information about setting up the braid, but I still want to add a little to his story.
My childhood passed in the village. During haymaking time, men from the collective farm were sent to mow by hand where mechanical mowers could not take the grass. And we boys always ran there. It was interesting for us. And when the most noble mower, who had seen the world of his grandfather, was assigned to rivet the scythes (and with constant work, each one had to be trimmed three to four times a day), then the real death began. So that old man rivets and tells us in detail about every detail, what and how to do with it. After such lessons, even the most lazy and dull of us began to manage this matter. Oh, where would we find such teachers today... That grandfather mowed down - he danced like in ballet, he worked beautifully. After him, the meadow seemed to be shaved.
So, you need to start with the right choice of braid.
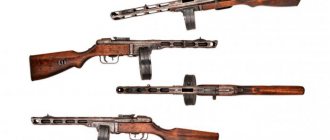
The most popular, that is, one might say, universal, is considered to be No. 6. This means that its blade length is 60 cm. Scythe No. 7 is also not bad, but it is more suitable for flat terrain, and it is harder to control. There are also No. 8 and 9, you can cut everything with them, but only physically very strong people can work with them. Numbers, by the way, are placed on the heels of the braid, next to the brands. Well, that means you’ve chosen your tool – it’s time to prepare the scythe for work.
Here’s the point: you need to start riveting the braid only from the middle, and carry it with your heels or toes, otherwise it will move in waves and then all is lost. And most importantly, you can’t hit the same place twice!
This means that we place the braid on the headstock with the plow down, mark the approximate center with chalk and rivet it in the direction of the spout with medium force hammer blows. Then again from the middle to the heel. With each pass we make the blows weaker and weaker, and the last one is so light. If the braid is clogged (that is, it has not been riveted for a long time), we go over it with a hammer 8-10 times. During this operation, you can also find out what the scythe is capable of. If the metal unravels in two or three passes, it means it leaves much to be desired.
A lot also depends on the choice of braid. The best tree for it is aspen or spruce, and its optimal length is 2 m. We attach a handle to it at the level of the navel. Ideally, you should not buy it in a store, but make it yourself, so that, as they say, it fits your hand. And if everything is done correctly, then mowing by hand is a pleasure. True, I am already over 60 years old, and it has become difficult to mow large areas during haymaking (especially if it needs to be done quickly due to impending bad weather). In this case, a good option is a brush cutter.
Working with this tool, I don’t get tired at all, and I don’t need to rivet it. And you can also forget about frequent sharpening with a whetstone. I mow with a hand scythe while there is dew (it wasn’t for nothing that they used to say: “Down with the dew and we’ll go home”), otherwise you won’t be mowing, but chopping. You can work with a lawn mower at any time. This is what we will discuss.
Before buying a lawn mower, you need to clearly understand what you need it for. For making hay, a unit with a power of 1.2-1.5 kW and an engine volume of at least 30 cubic meters is best suited. cm, otherwise it will be difficult to cut thick tall grass.
You can, of course, buy a more powerful scythe, but then the gas mileage will increase. Here it’s up to you to decide what is more convenient and profitable. In general, one worker with a lawn mower replaces almost three mowers with hand tools.
Bottom cleaner for algae.
Video editingHow to add video to FION
Bottom cleaner for algae. Price at Ulovistaya Tochka >>>
Bottom spit "Megatex". A device for cleaning fishing spots from algae.
Every angler has found himself in a situation where, having come to a pond to fish, he could not find a suitable place for a long time, with regret, passing by places overgrown with aquatic plants. And how can constant snags when landing fish, broken leads, tangled gear, etc. ruin fishing? It will not be difficult to quickly prepare a place in the coastal zone for fishing using the proposed device. In a matter of minutes you can make a corridor through thickets of aquatic plants. The weight of the device is 1.4 kg, the overall dimensions when folded are 50x6x3 cm. The device can be easily laid out on the shore of a reservoir by turning two strips and connecting their ends with a carabiner to which a rope is tied (Fig. 1). The structure, in the form of a triangle, is thrown into a reservoir, dragged along the bottom, and on the shore, taking the device by the handle, it is shaken and freed from algae. Don't be afraid to scare the fish. Tests have shown that such a process, on the contrary, attracts it; the rising turbidity and the remains of algae serve as additional bait.
For convenience and safety, it is recommended to tie the free end of the rope to a pointed metal peg, which is stuck into the shore and thus prevents the device from being lost during a strong cast.
The device is made of stainless steel, the design is reliable and durable.
Before putting it in the case, it is recommended to clean the rotation points from dirt, wipe them with a dry cloth, and before long-term storage, lubricate them with any technical oil.
Views:
3590
Comments:
| PavelPadlik07 Revda 103 |
ADD A COMMENT
The structure of the scythe and the choice of its knife
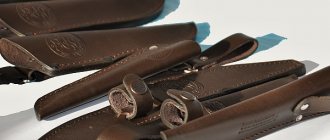
The scythe consists of a knife (Fig. 30, a), a braid, a handle, a wedge, and a ring. A knife is distinguished by a butt (Fig. 30, c), a heel, a spine, a blade, and a spout. Knives are made from tool steel U7A, U8 or U8A. Scythe knives are also called Lithuanian knives (from the word “cast”).
Depending on their length, scythe knives have numbers: 500 mm - 5, 600 - 6, 700 - 7, 800 - 8, 900 - 9, 1000 - 10. How to choose a good scythe knife? The braid blade should be without any delaminations or cracks, even and of the same thickness along its entire length. To identify unevenness, apply a flat plate or coin to the canvas. The quality of steel and especially the presence of cracks have long been determined by the sound: they took a knife by the heel, held it in their hand and hit the butt against a massive wooden object. The sound should be clean and clear. In addition, the quality of the knife was judged by its elasticity and hardness. Again, they took him by the heel, pressed his nose against the block, and pressed lightly. If the blade bent evenly and then returned to its original shape, the knife is good. These verification methods are not abandoned at the present time.
Making the handle
Today it is possible to find a scythe made of good grades of steel and forged, but its cost is considerable. It’s easier to go to the store and buy a ready-made blade.
Materials
For a self-made scythe knife, it is better to use the very tip of the tip; according to craftsmen, the most durable place is located there.
Tools
You will need a simple tool:
- sheet of paper, pencil, marker;
- Angle grinder (grinder), with grinding and carving wheels;
- vice, drill with a set of drills;
- belt sander or sander;
- masking tape;
- wood block for the handle;
- epoxy adhesive.
A braid blank for assembling a knife. The type of handle was specified right away, there shouldn’t be any difficulties:
- The wooden block must be marked by attaching a shank to it. This needs to be done from all sides.
- Then we clamp the block in a vice and carefully drill out a hole for the shank.
- We try it on, if it fits tightly, but all the way, the task is completed.
- After wrapping the blade with construction tape so as not to cut it, pour epoxy glue into the hole and install the blade.
- We leave it all to dry for a day. Then we grind the handle again using the grinder to the size you need.
We invite you to familiarize yourself with Making cages for quails
And in principle the knife is ready. It is better to impregnate the handle with various water-repellent oils or wax.
Wooden knife handle.
In fact, it was possible to make a composite handle from any other materials. But in this case it is a matter of taste. On our resource there is a whole article about how to make a handle for a knife. There you will definitely find a suitable option for yourself.
Preparing the scythe for work
To work effectively with a scythe, first of all, it is necessary to correctly “adjust” the scythe to the height of the mower. First, determine the distance AB (Fig. 30, b), i.e., the height at which the handle of the scythe should be secured. To do this, place the scythe in front of you, the place where the handle is attached should be at waist level. Next, set the grip of the scythe, i.e., the outward deviation of the tip of the knife from the circle drawn by a piece of cord from point B (attaching the handle to the scythe) with a radius through point A. The grip is installed when the knife of the scythe is only slightly secured to the scythe. Pressing with your finger at point B, bring the cord to point A and pull it to the heel of the knife, then move the stretched end of the cord from point A to the spout of the scythe knife. Depending on the physical strength of the mower and the density of the grass, the grip should be from 0 to 20 mm (most often the grip is set to zero). After installing the grip, the scythe knife is tightly secured with a wedge (see Fig. 30, a). The fastening must be reliable, because involuntary violation of the installed grip affects both the quality of mowing and the effort during work.
It is more convenient to hold the scythe when the handle is slightly tilted to the right from the plane of the knife. Taking this into account, the handle is secured to the braid. Two types of handles are used. The first is when a straight handle is driven into a hole hollowed out in a braid and wedged from the outside (similar to wedging the handle of a hammer). The handle of the second type (see Fig. 30, a) is made from a freshly cut branch of bird cherry or willow with a diameter of 25-30 mm and a length of 350-400 mm. In the middle of it, to a depth of less than half the diameter of the branch, a groove approximately 80 mm long is cut out (depending on the diameter of the braid), which prevents the workpiece from breaking when bending it around the braid. Cutouts are made at the ends of the workpiece for attaching twine. After bending the workpiece on the braid, the ends of the handle are tied with twine. A handle of this type is convenient in that, after loosening the twine, it can be moved higher or lower along the mower depending on the height of the mower.
The braid should be strong and elastic, 1.7-2 m long. It is best to make it from a flat young spruce tree, the trunk diameter of which is 35-40 mm at a height of 1-1.5 m from the root neck. The knots of the workpiece are cut off and the bark is removed. Then, so that the handle is smooth and without cracks, dry the workpiece in the shade in a vertical position.
To secure the knife to the braid, you need to cut its end obliquely and carefully hollow out a recess on the cutting plane for the spine of the knife heel. To properly attach the scythe, you should place the knife, which is still loosely attached to the scythe, on a flat, smooth surface (Fig. 30, d) and, due to the inclined cut of the scythe, ensure that the blade in section A-A rises by 10-20 mm when mowing on a flat meadow (low cut) and 30-35 mm - for mowing potholed terrain with hummocks (high cut). If the knife is not installed correctly, the blade will ride up and cut the grass poorly, or, conversely, tilt down and cut into the ground.
The wedge that is used to secure the scythe knife after it has been correctly attached to the scythe is made of strong, dry wood. You can use different rings (Fig. 30, a): two narrow ones or one wide one. Rings are available with a key (Fig. 30, e) and without a key (Fig. 30, f), with the help of which the knife is attached to the braid with screws.
Paper model
It is better to make a children's kokoshnik or headdress for a doll from paper - a lightweight material that can be decorated with fabric and beads. For work you will need the following materials:
- thick paper of any color;
- scissors;
- light fabric - silk, satin;
- accessories for decoration;
- glue stick, gun or lighter;
- centimeter;
- satin ribbon.
Along the line of the forehead, measure the distance from one ear to the second, and mark a crescent moon on paper according to this measurement. Move 2 cm downwards, draw a second stripe - this is a headband for fixing the kokoshnik on the head. Cut out the workpiece and bend it along the bottom line; make one piece from the fabric with allowances of 1.5 cm on each side. Glue is applied to the paper, and the textile is secured to the frame with tension. The edges are folded and fixed on the back side of the product.
A satin ribbon is glued to the reverse side, which will allow you to secure the kokoshnik to your hair. Cut out another piece from the fabric, the size of which is smaller than the first. Coat the edges of the headdress on the backdrop with glue and attach the textiles. It will cover all errors and allowances of the front element. The finished product is trimmed along the outer edge with lace, sequins, braid, beads and rhinestones. For a classic look, you need to braid one or more braids.
New Year's chair covers: A selection of super ideas for the holidays
How to mow?
The braid is taken with the left hand by the braid above the handle, and with the right hand - the handle itself, grabbing it from above. Place the right leg in front, the left leg behind, turn the body slightly to the left, bend slightly - and begin to mow in a circular motion from right to left.
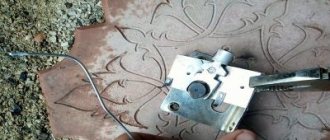
The scythe may encounter a stone or bump, causing part of the blade to bend to the side and become dull. To correct a damaged blade, the mower must always carry with him a spatula (Fig. 31, d) - a birch bark case 1, attached to the belt with a strap 2. The case contains a sharpening stone 3 and a smooth steel rod 4. In order to bring the blade into order, stick the end of the braid into the ground, wipe the knife with a bunch of grass, take a steel rod, press it against the damaged area of the blade and straighten it so that it takes a normal position. After this, the blade is sharpened with a whetstone.
If a good scythe knife is chosen, it is correctly (as described above) adjusted to the mower, skillfully sharpened and beaten, then such a scythe is easy to work with.
Source: Small mechanization in household plots and farms. Ed. I.P. Oil. 1996
When to use a scarf for fishing
An opinion was expressed about the scarf as a poaching tackle, since a significant piece of fishing net is used in its manufacture. Here you need to know that this device is not included in the list of prohibited devices.
Another thing is that you cannot use a large number of these essentially traps, and even more so you cannot lower them into wintering pits. Winter fishing for kerchief is not poaching or even a type of port - it is a hobby that brings moral satisfaction and preserves nature.
Use this convenient and at the same time simple device as an addition to your main fishing, and good luck with the bite.
Source
P O P U L A R N O E:
DIY garden bench
Every family today has such a necessary attribute - a toilet. Over time, the old toilet is replaced with a new, beautiful, fashionable design. What to do with an old toilet?
Today we will recycle an old toilet, or rather one of its components - the drainage tank.
Today, almost every home has a printer, laser or inkjet.
Sometimes you have to print photos, cards, etc. on larger paper.
Afterwards you will need to trim the paper exactly to the required size.
To do this, you don’t have to buy a machine; you can make it yourself.
Roach
I won’t dwell on catching roach with traps for a long time, although this particular fish is one of the main objects of spring fishing. But the fact is that almost all methods of installing gear described below in the “Pike” chapter also apply to roach.
Very often these two fish spawn in the same places and move to the spawning site along the same routes. You just need to take into account that both the spawning run and the process of spawning in roach are shifted in time to a later date (the development of roach eggs requires a slightly higher water temperature).
It is impossible to indicate the exact period of this gap, sometimes it is 2-3 weeks, and sometimes only a few days - it all depends on what kind of spring it was, long or fleeting, and, accordingly, how quickly the water warms up on the spawning grounds.
And here's what you need to know: Fishing rod for carp: rules for choosing good tackle
In addition, in different bodies of water, even if located nearby, the timing of spawning may vary: it happens that in warmed river backwaters roach is already spawning, and not far away, on a deep lake, pike is just beginning to spawn.