A laser target designator is a good thing that allows you to clearly identify the target. A bright red (less often purple or green) dot is clearly visible even in poor lighting. Pneumatic weapons equipped with a laser target shoot more accurately and accurately.
However, this device, even the simplest plastic one, costs more than 1000 rubles. It doesn’t matter - the craftsmen have figured out how to save many times over by making their own laser device to mark the target. Next we will tell you how to do this yourself.
Types of spray guns
Before creating a paint sprayer with your own hands, you need to pay attention to their classification. The following types of such equipment are distinguished:
- Manual.
- Pneumatic.
- Airless.
- Combined.
- Electric.
Spray gun device
The manual version is characterized by the fact that the master has to perform certain actions to supply the substance. Pneumatic models are the most widely used, as they are characterized by an optimal combination of practicality and cost. In most cases, homemade versions are represented by a combination of a sprayer and a pump or compressor. Electric ones appeared on sale relatively recently; the features of the device allow you to adjust operating parameters with high precision. Combined ones are rarely made by hand, as they are characterized by a complex mechanism.
A spray gun for whitewashing should be included in a separate category. You can also make it yourself; when creating the design, you take into account the fact that the lime mortar may contain large impurities. It is worth considering that this version of the device cannot be used for spraying paint.
Automatic paint sprayer
Required tools and materials
In most cases, a homemade design is created to work with water-based paint. As a rule, their creation requires a standard set of tools, as well as a welding device. The following are used as a basis:
- Aerosol can.
- Vacuum cleaner.
- Old refrigerator.
- Ball pen.
The choice of materials and tools is carried out depending on the characteristics of the structure being created. The scheme is selected taking into account what type of work will be carried out and what productivity the equipment should have.
Operating principle
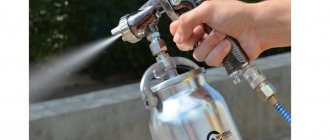
A spray gun is a device designed for applying paint and varnish material and other liquids to objects by spraying. The result of the work in this case looks better than doing it manually.
The principle of operation of the device is to supply paint and air under high pressure to the nozzle of the device.
The air stream breaks up the paint and varnish, mixes with it, turning into fine dust. Thus, the working composition leaving the nozzle evenly covers the entire working surface.
For reference! Finished products are available for sale. However, their cost starts from 2,000 rubles. Not everyone wants to incur such expenses for one-time work.
Aerosol can sprayer
A homemade spray gun is often created with your own hands from an ordinary aerosol can. This design is characterized by simplicity and low cost. To carry out the work you will need the following elements:
- Bicycle wheel tube or nipple. In this case, the camera itself is not required.
- Plastic bottle of suitable size. It must be durable and free from serious defects.
- Aerosol can. When choosing them, attention is paid to the quality of the sprayer, since it should work for a long time.
- Bicycle hand pump.
DIY spray gun from a can
Much of the above does not need to be purchased; you can find it in the garage. Work on assembling the structure is carried out as follows:
- The selected bicycle cover will require a nipple that can only allow air to flow in one direction.
- The bottle will be used as a paint storage tank. A hole is made in it that is suitable for the nipple.
- A nipple is attached to the inner wall. When fastening, it is worth considering that the connection must be airtight. This element will only supply paint in one direction.
- The upper part of the can is sawed off with a hacksaw. It is selected so that it perfectly matches the diameter of the plug.
- Cold welding is used to connect the spray can to the bottle. This is due to the fact that it is necessary to ensure reliable fastening of such an element, since high pressure will be exerted on it.
Removing the valve from an aerosol can
The created design is designed for a pressure of no more than 3 atmospheres. The air is pumped using a bicycle pump, for the connection of which a nipple was located. Such a home-made device ideally copes with the task of painting various surfaces with a water-based composition. The container can also be filled with lime mortar.
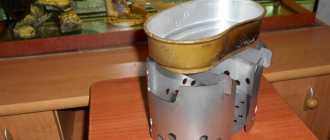
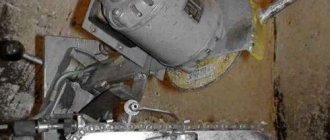
Spray gun from a vacuum cleaner
A vacuum cleaner can be used to create the required pressure. It is ideal when the primary consideration is performance.
You can create a DIY spray gun from a vacuum cleaner when using an old model, since they allow you to connect a hose to the outlet hole.
If there is no such model, then many problems may arise with ensuring the required tightness.
Recommendations for assembling the structure are as follows:
- A suitable bottle is selected, which can be made of plastic or glass. The diameter must be at least 5 cm.
- A cork is cut out of foam plastic. It should fit perfectly under the neck of the tube. When creating it, it is worth considering that the plug is intended to fix the inlet and outlet channels, and therefore must have a rectangular protrusion. Due to the high degree of machinability of the material, creating the required shape will not be difficult.
- Two holes are formed in the foam, which are intended for the outlet and inlet tubes. The dimensions are selected so that they are inserted with force, thereby ensuring the required tightness.
Paint sprayer from a vacuum cleaner
To spray the substance, you will need a nozzle with an adjusting screw. A hole is created in the upper part of the body to connect the bottle. This design is highly efficient, but the vacuum cleaner requires electricity to operate. In addition, you need to ensure that the nozzle does not become clogged, as this can lead to an increase in pressure in the system, rapid wear of the vacuum cleaner motor, or rupture of the pipes.
How to attach a ready-made laser target to a weapon
The easiest way to do this is with clamps made of tin or aluminum with a thickness of 0.8-1 mm. You will also need two bolts and nuts for them. To make it neat, we grind off the caps of the bolts. We will fuse the nuts into plastic blanks - this will help to quickly adjust the laser pointer.
There are also options for finding a mate for a weaver or picatinny rail, but they are more labor-intensive. For example, you can take a cable channel strip for a red dot sight. But it still needs to be attached to the laser center itself - accordingly, tinkering with the body. And then it makes sense to make it rectangular.
Refrigerator for making a spray gun
To create a spray gun, a compressor is suitable, which is installed on the refrigerator. You can make such a spray bottle yourself if you need to save on the amount of material consumed. In addition, the design features make it possible to spray lime. Among the features of making such a sprayer with your own hands, we note the following points:
- A receiver is required, which can be used as an old cylinder. The container used must have increased tightness.
- For disassembly, you can take an old refrigerator from which the compressor and start relay are removed. Dismantling is quite simple; just saw off all the copper tubes.
- The inlet and outlet openings can only be determined by connecting the compressor to the power supply.
- In order to eliminate the possibility of various debris entering the system, a filter is attached to the suction pipe, an old automobile version can be used. It is secured with sealant.
- The tube through which air is pumped is connected to the previously prepared receiver with strong hoses through a fitting. All connections are also covered with sealant.
- In order to increase the efficiency of the design in question, a diesel filter is attached to the outlet after the receiver. It reduces the humidity of the supplied air.
DIY spray gun from the refrigerator
It is worth considering that the compressor must be located in the same position as at the time of use in the refrigerator.
Otherwise, it may be difficult to start the device. In addition, experts recommend periodically changing the oil, which ensures a long service life of the compressor. In order for it to remain stationary during operation, a special base is created.
Spray gun holder
In almost all cases, a special holder is required for the device to operate. If necessary, you can also make it yourself. To do this you will need:
- A small piece of plywood, which measures 25 by 25 cm. Using a jigsaw, a hole is formed in it that fits the diameter of the spray tank.
- The handle is inserted into the groove, after which the edges are cut to size.
- Special legs are created for the stand, which ensure the correct positioning of the hose.
Spray gun holder
Such a holder can additionally be equipped with an element for installing a filter funnel. It is created using aluminum wire, which can be secured with screws.
Ballpoint pen spray
A small and practical device can be obtained by using a ballpoint pen as a base. Such a home-made device can work with a small cylinder, the volume of which is no more than 1 liter. If you need to carry out small finishing work, then you can create such a spray gun with your own hands quite quickly. Recommendations for performing the work are as follows:
- All you need from the handle is the outer shell, which should not have any defects. To do this, all internal elements are removed. Attention is also paid to the size of the shell; it should not be too large or small.
- The reverse tip is cut off at its widest point.
- You will also need a rod. It is cleaned from the paste using alcohol.
- A hole is created in the central part of the cork that will fit under the rod. It will be drawn to the bottom to connect with the bottle in which the paint is placed.
Spray gun from a pen
You will have to pump the air yourself. That is why this design has not become widespread, since it cannot be used to process a large area.
What is the problem?
It’s no secret that the most modest tactical flashlight, mounted on a Weaver rail, like a laser laser, costs at least two to three thousand of original wooden ones, and devices of advanced models are even more expensive. The Weaver bar itself, attached to the barrel, is another one and a half to two thousand. However, in my experience, neither laser lasers nor TFs are widely used in hardball.
However, situations happen when you need to break into a darkened room, basement, etc., where there is nothing to do without a flashlight, besides, tripping over something in the dark is not good for your health and a weapon, for example Drozd, can be damaged, and it’s easier to shoot at the enemy. In addition, such flashlights have three modes - bright, dim and flashing (strobe). When such a strobe is pointed at an enemy in the dark, he becomes somewhat disorientated, which can be used to advantage. And the laser target, for example, can be used to simulate cover, so as not to waste bullets, for zeroing sights, for target designation, and directly for aiming a weapon at a target at medium distances. In addition, these canopies add ambiance to the weapon. But buying expensive devices for the sake of it personally was a bummer for me. Moreover, this idea came to my mind long before hardball - they were shooting rats in the basement. Opponents of such a body kit loudly shout about the unmasking qualities of both the laser target and the TF. So we need to use it wisely, then we will get more positive qualities.
Making a spray gun for powder paint
Powder paint is used to cover a wide variety of surfaces. It is worth considering that such equipment is quite difficult to manufacture; a homemade sprayer is assembled as follows:
- First, the electrical module is assembled. It consists of a core with wound wire. The element is placed in a sealed plastic container with paraffin.
- The gun is assembled, which ensures spraying and supply of paint. A plastic tee is used as a base into which the core is inserted. The stability and strength of the element is ensured by treating the edges with glue. All electrical connections are routed through the bottom of the structure.
- The previously created gun and electrical module are connected to the paint tank. The flow of paint can be controlled using a rubber trigger.
- All wires are brought out and fixed on the power supply.
DIY powder spray gun
After this, you can begin directly testing the spray gun, for which its container is filled with powder paint.
Question of price?
In total, we’ll match the grandma. A tactical flashlight will cost 300-350 rubles, a laser target designator is even cheaper than 150-200 rubles. Now try to equip a weapon with factory gadgets for that kind of money!?
In principle, it is also possible to install these body kits on pistols, but here a problem immediately arises with the holster.
Well, in short, what I wanted to write. Go for it. I'll be happy to see the comments.
Safety precautions when making a spray gun
Almost all created structures are associated with high pressure, which is supplied from various devices. That is why it is recommended to carry out work on assembling the spray gun in ventilated, protected areas. During assembly, special attention is paid to the tightness of all connections, as well as their strength. The amount of supplied pressure is also controlled.
Safety precautions when working with a paint sprayer
Making a regular spray gun with your own hands is quite simple; the equipment created in many cases copes with the assigned tasks. The most difficulties arise when it is necessary to paint the surface with a powder composition.
What you need for work
The powder painting method involves the use of suitable equipment and devices, as well as dividing the process into sections.
Approximate diagram of the line for powder coating
For quality work you will need:
- Cleaning area. All parts undergo mandatory training. At this stage, the old layer is removed and degreasing is carried out. The process can use manual or specialized tools. If you plan to carry out constant cleaning, then sandblasting equipment is the best solution.
The spraying chamber is a cabinet with built-in ventilation - Sputtering chamber. A separate closed place for applying paint with good ventilation is the key to avoiding further problems. The camera also allows you to save some of the lost paint. In industrial products, a recuperator filter is used to collect unused powder; at home, it can be replaced with a cyclone vacuum cleaner.
- Gun (spray gun) for painting. To work, you need a special sprayer, which you can purchase or try to make yourself.
Standard spray gun design - Oven for polymerization. It is in such a chamber that the painted part is baked. This equipment should allow you to control the temperature, because the process of coating formation depends on it.
- Final drying area. A separate place will be required to cool the processed product. If the process is not continuous, then a furnace can be used for these purposes after it has been gradually cooled.
A mini-oven for coating polymerization is considered the main unit in the line - DC source.
A convenient location of all areas should be provided; much attention is paid to the suspension system. Using a hanging trolley can make the task easier. Placing equipment even in a minimal amount will require a fairly spacious room, although some areas can be combined if desired.