And our article today is about boys’ toys. It is probably difficult to find a boy who did not play with soldiers as a child. In the minds of most of our contemporaries, they, that is, soldiers, are perceived only as children's toys. But, firstly, this is an overly simplified approach, and secondly, many famous people, already quite adults, were not ashamed of their passion for small toy warriors. Their list includes the French monarchs Louis XIV, Napoleon I and Napoleon II, Russian commander Alexander Suvorov and his contemporary Emperor Paul I, German composer Johannes Brahms, English writer Robert Stevenson, English Prime Minister Winston Churchill and many others, famous and less famous personality.
How to make soldiers with your own hands from different materials
- July 4, 2019
- Crafts
- Natalia Penchkovskaya
Soldiers for boys' games can be made from absolutely different materials - from wood and ice cream sticks, from paper and cardboard, cut out of wood or poured into a mold using tin. In this article we will look at how to make soldiers with your own hands. These are simple options that even schoolchildren can handle making.
You'll learn how to quickly create an army out of cardboard toilet paper rolls and paper straws. We will also consider ways to sculpt soldiers from plasticine or clay, and also tell you how to properly pour tin warriors in self-prepared plaster molds.
To make uniforms for a man with a weapon or simply in military uniform, a variety of materials are used. Then the blank needs to be painted in the chosen colors, be it a modern warrior or a soldier of an ancient army. A child can show his imagination and decorate his uniform with any small details.
Depending on the type of base material, gouache or acrylic paints are chosen; tin men can simply be sanded and rubbed with felt so that the soldier shines like a mirror.
Popsicle stick soldier
Let's figure out how to make soldiers from thin and flat sticks. To create one person, prepare three identical blanks. You will also need a glue gun to connect them together with the end part. This will be the head, torso and legs.
To create arms, one stick is cut in half and attached to the sides of the body, departing the length according to the size of the head from the upper ends. When the glue has hardened, the resulting figure can be additionally sanded with fine sandpaper and painted on both sides with paints.
Before you make soldiers, think about their purpose. If they are made for a child's play, then you need to make a solid base so that they maintain an upright position. This craft can be made as a Christmas tree decoration or as a pendant on the handle of a children's closet door. For this purpose, a hole is cut out on the top for threading the ring.
Army made of cardboard tubes
You can make an entire army of warriors out of toilet paper rolls or kitchen napkins. The shape of the crafts remains unchanged, cylindrical; variety is introduced by small details of the costume and changes in the appearance of the hussars.
It’s easy to make soldiers at home using the model that can be seen in the photo above. These are old hussars in tunics with cross belts and medals made of colored paper with appliqué. People differ not only in the colors of their uniforms, but also in their age. Some only have a mustache, while others have a long gray beard. It’s also interesting to fantasize about the high cockades on the shako.
Paper soldier made from tubes
Before making a paper soldier, as in the photo below, you need to draw a detailed pattern of the torso and feet, cut out the details of the craft according to the template and assemble them into a three-dimensional structure using PVA glue. The warrior's legs and arms are made by rolling paper into a tube. The head, along with a shako or any military cap, is cut out of cardboard separately and attached to the back of the figure.
This version of the soldiers holds a vertical position well, so a child can move it back and forth across the battlefield or use it for a model for an exhibition at school.
Knowing how to make soldiers from a pattern, you can glue soldiers of different sizes.
For giant versions of outdoor figures, you can use large cardboard sleeves, for example, from linoleum or cling film, and assemble the body from corrugated cardboard.
Plasticine warrior
Plasticine is an excellent material for bringing creative ideas to life. You can sculpt soldiers in any pose, add grenades or machine guns, pistols or a spear to their hands. In this art form, you can use many techniques - smearing and rolling, pressing and joining parts together.
As it hardens, the plasticine figure becomes harder. If desired, you can change the soldier’s weapon and add small details - put on a backpack, binoculars, or bandage him if he is wounded in battle. If the soldier is tired, the plasticine can be easily crushed back into the chest and sculpted into a new battle character.
How to make a tin soldier
There are several ways to cast tin soldiers. This is a soft metal that melts at relatively low temperatures, so such crafts are easy to make at home. Different materials are used as a form.
Many in childhood were engaged in casting right on the street, tamping the dense soil with a little man from a set of friends. Liquid metal was poured into the resulting hole with the contours of a soldier.
After hardening, the excess parts were cut off and it was possible to play “war games”.
It is convenient to make a mold at home from thick rubber or plaster mixture. When it is still soft, the finished little man is placed in it. After hardening, it is removed. The same is done with the second part of the plaster. Then the parts are connected to each other and tin is poured into the hole between the bricks. Usually it is done in the area of the soldier’s legs. All that remains is to polish it and you can play with friends.
We have described several simple ways to make soldiers, try the one you like.
Master class on making soldiers from non-traditional materials for February 23
Tatyana Titova
Master class on making soldiers from non-traditional materials for February 23
For boys, military-themed games are one of the most exciting games. I propose to make an excellent game set for the continuation of the game “Soldier's Everyday Life and Holidays” from foam rubber dishwashing sponges. What I like about this material is that it does not need to be painted. Crafts made from it are original and expressive.
For work we will need material:
foam sponges for washing dishes, chenille wire, plastic spoons, ready-made eyes, tape, felt-tip pens, awl, scissors, universal glue.
Description of manufacturing method:
1. Cut the foam sponge into 4 parts. From the part we make a torso for a soldier.
2. Making the head. Break off part of the handle from the plastic spoon. We insert it into the foam rubber, lightly smearing it with glue.
3. For arms and legs we use chenille wire. Lightly coat the ends of the wire with glue and insert them into the foam.
3. We make shoes from two spoons.
4. Cut out palms from foam plastic and glue them.
5. Paint the face in flesh color.
6. We roll the wires into a spiral and glue them to the head - we get a headdress.
7. Paint the boots black.
8. Glue on the nose, eyes, draw a mouth.
9. Cut out a visor from foam plastic, paint it black and glue it to the cap. For shoulder straps and belt we use yellow tape
10. Glue the stars.
11. The next batch of brave soldiers is ready for battle!
12. Step-by-step photos of tank manufacturing.
13. Automatic machines. We cut out vending machines from ceiling tiles and paint them gray or black.
Thank you for attention!
The game is to be continued.
Master class on making binoculars for February 23rd The holiday on February 23rd will soon be, and what is a holiday without a gift. I bring to your attention a master class on making binoculars for February 23rd. Master class on making flowers from natural material Pine cones are an excellent material for children's creativity, environmentally friendly and safe, from which you can create interesting and original ones. Master class on making a three-dimensional postcard for February 23. The holiday of Defenders of the Fatherland Day is approaching. In childhood, all children think that their dad is the strongest, the smartest, the bravest, and of course. Master class on making a craft “Monkey under a palm tree” from traditional and non-traditional materials. The symbol of the coming New Year is a mischievous monkey. I bring to your attention another craft dedicated to the hostess of the year 2016 from the traditional one. Master class on making a snowman from waste material Winter is coming, which means preparations for the New Year begin. I bring to your attention one of the main characters of the New Year and an assistant. Master class on making soldiers from natural materials for February 23. Crafts made from acorns are a simple and fascinating form of creativity and provide a rich field for imagination. Acorns are easy to color.
How to make a tin soldier at home?
Tin is a low-melting metal. It ranks fiftieth in the periodic table. It is quite widespread in nature, in particular, ore for its production is actively mined in the Laptev Sea.
Tin
Man began to use tin back in the Bronze Age. In particular, it was used to produce bronze. Nowadays, it is used as solder, coatings, etc. In addition, tin is used in jewelry and in the manufacture of toys, for example, tin soldiers, etc.
Tin casting process
The melting point of tin is only 231 °C. But its boiling point is within 2,300 °C. The temperature at which the metal will be melted can be achieved at home.
That is, it is quite possible, of course, subject to certain rules and safety precautions, to perform tin casting at home. In industrial conditions, special centrifugal casting machines are used for tin casting.
To make molds, gypsum, alabaster, epoxy resin, silicone and, of course, metal are used.
Tin casting process in industry
Creating a form is perhaps the most important process. First you need to create a sketch of the future model. After this, the model is made from polymer clay. To apply small parts you must use an awl.
Another, no less important process is the production of injection molds. When manufacturing it, it is necessary to ensure that the correct connector is present.
It is needed so that the finished casting can be removed without causing damage to the product itself.
Silicone tooling for tin casting
Making equipment from silicone will require more material and time. This is because it must be subjected to a vulcanization process.
But as a result of all the hassle, multi-turn equipment for casting tin products will be obtained. If the future part is quite complex, then it will be necessary to provide for the presence of embedded parts.
We must not forget about the air ducts; air must escape through them as the mold is filled with tin.
An important element of the design of the equipment is the hole through which the filling will be performed. If it is small, the metal will flow too slowly and the solidification process may begin before it is completely filled.
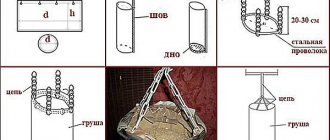
Before casting begins, the mold halves must be joined together and placed between a sheet of plywood. The sheet must be at least 12 millimeters thick, and the size must exceed the dimensions of the metal mold.
Upon completion of assembly, the entire structure is tied together with a rope.
Two half-forms between sheets of plywood, tied together with a rope
Casting technology is not very complicated; it makes sense to prepare the metal for pouring after the final assembly of the mold. To do this, it needs to be warmed up well. Once a yellowish film appears on its surface, we can assume that the tin is ready for pouring.
If the metal is overheated, a blue or purple film will float on the surface of the melt. The molten metal is poured in a thin stream. In this case, you can lightly tap the housing to remove air.
You can open the mold only after the cast part has completely cooled. To remove the casting, you need to use forceps.
You must be prepared for the fact that the first product received will have some surface defects.
The machining sequence is as follows. First, the flash is removed. So, they call the excess melt that flows into the seam of the mold. A scraper is used for this. Side cutters are used to remove the sprues. For final processing of seams, use abrasive sandpaper with the finest grain (zero).
Tools and materials for casting
Tin is almost an ideal material for casting in both domestic and industrial settings. What materials and tools will be needed to produce the mold and perform casting. To make the mold you will need sealant and plaster. The first will be used to make the equipment itself, and gypsum will be needed to make the frame into which the technological equipment will be installed.
Tin Casting Tools
In addition to the materials mentioned above, you will need simple metalworking tools - files with different sections, pliers, a soldering iron, etc.
Tin casting molds
For the manufacture of injection molding equipment, materials such as gypsum or silicone are used. It all depends on the part and its purpose. The simplest one is gypsum. To make it you will need a wooden box, some plaster and a piece of metal tube.
Creating a snap-in is performed in several steps:
- Preparation of gypsum mixture. It should resemble thick sour cream in appearance.
- The mixture is poured into a pre-prepared box and leveled.
- To obtain a half-mold, you need to take the part and immerse it halfway in the prepared plaster. A similar operation must be performed with the second half of the part. As a result, 2 half-forms will be obtained.
- The halves must be connected, or fastened with locks, or simply tied together with a tight elastic band. A prepared metal pipe must be inserted into the place through which the molten tin will be poured.
In principle, the injection molding equipment is ready for use. The molten tin can be safely poured into the resulting mold.
What is the difference between gypsum forms and others - the main thing is that they have less durability. If their surface is not prepared, then such equipment can withstand one or two cycles.
Main methods of tin casting
In industrial conditions, there are several technologies that make it possible to quickly and efficiently produce castings from tin and its alloys.
The most popular is casting in a centrifugal machine.
The essence of this method is quite simple: molten metal is fed through a system of gates into molds located around the same axis and rotating at a certain speed. Their rotation causes the creation of a centrifugal force, which presses the incoming metal inside the mold.
Before pouring, compositions can be applied to the working surfaces to facilitate the removal of the finished casting from the mold.
What military-themed crafts can you make?
These are techniques, pictures, applications and simply greeting leaflets. Much depends on the material you are going to use. In some cases, things that have become unnecessary - matchboxes, paper sleeves, CDs - can be turned into interesting homemade products.
Creative imagination plays a decisive role here. Find out how to do this below.
How to make a mold for tin products - prodetey.ru
How to make a mold for casting tin soldiers
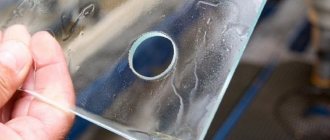
The mold for casting tin soldiers is made of three components: two parts are plaster, and the third is a metal block. 1. Take a flat block of plasticine and press the sample soldier into it halfway, and press the metal block against the soldier’s stand as shown in Figure 1. 2.
Make a fence from the walls of a matchbox and protect the plasticine blank with it - just stick it into the plasticine as in Figure 2. Make two or three indentations in the plasticine, as in the figure. These holes will be needed when joining the two halves of the future plaster mold. 3.
Spread vegetable oil over the entire surface of the plasticine, the soldier pressed into it, the pits and the metal bar, and begin making a plaster mold. To do this, pour gypsum or alabaster powder sifted through a sieve into a cup and, stirring, pour in so much cold water so that the mixture looks like liquid sour cream. 4.
Slowly and carefully pour the plaster of Paris from the cup into the plasticine blank. In this case, you must carefully ensure that there are no bubbles. Due to the chemical reaction, the plaster will heat up a little and should be given time to cool - about 10-15 minutes. 5. When the plaster has cooled, carefully remove half of the plaster mold and take out the soldier. 6.
The second half of the plaster mold is made in the same way as the first one already made, only instead of a plasticine blank, take the first half of the mold along with the soldier placed in it. Place a metal block on the soldier’s stand and stick a fence with plasticine (Fig. 6).
Lubricate the surface inside the fence with oil, fill it with liquid plaster, and when it has cooled, separate the halves of the mold, carefully remove the sample soldier, and leave the mold to dry for a week. 7. In order to pour tin into a mold, you need to make a sprue in it - a special groove that can be easily cut with a knife from the edge of the mold to the base of the figurine in both of its halves.
Also, with the tip of a knife, you need to scratch scratches-grooves from the edges of the figure to the edges of the shape. These are airs, through which the air displaced by the molten tin will exit the mold. The airs should not be made too wide, otherwise the tin poured through them will flow out of the mold. 8. Before casting, place a smooth sheet of paper between the tightly clenched halves of the mold and a metal block for thermal insulation.
What do we know about tin?
This metal has been known to man since prehistoric times. Tin, like copper, was discovered and mastered earlier than iron! Today, archaeologists are finding tin items dating back to 5000 BC.
The ancient Egyptians went to Persia for tin. The Phoenicians brought tin ore from the British Isles. The ancient Indians also actively worked with this metal.
At one time, bronze, a strategically important metal for all mankind, began to be produced from an alloy of tin and copper.
Tin is a fairly malleable and soft metal with which you can work perfectly and make the most complex finishes from it. The silver-gray tint and noble matte shine make tin art products aristocratically majestic and aesthetically attractive.
Today, tin is widely used in jewelry alloys. Designer jewelry made of tin looks like real works of art - stunning medallions and bracelets, pendants and rings.
Tin is hypoallergenic and absolutely harmless to the body. This is one of the purest metals, so jewelry made from it is of high value. Pewter jewelry is often plated with gold or rhodium alloy, which gives it even more beauty and shine.
Designers of the world's leading brands do not forget to include this ancient metal in the best examples of their collections. Such jewelry is very practical - you can wear it for years without taking it off. Tin is not afraid of corrosion; you can swim in the shower and in sea water.
Jewelry containing tin is a practical and stylish gift!
Tin is ruled by Jupiter. The energy of metal is solemn and festive. Symbolizes the rule of law, material wealth, and the authority of its owner. Strengthens the energy of people whose lives are dedicated to duty of service - to the state, society, their people.
Pure tin is recommended to be worn by patriotic girls with an active civic position. This is the metal of spiritual and social leaders, as well as people with an active and stable cosmogram: Fire-Water, Fire-Earth, Earth-Fire.
Tin favors Sagittarius, Taurus, Leo, Pisces and Cancer, as well as balanced representatives of the Aries sign. It is not recommended to wear “air” signs often. If your patron planet is the Sun and Venus, also feel free to choose tin jewelry.
But if Uranus, Mercury and Pluto dominate in your cosmogram, use tin extremely carefully.
Homer also wrote about tin. There are mentions of this metal in the Bible (4th book of Moses). In ancient Rome and ancient Greece, tin was highly valued and was available only to the wealthy classes.
In ancient times, excellent tin figurines were cast on religious and secular themes. It was believed that the spirits of Saints lived in them.
Hellenic religion and culture attributed tin figurines to the guardians of the home and hearth, so they were in every home and, of course, in temples.
It is curious that for many centuries, Christian church relics, both in Europe and in Russia, were most often stored in tin boxes.
In ancient times, castings with the finest detail were made from low-melting tin. Low-relief openwork stripes and magnificent figured tin plaques were used to decorate wooden frames, mirrors, the walls of caskets and caskets, cabinets, frames for icons, etc. The top and bottom of the icon rows in the Annunciation Cathedral of the Moscow Kremlin are covered with patterned openwork tin.
The main proof of the absolute harmlessness of tin is the widespread use of the metal in the manufacture of tableware.
In the Middle Ages, tin dishes and household utensils made of tin were evidence of the prosperity and financial well-being of the owners of the house. Pewter dishes with elaborate engravings adorned the royal tables.
In the era of Peter the Great, this was a mandatory attribute of table decoration for representatives of the nobility. Today it can be seen in the history museums of St. Petersburg.
Pewter cookware has no smell or taste. Unlike other metals, tin does not rust. Over time, the metal fades slightly, acquiring a pleasant velvety tone. Antique tin tableware is still in demand among collectors today, especially in Europe.
Tin Scream
A characteristic phenomenon has been noticed - when bending a bar of pure tin, you can hear a sound that is very similar to the creaking of snow underfoot in frosty weather. This sound is called a “tin scream.” It indicates the purity of the metal. If you add a little of any other alloy to the composition of tin, then you will no longer hear the tin cry.
Metal professionals often use this method to determine the purity of tin. Melodic sounds generated by tin can be heard in the ringing of bells - this metal is almost always included in the composition of copper and other alloys that are used to cast bells. Also, tin pipes give birth to divine organ music.
The magical power of tin
Tin figurines originally had magical and sacred meaning. They were passed on to newly minted oracles and priests during the initiation rite, which made it possible to interact as harmoniously as possible with the elements and energies of the Earth, to penetrate the secrets of nature carefully and carefully, maintaining physical and mental balance.
Aircraft
Each of us has been familiar with a simple method of making an airplane since childhood - from a sheet of paper. It can confidently be classified as origami - military equipment is made by bending, bending and folding without breaking its integrity.
Even such a simple design can be improved by changing the curve of the wings or decorating it. At the same time, it is better to decorate the base before you start folding the airplane, and when it is ready, add stars to the wings. This toy is very short-lived and is afraid of water.
Note!
- How to make a snowman from plastic cups: step-by-step photo/video instructions + master class
DIY wedding decorations, crafts and accessories: photos of original wedding decor
Wedding invitations - original and unusual handmade samples with photos, video invitation example
A very original idea to make an airplane from a plastic bottle. This is the basic element, it will serve as the fuselage. Cardboard is suitable for the wings and tail. Further actions depend entirely on the ingenuity of the master.
You can recreate an airplane by gluing two pairs of wings on opposite sides of the bottle. We connect the tail part either with glue or by inserting it into a previously made cut. You can attach cardboard propeller blades to the lid.
You can also glue one pair of wings, a tail, and draw cockpit glazing - you’ll get a transport plane. And if we make a propeller with a hole in the middle, put it on the neck and press it with a lid, our transport worker will receive a working part!
Recommendation: In this case, it is better to choose small bottles with a capacity of 0.5 - 1 liter. This will ensure the proportions are correct.
An experienced craftsman can add landing gear, weapons and other elements to the aircraft at his discretion.
Among the military-patriotic crafts made with your own hands, one of the simplest is a rocket. To make it, you can use a plastic bottle or cardboard cylinder. This will be the body.
Stabilizers are mounted to it from below, the top is cut and made pointed. Next, you need to paint the blank, write the serial number - and the rocket is ready!
Making tin soldiers at home
Are you here
Today, tin is a common metal. However, in the 16th and 17th centuries, it was quite rare and valuable, so Russia bought it from other countries. Tin was used to coat iron products to protect them from rust.
From this metal, Russian craftsmen created dishes with relief patterns, since soft, pliable tin could easily be processed with a chisel. After casting the product, the master decorated it with intricate patterns or an engraved inscription.
Today, the Moscow Historical Museum has various examples of tin utensils that have been preserved from ancient times.
Briefly about malleable tin
Metal tin has such a crystal structure that when it is bent, the metal crystals crunch as a result of friction against each other. This crunch is a distinctive feature of pure tin from its alloys, which do not emit sounds when bent.
And our article today is about boys’ toys. It is probably difficult to find a boy who did not play with soldiers as a child. In the minds of most of our contemporaries, they, that is, soldiers, are perceived only as children's toys.
But, firstly, this is an overly simplified approach, and secondly, many famous people, already quite adults, were not ashamed of their passion for small toy warriors.
Their list includes the French monarchs Louis XIV, Napoleon I and Napoleon II, Russian commander Alexander Suvorov and his contemporary Emperor Paul I, German composer Johannes Brahms, English writer Robert Stevenson, English Prime Minister Winston Churchill and many others, famous and less famous personality.
Toy soldiers - ancient toys
The history of the soldier goes back more than 4 thousand years. The oldest of them were found in the tombs of ancient Egyptian pharaohs. Made of wood, the figurines represented the guards protecting the deceased ruler in the afterlife.
The terracotta guard from the mausoleum of the ancient Chinese emperor Qin Shi Huang is known throughout the world. The full-length figures of his bodyguards are made with the highest detail, and the face of each is so individual that there is not the slightest doubt about the portrait resemblance.
In the Middle Ages, European kings and nobles became interested in playing soldiers. This was perhaps the only social stratum that could afford such pleasure, because the material for making figurines was most often precious metals. The games themselves had tactical and strategic aspects - in them, future commanders learned the basics of controlling military units.
In the XVII – XVIII centuries. More than one self-respecting royal court could not do without a collection of miniature warriors. And at the beginning of the 19th century, toy soldiers finally became available to the general consumer and reached the masses. This is connected, oddly enough, with the spread of cheap earthenware. Before this, most European tableware was cast from tin.
But earthenware technology turned out to be much more economical, and tin foundries simply could not stand the competition. In search of a new market, they turned to the production of tin figurines. And so the textbook tin soldier was born.
This happened in the German city of Nuremberg, and the first soldiers among collectors are called that: Nuremberg miniature.
Remember, Andersen: from one tin spoon - 25 soldiers? If you compare it with the products of modern factories, you will be surprised at the size of the spoons of that time. But surprise will be premature: the spoons of that time were no larger than the spoons of today.
But the soldiers, on the contrary, were inferior in parameters to their descendants at the beginning of the 21st century. The Nuremberg figures were flat, no thicker than 3 mm, and the height of the foot soldier was approximately 30 mm.
So it's no surprise that one spoon yielded two dozen tin-resistant ones.
Subsequently, three-dimensional figures appeared, more interesting, but also more expensive, and the most expensive among mass products were made completely collapsible. Russian artist of the turn of the 19th – 20th centuries. Alexander Benois recalled that he perceived the appearance of just such collapsible soldiers as a real holiday.
In the twentieth century, the range of raw materials for the production of toy soldiers expanded significantly due to polymer materials. After World War II, toy soldiers became one of the most popular items on the toy market.
During the same period, military-historical wargames (military-tactical games with soldiers) were gaining popularity. Unlike similar games of the Middle Ages and Modern times, they are now dedicated to specific events in military history, be it the Spartacus uprising or the Battle of Stalingrad.
The main contingent of wargamers are not children, but young people aged sixteen and older.
At the same time, collecting soldiers is also developing - both ancient ones from a hundred and two hundred years ago, and modern ones, produced specifically for collectors.
Be that as it may, the spirit of Andersen’s soldier did not burn out in the flame of the stove, but continues to warm the hearts of millions of “soldiers” around the world.
Kononko Yulia
DIY soldiers at home
For those who want to make soldiers for children with their own hands, there are different methods and materials. You can sculpt soldiers yourself from plasticine, clay , or even cold welding mass. Sergey Osipov shows how to sculpt soldiers from “cold welding”:
Try to repeat all the steps, and then you may end up with soldiers that look like these figures by amateur sculptor Sergei Kiselev:
Here is a video about the author of this plasticine army (more than 2000 soldiers):
They also make soldiers from wire , very detailed instructions here: www.lobzik.pri.ee/modules/news/article.php?storyid=404
Well, those who want to cast their own metal soldiers can first look at the instructions:
paper soldiers more carefully. They can be flat, for example, like this:
Or voluminous, like our soldier made from candy wrappers.
But about wooden soldiers (from the book “Dolls” by V.S. Goricheva):
Photo from the youngest participant in the competition and the first man among the participants in all the competitions on my blog. Meet Arkhangelsky Stepan , 11 years old.
Stepan lives in the city of Kavalerovo and, as befits boys, is not indifferent to war games. He loves to sculpt knights and all sorts of warriors from plasticine. Basically, he does this in the children's group at the Svetlitsa club.
The description of the work is short: you take plasticine of different colors. Stepan sculpts without a base. Tearing off the mass in small pieces, he creates the required shape, looking at the picture.
And it turns out this knight:
How to make soldiers from plasticine and wire is written in the book “Dolls” by V.S. Goricheva:
And another step-by-step master class on sculpting a soldier from plasticine:
On the topic of plasticine soldiers, I found this amazing video:
And this is a Red Army soldier made of fabric, a sewing pattern from the album “Art in Everyday Life”:
In general, you can make soldiers with your own hands or buy ready-made ones.
The main thing is that they remain toys in the hands of boys and adults, and that people do not become toys in the hands of the rulers of this world.
In order not to forget the page address and share with friends, add to your social networks:
More interesting:
February 23, DIY toys
Toy soldiers
How to make a soldier with your own hands from paper or plastic mass? It's simple:
You can depict soldiers, cut them out and glue them to previously prepared stands. The advantages of this method are the ability to create a large number of any soldiers in a short time and complete freedom of action - you can make warriors from completely different eras.
A sleeve can be used as a base. She will be a soldier. First we depict the face, then the limbs and camouflage uniform, and add insignia. You can also cut out a tiny machine gun (or any other weapon) and fix it on our figure with twine or thread.
Among children's and youth's crafts and compositions on a military theme, plasticine figures stand out. In this way, you can produce more than a dozen soldiers, add previously made weapons - and get a whole composition (the capture of the Reichstag or the defense of Stalingrad).
Such a composition can already be considered a model of the Second World War, because it depicts a specific event. For entertainment purposes, it is worth adding decorations to the site with troops and equipment - destroyed buildings, trees and other vegetation.
How to make a tin soldier at home
How to make a tin soldier at home
| Tin soldiers are boys' favorite toys of all times, but what if you only have one soldier of a certain shape, but you need several of them for play or for your collection? In this case, you can try to make them yourself, although this will require a lot of patience and effort. How to make a tin soldier at home? Read these instructions, look at the pictures and try to make it. If you try, you should get a soldier. In order to make a new tin soldier, you will need a ready-made soldier, as a sample. If it is painted, you need to wash off the paint from it with acetone, and then start making a mold for casting. | Tin soldiers are boys' favorite toys of all times, but what if you only have one soldier of a certain shape, but you need several of them for play or for your collection? In this case, you can try to make them yourself, although this will require a lot of patience and effort. How to make a tin soldier at home? Read these instructions, look at the pictures and try to make it. If you try, you should get a soldier. In order to make a new tin soldier, you will need a ready-made soldier, as a sample. If it is painted, you need to wash off the paint from it with acetone, and then start making a mold for casting. How to make a tin soldier at home, casting a soldierTo cast a figurine of a soldier, find a clean jar (suitable for Vaseline) and use pliers to bend it into a ladle shape (as in the picture). From such a ladle it will be more convenient to pour liquid tin into the mold. Attach pliers to the ladle instead of a handle, put on a mitten or glove and carefully melt the pieces of tin in it on the stove. When the tin melts, firmly hold the two halves of the mold folded together in your hand (they should be held with the sprue facing up) together with a metal bar (as in the picture) and pour the liquid tin into the mold. DO THIS CAREFULLY, DON'T SPILL MOLTEN TIN ON YOUR HANDS OR LEGS, DON'T ACCIDENTALLY SPLASH IT IN THEIR FACE OR GET BURNED!!! Then let the tin cool well, carefully open the mold and the tin soldier is almost ready. All that remains is to remove the excess with nippers and process the figure with a file. If the figurine is unsuccessful, then it can be melted and the soldier is cast again. |
Educational program for beginners
Educational program for beginners
Post by Shvets » Tue Jul 14, 2009 8:25 pm
Post by Shvets » Tue Jul 21, 2009 3:52 pm
I am pleased that so many people have looked at this topic, and therefore I continue with tacit approval.
I have been a visitor to this site for over a year now. And the more I watched what was happening on it, the more I became convinced that the best way to replenish your collection of toy soldiers is to create them yourself. Then you will be independent of manufacturers and cash (which is important) and, most importantly, completely free in the subject of compiling your collection. In short, I decided to move on from contemplating other people’s soldiers and making my own. Next, I will describe the entire process of making a tin soldier by me, and I hope my notes will be useful to others. For those who, like me, with needlework skills at the high school level, have decided to make their own tin soldier.
To create a soldier it is very desirable, almost necessary, a sketch i.e. drawing of a soldier. There are three ways to get a sketch: 1. Copy someone else's drawing. 2. Draw it yourself. 3. Ask the artist to draw. Pros and cons of these methods. 1st method. The fastest way to get a sketch. It is enough to measure any picture you like, calculate the percentage of reduction to the desired size and make a copy using a simple photocopier. An example is a postcard from a set of postcards by artist V.I. Semenov. Anyone who has a scanner, printer and all sorts of useful computer programs at hand can use them. Disadvantage: it is difficult to find the desired design and not all designs are suitable for making soldiers. 2nd method. Better than others, it allows you to turn your plans into reality and get exactly the kind of soldier you have long wanted. I don’t draw well, so I took templates for sculpting 35th scale figures (the conditional height of the figure is 6 cm) and immediately “dressed” the figures in armor and weapons on tracing paper. A major drawback of this method is that not everyone can draw well, especially moving figures. 3rd method. The first two are preferable, because allows you to get not only a high-quality sketch, but also an original soldier at the output. This method has a lot of disadvantages: a) not everyone knows an artist, b) the artist needs to be somehow encouraged to fulfill the order, c) artists very often have their own vision of the world, and even if you have explained in detail what kind of figure you would like to see on paper , there is still a danger that you will receive a picture that is not the one you previously imagined. Example: a running Red Army soldier with a rifle looks completely different from how I asked him to draw.