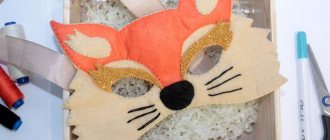
All children simply love games related to food - feeding child dolls, selling it in a store, inviting “guests” to restaurants and cafes. And any little housewife, playing with her doll, must feed her some yummy food! To do this, let's make a dessert in the form of a cake.
It does not have a single small detail or sharp corners. No glue or dyes are used during the work - therefore, there is no threat to the health of children. So there are absolutely no age restrictions!
This game will allow your child to develop various skills necessary in adulthood. Try to create at least 1 piece first. We promise that you will love it and will make a whole felt cake! It can be used not only in the game. It can also be used simply as kitchen decor.
Simple cake for a doll
To “cook” it you will need to acquire:
- Felt in various suitable shades - pink, brown.
- Threads that match the color.
- Small beads.
- Sequins.
- Filler - padding polyester, cotton wool or holofiber.
- Scissors, pencils, compass and ruler.
At the beginning of the work, do it using a compass (if you don’t have one, use any object that is suitable in size - a saucer, a mug).
Divide the resulting circle into 6 equal sectors. These will be the details of the felt cake pieces. Transfer the pattern to fabric of both shades.
The side of the piece is also needed - its width will be five centimeters, and the length depends on the perimeter of the triangular top. Let's make it from brown felt.
Cut another pink strip equal to the two long sides of the triangle - this is the “cream” layer.
The parts are ready, let's start sewing!
A narrow pink stripe is fixed with pins in the center of a wide brown stripe and stitched along its entire length. Then, starting from the sharp corner, the side panel is attached to the upper triangle with a seam “over the edge” - let’s say it’s pink. The lower part is sewn on in the same way - do not forget to leave a small hole, this is where we will put the filler.
That’s it, the “biscuit” is ready! It's a matter of decoration.
Embroider the entire perimeter of the pink triangle with beads and sequins. Decorate with “marshmallows”, “fruit slices” - methods for making them are given below.
Thus, we made one piece of cake! Make 5 more and you will have a wonderful doll dessert!
LiveInternetLiveInternet
Monday, February 09, 2015 04:36 + in the quote book Cake - handmade yummy!
I propose to sew a beautiful and unusual cake. What we need: 1- fabric for the “cakes” 2- padding polyester 3- cinnamon 4- coffee 5- vanillin 7- beads, beads 8- white fleece or felt for the “cream” 9- decorative ribbons, flowers 10- spices: I have star anise and cinnamon sticks 11- scissors, thread, needles 12- sewing machine (if you have one) And besides: Let's start with the cake layers. In order for the cakes to turn out even, take any container that is suitable in size (cup, saucer). Apply it to the fabric for the cakes (I have the most ordinary calico) folded in half and circle it five times
Then, take a piece of padding polyester that is suitable in size and place it under the fabric. Sew the shortcakes along the contour along with the padding polyester, no need to leave any holes for turning inside out, you’ll get three-layer pancakes like this
cut out, make a small incision with scissors on one layer of fabric, turn the pancake inside out through the slot, so that the padding polyester is inside the part
Sew up the hole. Carefully, but without fanaticism. We'll hide it safely anyway. We attach a thread to each pancake, it will help us a little in the future
Let's get to one of the most delicious moments, painting. I think everyone knows the recipe for our beautiful paint very well, let me remind you briefly: PVA glue, instant coffee, a couple of vanillin bags, mix everything, take a brush and enjoy
Did you paint it? Let's bake! This is where some strings will help us. We tie the pancakes to the wire rack and put it on the very top, in the oven, at medium temperature, for about 10 minutes. Then we remove them and pull out the strings. Let's go on sewing. It's time to do the cream. We will make the cream from white fleece or felt. We trace our lid five times and cut it out. Next, we sew the felt part and the pancake together using beads
And so we sew together 4 parts, but do not connect the fifth yet. This is what we get: Place the fifth pancake on top (without cream)
Take a long needle and sew all five parts together
And only now we sew on the last, top layer of “cream” in the same way, using beads
Well, this already looks a lot like a finished cake, doesn’t it? Let's decorate it, what would a cake be without roses? I have these ready-made decorative roses
Sew them in a circle, sewing a bead into the middle of each
Oh, what a beauty! Also, our cake (like any decent cake) will be with nuts, or with berries. Their role will be played by large round beads your text Glue them between the layers
Here! How real! Now let's take beautiful spices, such as star anise or cinnamon. This particular cake will have star anise stars on it. We select the most beautiful ones and glue them. So. So far we don’t have a very beautiful bottom of the cake, now we’ll hide it. From a piece of cardboard we cut out a circle with a diameter slightly smaller than our favorite lid. Glue it. Place the cake on a beautiful napkin and admire it
We take glitter (I use gold powder for nails) and use a brush to apply a little on the star anise, sprinkle a little on the sides
Then sprinkle all this beauty a little with cinnamon powder. Fix all the beauty with hairspray (spray from a distance of 30 cm onto the cake) this will fix the powder and cinnamon. Well, we did a great job. Our handsome man is ready to pose.
Source
Felt cake
Such products are perfect for children to play tea party, shop, cafe. Or simply as interior decoration. Choose colors that your imagination allows. I'll show you how to sew a cake. I chose a pink color for the base and decided that it would be delicious if I decorated the top with a strawberry, a piece of kiwi and a vanilla cream donut. You will also need zig-zag braid, thread (floss), a needle, scissors, a piece of padding polyester, a circle of foam rubber with a diameter of 5 cm. Thickness is about 2cm. All seams that fasten the parts are overcast. The first photo shows all the patterns with dimensions. They are easy to build because they are geometric shapes. Please refer to these dimensions. You can also either proportionally reduce or increase the dimensions.
Base for the cake.
A) Sew pink felt parts - a circle and a rectangle. B) sew the side of the cake. C) fill the resulting “cap” with padding polyester. Don't stuff it too hard. Stuff until the felt cap is straightened and the surface becomes smooth and without wrinkles. And leave room for a foam mug. D) cover the padding polyester with foam rubber D) and sew a sand-colored circle with an overcast stitch. This is the bottom of the cake. E) ready-made cake base for creativity. I decided to decorate with a rope of light green cream. For this I used zig zag braid. Sew the needle forward. We fix it so that the joint is less visible. Holds tight.
Strawberry.
A) To make grains on the berry, I make “French knots” with yellow thread over the entire area of the semicircle.
B) Then from the wrong side we make a seam with an overlock stitch to secure the radii of the semicircle. Secure the seam with a knot, but do not cut the thread. B) The result is a cone. D) Using this thread, we gather the edge of the cone along the entire length with a “forward needle” seam. D) Place a piece of padding polyester inside the cone to create a berry that holds its shape well. E) We tighten the thread and secure it with several seams. Using a green thread that matches the sepals of the berry, we sew on the sepals. Kiwi.
In the photo (this is how it turned out for me), the first picture is a finished strawberry.
A) as in the picture, apply a small semicircle to a large semicircle and sew one part to another. B) using light green thread we make large, spaced stitches that imitate kiwi fibers. C) using a black thread using a French knot stitch, we make dots that imitate kiwi seeds. D) fold the kiwi semicircle in half and make a seam either along the radius or along the length of part of the circle, whichever is convenient. We will put a piece of padding polyester into the cavity of the part, just a little bit, to give volume to the piece of kiwi and make the last seam. D) a ready-made piece of kiwi. The thread, if left, will later help to sew a piece of kiwi to the Cream cake.
A) I hastily took the first photo with the patterns and did not show the part for the cream.
This is a circle with a diameter of 5 cm, petals are cut out in it in the same way as can be seen in the photo. There are eight of them. There are cuts between them that go into the center of the part, but this is literally 5mm. B) collect the petals with a needle and thread in the same way as in the photo. We pierce the tops of the petals all the time in one direction until we collect all 8 petals. C) Let's draw the thread again into the first petal. D) Tighten the thread and secure it on the wrong side. Assembling the cake.
A) sew on a piece of kiwi B) sew on a strawberry C) sew on cream D) decorate with beads.
Source
Cookies made from leftover materials.
Probably many needlewomen have encountered a problem when there are small pieces of fabric left that are a pity to throw away, and there is nothing to sew - they are small. So I have accumulated a bag of small pieces of fleece and felt, and since I really love sewing sweets, I decided to sew cookies from them. Firstly, the New Year is coming soon - it’s great to decorate the Christmas tree with them, and secondly, if you have children, this is not a replaceable thing at all. So let's transgress. We take pieces of any non-flowing material (I took fleece) of brown color, this will be dough, and cut out circles, stars, hearts, etc. from it. If you have cookie cutters, the task is generally simplified by cutting out them. We put two pieces together - this is the cookie itself. You can cut out little animals, gingerbread men, and Christmas trees. Now we cut out figures of the same shape from felt, but about 1.5-2 mm smaller. This will be the icing. Place the icing on one of the cookie halves and sew with a regular seam across the edge.
Now we turn on our imagination and decorate our cookies - we embroider them with sugar, beads and glass beads, for the children I embroider letters so that they collect words... In general, there is freedom of creativity here...
Now the IMPORTANT stage - cut out the padding polyester according to the shape of the cookie, and put all the parts together, if you don’t do this and stuff the already sewn cookies, in 95% of cases they will turn out uneven and lumpy. Why do we need spoiled baked goods?
The last stage is to sew our cookies together with the same seam over the edge, if this is a Christmas tree decoration, add a loop.
ALL!
Our cookies are ready. ENJOY YOUR TEA PARTY! Source Felt pincushion “Cake” Template:
The pattern can be drawn by hand - small irregularities will not be noticeable. 1. To get started we need: a pattern a piece of cardboard 12*12 cm pieces of felt in the colors of your choice about 20 small beads (mine are about 4 mm in diameter) scissors a self-disappearing fabric marker (or tools for your favorite method of transferring a pattern onto fabric) threads matching filler (I will have holofiber) 2. Cut out the parts from felt. Using the pattern of a circle of small diameter, cut out 4 pieces from cardboard (and glue them together - this is the base) and 1 piece of red color (its half will be a strawberry), from the pattern of a 4 * 4 brown square of arbitrary shape, cut out hot chocolate (with which we will decorate the filling on top ), from a 3*3 green square pattern we cut out the leaves for the strawberry, we cut out an 8*3 rectangle from brown (or any other color) felt it will be a tube, rectangles 7.5*0.5 and 5.5*0.5 - This is a caramel, I chose pink and nude felt for it. Here's what I got: 3. Make the base of the cake using a disappearing marker, beads and a needle and thread. In the center of the cut out circle, draw a circle pattern with a diameter of 5 cm: Around it, draw another circle somewhere a centimeter from the central circle. Draw on the outside of the cake; the mark from the marker will then disappear. Here's what happens:
Along the top hand-drawn circle, sew the beads with the seam forward, sew on the bead with a small stitch, the next stitch comes out a centimeter from the bead and again make a small stitch sewing the bead, and so alternate until the middle of the circle (see pictures below).
As you string the beads, gather them together
When you have assembled half of the circle, insert the glued cardboard circles inside. The result is a side view:
View from above:
4. Make the filling from a large white circle, assemble it in a circle, fill it with holofiber and fix it:
This is how the cake appears (not glued yet)
5. Sew the cut-out “hot chocolate” on top (you can glue it, it’s more careful, but if you then use it as a pincushion, the glued area will be hard and the needles won’t let through).
6. All that remains is to make the decorations. What is in the picture on the right is for the strawberry (we will sew), and what is on the left is a stick and a lollipop (we will glue). We sew half of the red circle with yellow threads (you can choose a different one) with the seam forward and sew the needle in random order, imitating a strawberry). Then we fold it in half and sew the straight side; We sew the curved side with the seam forward with a needle along the edge, fill it a little with holofiber and tighten the thread, securing it.
We make the leaves of the strawberry - stitch the needle forward in a circle inside the pattern of the petals, then pull it together, it will look like a piptik (I don’t know what else to call it) - branch 7. Take everything we have made and heat up the glue gun. We glue the white and pink stripes into a lollipop, the brown strip along the long side into a stick, and decorate the stick with the remains of a light-colored thread. Glue the leaves to the berry. Glue the white filling to the cardboard base, straighten the folds evenly. Glue the strawberry, stick, and lollipop to the “hot chocolate” on top.
Source
Making textile cake cream from fleece
DESCRIPTION OF THE MASTER CLASS: To make it you will need two pieces of fleece of good density. They can be of different colors, or the same color. You can also use soft felt to make cake cream.
Cut out two circles with a diameter of 6-7 cm, placing fleece on top of each other (required).
We also cut segments in TWO circles at once. We try to cut them the same. Ideally, mark their location in advance.
Next, in each segment we round one edge.
And, threading the needle in the center of the circle, we pull the edge of the petal to class=”aligncenter” width=”635″ height=”423″[/img] We do this with all the petals. Wrapping one at a time, from the non-rounded side.
Sew all the parts. We fasten the thread if the product is completed or using the same thread, attach any decorations to the top of the cream. You can use large beads, beads, buttons. And whatever comes to your mind Bon appetit everyone Source
| Categories: | handicrafts/felt crafts handicrafts/crafts sewing/children toys |
Tags:
felt crafts toys sewing master class
Cited 18 times
Like share
0
Like
- I liked the post
- Quoted
- 0
Saved
- Add to quote book
- 0
Save to links
Liked
0
DIY felt cake in 1 hour
And sometimes a cake is simply urgently needed for the holiday table - after all, it’s the doll’s birthday! In this case, there is an option in which it will take about an hour to prepare.
Required tools and materials:
- Felt sheets.
- Satin ribbon.
- Strip of silk fabric.
- Thread and needle.
- Sintepon or cotton wool.
So, let’s make a quick felt cake with our own hands. The patterns here are completely simple - 2 small circles (12 cm is enough) and a strip 4.5 - 6 cm wide, and its length will be equal to the length of your circumference.
First, cut out all the details from felt. Next, attach a satin ribbon to the side, decorating it with beads. And then you sew everything together - the top, the side and the bottom - and stuff it with any filling.
Drape the silk with an accordion and sew this strip along the top seam, imitating a cream stripe. Strawberries or berries can also be sewn from pieces of fabric.
Foam cake recipe photo
Ingredients: for the dough I took: 200 g of butter; 1 egg; 2 tablespoons of sugar; a pinch of salt; 1 teaspoon of baking powder; 2.5 - 3 cups of flour. For filling: apples; lemon juice; sugar; from spices: ground cinnamon, cloves, nutmeg Preparation: 1.
Ingredients: ● Chicken breast - 1 piece ● Eggs - 2-3 pieces ● Breadcrumbs - 1 Cup ● Salt - To taste ● Oil - To taste (sunflower or olive) Preparation: Let's prepare all the ingredients. Everything, that.
INGREDIENTS: ● Milk - 500 Milliliters ● Starch - 4 tbsp. spoons (without a slide)● Premium wheat flour - 4 tbsp. spoons (with a slide) ● Egg - 3-4 Pieces ● Salt - 1 Pinch ● Sugar - 2-3.
Ingredients: 800 g pork 250-300 g champignons 2 small or one large sweet pepper 1 large onion 1 carrot 1 tbsp. tomato paste (I took ketchup) a little fresh dill salt and pepper to taste Cut the meat into small pieces and.
1. Salad of crab sticks with tomatoes Ingredients: ● Crab sticks - 150 gr. ● Tomato - 1 pc. ● Garlic - 1 clove. ● Hard cheese ● Mayonnaise - 20 gr. Preparation: Cut crab sticks diagonally into strips, tomatoes.
Source
Foam rubber will also come in handy
But the easiest way to make treats for a doll party is in the following way. You will need a piece of foam rubber 4-5 cm thick, felt scraps and a needle and thread.
Cut a circle with a diameter of 12 cm from foam rubber. Apply the same circles to felt - these are the top and bottom parts of the cake. The side part will have a width equal to the height of the foam rubber - 4 - 5 cm, and a length equal to the circumference - 38 cm.
Sew all felt parts using any seam convenient for you. You can decorate such a dessert with artificial fruits, beads, crafts made from materials, etc.
Comments
This is my favorite foundation! Ideal p. Basic pizza dough recipe
Thank you very much for the recipe! How much am I? American style pancakes
Very tasty, even better than what I imagined. Cottage cheese casserole
I put them in small plastic bags. Blueberries mashed with sugar
Ah, that's the thing! :))) It was about 10 years ago. Kurt
Sip New Day Cake
- For the test:
- 100 g condensed milk,
- 1-2 tbsp. instant coffee,
- 2 eggs,
- 2 cups sugar
- 250 g sour cream,
- 1 tsp slaked soda,
- 2 cups of flour.
- For cream:
- 250 g butter,
- 1 cup powdered sugar,
- 100 g condensed milk,
- colored coffee or cocoa.
For the dough, grind the eggs with sugar, mix with sour cream, condensed milk with coffee dissolved in it, add slaked soda and, gradually adding flour, knead the dough. Bake 2 cakes.
Cream: grind softened butter with powdered sugar, add colored condensed milk, beat everything thoroughly.
Cut each cake into 2 more layers, layer all the cakes with cream, and also grease the sides with cream.
Dried apricots
dried apricots - dried apricot halves (the yield of pitted dried apricots from 1 kg of raw material is 200 g). Dried apricots are similar in chemical composition to fresh apricots. On average, dried apricots per 100 g of product contain 5.2 g% protein and 65.9 g% carbohydrates. Its energy value is 272 kcal. Easily digestible sugars in dried apricots are approximately equally represented by glucose, sucrose and fructose. The content of mineral substances in dried apricots is as follows (in mg%): potassium - 1717, magnesium - 105, calcium - 160, phosphorus - 146, iron - 12, sodium - 171. The dietary properties of dried apricots are mainly due to the significant predominance of potassium salts over sodium salts. The decongestant, diuretic effect of thick infusions and decoctions of dried apricots without sugar has been known for a long time. They are widely used in the complex therapy of many diseases of the cardiovascular system and kidneys. Dried apricots are often beneficial for patients with diabetes. True, dried apricots of the best Tajik and Uzbek varieties, septal, which contain more than 80% sugar, are contraindicated for this disease. With great benefit, dried apricots are included in the so-called magnesium diets used to treat hypertension and nutritional forms of anemia. The relatively coarse fiber of dried apricots, after soaking and especially boiling, does not linger long in the stomach and moderately stimulates intestinal motility. Dried apricots are quite poor in vitamins, but even in small quantities, those contained in it help maintain the proper balance of these substances in the body, especially in the winter-spring period. Before use, dried apricots are sorted to remove foreign impurities and washed thoroughly in warm water, changing it several times. The washed dried apricots are poured with warm water and left to swell for 2-3 hours. To prepare the puree, the swollen dried apricots are boiled for 15-20 minutes in the same water in which they swelled, then wiped, adding a decoction.
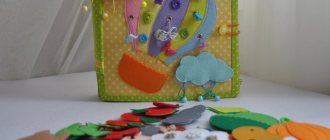
DIY felt Velcro cake
But the most important thing about this craft is that it can be used not only for playing “mother and daughter,” but also as a wonderful educational toy. Kids learn to play with each other, carefully “cut” with a toy knife, count, add and subtract, distinguish between color shades, etc. So, by making this felt cake with your own hands, you will get an educational and educational toy.
Prepare a set of felt sheets, matching threads, padding polyester or cotton wool, and Velcro.
To sew a felt cake, you first need to make a pattern. The size can be any, based on the amount of available material and your desire.
You need to sew one side of Velcro onto the triangular parts of the top.
For one piece of felt cake, you need to connect two triangles and one side, not forgetting about the hole for the filling. Having inserted the padding polyester inside, sew up this place too.
In this way you need to sew 6 “pieces”.
To decorate from pastel-colored felt, cut out the details for the “marshmallow.” How to do it is described below. We sew the second part of the Velcro on the bottom.
Ready! Attach all the marshmallows to the pieces and play for your health!
How to make crafts like this from a foam sponge (clickable)
A brand new dish sponge is a very attractive item in itself: bright, dense, elastic.
Why not a cake! This wonderful set of cakes was made by teacher from Armavir Tatyana Kiryushatova. Please note how simple the craft technique is: small sponges do not need to be cut, and anything can be used as decoration - broken hairpins, scraps of braid and buttons. The main thing is to glue them more securely.
“The set of “cakes” is very durable, and if necessary, they can... be washed!
Variations on the theme of the previous craft: Anna Pristash did not use a dish sponge, but a two-color washcloth with a textured surface, and the result was a real “cake with cream.”
“In general, pieces of the “cake” can be easily obtained by cutting the sponge into triangular pieces. Mom is the best person to handle this task. Well, then you can do whatever you want with such a blank!
For example, you can glue together a multi-layer “cake” (innerchildfun.com).
You can paint the “cake” with any colors - it will be a multi-colored “cream”. Painting a sponge is easy, and of course, if necessary, you can always rinse it thoroughly and return it to its original state (oneperfectdayblog.net).
You can decorate the “cake” with pompoms, beads, sparkles, buttons, or paint a pattern.
But on the website sugarspiceandglitter.com they suggest not making accessories for the game, but organizing a real training camp for young housewives! As a cream - shaving foam with food coloring, decorations - cereals colored with food coloring. Of course, such a creation will not last long, but the technique of applying the cream can be honed to automaticity!
(Click on photo to enlarge)
Don't stop at cream puffs! A couple of strips of cardboard will turn the sponge into a “waffle.”
And if you carefully cut the sponge in a spiral, and then tighten the resulting product from the bottom with an elastic band, you will have a wonderful cupcake!
Dear dolls! Enjoy your tea!
Source
Collapsible cake with magnets
This wonderful construction set promotes the development of fine motor skills of the baby's hands, memory, and thinking.
To work you need to purchase:
- Felt sheets - any suitable shades.
- Metal washers - about 1 cm in diameter - sixty pieces.
- Round magnets - sixty pieces.
- Hot melt adhesive.
- Glue (you can take “Glue instead of nails - transparent seam”).
- Chalk or soap.
- Thread and needle.
- Expanded polystyrene 3 mm thick.
- A piece of foam rubber - thickness 3 - 4 mm.
- Pearl beads - 0.5 cm in diameter.
- Non-woven fabric.
First, draw a circle with a diameter of 20 cm and divide it into six sectors. We make 2 holes in one of the triangles - we will attach magnets here.
Draw 13 parts on the foam rubber and cut them out using scissors.
This is one piece of felt cake. The first cake layer will have 3 layers of foam rubber, the cream layer will have 2, the second cake layer will have 3 more, the second cream layer will have 2, and the third layer will have 3.
We take 5 parts and cut out holes for magnets in them. In another five blanks we make indentations to the middle - here we will put washers.
We don’t touch 3 parts - we leave them as they are.
Then we place the washers in the prepared “nests” and carefully grab them with threads to the foam rubber.
Let's do the same with magnets, observing the polarity! We will also secure it on both sides.
Now let’s assemble the “cream”: take 2 parts - with a washer on top, a magnet at the bottom - and glue them together with drops of glue applied to the magnet.
The “Korzhik” is assembled in almost the same way, alternating a part with a washer, foam rubber without inserts and a part with a magnet.
So, we must assemble three “biscuits” and 2 cream layers. To be on the safe side, you can also sew the edges with thread - very loosely, without tightening the edges and preventing deformation.
Constantly check the magnets for polarity, because we definitely need to magnetize the layers!
Next, take felt, a template and cut out triangles, with an allowance of 2 mm - 2 for each layer. You also need strips of different widths - “cream” 1 cm, and “biscuit” 1.5 cm. Their length is the same and equal to 32.5 cm.
Choose the color yourself, to your taste - after all, a felt cake can be “chocolate”, “strawberry”, “pistachio”, or maybe assorted.
If you use white felt, the magnets will show through. This is not very beautiful, so glue the parts with non-woven material, and only then cover them with material.
Sew all the parts together using an “over the edge” or “overcast” seam, putting foam rubber inside.
So we only got 1 piece. To create a whole cake, sew 30 “layers” - 18 “biscuits” and 12 “creams”.
At the end of the work, simply fold all the layers together and decorate with felt “fruits”.
Each cake layer can be rearranged to create new types of dessert - this will give the child the opportunity to experiment with the composition.
Master class “Cake and pastries made of foam rubber”
Deeva Svetlana
Master class “Cake and pastries made of foam rubber”
To make the cake you will need :
1. A sheet of foam rubber 3 cm thick .
4. Gouache, brushes, scissors.
At the first stage, we draw five circles of different diameters on a sheet of foam rubber .
Then, using a stationery knife, carefully cut out circles from foam rubber .
The next step is to paint the glued circles with gouache.
In my example, I took light brown gouache and dark brown and alternately
When the paint is dry, you can start decorating the cake .
For decoration, I used the remnants of foam rubber that remained after cutting out the circles. I decorated the top small circle with a rose, which I cut out from a round piece of foam rubber and glued it with a gun, having previously painted it with gouache.
I decorated the remaining circles with various flowers, leaves, circles, which
I cut it out of pieces of foam rubber and painted it with gouache .
I made the cakes from foam rubber , cutting out circles of small diameter and coloring them
The cake turned out just like the real thing!
Master class on making a Christmas tree from foam rubber “Christmas tree, Christmas tree forest scent” Hello, colleagues. I made a wonderful Christmas tree made of foam rubber. Moreover, the foam rubber is not new. I bought a sofa. When they brought him. Master class “Toy cakes” We all buy toys for children, but the best toy is the one made with our own hands. Make toys for children, and then watch with. Master Class. New Year's toy made of foam rubber and waste material "Santa Claus" Who are the most important guests of the New Year's magical holiday? Of course, Father Frost and Snow Maiden. I offer a master class on making New Year's. Master class on making a “Hut” costume for an adult from foam rubber To prepare a surprise moment for New Year’s matinees in middle groups, a life-size “Izbushka” from which they appeared was simply necessary. Master class “Let's make a cake with our own hands” Music director of SPDO Municipal Educational Institution Secondary School s. Pervomayskoye, Fedorovsky district, Saratov region. Kromina Larisa Vasilievna" Master class "Let's do it.
Presentation “Master class “Such comfortable foam rubber. Masks made of foam rubber” “Such comfortable foam rubber” Teacher of the compensatory group Korekova T.V. Goal: To share with colleagues personal experience in making masks.
Master class “Cake for birds without baking” We recently celebrated Titmouse Day and in honor of this holiday we “baked” a cake for birds. We would like to share the recipe with you. Ingredients. Master class “Cake with a surprise” We all love to give gifts. Some take it lightly and don’t bother, but others take it differently, putting their soul into the gift. Like this,. Master class “Yellow Dog with a Heart” from foam rubber On New Year’s Eve, I propose to make a cute yellow dog from foam rubber and creative material as a souvenir. Craft.
Source
Cake decorations - felt “meringues”, “wafers”, “marshmallows”
Decorating cakes is a must, even if they are felt ones. And what else to decorate it with, if not with crafts made from the same material? Moreover, felt holds its shape perfectly and is perfect for creativity!
For example, airy “meringue” is very easy to create from pieces of white matter. Scraps left over from making the cake will work.
For one airy cookie, we need to cut out 4 circles with a diameter of 3 cm. Now cut three of them into 2 parts. Fold each half in half and sew the free edge with white thread. Glue a bead into the middle of the funnel.
Then glue all 6 parts to each other, hiding the seam inside. We attach the fourth circle at the bottom. Ready.
Having created several of these decorations, you can place them on the cake.
But felt from pastel shades makes an excellent “marshmallow”. For it, cut out a circle and cut in eight places, evenly distributing the cuts around the circumference. On one side, we round each of the sectors, and stitch along the sharp edges. Place a lump of any filler inside and tighten the thread. The top can be decorated with beads or sequins.
How to Roll a Towel into the Shape of a Piece of Cake
Some prefer a more complex composition in the form of a cake, cut into pieces.
Or they want to give a small gift in the form of a separate piece of cake to a loved one. It’s not difficult to do, you just need to be careful and be patient. To work, you will need a specially cut form from thick cardboard, a towel, safety pins and various decorations .
The execution process is as follows.
- on the prepared cardboard .
- To ensure that the product does not move and holds well, it is pinned with safety pins
. - Form a lush piece of “cake” from the remaining canvas
. - Decorate with artificial flowers or fruits.
Advice! You can place the composition in translucent packaging to imitate a natural culinary masterpiece.
A towel is a great gift for any occasion for both men and women. The main thing is to learn how to present it correctly and beautifully. Then there will be no problems with gifts for loved ones.
How to wash terry towels
Paper towel holder for railing
Light cake “Melts in your mouth”
Light - because without eggs and butter. And also because it cooks very quickly. I’ve been making this for a long time, the first time I didn’t expect that from such a minimal set of ingredients I would get a light, porous, tasty cake that just melts in my mouth! The thing is that I'm losing weight! But I really love baking - both cooking and eating))) Therefore, in order to pamper myself (sometimes) and my family (often), I look for recipes for light dishes for the figure (and the wallet, by the way!). I invite everyone to try this wonderful cake!
Cake "Piece work"
The result of my long experiments. On the one hand, I really love cream cheese cakes. On the other hand, I try to make them as light as possible. As a result of trial and error, an excellent recipe was born - a delicate curd-chocolate delicacy made from low-fat cottage cheese, the lightest cream, fruit, without butter, almost without flour... The taste of the holiday should be light and sweet! And preparation should not take much time. I am presenting this cake to commemorate our victory in the “Things for All Hands” competition. And once again I want to say a huge thank you to our team, consultants, support group and site administrator Jane. The completed competition means excellent, interesting, eventful days and an overall victory.
Cake pigeon's milk"
The Bird's Milk cake was invented by a Moscow chef and, by the way, the author received a patent for this invention. They sold it in Moscow on Arbat in a confectionery shop from the Prague restaurant. When they took him out, and this didn’t happen every day, a line formed, almost like at the Mausoleum. They grabbed 3-5 pieces for both friends and acquaintances. The proposed recipe is as close to the original as possible at home. The cake turns out INCREDIBLY delicious. The other day I made it for my husband’s anniversary, for his work. The people were shocked and delighted. My husband's assistant said that the cake was a hit! I offer my most sincere apologies to cooks Barbie, Natalka9, Tanya-O-511 and Oxana for unwittingly repeating the recipe they posted earlier. For some reason, when I searched, I was given only one recipe, but it was completely different.