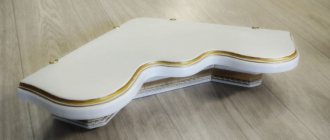
Home iconostasis made of natural wood with carved patterns
The tradition of arranging a home iconostasis has existed for more than one century. Although in modern homes icons are often placed on bookcase shelves or hung on the wall, it is best to set up a separate special place for them.
Single-tier straight rack - shelf for icons
A good option would be a hanging shelf, which according to the canon should be placed on the eastern wall of the house. Often such a shelf is made corner, two or three tiers high.
Beautiful wooden shelf for icons in the corner of the room in three tiers
Corner shelf for icons with candlestick
Design options
Shelves for the Orthodox canon may differ markedly from each other. It all depends on the location of such products. It is actually customary to place icons in a corner that will be directed to the east. Shelves can be multi-tiered or simple in one tier. Also, the shelf will look either angular or just straight, depending on the place where it is planned to be mounted. The shelves also have a noticeable difference in terms of design; often there may be some kind of carving on the back wall. The carving can depict both the outlines of the holy apostles, as well as some vegetation and even birds.
It is important to know that the shelf should contain only icons and everything that may relate to religion. It is not customary to place all sorts of foreign objects next to icons, which do not play a role in religion. Any do-it-yourself corner shelf for icons requires, first of all, a detailed thought out of the version of the shelf itself, and only after that can you prepare the materials that will be useful in the work and the actual tools for its manufacture.
The history of topiary
Descriptions of topiary are first found in literary works of the Roman Empire. There are mentions of them in the works of Pliny the Elder and the epigrams of Mark Valerius Martial. Military campaigns and the seizure of new lands contributed to the appearance of many slaves on the territory of Rome. The responsibilities of some of them included caring for the garden and green spaces. Among the gardeners there were real talents who created beautiful figures of the most incredible shapes from boxwood thickets.
Gradually, this skill turned into a new type of art, which aroused admiration among visitors to the parks of noble people of that time. Craftsmen engaged in decorative pruning of bushes were called “topiary.” After some time, the fashion for gardens with decorative plant statues, labyrinths and compositions passed away. Figures made from plants remained to decorate the gardens of only topiary fans.
The topiary craze resumed in the 16th century, inspiring designers to decorate French parks with green sculptures. The most famous of them is the park surrounding the Palace of Versailles. In Russia, this direction of floristry appeared in the 18th century, but did not find much support among the population. And only in recent years have green sculptures been increasingly used in garden design. Modern technologies make it possible to produce artificial materials that are not inferior in their decorative qualities to natural plants.
Decoration methods
Each do-it-yourself corner shelf for icons requires not only its creation itself, but it is also important to pay special attention to the actual decoration of such a homemade product. You can certainly buy ready-made options in the store, but it’s so nice to make something yourself, especially if you design it creatively and it turns out to be just a designer item. With experience working with such wooden surfaces, you can safely make various kinds of carved slats, balusters, and even candlesticks. It is customary to decorate the crowning shelf for icons using the carving technique; you can also use various church domes or crucifixes. If you want something unusual, but you don’t have much experience working with such things, or you have no idea at all how to create such wonderful things, craftsmen from various companies are rushing to your aid. There are already numerous options for such attractive shelves on the market. There are many options for ordering, which you choose yourself. You can also simply create an ordinary shelf, and all the missing elements with which you can safely decorate it can simply be found in a store or even purchased at a church store.
Features of artificial turf topiary
These garden sculptures have many differences from those created from living plants - shrubs, climbing and flowering crops. The composition is based on a three-dimensional wire frame onto which sections of artificial turf are attached. Synthetic grass topiaries have a number of advantages:
- maintain a rich green color throughout the year;
- do not need watering or pruning;
- do not deteriorate from rain and snow, withstand low temperatures well;
- do not fade even on the hottest summer days;
- are not affected by putrefactive bacteria, mold fungi, aphids, bugs and other garden pests.
Artificial turf topiaries are usually shaped like a ball, square, or cylinder. Compositions of several pyramid-shaped objects look interesting, reminiscent of the pyramid complex in the Giza Valley. More difficult to manufacture are volumetric multi-tiered models, curled in the form of a spiral or containing a combination of several shapes. Experienced craftsmen make sculptures in the form of a human figure or an animal.
Minor details of fastening
It is worth knowing that the actual fastening of the shelves for icons must be done using dowels. But first you should install the hinges on the product, and only after that press the structure against the wall and mark the locations of the required holes. Next, use a drill to securely install dowels into the wall and you can safely hang the product and check the strength of its fastening.
The article told how to make a shelf for icons with your own hands and it is so simple that you can create such useful things for the home. But if you have no experience in woodworking, you don’t have to cut something yourself, but simply purchase parts for decoration and attach them to a shelf; it will look just as attractive if they were created by a master’s hand. Several types of shelves for icons can be made in just a few minutes.
Source
How many hands does an organist have?
But how does a musician manage to make all these thousands of pipes - wooden and metal, whistle and reed, open and closed - tens or hundreds of registers... sound at the right time? To understand this, let’s go down for a while from the upper tier of the organ and go to the pulpit, or organist’s console. The uninitiated, at the sight of this device, is filled with awe, as if in front of the dashboard of a modern airliner. Several hand keyboards - manuals (there may be five or even seven of them!), one foot keyboard, plus some other mysterious pedals. There are also many pull levers with inscriptions on the handles. What is this all for? Of course, the organist has only two hands and will not be able to play all the manuals at the same time (there are three of them in the organ of the Great Hall, which is also a lot). Several manual keyboards are needed in order to mechanically and functionally separate groups of registers, just as in a computer one physical hard drive is divided into several virtual ones. For example, the first manual of the Great Hall organ controls the pipes of a group (German term - Werk) of registers called Grand Orgue. It includes 14 registers. The second manual (Positif Expressif) is also responsible for 14 registers. The third keyboard is Recit expressif - 12 registers. Finally, a 32-key footswitch, or “pedal,” works with ten bass registers.
0
Speaking from the point of view of a layman, even 14 registers for one keyboard is somehow too much. After all, by pressing one key, an organist is able to make 14 pipes sound at once in different registers (and in reality more due to registers like mixtura). What if you need to play a note in just one register or in several selected ones? For this purpose, the pull levers located to the right and left of the manuals are actually used. By pulling out a lever with the name of the register written on the handle, the musician opens a kind of damper, allowing air access to the pipes of a certain register. So, in order to play the desired note in the desired register, you need to select a manual or pedal keyboard that controls this register, pull out the lever corresponding to this register and press the desired key.
Corner shelf for icons - a sincere gift and a home-made interior element
Home iconostasis made of natural wood with carved patterns
The tradition of arranging a home iconostasis has existed for more than one century. Although in modern homes icons are often placed on bookcase shelves or hung on the wall, it is best to set up a separate special place for them.
Single-tier straight rack - shelf for icons
A good option would be a hanging shelf, which according to the canon should be placed on the eastern wall of the house. Often such a shelf is made corner, two or three tiers high.
Beautiful wooden shelf for icons in the corner of the room in three tiers
Corner shelf for icons with candlestick
Thrust ring
The ring is the base of the entire extender; it must be made of durable material. Plastic, thick textolite, wood or plywood are suitable. When processing a part, the following points must be taken into account:
The thrust ring should be wide enough; it distributes the pressure over the surface of the pubis. The larger the surface of the ring, the less pressure it will create on the pubis.
You can provide a soft cloth wrap or a foam pad that will soften the pressure. Sharp edges are also not allowed. An erect penis must fit into the opening of the ring.
An erection may occur while wearing an extender, so you need to be sure that in this situation you can easily remove the extender.
Varieties
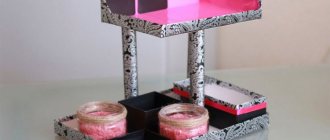
Shelf for icons “Home mini-iconostasis corner”
In workshops you can order a stand for home icons of any size and configuration, but this is quite an expensive job.
Corner shelf made of fiberboard, made in three tiers
An easier option is to use a regular corner shelf from a hardware store, but this may cause sizing issues. In addition, you will have to look for a model that will “fit” better into the interior. All these difficulties can be avoided if you make a shelf for icons yourself - this is quite feasible even with little experience in carpentry.
Wall-mounted corner shelf for wooden icons
A do-it-yourself icon shelf can have any convenient design. Corner shelves are made single-level or in several tiers. To connect several levels, supports carved from wood are usually used. The finished shelf is often decorated with carvings, openwork overlays, and covered with special carpentry varnish and wax.
Small corner shelf for icons, two tiers
DIY home iconostasis
Location of icons
Images on the shelves should be placed in the prescribed order. Only in this case will they fulfill their task regarding the patronage of the residents of the apartment. The optimal number is considered to be 12 - according to the number of great Christian holidays. According to church canons, all structures are crowned with an Orthodox cross.
On the top tier in the center is an image of Jesus. On the left is the image of the protector - the Most Holy Theotokos, and on the right is John the Baptist. On the lower levels there are icons of the Holy Trinity, Nicholas the Wonderworker, Archangels Michael and Gabriel, Apostles Peter and Paul, Prophet Elijah, the Burning Bush and other saints revered by people.
Manufacturing stages
Carved corner shelf for handmade icons with drawing
Before starting work, you should make a drawing of the project. The size and number of shelves depend on the type of icons that will be placed on the finished home iconostasis. To make a simple two-tier shelf, you will need two 1.5 cm thick pine boards, as well as four supports.
We cut out three parts using a jigsaw according to the template - sidewall, side and bottom
The workpiece is milled using a stencil using special equipment
To turn decorative parts you will need a lathe or take them ready-made
We assemble the shelf - the bottoms are screwed to the turned elements using self-tapping screws
When connecting the sidewalls to the bottoms, the screws should hit the middle of the ends of the bottoms
The sides are screwed on using cylinders - self-tapping screws are inserted into the holes from the bottom, the cylinders are put on, the hardware is screwed into the side
The final stage is coating the finished product with drying oil and attaching it to brackets in the corner
After completion of the work, the finished shelf is treated with stain and varnish. Both colorless varnishes and those that give the board the color of different types of wood are suitable. When choosing a quick-drying varnish, the product is ready for use in a few hours.
Small shelves for icons of different colors - pine, walnut, mahogany
Required materials and tools
To make a corner shelf, wood of various decorative species is used - for example, oak or cherry. A less expensive material would be pine board. In addition to wood, you can also use plywood or chipboard. The thickness of the board can vary from 1.5cm to 2.5cm. You will also need boards of small width in order to carve the supports.
To work you will need the following tools:
- tape measure or ruler;
- hacksaw;
- sandpaper for wood;
- electric jigsaw;
- electric drill;
- self-tapping screws;
- wood glue;
- wood varnish.
Required Tools
To attach the finished shelf to the wall, you will also need masonry drills, metal corners or hinges, and self-tapping screws with dowels.
Decoration
Depending on the complexity of the elements of decorating shelves for icons, you can make them yourself or purchase them ready-made
The most common way to decorate a home icon case is wood carving. You can do it yourself using a jigsaw. If you do not have the necessary experience, carved elements can be bought at a hardware store or ordered in a workshop. The finished carved plates are attached to the shelf with wood glue.
Soft wood is selected for carving: birch, spruce, pine, aspen or juniper
Another way to decorate is to burn out the ornament using a special device - for this, you first apply a drawing of the pattern to the wood with a pencil. The shelf can also be painted - special wood paints are sold in construction departments. An alternative to strict monochromatic painting is to apply a pattern to the enamel with paint of a different color.
You can burn out the ornament and then open individual fragments of the image on the shelf with enamel
To further strengthen and decorate the shelf, its back walls are covered with a wooden panel. It can also be decorated with carvings, painted with varnish and enamel.
Shelf for icons with a beautiful back wall
To decorate the upper part of the shelf for icons, you can choose the outline of an Orthodox church
When using a plywood board, these methods will not work - but painting with acrylic paint with the addition of gilding will look impressive on such a panel.
A small figured shelf for icons with candlesticks and a lamp
Toy color
There are grasshoppers of various colors. The most common is green. There are orange, purple and red toys.
When purchasing, you must take into account that over time, the fabric of the bag will lose its original color and become faded and inconspicuous. Therefore, the best option would be a dim, uniform pattern.
Here is a photo of a herbalist that will last for months.
Fertilizer
Soil enriched with minerals can provide the plant with strength for a long time, but even the largest supply is depleted. Sawdust or pine needles as drainage have a beneficial effect on the condition of the grass; they can be carefully replaced (if the herbalist is made independently) with renewed ones after a year.
Fertilizers for indoor plants or universal complexes will be a good way to feed them from May to September. During the winter, interference with the life of the plant should be suspended. With the arrival of spring, solutions containing nitrogen and microelements are used.
If parasites appear on the grass, it is promptly treated with a solution of soap suds or insecticides. The diseased plant is placed away from healthy ones so that the infection is not transmitted.
Precautionary measures
If there is a need to paint the herbalist, only environmentally friendly paints are used. For example, in order for gauze to acquire a shade, it should be kept in paint of the desired color.
You cannot apply acrylic on top of the toy, otherwise the grass will not germinate or will quickly die. It is better to cut out the eyes from cardboard, the nose and mouth from plastic.
In addition to the lawn, you can use the seeds of plants such as dandelion and chamomile. The main thing is that there is enough space for the root system. To do this, you should put more soil and, therefore, increase the size of the toy.
Photo: rastenieinfo.ru.
In order for the grass to turn out to be of high quality and decorate the room for a long time, you need to take into account the instructions provided.
Treatment
After two weeks, when the size of the shoot exceeds 6-7 cm, the first haircut is done. It is necessary to shorten it by 2-3 cm. Scissors are used, treated and disinfected, so as not to infect the herbalist from another indoor flower.
The grasshopper’s “hair” should look neat. If an extra blade of grass peeks out from the side, it is pulled out. The more often the treatment is done, the more beautiful the toy looks. With regular trimming of the lawn, it grows much thicker and denser.