This article will present the types of bite alarms, their brief characteristics, advantages and disadvantages, as well as DIY options.
The alarm is an indispensable part of fishing gear, the main purpose of which is to improve the quality of fish bite and its timely recognition.
There are:
- visual;
- sound;
- lateral;
- electronic.
The simplest bite alarms (principles of operation, manufacturing instructions):
Every fisherman has eyes, ears and hands to determine the bite. The mechanical signaling device is designed, due to its operating principle, to indicate the beginning of a bite through visual, acoustic or tactile contact.
Mechanical visual alarms
Nod. The simplest devices are the familiar float or the tip of a fishing rod (nod).
These types of alarms are familiar to everyone. Every fisherman knows how to make a float and nod himself, or which one to buy. Foil tube. Also, there are slightly different alarms, which are based on the principle of operation on the vibration of the fishing line. The simplest visual one is a foil tube.
- Take aluminum foil and roll it into a tube.
- Then we put the tube on the main fishing line.
- You need to thread the line between the reel and the first ring on the rod - the line will sag in this place.
As the bite begins, the sag of the line decreases, we understand that the fish has begun to grab the bait. Aluminum foil is good because it shimmers in the sun (its movement is clearly visible), and also rustles when bouncing.
Disadvantage - it is useless in windy conditions (reason is the lightness of the material).
Blitz tips
- By using a nod, you can recognize the bite of less active fish. To form such a nod, you need wire material or a thin metal plate. In this case, the nod is attached to the tip of the rod using electrical tape, through which the fishing line is threaded. In order to most effectively capture the bite and touch of the fish, the nod should be attached to the side of the end of the rod.
- In the case of using a firefly indicator light and using light tubes for a long time, they should be placed in freezers, naturally after fishing!
- To increase the effectiveness of side alarms for the presence of fish, it is advisable to place a certain brightly colored object on the tip of the hook, which can be, for example, a ball.
- To achieve greater sensitivity of the bells, you need to significantly stretch the springs to which the bells are attached.
Mechanical acoustic alarms
The right bell. Let's talk about a simple acoustic signaling device - these are bells. Our design is much better than store-bought bells, since the bell flies off the tackle during hooking and does not interfere with fishing.
- We buy a bell and remove everything that hangs on it.
- We are looking for a rubber hose about three centimeters in diameter. When searching, pay attention to the fact that its walls are thin.
- On the hose we measure a piece one and a half centimeters in length.
- Cut off the measured ring and see what shape it has. If it’s a circle, then we cut along one side anywhere, but if it’s an oval, then we make a cut on one of the elongated sides.
- Now we need two nuts and a bolt. The size of the bolt is such that it fits into the ear of the bell.
- Now you need to make a hole at one end of the cut rubber ring equal to the diameter of the bolt (it is better to drill at low speeds).
- We thread the bolt through the hole in the rubber ring (with the head inside the ring). You will get a hook made of a rubber ring with a bolt protruding from one side.
- We put a piece of thick fishing line a meter long on the bolt with a tightening loop.
- Tighten the loop.
- Now we put on the bell, press everything together and tighten it with a nut, then screw on the second nut to lock the first.
We have a bell with a rubber hook. We hang it on the fishing line closer to the tip of the rod. When hooking, the bell may fly off - in order not to lose it, we tie the free end of the fishing line on our structure to a peg in the ground.
This design is much better than the cheap bells that are sold in stores. Because the signaling device flies off the rod. You don't irritate yourself or nearby fishermen. And also you don’t scare away the fish.
Bottom line
Regardless of what type of alarm you choose for feeder fishing, it is worth remembering the main purpose of the auxiliary devices. They should help and facilitate a successful quiet hunt and in no case become an additional headache.
That is, if you have a proven method that you have been using for years, you should think about whether it should be radically changed to a new one?
Experiments are, of course, a good thing, but it’s worth remembering the proverb that a bird in the hand is more reliable than a pie in the sky.
Electronic signaling devices
Having thought about the alarm and appreciating its advantages, I want more from it. A mechanical alarm requires mandatory control by the fisherman over its operation, that is, being near the fishing rods all the time. What if you want more? To go away for natural needs, cook food, just relax and stretch your legs, here an electronic alarm comes to the rescue, it is also called a swinger for fishing. It does not require constant presence near the rod and will indicate a bite with a visual (light) or sound signal. There are a sufficient number of types, types and models on sale.
Can be divided into types:
- visual
- sound
- combined
The principle of operation is just as simple - the fishing line passes through the slot, there is a small reel in the slot, and when it moves, a signal is triggered.
So, we described primitive mechanical alarms and briefly talked about factory-made electronic alarms, which are sold in stores. Now we’ll tell you how to make a more or less simple design of a mechanical signaling device, as well as how to assemble an electronic one yourself.
Sensitive hands
Alternatively, you can use your own body as a bite alarm. In this case, you should pass part of the fishing line through your hands, and with the slightest tension, you can instantly make a hook. However, this method requires patience and concentration, since even swatting away mosquitoes will be problematic.
Having chosen this method of fishing, you should choose a comfortable position and have a stable nervous system. In any case, ingenuity and ingenuity will only benefit a fisherman of any rank.
Design and manufacture of a simple side mechanical signaling device
We will need the following components:
- Latch fastener for PVC pipes (used for fastening to a wall, ceiling or floor, the pipe itself is snapped into it).
- Steel (elastic) wire 20 cm long and 0.8 - 1 mm in diameter.
- Nylon thread, waterproof glue, any paint for metal of a “poisonous-bright” color (paint can be bought in cans) or a self-adhesive film of a bright color.
- A rod or tube (guide) 8-10 cm long. The diameter of the tube is such that it fits tightly into the side hole for the PVC pipe holder.
Step-by-step instruction
Let's start assembling our alarm device.
- We make a hole at the end of the tube or rod according to the diameter of the wire.
- We bend the wire in an arc, measure 5 cm from one end and bend it 90 degrees outward from the inner bend of the arc.
- We thread the wire through the hole in the tube or rod. We will have a curved tip parallel to the guide.
- We coat the tip of the wire and the guide with glue and wrap it tightly with thread in several layers.
- We coat each layer with glue.
- Once it dries, you can either paint this place or open it with varnish (for example, for nails), as an option, put a heat-shrinkable tube over the gluing area and use a lighter to encircle it along the diameter.
- At the other end we bend the hook for winding the main fishing line.
- We insert the guide into the pipe holder (it is better to place it on glue).
- We paint with “poisonous” paint or cover with a bright film 5–7 centimeters of the tip of the holder on the side of the fishing line hook.
- We put it on the rod handle after the reel. The arc wire should be on the side.
- We grab the ends of the holder with a thick rubber band (so as not to fly off). We hook the main line after the reel to the hook on the wire arc.
When biting, the line tightens and bends in an arc. Based on the vibrations of the bright tip of the arc, it is easy to determine the moment of the bite.
Light
Such indicators will come in handy if you plan to go fishing at night. A simple option is to paint the float with fluorescent paints. And if there is a need to make a signaling device to attach to the tip of a fishing rod or fishing line, you can make an electronic firefly.
| Materials | Tool |
| cocktail straws | scissors |
| battery (button) 3 V | hot glue gun |
| heat shrink tape (thickness should be equal to the diameter of the battery) | lighter |
| LEDs | |
| small crocodile hair clips |
Manufacturing stages:
- Cut a piece from the straw, about 3-5 centimeters long. You can choose the size yourself, depending on what kind of firefly you want to make.
- The piece of straw must be filled with glue from a hot gun. Make sure there are no voids when filling.
- While the glue has not hardened, insert an LED into one side of the piece of tube. It should enter the glue with its head about a centimeter and a half. Leave to cool completely.
- We insert the battery into the shrink tape. The length of the piece of tape should be equal to the diameter of the battery + a centimeter of reserve on one side.
- We take a whole straw and insert it into the shrink tape on the side where we left a free edge. Using a lighter, grab the tape. Be careful, as at this stage you will have to act very quickly. It is important not to let the heat shrink around the tube completely harden. After removing the lighter, quickly remove the straw and insert it back again. Repeat this action several times until the cooling heat shrink takes the shape of a place where the tube will be freely inserted and from where it will be easy to pull out.
- Run the flame from a lighter over the heat shrink on the back side of the battery (opposite from the one you formed in the previous step). Be careful, you do not need to completely solder the battery.
- The last step is to glue a crocodile clip to one of the flat sides of the battery using a hot gun.
Schemes of simple electronic bite alarms (working principle)
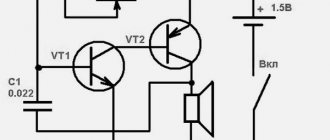
Option 1. Simple circuit of an electronic signaling device
The line tension sensor is made from a contact group from the RPU-2 relay. It is only important to set the relay to open at the slightest movement of the fishing line, but this can be done very easily during assembly.
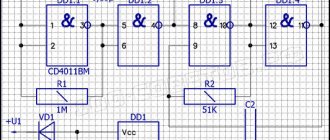
Option 2. Simple circuit of a waiting sound and light alarm
A very simple scheme. The sensor is based on the same RPU-2 relay or any other analogue. The fishing line is wound behind the sensor and connector SA1 is closed manually. As soon as the line is tensioned during a bite, it will pass through the sensor and the chain will allow the speaker to signal the bite. You can also install an LED in parallel for light signaling. Read the article about fireflies for night fishing with a battery.
Option 3. Electronic alarm from a key fob with a melody
A very simple scheme and does not require additional description. The RPU-2 relay or its equivalent is still used.
Option 4. A more complex circuit of a waiting bite alarm
To assemble an electronic signaling device, you need to have at least minimal design skills - what housing to place, what system is best to come up with, mounting method, etc. Each designer determines this for himself. We will tell you about the very principle of operation of the electronic signaling device and its components. For assembly you will need:
- 3 volt battery (or several connected in series).
- Contacts from a broken alarm clock or toy.
- The reed switch is open, without a magnet.
- Magnet (can be used from a furniture latch).
- LED or buzzer (or both for a combination alarm).
Here is the most complete circuit of an electronic sound signaling device.
The principle of operation of such a signaling device is as follows: when a magnet is supplied to the reed switch (during a bite), the circuit closes and transmits electric current to the LED or tweeter (or to both elements). The LED lights up or the beeper buzzes, signaling the start of a bite.
Such a circuit can be used, for example, in the mechanical signaling device described above - improving it into an electronic, combined one. In this case, we need to bend the arc so that it is closer to the rod with the tip where the hook is located, through which the main line passes. You need to attach a magnet to this tip of the arc, and attach the batteries, a reed switch and an LED with a buzzer located inside some tube or box to the rod.
How to make a spring for fishing on a feeder - the technology for creating a pseudo-method feeder.
A detailed carp guide for beginning carp anglers. Construction of basic gear and many other aspects.
Bait for wild carp at this link.
When biting, the fishing line will stretch and bend the wire arc with the magnet, bringing it closer to the reed switch. The reed switch will close the circuit and supply power to the LED and buzzer. You can put a toggle switch in the circuit to turn the tweeter on and off at will, and then it will only work in the on position.
To ensure that the LED always works, install the toggle switch in the circuit after the LED, so that the LED itself is not left without power in the off position. It turns out to be a wonderful signaling device.
Electronic signaling device Megatext and its operating principle
You can read a detailed article about it here. Suitable for ice and summer fishing with bottom gear.
The advantage of this design is that in the open state our alarm does not consume power from the elements at all. It can be used at any time of the day. If you need to move away, you just need to turn on the buzzer and it will notify you of a bite at a distance from the rod. In case of failure or discharge of the batteries, such a detector will be able to operate in mechanical mode. It will be enough to remove the magnet and bend the arc to its old position. Successful hooks to you.
Features of fishing with a feeder
The presented type of fishing can be mastered by any novice fisherman. In addition, this activity does not require large financial investments, which is important in our time. With equal success, you can catch both predatory fish and other species using the feeder. To intensify the process, experienced feeders often throw in complementary foods and set up several gears.
This type of fishing allows you to make long casts and catch at close range.
By choosing the right position and distance, you can throw over any thickets, reeds and snags. For the optimal choice of gear when fishing on a feeder, the following factors must be taken into account:
- features of the reservoir (current, depth, rocky shore);
- carrying out the process from the shore or floating craft;
- size of fish expected to be caught;
- time of day and time of year (these factors influence the choice of casting range).