Finally, I was discharged from the hospital, and before I had time to come to my senses, an acquaintance immediately approached me with a request to make the speaker from the PC beep. He said that he wanted to put a tweeter in his multimeter, but the problem is that when voltage is simply applied to the speaker, it remains silent like a guerrilla. Why does he need this and why doesn’t he buy a normal multimeter, I didn’t ask, let him do what he wants with it, and at least I’ll stretch my hands.
As has already become clear, if you apply direct constant voltage to the speaker, it will not squeak at all. This is understandable, this is an ordinary small speaker, but due to the very low sound quality it was nicknamed a tweeter. To make it produce sound, you need to apply not direct voltage, but high-frequency pulses.
I went online with this question.
On YouTube I found a simple frequency generator circuit. Here she is.
As usual, I dug transistors out of my trash, they turned out to be s8050 and bc327-25. I didn’t worry about the capacitor and set it to 0.015 rather than 0.022, because we still have a trimming resistor in front of it, which is what adjusts the pulse frequency. I powered this thing from a 5 volt power supply through a 910 Ohm resistor and...
Still the same treacherous silence, I immediately began to blame the fact that I powered it incorrectly, but the battery also had zero effect, then on the transistors, I even assembled everything anew but with KT815 and KT814, and still achieved nothing.
And then comes the mysticism. I stuck to the circuit for about 15 minutes, and with my knowledge (I’ll ask experienced people to explain), I thought why the plus goes to the emitter if, in fact, it should serve as an output, and I simply switched the contacts between the emitter and collector. And immediately I heard a familiar squeak. I still can’t understand why this is so, because my last post had a similar circuit, but I didn’t touch the transistors there.
Photo of what came out
Power is supplied to the red and black wires.
I hope there is someone who will be helped by this scheme, because the search engine gives similar solutions with microcontrollers, which are not always easy to find. And here, as they say, we cobbled it together from what we had. And everything works. The application of this scheme can be very diverse; when I was looking for how to do this, I came across a person who wanted to attach a tweeter to a kettle.
A little off topic.
My next post will be a complete circuit of a gauss gun along with a capacitor charge indicator. Naturally, everything is simplified to the maximum (I don’t know any other way).
I often have fun at home. I recently saw a post about the Felix computer, and inspired by it, I decided to upgrade my own. If anyone is interested, I can also show you and tell you in detail. And so, that's all for today. I will also be glad to receive constructive criticism and answer your questions if possible.
The Arduino tweeter, which is often also called a buzzer, piezo speaker or even buzzer, is a frequent guest in DIY projects. This simple electronic component connects easily to Arduino boards, so you can quickly make your circuit make the sounds you want - beeping, beeping, or playing a decent tune. In this article we will talk about the difference between active and passive buzzers, analyze the diagram for connecting the piezoelectric element to the Arduino board, and show an example sketch for controlling a buzzer. You will also find an example of a melody that you can use for your project.
The easiest way to make a bite alarm with your own hands
All fishermen know how important it is to notice a bite in time and prepare for hooking.
Today the market offers a very large selection of different alarms and floats. But, if you make an alarm with your own hands, you can get a very high-quality product without spending a cent. The signaling device is quite simple to make and the work, moreover, does not take much time to make.
Bite alarm. Manufacturing.
In order to start making a bite alarm, you need to prepare the following materials:
— Wire. — Cambric (2 pcs.). — Pliers. — Stationery knife or scissors.
It only takes 15 minutes to make a bite alarm.
Now you need to take the cambrics. This is necessary so that this design holds well and the fishing thread does not get stuck in the alarm. By the way, you don’t need to buy cambrics in a store, because this is exactly the thing that you always have quite a lot on hand.
For example, you can take any cable you have at home that will fit in diameter and remove part of its insulation. For this homemade product, it would be best to take a cable from a satellite or television antenna. Now you need to cut off part of the cable with scissors or cut the insulation with a stationery knife and remove it.
The positive thing about making a signaling device with your own hands is that no money is wasted in its manufacture. At the same time, you have a really high-quality alarm device of your own production, which is enough for many fishing trips. Due to the fact that this signaling device was made of aluminum, there will be no corrosion or breakage.
Perhaps many fishermen have encountered the fact that plastic analogues from stores cannot withstand a long period of use and quickly break. If you make a signaling device yourself, you don’t have to spend a lot of time and effort, and it turns out much better than a store-bought one. This kind of alarm works well when fishing with bottom rigs. Even the smallest bite will be noticed and you will be able to react in time.
When hooking and removing fish, the alarm will not interfere. The same will happen during long-distance casting of bait. In addition, there is no need to prepare the alarm for casting a fishing rod, because everything will always be ready for perfect operation. Source
Receive a selection of new homemade products by email. No spam, only useful ideas!
*By filling out the form you agree to the processing of personal data
Blitz tips
- When purchasing an electronic alarm, pay attention to what the components are made of. Don’t be too price-conscious; plastic alarms are inexpensive, but they won’t last long.
- When transporting gear, do not forget to pack the alarm in a special case in order to avoid cracks and breakages.
- To make the bell more sensitive , the spring to which it is attached must be stretched as much as possible.
- You should not buy alarms with a metal keel. Such a float does not reflect bites well and determines depth.
- If in sunny weather the fish does not want to bite , then you need to make the alarm darker and attract the fish to the newly fed place.
Video: Biting crucian carp in summer, on a bell
You can increase the sensitivity and functionality of the alarm if you modify it, again on your own, without buying expensive devices.
As they gain experience, many fishermen begin to finalize and modify their gear, taking into account the characteristics of the reservoir and weather conditions. Usually, modifications take place directly at the fishing site by using handy materials or materials found by chance.
To modify the alarm holder, which is important when arranging a large number of gear and visually tracking everything at the same time, you need:
- take a rubber hose with a diameter of 3 cm and thin walls;
- cut a ring 15 cm wide;
- make a cut on the ring;
- thread it through the ear of the bell;
- secure with a bolt.
Hand-made bells have a special sound that can no longer be confused with the sounds of nearby fishermen - neighbors.
This article will discuss how to catch crucian carp using a modern donka. Modern bottom tackle is, first of all, a fairly rigid rod that can withstand the casting of a load, and a spinning reel.
You can use several rig options with this rod. Solid fastening of the load With this type of equipment, the load is tightly secured at the end of the fishing line and does not move along it.
Above the load, a leash is attached to the main line using a swivel or using a loop-to-loop method. Sometimes you can see the use of two hooks, fixed at some distance from each other.
This type of installation is used in cases where a large fishing distance is required. In this case, the load and hooks secured in this way will necessarily lead to self-hooking.
Sliding fastening of the load This fastening is used if the crucian carp in your pond is very careful and can spit out the bait when it feels the weight of the equipment. The fishing line is passed through the sinker, then a piece of nipple about 1 cm is put on it, which will absorb the shock of the load along the end loop to which the leash with a hook is attached.
Instead of a tube, you can use a piece of wire with loops to secure the hooks.
Personal experience of use.
I have come across buzzers of various designs and characteristics. They always squeaked very stably, and did not require virtually any expensive audio amplifiers. Many developers love them, but I have identified a number of difficulties when working with them:
1) Extremely disgusting sound during testing. Of course, if you operate this part once every few days, then nothing, but during tests it will beep constantly, which will inevitably affect your sensitivity and desire to work.
2) Sufficient power consumption for wearable electronics. It’s definitely not worth betting that you will carry such a thing with you.
3) Sufficient inertia. At one time I spent a lot of time making a midi keyboard based on a cheap buzzer. After all my efforts, good sound transmission did not work out, but I managed to restore the music from the old SEGA, which my customer was extremely happy about.
Timerkaev Boris is a 68-year-old doctor of physical and mathematical sciences, professor from Russia. He is the head of the department of general physics at the Kazan National Research Technical University named after A. N. TUPOLEV - KAI
Source
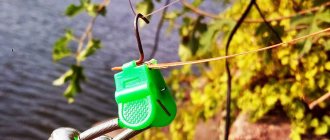
Portable electronic bite alarms for feeder
Portable alarms are, of course, inferior in functionality. Their main advantage is their relatively low price and compact size.
For night fishing, a good option would be the Strike Alert light signaling device. It has special grooves on the body with which this signaling device is attached to the tip of the fishing rod.
In working condition, it lights up green; when a bite occurs, it lights up red. It detects a bite by the vibration of the blank; it has a board inside that allows you to ignore the effects of waves and wind. True, in a strong wind they can
be false positives.
"Megatex" Jay 3 is suitable for fishing both during the day and at night. Has 5 sensitivity levels. For fishing on a still body of water, the most sensitive ones are 5 and 4; for fishing in the current and in the presence of wind, 2 and 3. Also in this alarm you can adjust the signal volume and tone. All this is done with the help of one button. If you press it, the indicator will turn on, if you press it again, it will turn off. By holding the button, you will hear characteristic signals (peaks). In order to set the fourth sensitivity level, you will need to release the button after the fifth signal. The melodies change on signals 7, 8, and 9. In order to disable the function of automatically turning off the signal when cutting, you must wait for the 10th signal. In order to set the tone, you need to hold down the alarm and wait 20 seconds, then it will start playing a melody with different volumes and tones. In order to select the sound range that suits us, we need to release the button and the alarm will remember the mode we have chosen.
When the fish bites,
Our light diode located on the case also works. It lights up for 20 seconds, then turns off, and lights up every 5 seconds so that we can understand which rod the bite occurred on. The sound time of the sound signal is 4 seconds.
This electronic bite alarm for the feeder is attached to the rod, preferably on the first leg of the blank, since when hooking it automatically turns off so as not to discharge the battery and not irritate the angler with its signal. Therefore, we re-throw the tackle again, place the rod on the stand and turn on the alarm; the previously set settings are saved. The battery of such a signaling device is enough for 5 years of active fishing.
This alarm also has a board that can ignore wind, waves, and the feeder rolling down a slope.
Electronic bite alarms for feeders on clamps. There are different types of them (YOLO, Akara) the point is that the alarm is attached to the rod on the first leg of the blank using a special clamp, preferably it has rubber seals for better fixation on the rod. The alarm body itself may have grooves, a wheel, or a hook for securing the fishing line. At the moment when the fish attacks the bait, tension in the fishing line will be created and the alarm will notify about the bite. In cases where the fish bites when it is relaxed, that is, towards the shore, this alarm will not work, so it must be used in combination with a swinger. It is necessary to select these alarms so that you have the opportunity to adjust the volume and tone, especially if you are fishing with several rods; it is also desirable that this alarm be equipped with an LED that periodically blinks after a bite, letting us know where exactly the bite occurred. But you shouldn’t expect much from these rods, and despite the presence of a board, be prepared in advance for false alarms in strong winds and waves
If you are going to catch small fish, pay attention to the force that must be applied for the alarm to work; some are not designed to recognize weak bites
Recommendations
Comments 19
Grunts at those moments when the contacts rub against each other. You didn't buy a buzzer, but just a piezo emitter. That is, it's just a speaker without a circuit board inside that makes it squeak.
Then it's strange. Must work. You need to check with a multimeter what voltage is coming to it.
When the door is open and the light is on, everything works, but when the door is closed, it sometimes seems to grunt, I’ll try to throw it on a different limit switch
Oh, so it means that either the limit switch sometimes contacts the body, or the wiring is somewhere, or the alarm system checks the condition of the limit switches. And there is no point in throwing it at the other end switch, they are all paralleled.
More like a signal. Tomorrow I’ll try to power the second limit switch and then I’ll report back. Luckily I have 2 of them, one for the interior light, the other for the light at the end of the front door
Grunts at those moments when the contacts rub against each other. You didn't buy a buzzer, but just a piezo emitter. That is, it's just a speaker without a circuit board inside that makes it squeak.
So I turned off the same thing and went somewhere and the light was on and there was no difference between near and far
Zero from the limit switch plus from the near
I have no idea yet what it should look like, because if you turn on the headlights in the evening, the squeaker will beep all the time, just keep an eye on the light bulb on the panel)
The buzzer should work when the door is open
Well, this is a completely different function, when I turned off the engine and forgot to turn off the lights, and you have the following question written: I always forget to turn off the low beam headlights in the daytime, in the daytime I have to drive with low beams in general
The buzzer should work when the door is open
and the fact that she grunts is that when you closed the door, a plus appears on the wire through the lamp, and when you turned off the light, a minus appears on the other wire through the lamp, so it grunts with a change in polarity, set the diode to either positive or negative
Well, if you believe logic, then when the door is closed there should be nothing on the door limit switch since the limit switch is triggered when the door is opened
the logic breaks down, when the minus opens, a plus appears at that point)
strange crap, I have such a buzzer on the control panel, the turn relay works properly, the light comes on, the buzzer beeps, the light does not light, the buzzer is silent, and then there’s something wrong
the logic breaks down, when the minus opens, a plus appears at that point)
Good day, dear readers of this article. Today I want to share with you a simple buzzer circuit. First, a little theory. Due to the recent tightening of traffic rules in Kazakhstan, you need to drive with your low beams on; my grandfather often forgot to turn them on. I decided to make a simple reminder for him. A store-bought buzzer has an irritating, constant squeak. It was decided to do periodic beeping. In general, quite often you need to make a light bulb blink or assemble a buzzer, but not everyone has the skills to assemble transistor circuits of this kind, and often the parts for them are not at hand. I present to you the simplest diagram of such a device, often called a breaker, based on an electromagnetic relay.
Sound
Acoustic alarms are suitable for day and night fishing. An alternative to purchased bells can be a homemade indicator, the production of which will not take much time.
| Materials | Tool |
| bell | construction or stationery knife |
| a piece (1.5 cm) from a thin-walled rubber hose with a diameter of 3 cm | drill and drill bit (diameter matches the bolt) |
| bolt and 2 nuts | pliers |
| 1 meter thick fishing line |
Manufacturing stages:
- Using pliers, we separate all the hanging elements (except the tongue) from the purchased bell.
- Use a utility knife to cut the rubber ring cut from the hose in one place. The result should be a blank in the form of a curved rubber strip.
- At one end of the workpiece, use a drill (at low speed) to drill a hole with a diameter that matches the bolt.
- We thread the bolt into the hole so that the head is inside the bent part of the rubber blank.
- At one end of the tight fishing line we make a tightening loop and put it on the bolt.
- Next we put the bell eyelet on the bolt. The tightened loop of the fishing line should be between the rubber blank and the ear of the bell.
- We tighten the structure with one nut. The second one is needed to counter the first one.
The result of these simple manipulations should be a bell that has a rubber hook. It is this that is attached to the rod, and the end of the fishing line is fixed on a peg driven into the ground near the stand.
Important! It is necessary to correctly calculate the length of the fishing line. Since such a signaling device flies off when hooking, it will need to be pulled out with a fishing line before the next cast.
Finding the break point
After a break in the electrical wiring has been discovered, it is necessary to localize the place where it happened. For dialing in this case, you can use a tone generator, for example, the Cable Tracker MS6812R or TGP 42. Such devices allow you to determine the location of the break with centimeter accuracy, as well as determine the route of hidden wiring; in addition, the devices have other useful functions.
Model MS6812R
Devices of this type include an audio signal generator and a sensor attached to an earphone or speaker. When the sensor approaches the place where the UTP cable pairs or electrical wiring wires are broken, the tone of the sound signal changes. When a tone test is performed, the wiring must be de-energized before connecting the sound generator, otherwise the device will be damaged.
Note that with the help of this device you can test both power and low-current cables, for example, check the integrity of twisted pair cables, radio wiring or communication lines. Unfortunately, such devices will not allow you to determine the correct connection; special equipment is used for this purpose - cable testers.
Assembling the “bell”
If the homemade device in the form of a rattle or bell is ready, then all that remains is to assemble it and test it in operation:
- attach the nod to the fishing rod, placing it on a plastic clamp at an angle of 45 degrees;
- pull the main line through the nod;
- bend as close to the fishing rod as possible;
- mount a magnet at the end of the arc;
- connect a battery, LED, tweeter, reed switch to the fishing rod, if you need to create a light and sound device;
- attach the bell to the fishing line with wire to achieve greater sound;
- make a vertical cut at the bottom of the tube, retreating approximately 1/3 from its height;
- lock the structure with a locking ring so that it moves heavily back and forth in order to determine the degree of depth of the gear when lowered into the water.
If you buy a regular bell, you can assemble the alarm as follows:
- take a wine cork, drill a hole in the middle for the bell;
- pierce the cork diagonally with a needle and thread so that the needle goes into the drilled hole;
- drop a little glue onto the ear of the bell;
- drill a hole in the cork so that the eye fits tightly;
- after the glue has dried, make a slot for the fishing line over the cork;
- connect the structure together, leaving a free end of the fishing line of the required length.
Thus, you can make an electronic alarm yourself and thereby simplify the fishing process.
Installation on a stand
Experienced feederists argue that even if you use a bell, you need to hook it to the stand on which the feeder is installed. This immediately solves all the problems - there is no constant ringing when casting and retrieving, there is no need to farm anything on the rod itself, there is no need for constant installation and removal when casting. Installing the bell on the feeder by attaching it to a stand is the most correct option. However, there are pitfalls here too. A bell that is incorrectly attached to the stand may simply not respond to bites. The rod should be placed on the stand so that it lies on it in the upper third, almost at the quiver tip. In this case, the farthest (first) stand, closest to the tip, on which the bell is hung, should not be inserted tightly, but hingedly and have a slight movement to the right and left. Then, when biting, vibrations will be transmitted to the bell, and it will jingle.
A convenient option for an amateur is a swinger on a chain, without any electronic fillings (then it costs 100-200 rubles). It operates on the principle of a simple counterweight, like on the good old kiosks. This gadget is needed in cases of hatching rarely biting fish when fishing not with a quivertip, but with free reeling. For example, when fishing for carp or carp, especially with inline montages. Moreover, if the tackle is left for a long time, a large fish can simply pull the feeder into the water if the clutch is not loosened. The swinger is attached with a chain to the stand, and the heavy part is attached to the fishing line in the area of the first ring from the reel with special hinges. When jerked during hooking, it simply breaks off the braid and remains hanging on the stand. A bell is placed on the chain, and when the swinger twitches during a bite, the ringing will be heard from afar. This is useful when fishing with several gears installed at a distance from each other.
Methods
Testing methods depend on the purpose for which it is performed. To check the integrity of the cable for a break or electrical connection between its wires (short circuit), the continuity test can be done with a tester based on a battery and a light bulb, or you can use a multimeter for this purpose. The latter is preferable.
Despite the fact that the price of a multimeter is higher than a primitive device, we recommend buying it; this device will always be useful in the household.
The simplest device for testing an electrical cable
To check the cable, the multimeter must be turned on in the appropriate mode (diode or buzzer image).
Multimeter set to dialing mode
The testing methodology is as follows:
When checking a wire for a break, the tester is connected to its ends as shown in the figure. If the cable is intact, the light will glow (when testing with a multimeter, a characteristic sound signal will be heard).
Checking for a break
Explanations for the picture:
- A – electrical cable;
- B – cable cores;
- C – power source (battery);
- D – light bulb.
If the cable has already been laid, then on one side it is necessary to connect the wires together and ring the wires at the other end;
Second option for checking the power cable
when checking the presence of an electrical connection between the cable cores, the tester probes are connected to different wires. Unlike the previous example, there is no need to twist the wires on the other side. If there is no short circuit between the wires, the light will not light (when testing with a multimeter, no beep will sound).
Schemes of simple electronic bite alarms (working principle)
Option 1. Simple circuit of an electronic signaling device
The line tension sensor is made from a contact group from the RPU-2 relay
It is only important to set the relay to open at the slightest movement of the fishing line, but this can be done very easily during assembly
Option 2. Simple circuit of a waiting sound and light alarm
A very simple scheme. The sensor is based on the same RPU-2 relay or any other analogue. The fishing line is wound behind the sensor and connector SA1 is closed manually. As soon as the line is tensioned during a bite, it will pass through the sensor and the chain will allow the speaker to signal the bite. You can also install an LED in parallel for light signaling. Read the article about fireflies for night fishing with a battery.
Option 4. A more complex circuit of a waiting bite alarm
To assemble an electronic signaling device, you need to have at least minimal design skills - what housing to place, what system is best to come up with, mounting method, etc. Each designer determines this for himself. We will tell you about the very principle of operation of the electronic signaling device and its components. For assembly you will need:
- 3 volt battery (or several connected in series).
- Contacts from a broken alarm clock or toy.
- The reed switch is open, without a magnet.
- Magnet (can be used from a furniture latch).
- LED or buzzer (or both for a combination alarm).
Here is the most complete circuit of an electronic sound signaling device.
The principle of operation of such a signaling device is as follows: when a magnet is supplied to the reed switch (during a bite), the circuit closes and transmits electric current to the LED or tweeter (or to both elements). The LED lights up or the beeper buzzes, signaling the start of a bite.
Such a circuit can be used, for example, in the mechanical signaling device described above - improving it into an electronic, combined one. In this case, we need to bend the arc so that it is closer to the rod with the tip where the hook is located, through which the main line passes. You need to attach a magnet to this tip of the arc, and attach the batteries, a reed switch and an LED with a buzzer located inside some tube or box to the rod.
A detailed carp guide for beginning carp anglers. Construction of basic gear and many other aspects.
Bait for wild carp at this link.
When biting, the fishing line will stretch and bend the wire arc with the magnet, bringing it closer to the reed switch. The reed switch will close the circuit and supply power to the LED and buzzer. You can put a toggle switch in the circuit to turn the tweeter on and off at will, and then it will only work in the on position.
To ensure that the LED always works, install the toggle switch in the circuit after the LED, so that the LED itself is not left without power in the off position. It turns out to be a wonderful signaling device.
Volkswagen Passat Black Wolf › Logbook › Buzzer for headlights not turned off (beginning)
I haven’t written anything for a long time due to health problems lately. Now I seem to be on the mend, I will continue to practice as much as possible.
In the spring, summer, several times and just recently I had to carry a dead battery home to charge, the reason for this was quite banal, I forgot to turn off the headlights. I think this has happened to almost everyone. My old Mercedes had a standard buzzer that started beeping with an unpleasant sound if the ignition was turned off, the headlights were on and the door was open, three conditions under which it would go off. There is no such bun in the Passat. I decided to fix this. I went online, read what people were writing, looked at the proposed schemes, and didn’t particularly like anything. My father-in-law is a KIPovets, I went to consult with him, and in the end we came up with the following scheme:
I didn’t find 12 volt buzzers, I used 5 volts, it consumes around 20 mA, so we decided to use a regular resistor instead of a voltage stabilizer, and the design will be smaller. Theoretically, everything should work, the main thing is to choose a transistor with a maximum emitter-base voltage, greater than the maximum voltage of the on-board network, preferably with a margin. There is a diagram, all that’s left is to assemble the structure, said and done, it turned out like this:
A little unaesthetic, but that’s not the point. Tests carried out at home showed that everything works. It’s just a matter of installing this miracle in the car, more about this in the next post.
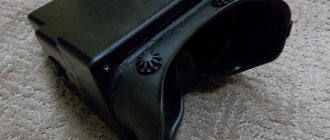
PS A small digression, another one of my crafts, so to speak. My brother changed the car, recently brought the interior lamp, said it didn’t work, and asked to have it fixed. Disassembled
I decided to conduct an experiment; I had an LED strip, took lights and resistors from there, and found a way to make printed circuit boards. In general, my first experience with printed circuit boards and SMD elements, this is what happened
Criticism and suggestions are welcome. There are many different ideas, and to the best of my ability I will bring them to life. I will also try to write reports on the work done.
Mechanical acoustic alarms
The right bell. Let's talk about a simple acoustic signaling device - these are bells. Our design is much better than store-bought bells, since the bell flies off the tackle during hooking and does not interfere with fishing.
We buy a bell and remove everything that hangs on it. We are looking for a rubber hose about three centimeters in diameter
When searching, pay attention to the fact that its walls are thin. On the hose we measure a piece one and a half centimeters in length. Cut off the measured ring and see what shape it has. If it’s a circle, then we cut along one side anywhere, but if it’s an oval, then we make a cut on one of the elongated sides. Now we need two nuts and a bolt
The size of the bolt is such that it fits into the ear of the bell. Now you need to make a hole at one end of the cut rubber ring equal to the diameter of the bolt (it is better to drill at low speeds). We thread the bolt through the hole in the rubber ring (with the head inside the ring). You will get a hook made of a rubber ring with a bolt protruding from one side. We put a piece of thick fishing line a meter long on the bolt with a tightening loop. Tighten the loop. Now we put on the bell, press everything together and tighten it with a nut, then screw on the second nut to lock the first.
We have a bell with a rubber hook. We hang it on the fishing line closer to the tip of the rod. When hooking, the bell may fly off - in order not to lose it, we tie the free end of the fishing line on our structure to a peg in the ground.
This design is much better than the cheap bells that are sold in stores. Because the signaling device flies off the rod. You don't irritate yourself or nearby fishermen. And also you don’t scare away the fish.
Float
Manufacturing instructions
To do this you need:
- Cut a ball with a diameter of 6-7 mm from a piece of foam plastic
- paint the top red or orange, the bottom blue
- make a hole in the center of the ball
- insert a beech rod into it, its thickness is up to 2 mm, length 6-7 mm
- paint the upper half of the rod with stripes of different colors
- put a figure eight on the bottom
- secure the fishing line
- Hang weights just above the hook (they will load half a ball of polystyrene foam into the water)
Making your own visual bite alarms
A visual alarm helps the fisherman visually notice a fish bite. Eye alarms come in the form of a nod, float, firefly or foil tube.
Nod
The nod is a spring with a length of 10 to 15 cm. On one side, the spring is attached to the tip of the feeder, and on the other side there is a ring into which the fishing line is threaded. To assemble a feeder nod with your own hands, you will need a rigid steel wire or a ready-made spring element. The nod can be made movable. To do this, attach a rubber or plastic tube to the tip of the feeder. When changing the length of the tube, the rigidity of the nodding mechanism is adjusted.
Float
The float can be made from a dense piece of polystyrene foam or purchased ready-made in a store
When creating, it is important to maintain the proportions of the weight of the feeder and the alarm, otherwise the float will either sink immediately or float on its side. During the process of assembling the tackle, a locking ring is attached to the fishing line, which helps to select and adjust the immersion depth of the feeder
It is best to make the ring tight so that the length of the fishing line is adjusted only when necessary.
Budget spinning reels Riobi Exiya Features of crucian carp killer tackle and how to make such equipment How to properly tie a jig to a fishing line Diagram of how to learn how to tie a hook to a fishing line
Firefly
There are several ways to create a light bite indicator for donkey.
- Reflective foil. The foil is cut into strips 5 mm wide. After this, the strips are glued to the top of the float with waterproof glue. A flashlight beam is directed at the structure, creating a glowing effect.
- Glowing paint. Fluorescent paints are applied directly to the float or to a homemade small capsule.
- Light-emitting diode. An LED firefly can be easily assembled from a flashlight from a regular lighter and a stationery clothespin-clip. The LED with battery must be removed from the lighter and secured in the center of the hole in the eye of the clothespin.
In addition to homemade bite alarms, there are factory-made fireflies. They consist of a plastic capsule with a chemical liquid, inside of which there is a thin glass tube with another liquid. When such a flask is broken, the internal capsule bursts, the liquids mix and the glow effect is activated.
Foil tube
To make it you will need a tube 15–20 cm long and aluminum foil. The diameter of the tube should be slightly larger than the diameter of the first feeder ring. Several layers of foil are wrapped around the tube, and the edge is secured with electrical tape or tape. A fishing line is passed through the hole, which is then passed through the rest of the feeder equipment. As a result, the tube should sag slightly between the first ring and the coil. If there is a bite, the sagging decreases and the tube begins to bounce. The reflections and rustling of the foil are the indicator of a bite.
Light
Such indicators will come in handy if you plan to go fishing at night. A simple option is to paint the float with fluorescent paints. And if there is a need to make a signaling device to attach to the tip of a fishing rod or fishing line, you can make an electronic firefly.
| Materials | Tool |
| cocktail straws | scissors |
| battery (button) 3 V | hot glue gun |
| heat shrink tape (thickness should be equal to the diameter of the battery) | lighter |
| LEDs | |
| small crocodile hair clips |
- Cut a piece from the straw, about 3-5 centimeters long. You can choose the size yourself, depending on what kind of firefly you want to make.
- The piece of straw must be filled with glue from a hot gun. Make sure there are no voids when filling.
- While the glue has not hardened, insert an LED into one side of the piece of tube. It should enter the glue with its head about a centimeter and a half. Leave to cool completely.
- We insert the battery into the shrink tape. The length of the piece of tape should be equal to the diameter of the battery + a centimeter of reserve on one side.
- We take a whole straw and insert it into the shrink tape on the side where we left a free edge. Using a lighter, grab the tape. Be careful, as at this stage you will have to act very quickly. It is important not to let the heat shrink around the tube completely harden. After removing the lighter, quickly remove the straw and insert it back again. Repeat this action several times until the cooling heat shrink takes the shape of a place where the tube will be freely inserted and from where it will be easy to pull out.
- Run the flame from a lighter over the heat shrink on the back side of the battery (opposite from the one you formed in the previous step). Be careful, you do not need to completely solder the battery.
- The last step is to glue a crocodile clip to one of the flat sides of the battery using a hot gun.
To use such a light indicator, you need to connect its two parts (with a battery and with an LED). To do this, slightly straighten the legs of the diode and insert it into the finished hole so that the legs are on both sides of the battery, according to the polarity. After activating the firefly with a bobby pin, you can place it on the tip of the fishing rod or on the line between the reel and the first winding ring.
Pendulum type
Some anglers prefer to use pendulum alarms. They are attached to the upper part of the rod with one end of the guide ring, and the other end clings to the fishing line. A small weight provides slack and signals a bite by raising or lowering the guard.
How to make a stand for a feeder rod with your own hands
As a rule, factory fittings are used. But such a device for the feeder can be made with your own hands. Moreover, it causes less damage to the rod blank. To do this you will need:
- a plastic tube from 15 to 20 cm long (suitable for a cocktail, but it is not rigid enough),
- steel wire 0.5-08 mm thick,
- thick foam or wine bottle cork,
- glue.
Pendulum signaling device assembly: a fishing line is threaded into the larger ring, the smaller one clings to the pass ring
The manufacturing process consists of the following stages:
- give the foam a cylindrical shape (for cork we skip this step),
- drill a hole with a diameter equal to the outer thickness of the tube,
- Lubricate the tube with glue and put foam on it so that there is a distance of 3-4 cm from one edge,
- we thread the wire into the tube and make loops - you can leave a small gap under the pass ring, under the fishing line (in the photo on the right) we make a small overlap so that the alarm does not jump off.
The loops should be perpendicular to each other. Otherwise the device will not work. To prevent the larger ring from damaging the blank when casting and hooking, we recommend putting a cambric on it.
For better visibility, the device is painted in bright light. To sound the alarm, it is equipped with bells. When fishing at night, a “firefly” attached to a tube will help you see the bite.
Electronic options
The presented samples have an operating principle based on closing and opening an electrical circuit. Making the simplest version:
- We take as a basis an ordinary keychain with a melody;
- it is attached to the feeder stand, and the contacts are in the closed position;
- they are brought out in the form of 2 plates;
- A plastic fragment 1 mm thick is fixed between the coil and the first ring, and the second end is inserted between the removed contacts.
Principle of operation
An electronic bite alarm installed on a feeder is a device that reproduces the action of opening and closing an electrical circuit through a feeder line during a bite. The alarm has both sound and light warning signals.
How it is made
To manufacture the alarm, you will need a housing, which may consist of a plastic box. The indicator of the alarm can be operated by an LED, which will be mounted on the housing. The sound capsule is attached to the wall inside the housing in a tight-fitting manner. The battery is also installed in the inside of the case. You also need to place a corner in which the spring will be attached at one end. Next, a small ring should be attached to the top of the spring.
It is necessary to take into account the attachment of a piece of additional fishing line, which will be attached at one end to the ring on a spring, the free part of which is brought out through a hole on the body located opposite the ring. A clothespin is attached to the free part of the fishing line, which will be located on the outside of the body.
The signaling device, during its operation, must be attached to the rod. The clothespin must be hooked onto the main fishing line. When the fishing line is pulled, an action mechanism is activated, as a result of which the reed switch will begin to approach the magnet, as a result of which the alarm goes off. At the same time, the electrical circuit will work, which contributes to the lighting of the light bulb and the operation of the sound capsule.
Testing wires with a multimeter
Manufacturers make different types of multimeters, but the measurement principle remains the same, only the location of the controls and measurement limits differ. To check the integrity of the wires, the measurement mode switch is placed in the continuity position; this is marked with a diode or buzzer sign. After which the dialing process is carried out using the methods described above. The integrity of the conductor, in addition to the display of zeros (no resistance), is accompanied by an audible signal or an LED indicator, this depends on the brand of the multimeter. article: → “How to use a multimeter for dummies?”
Multimeter GE 2524 in dial position
The probe with the black wire is inserted into the connector with the ground symbol (housing), the red one above, into the connector for measuring resistance with the Ohm symbol “ Ω”. The disadvantage of many digital multimeters in dial mode is the delay in the sound indicator signal when touching the contacts. It is necessary to fix the probes on the wire for 2-3 seconds to make sure there is contact. This inertia in operation creates some difficulties in checking the integrity of the wire.
Multimeters of the UNI-T type have good performance in dialing mode; the sound indicator operates almost instantly when the contacts are closed.
In other parameters, UNI-T is not inferior to other models in measurement accuracy and number of options. article: → “Checking circuits with a multimeter or tester.”
Comparison table of characteristics of Fluke-179 and UNI-T UN61 multimeters
Please note that for all instruments it is advisable to use probes with gold-plated rods. Unlike steel ones, they are not subject to oxidation and provide reliable electrical contact.
Bells
A more modern variation of the sound signaling device is the bell. As a rule, there are two of them mounted on a clamp. That, in turn, is put on a fishing line.
In modern practice, there are two options for their use:
- non-removable;
- tied to a rod stand.
In the first option, the device is installed either on the fishing line, and there is a risk of either damaging the fishing rod, or pinching the fishing line, or it is pinched at the tip, which leads to the risk of overlap when casting.
The second way is more acceptable. It is a little more troublesome due to the difficulty of selecting a clamp, but more practical.
Popular models and prices:
Manufacturing Features
There is more than a wide range of ways to make donka yourself. And today you can easily find a huge amount of information on this topic. Naturally, now in specialized fishing stores, including online ones, a solid assortment of ready-made installation options is available for every taste and budget. However, homemade gear benefits not only from a financial point of view.
The list of the most common installation schemes includes:
classic donka (simple snack);
A striking example of improving the classic donkey is the use of various types of fishing rods and feeders. However, the essence of the design remains unchanged, even taking into account all the innovations.
The features of the gear in question are reflected even in its name. It is designed for catching fish that prefer mainly the lower layers of water. To deliver the leader(s) with hooks directly into the fishing zone, you will need a sinker. Another integral attribute of the donkey is a device for fixing a fishing line or cord on the shore. This can be any stand or stags made from ordinary branches, often used by supporters of traditional methods.
In a simplified version, the classic bottom tuck includes:
- a reel or reel for winding (storing) the main line material;
- rack for fixing gear;
- the simplest mechanical signaling device of any design;
- main line;
- directly the installation option itself, consisting of leashes with hooks and sinkers.
If maximum cost savings are of paramount importance, then it will be enough to purchase only fishing line material (main and for leashes), as well as hooks of the corresponding number. As a rule, to tie a regular hook, you don’t need expensive fishing line or cord for the base. Material in 100 m reels with a cross section of 0.35-0.4 mm is quite suitable. Most often, fishermen throw gear with their hands at 50-70 meters. At the same time, there remains a more than sufficient supply of fishing line in case of landing the catch.
At the moment, special leader material of various types is on sale in reels of 25-30 meters. The classic installation scheme provides for the presence of 3-4 hooks (from 4 to 6 numbers according to the European classification). The remaining structural elements, that is, the reel, stand and sinker, can be made with your own hands. At the same time, the quality of homemade products will most often not be inferior to store-bought ones.
Different types of bottom gear are designed to perform specific tasks, taking into account certain fishing conditions. We can talk, for example, about fishing from the shore or from a boat, in still water or in the current
And also during production, the characteristics of the bait and baits used are taken into account. Of course, you shouldn’t forget about the habits of the fished object in each specific case.
It is precisely taking into account all the listed important nuances that the decision to equip the donk yourself often turns out to be rational.
For the vast majority of experienced fishing enthusiasts, it is no secret that most often the grandfather’s “ancient” donka easily catches modern equipment. At the same time, there is no need to even talk about comparing the cost of the two options.
When assessing the key features of self-production, it is worth focusing on such important points as:
- minimum cost of raw materials;
- installation variability;
- maximum compactness;
- the fastest possible preparation of gear for use;
- variety of baits and baits used, taking into account fishing conditions;
- the ability to comfortably use several gears at once.
Another important advantage of the homemade option is the opportunity for beginners to learn the basics of fishing at minimal cost and at the same time decide on their preferences.
Advantages and disadvantages of electronic signaling devices
Such devices are used by experienced fishermen in conditions when it is necessary to catch a trophy specimen. The peculiarity of electronic devices is that they can distinguish true bites from false ones and react to the slightest movements of the gear. Therefore, it is simply unrealistic to miss the moment of a bite. Some models can take into account wave strength, currents, etc.
If you analyze what the advantages and disadvantages of electronic alarms are, then you should take into account not cheap Chinese models, but products from well-known companies. As a rule, cheap models from dubious manufacturers do not meet the stated requirements
They also do not differ in reliable operation and reliability, which cannot be said about real proprietary developments.
The advantages of electronic alarms include:
- Very high sensitivity.
- Absence or minimum of false alarms in difficult fishing conditions.
- The ability to adjust the tension of the fishing line in windy conditions and the presence of waves, the presence of a strong current or the movement of a load along a slope.
- When fishing with several fishing rods, it is easy to determine where and on which fishing rod the fish took the bait.
The disadvantage of such devices is their high cost, which limits their use for some categories of fishermen. In addition, counterfeits are possible or, in other words, you can purchase counterfeit products. In addition, you need special stands for fishing rods, which is an additional cost. Some feeders use regular racks, although at least two are required. At the same time, it still turns out cheaper.
Electronic fishing alarms are used by avid feeder fishers. Models with a pager are good for carp anglers: after thoroughly feeding a promising place, you can go to a tent and relax a bit. Catching trophy carp has its own characteristics: there can be no more than 3 bites per night. In this case, it makes no sense to sit near the fishing rod all night waiting for bites.
Electronic and visual bite alarms for crucian carp killers while fishing.
Watch this video on YouTube
Insulation check
To test insulation with a megohmmeter or multimeter, the principle of continuity is the same as when searching for an electrical connection between the cable cores.
The testing algorithm is as follows:
- set the maximum range on the device – 2000 kOhm;
- connect the probes to the wires and see what the device display shows. Considering that the wires have a certain capacitance until it is charged, the readings may vary. After a few seconds, the device display can display the following values:
- one, this indicates that the insulation between the wires is normal;
- zero – there is a short circuit between the cores;
- some average readings, this can be caused either by a “leak” in the insulation or by electromagnetic interference. To determine the cause, switch the device to the maximum range of 200 kOhm. If the insulation is faulty, the display will display stable readings; if they change, then we can confidently talk about electromagnetic interference.
Attention! Before checking the insulation of the electrical wiring, it must be de-energized. The second important point is that when taking measurements, do not touch the probes with your hands, this can introduce errors.
Video: Wire continuity check - integrity check.
The simplest signaling options
The simplest bite indicators can be made independently, without any experience at all in working with electronics and electrical circuits. Some simple bite alarms do not even require the fisherman to have skills in working with a soldering iron.
Option #1
You will need:
- Light-emitting diode
- Small coin cell battery
- Heat shrink tube that holds the battery.
- Two silicone tubes, one of which must match the diameter of the LED.
First, you need to cut the heat-shrink tube so that when you place the battery in it, approximately 1-1.5 cm of tube remains on both sides. Insert a silicone tube inside, then use a lighter or other source of fire and burn until the tube is secured on both sides.
Important! From the side where the LED will be located, the tube should be removed.
Place the LED inside a silicone tube, then isolate it from contact with water using transparent silicone glue. It is also advisable to glue the fastening end, not forgetting to leave space for attaching the structure to the float. This homemade bite alarm can be used for night float fishing, and attached to carp, feeder or donk rods when fishing at night. The same device can be used to improve the pendulum bite alarm, making it visible at night.
Important! If the LED does not light up, you need to change the polarity of the contacts.
Option No. 2
This DIY bite alarm is a little more complicated. To make it you will need:
- LED with batteries (options from lighters with flashlights are excellent - there is already a ready-made case for batteries).
- Metal tube.
- Spring and self-tapping screw.
- An elastic band and a few centimeters of thin wire.
Place the light bulb with batteries inside the tube; one of the LED contacts must be shorted to the housing. Fix a self-tapping screw on the spring, place this end inside the tube, and secure the other end inside the body with an elastic band.
A wire must be soldered to the second contact of the LED, the other end of which must be secured to the part of the spring protruding from the outside. When a bite occurs, the spring, weighted with a self-tapping screw, closes the contact and the LED lights up. It’s also easy to make a do-it-yourself sound bite alarm from a similar design; just replace the LED with a buzzer from an inexpensive postcard, but flashes of light at night are more noticeable than short-term sound signals.
Buzzer connection.
The connection to the circuit is carried out like a battery or diode. The device has “+” and “-” symbols. We connect them to a supply voltage of 3 to 20 volts, and enjoy the resulting sound. The buzzer has a slight inertia, and after turning off the power it will sound for some time. Therefore, it won’t be possible to simulate sound on it, but it will work as an alarm system.
They are usually controlled using an amplifier using bipolar transistors with a common emitter. This allows you to make even polyphonic sound from your MK (ARDUINO/SMT32/MSP430). But it is necessary to take into account that there are buzzers with a built-in generator. They squeak intermittently, with a certain frequency. This allows you to use different buzzers that talk about different events. They cost more, but if you are assembling something without a microcontroller, then this is an excellent trick with your ears.