Many women express their individuality by creating unique jewelry with their own hands, be it brooches, necklaces, beads or bright bracelets.
Can you crochet? Publish your work on kru4ok.ru
Today we have compiled a selection of crocheted brooches.
What shapes do crocheted brooches come in?
Several years ago, brooches were knitted only in the form of various flowers, bouquets, i.e. plant themes predominated. Which is pretty commonplace for jewelry. Now on the Internet you can find crocheted brooches of almost any shape and color:
- animal faces;
- fairy-tale heroes;
- cartoon characters;
- wild and domestic animals (bears, hares, foxes, sheep, llamas, etc.);
- vegetables, fruits and their styling;
- lips, palms, eyes, etc. human attributes;
- items of women's and men's clothing;
- dolls of any shape, etc.
Despite the fact that it seems very simple to knit a brooch, you may often encounter some difficulties.
Selection of yarn and hook
The yarn should be thin, approximately 300-400m/50g. and hook 0.7-1.2 mm. So this is very painstaking work. Imagine the size of the paws on a 3 cm long bear brooch. And they don’t just need to be knitted, but combined into a single toy, embroidered on its eyes, nose, and ears.
How to decorate a brooch
For decoration you can use beads, beautiful beads, special eyes for animals, sequins and other attributes of costume jewelry. If your brooch imitates a real carrot or apple, then perhaps you shouldn’t decorate it with additional details, but rather work on making it look as realistic as possible.
Methods for attaching a crocheted brooch
In specialized stores you can purchase bases for brooches of various shapes: round, rectangular, pin, button, etc. Choose fasteners that fit the shape of your product. On the inside, it is best to disguise the fastening by covering it with matching yarn or gluing felt.
Some needlewomen do not disdain ordinary pins. If you are knitting a brooch for yourself, then it is quite possible that it can be placed on a simple pin.
We hope that our selection will help you not only create unusual jewelry, but also come up with your own ideas.
Benefits of a homemade brooch
When working independently, the master has full opportunity to select materials and decorative elements, choose cuts and surface treatments. Other advantages include:
- The master does not require any special skills or abilities. Making brooches is a creative activity that is accessible even to inexperienced needlewomen.
- Large range of models.
- Extensive collection of accessories in DIY stores.
- A large number of detailed instructions for conducting master classes, educational video lessons, diagrams and drawings for making original jewelry.
Thanks to a number of advantages, making decorative jewelry with your own hands has become very popular among fashionistas and needlewomen.
Selection of base material
There are many options for making a brooch from:
- Beads. Bead embroidery is one of the most popular handmade options.
- Satin ribbons and beads. The beads are sewn onto a pattern or bow made of satin ribbons.
- Finishing with decorative stones. Such beautiful stones as carnelian and malachite can also be used to create a brooch.
- Fabric patterns. From guipure, felt, and organza, craftswomen form original buds that are attached to fittings.
- Weaving from decorative (chenille) wire.
A large assortment of bead models allows you to create real collections of brooches of all sizes and colors.
Inventory
To make a brooch you will need:
- base (artificial leather, felt or other material);
- finishing material (beads, beads, glass beads, sequins, rhinestones, polymer clay, etc.);
- paper or cardboard for a sketch, pencil;
- accessories;
- thread or fishing line;
- glue gun
It is best to store your collection of finished brooches in a wooden jewelry box.
The basis
To make the brooch more comfortable to wear, you need to take care of a suitable base and a neat back. Usually the reverse side is made of thin leather or felt. Not only textile materials are suitable, but also wood, metal, and plastic.
The base can be single-layer or multi-layer. For a voluminous brooch, a multi-layer version is suitable; it is more durable. You can strengthen the base with cardboard. To do this, the cardboard is covered with felt on both sides.
Brooch material
A wide variety of materials are used to make brooches:
- Satin ribbons
- velvet
- openwork
- round (rocale)
- lace
Feathers, leather, fur, foamiran, polymer clay, wood, etc. are also used.
The combination of several materials looks interesting. However, to prevent the decoration from looking tacky, it is not recommended to use more than three at the same time.
Accessories
To choose the right fittings, you need to take into account the expected weight of the finished product and the material. The service life of the accessory will depend on the correct choice of fastening.
There are a lot of types of foundations, the main ones are:
- A pin with a rectangular platform. Classic brooch base. It is a pin with a fastening plate. Usually has 2-3 holes for fixing the plate to the product material.
- Safety pin. The simplest base for a brooch. Easy to use, found in every home. Can be used solo or attached to a platform made of felt or leatherette.
- Clamp It is most often used for making hairpins, but can also be used to secure brooches.
- Needle. A thin needle with a plug on one side and a clasp on the other.
- Collet lock. The fastener consists of two elements: a plate with a pointed pin and a latch.
- Filigree base. Filigree is a figured base assembled from wire.
- Figured base. This is a solid, usually metal base.
- The basis with the setting. The setting is a perforated platform.
Additional materials and tools
To work, you will need a well-organized workplace, because bead embroidery and cutting decorative stones is delicate, jewelry work. You also need to prepare:
- Handicraft kit (threads, needles of various sizes).
- Scissors.
- Beads.
- Beads.
- Decorative stones.
- Metal cuts, safety pins, additional fittings for fastening, facets.
- Transparent acrylic varnish.
- Felt.
- Satin ribbons in several colors.
You can also find ready-made templates for cutting out shapes from felt. For most beaded brooches, felt provides a solid base to work with.
How to create a chic winter brooch with fur
A small brooch with mink fur will be a wonderful gift for the New Year. She is fluffy and tender, winter and snowy! Like an ice-snowflake! It can be worn on a fur coat, hat or sweater. This accessory is easy to make with your own hands if you are at least a little familiar with the bead embroidery technique. I will not specifically dwell on the basics of beading; there are already a lot of wonderful master classes on this topic. The purpose of this master class is to show some of the features of working with fur, the order of assembly and work on the product.
To work you will need:
- mink fur;
- Toho beads sizes 11 and 15;
- Czech beads;
- faceted glass beads;
- Swarovski pearls;
- agate cabochon or any other stone;
- monofilament;
- scissors;
- beading needles;
- hard felt;
- Genuine Leather;
- brooch pin;
- cardboard;
- glue.
We make a sketch on paper, outlining the location of all the elements of the brooch, transfer it to cardboard and cut it out.
We trace the outline of the sketch on felt with a gel pen: after making punctures with an awl, we mark the points with a pen, then we remove the cardboard template and connect all the points together with smooth lines. Artists use a similar method in alfresco painting when it is necessary to accurately transfer a sketch, for example, to the surface of a wall. Only instead of cardboard there is tracing paper, and instead of a pen there is chalk or charcoal. The method is called powder.
We cut the felt with a small margin, rounding the edges, so the thread will not cling to the sharp ends of the base during embroidery.
Cut off small pieces of fur. We cut the fur along the flesh. It is better to do this by weight, with a sharp knife, perhaps a stationery knife, being careful not to damage the fur.
We lightly coat the fur with glue, mostly so that it does not move during embroidery, all edges will need to be stitched.
Glue the cabochon to the base.
We trim the cabochon with beads along the contour.
We braid with beads, picking up one bead at a time in mosaic weaving.
We form the teeth, highlighting them with beads of a different color and smaller size. Let's start trimming the fur outline. We close the seam, gathering beads, sew two beads at a time, stitch the needle back. It will still be practically invisible, since the fur is fluffy, but it will be of high quality and beautiful.
We sew on additional elements, I have these crystals in the frame. I don’t really like using crystals in dacs, but sometimes, due to the miniature size of the rhinestones themselves, it is not possible to braid them with beads. Therefore, I cover this frame with beads in every possible way.
At this stage, I deviate from the initial sketch and add a second piece of fur, carefully stitching it along the contour adjacent to the cabochon with beads.
We fill the voids with beads, trim each along the contour with beads. Between each bead we make a “bridge” of beads. The remaining fur that is not hemmed is also sewn along the edge with beads.
Add beads and pearls. When sewing, it is worth keeping an eye on the pile, it always strives to “sew on” along with the beads, we don’t leave it the slightest chance! You can use narrow tape to catch unruly pile while embroidering.
We sew all the remaining edges with beads. We fill all the voids with it. It’s okay if some hairs are also sewn in; they can then be easily pryed up with a needle and released.
Cut along the contour, close to the edge.
We glue the cardboard from the inside out and prepare a piece of leather by first placing a brooch pin.
Let's start trimming the edge of the brooch.
We take the needle out to the wrong side and pick up one bead. We stitch and bring it out again inside out. We collect a new bead, insert the needle into the previous one, tighten it and continue this along the entire perimeter. I prefer to stitch all the layers and at this stage I have already broken more than one needle. Despite the fact that the leather used is thin, you can pierce all layers in advance with an awl or gypsy needle, thereby extending the service life of the thin bead needle.
This is how the brochure turned out. Now there are photo options in “normal” light, and not, I confess, night shots.
A wonderful gift for the New Year. Thank you for your attention, enjoy your creativity!
When copying materials, please indicate authorship and an active link to the source. Thank you!
Workshops on making brooches
The most original decorations can be found on various web resources, where experienced needlewomen present their works. Among them you can find the following interesting ideas and instructions on how to make a brooch:
- Brooch “Bright Garnet”.
- Brooch “Autumn leaf”.
- Volumetric decoration made of satin ribbons and beads.
- Brooch made of chenille wire.
- Brooch “beetle” made of carnelian.
For each work presented there is a master class on how to make a brooch with your own hands. These instructions and detailed descriptions will help the craftsman understand the general principle of making decorative jewelry.
Brooch as part of a woman's look
A brooch has always been a reflection of the taste of its owner. Previously, it was worn only on special days. The generation of our great-grandmothers and grandmothers kept similar jewelry in boxes and hung it on if there was a special occasion.
Today, a brooch is one of the most important elements in building an image, a kind of finishing touch. This largely explains that there are many design solutions for it. Let's look at the most popular models.
Brooch “Bright Garnet”
To work you need to prepare:
- Felt.
- Pattern in the shape of a pomegranate.
- Scissors.
- Threads, needles.
- Cylindrical beads of yellow or metallic shade.
- Red cylindrical beads.
- Red beads.
Also, do not forget about additional accessories for attaching the brooch. A diagram of how to make a beaded brooch with your own hands:
- Using the prepared template, cut out a blank from felt.
- Prepare a photo of the finished brooch so you can see the embroidery pattern.
- Red cylindrical beads are used to trim the contours of the pomegranate in 2-3 rows.
- The next layer towards the core is white beads. Another vertical strip of white beads is the middle strip.
- Two halves of a pomegranate are embroidered with large beads.
The final stage is attaching the fittings to the back of the brooch. The top of the brooch can be coated with acrylic varnish to give the product a glossy shine.
Brooch is an ideal gift
Every year it becomes more and more difficult to surprise and please loved ones with unique gifts. A handmade brooch is an ideal gift that will not only pleasantly please the future owner, but will also become an indispensable accessory for a long time.
Note!
- Macrame: diagrams, interesting projects and detailed descriptions of making crafts
- Crochet amigurumi - examples of how to make a beautiful toy with your own hands (75 photos)
- Coffee topiary: step-by-step master class on how to make a small decorative tree from coffee beans
The most difficult thing in creating a brooch is finding a little time to create it and coming up with an idea. Options that are associated with the symbols of the year look interesting; such brooches will definitely contribute to success throughout the year.
By adding natural stones to the creation of a brooch, you can create a real piece of jewelry that already belongs to the category of jewelry. But even a brooch that is created only from felt will be very expensive, since it is a designer design created with your own hands. Therefore, you should not put off something that can bring a lot of pleasure.
Often, creating brooches is so addicting that it becomes a favorite hobby over a long period of time. Sometimes such a hobby can quite realistically even begin to generate additional income, which is also interesting.
Therefore, by reviewing everything that has not been used for a long time, you can begin to create a unique designer decoration that will definitely make you stand out from the crowd. After all, it is such strong details that create memorable, unique images that help add important goals.
Brooch “Autumn leaf”
The materials required for the work are similar to the previous version. However, emphasis should be placed on beads made in three main shades: red, green and golden tones. If desired, you can use a wider range of colors. The contours of the leaf itself are embroidered with beads with a bronze tint. Operating instructions:
- A base in the shape of a sheet is cut out of felt using a template.
- The outline is embroidered first with beads with a bronze tint. Embroidery is also carried out on the sheet itself, imitating leaf veins.
- The arrangement of the color scheme is the master’s imagination.
The fastening is formed in the form of a safety pin on the back of the brooch.
Brooch “Cat” on knitting needles
This accessory looks quite funny and your child will like it. In addition, it can act as a pendant and be attached to a bunch of keys or to a zipper on a backpack. The main thing is that such a craft is exclusive, and therefore will definitely attract attention.
We use the simplest knitting pattern - stockinette stitch. We make the eyes from beads, and for the collar we take a ribbon or braid. We use synthetic padding polyester or ordinary cotton wool as a filler for the product.
The yarn can have any composition - cotton, wool, synthetics. It is better to use thin knitting needles - this way the work will look more elegant.
Decoration made of ribbons and beads
To create a beautiful decoration you need to prepare:
- Several satin ribbons.
- Large beads of various colors.
- Felt.
- Glue.
- Threads, needles.
- Scissors.
Instructions for carrying out work:
- First of all, you need to make miniature flowers from satin ribbons.
- Using a needle and thread, sew the satin ribbon using large stitches.
- Having reached the end of the ribbon, tighten the thread, pulling up the folds of the ribbon with your hands. A bud is formed.
- Without fully tightening the thread, several large beads are hemmed into the core.
- Finally tighten the thread.
- Using a similar scheme, make 2 more flowers.
- Cut a circle shape from felt.
- Sew on miniature buds, as well as several beads.
- You can sew a decorative facet around the flowers.
As always, the final stage is attaching the fittings to the back of the brooch.
Crochet brooch, descriptions from the Internet
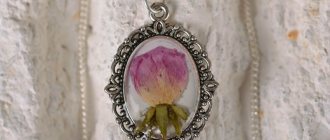
Brooch Misty Rose - crochet decoration
Materials:
- any cotton yarn;
- beads;
- yarn for the base of the brooch;
- hook for the selected yarn;
- brooch base;
- ribbon, lace;
- various decorative elements.
Crocheted cow brooch
author of the description @
Crochet brooch carrot
author of the description @
Crochet brooch giraffe
Quickly crochet a bunny brooch
If you want to please your child with a new toy that can easily be attached to a backpack or jacket, or maybe give a small gift to a friend, knit a brooch. It's not just for kids, it looks great on a summer denim jacket or bag. And your child can help you come up with accessories for her. You will have a new small funny and perky accessory, and they will definitely ask you where you got it. So, whoever knows how to hold a hook and knows simple posts - let's get started!
We will need:
- yarn - Alize SOFTY;
- floss (or thin yarn) black and pink for embroidering a face;
- hook: No. 2.25-2.5-2.75;
- any soft synthetic filler, in my case synthetic fluff;
- beads for eyes or special eyes, pastel for tinting;
- brooch clasp.
Crocheted unicorn brooch
Author @ We will need: a little milk Cotton Gold Plus Alize and your favorite color Cotton Gold batik, a handful of holofiber and a drop of black iris. A gram of gold for the horn. And the fastening, of course. ⠀ Hook 2.5. Knit tightly! ⠀ Description of the brooch:
How to crochet a dog brooch
Description author @
Crocheted pineapple brooch
Description author @
For knitting you will need Alize Miss yarn or a similar thickness of yellow and green color, hook number 1.25, eyes.
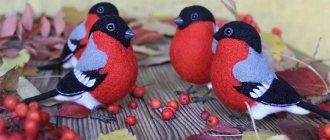
Crocheted bear brooches
Author Ekaterina Gushchina @ ⠀ To create such a brooch we will need:
- Iris in two colors (from the Iris from Gamma the brooch comes out smaller than, for example, from the Iris from Vita Cotton)
- hook (I have 1.1)
- filler
- brooch pin
- floss of different colors, including black
- dry pink pastel for tinting cheeks
- beads, ribbons, etc. for decoration.
Description of the brooch
Crocheted llama or alpaca brooch
You can knit this one from Mink yarn, it will turn out very cool. ⠀ Author - Ms. Eni, . Translation @ ⠀ Legend:
- KA - amigurumi ring
- VP - air loop
- pr - increase
- dec - decrease
Knitting pattern
Crocheted cactus brooch
Description author @
For knitting you will need Yarn Art Jeans yarn, hook No. 1.5-2mm, filler, brooch clasp, flower yarn.
Description of the brooch
Another cactus option:
Chenille wire brooch
You can also make original jewelry from beautiful fluffy wire. A simple DIY brooch for beginners:
- Place push pins on a thick sheet of cardboard, forming the outline of the selected shape (butterfly, bunny, star).
- The chenille wire is guided along the prepared contours, forming a figure.
- Remove the finished product from the improvised frame.
This brooch can be attached to clothing using a pin.
Boho style accessory
Almost any materials are suitable for such a brooch. There are no rules in boho style. The main thing is that the accessory looks casual, with a touch of vintage chic. Lace, pearls, textured fabric such as burlap will come in handy. Assembling a multi-layer rose.
We fold the central part of the flower in this way:
If you like it, you can leave it like that, decorating it with interesting beads and pieces of fabric.
There is no such thing as too much jewelry, don’t limit yourself to the store assortment. You will treasure a product made with soul and with your own hands for many years.
Brooch “Beetle” made of carnelian
To make an original beetle you will need golden-colored beads, a fairly large carnelian, metal cut, metal wire, glue, and fittings for fastening. Instructions on how to make a beetle-shaped brooch with your own hands:
- The carnelian is attached to a metal cut using glue. If the craftsman wishes, instead of cutting, you can use a felt base, to which it will be easier to attach the head and paws.
- From metal wire and beads you need to weave a head and two horns, curved like a crescent.
- You will also need three pairs of legs made of wire and beads.
There are special fasteners for cutting; a safety pin is also suitable for a felt base.
History of the brooch
A brooch is one of the most ancient types of jewelry. The first brooches were plant thorns and animal bones, which primitive people used to fasten the edges of their clothes.
With the development of civilization, brooches also changed. Fibulae and agraphs appeared. A fibula is a metal fastener for clothing that also serves as decoration. The edges of the clothes of the ancient Romans and Greeks were fastened on the shoulder with a fibula. The agraph usually had the form of a plate or rosette with a hook and loop.
In Ancient Rus', it was customary to decorate headdresses with agraphs; they were decorated with precious stones, enamels and filigree.
Brooches reached their peak in the 17th century in France. Researchers associate the popularity of this decoration with the name of the Marquise de Sevigne, recognized as a classic of French literature. She is also credited with creating a secret language of love correspondence through brooches pinned in a certain way. For example, a brooch with delicate lilies meant “meet you as usual, in our gazebo in the garden,” and a diamond brooch pinned near the shoulder meant “come today, I’m waiting for you.” Perhaps this is just a beautiful legend and the marquise only gave impetus to the creation of a “secret code,” but the ladies of the court picked up this idea and actively used the “language of brooches.” In the casket of noble ladies of that time one could find many variations of this decoration.
In Russia, brooches were no less popular. One of the fans of this accessory was Catherine the Great herself. Her brooch with a 70-carat Colombian emerald still has no analogues in the world either in size or in quality of execution. The Empress did not hide her love for cameos (a type of brooch, has a convex image and is carved from stone) and called it “stone disease.”
By the beginning of the 18th century, the so-called “corsage brooches”, which were incredibly heavy and richly decorated with stones, came into fashion. Moreover, it was considered good form to wear several brooches at the same time.
During the period of neoclassicism, jewelry carved from stone, as well as miniatures on enamel, became popular.
The craftsmanship of jewelers also improved, and products in an animalistic style appeared. The appearance of birds, animals and insects was very realistic, and this relatively new direction quickly gained popularity.
The 20th century became a kind of test for brooches: the fashion for them either subsided or flared up with renewed vigor. The famous fashion trendsetter Coco Chanel believed that the beginning of any jewelry collection should be a brooch.
Speaking about famous ladies who love brooches, we cannot fail to mention the English Queen Elizabeth II. Despite her advanced age, every time she goes out, she complements her look with a carefully selected brooch. The choice is truly great - the royal lady is the owner of a collection of more than 100 brooches. According to the Queen herself, one of her favorites is the “heart brooch”, in the center of which an 18.8-carat diamond shines.
Another powerful lady, Madeleine Albright, the first female Secretary of State in US history, was distinguished by her love of brooches. She continued the tradition of Madame de Sevigne and created a whole diplomatic language of brooches. Subsequently, Albright’s book was published entitled “Read My Brooches - Stories from the Diplomatic Box.”