Many fans of crossbow shooting are stopped from purchasing by the relatively high price of high-quality products or the low consumer properties of the simplest entertainment models. However, if you have the skills and tools, you can independently make a crossbow mechanism of a simple design.
Crossbow with trigger mechanism.
Step-by-step instructions on how to make a crossbow
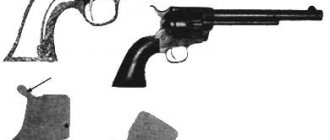
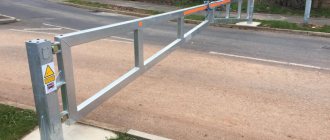
Between the firearm and the throwing one, between the slingshot and the sniper, there is an inverted bow - an elegant weapon for long-range combat within 250 meters. Penetration ability is within the limits permitted by the Constitution of the Russian Federation (Figure 1).
The law does not consider this type of hunting tool as a bladed weapon or a firearm. The only restriction is as follows: a crossbow made from improvised materials should not have a shoulder tension force of more than 43 kilograms. After overcoming this mark, the master will most likely meet with a squad of law enforcement officers. Consider this point before making a crossbow with your own hands.
In general, this is a relatively accurate, reliable, cheap to manufacture and, due to the specific design, an absolutely quiet weapon. An excellent tool for quiet hunting or defending land rights. Historically, the roots of this invention go back to the 5th century BC. Contrary to popular belief, it did not replace the bow, but complemented existing tactical solutions. It’s easy to learn how to shoot with the device: all you need to do is pick it up at least once. It's like a gun with a trigger - cock and shoot. True, then you should tighten the rope again and put the bolt in the stock, but this is purely practice.
Butt drawing:
Offered for DIY assembly, the crossbow has a block design. This allows you to compensate for the load when cocking the bowstring and maintain power. Compound crossbows are the most popular among hunters because... You can carry a crossbow in a cocked state for quite a long time. Horton actively uses this design in the production of its crossbows.
Device features and main details
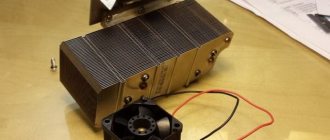
What does this rifle apparatus consist of? In the classic variation there are three main components, followed by solutions with increasing complexity (stocks, handles, components, Picatinny rails, etc.). Our instructions on how to make a crossbow do not involve installing optical sights or other technical bells and whistles (Figure 2).
The main part that concentrates the energy for shooting is the arc. By pulling the rope along it, it can transfer kinetic energy into the projectile. The whole structure revolves around this “capricious lady”. The main materials for its manufacture are metal and wood, but there are also more exotic solutions, such as glass fittings or butter knife blades. The requirements for the arc are flexibility, rigidity and ductility. So, for example, a solid steel frame will not work as a bow, while a car spring or a piece of saw will do.
To make a crossbow frame from wood, pay attention to species such as hazel, birch bark, acacia, ash, yew or bean. Before cutting the frame, you should keep the log in a dry, dust-free place for about a month or two. Fresh logs do not have the required qualities to undergo the processing procedure.
How to make a crossbow stock? Choose a durable type of wood, such as yew, beech, ash or oak. Hazel and conifers will perform well. The further process depends only on the flight of fancy and your skill.
Figure 2. Main design elements
The main controller of the mechanism is the trigger block. It is he who holds the bowstring until the lever is pressed. The cocking mechanism of a crossbow is made of a solid block of metal, less often it is a recess inside the stock with a cylindrical pusher rod.
The listed methods are not the final solution. Despite the fact that the crossbow is a single-shot design, there are bypass methods. The most common way is to make a repeating crossbow by making a special magazine for storing and feeding projectiles.
Bow arrows (bolts)
To achieve shooting accuracy and good accuracy, arrows must be made correctly and of high quality, be identical in weight, shape, size, plumage (you can shoot a bow under a group of identical arrows, find the optimal target settings).
Bow arrows must be strong and elastic, because the bow
transfers a significant amount of energy to the arrow. A flimsy, poorly designed and poorly balanced arrow will break when launched or hits the target.
Recommended hand weight (in grams:
- minimum: bow tension (in grams) divided by 5000;
- maximum: bow tension (in grams) divided by 2000;
Thus, for a crossbow with a pulling force of 40 kg we get the following weight range: 10 - 25 g.
The range of an arrow depends on the area of drag, the mass of the arrow and the amount of energy transferred to it by the string. A small value of the ratio of drag area to mass will result in a longer range of the arrow (if we take the amount of energy constant).
Reducing the length of the boom also improves its flight performance because as the length of the boom increases, the turbulence of the air flow parallel to the cylindrical surface increases, absorbing more energy.
An arrow consists of fletching, a point, a shaft, and a butt plate.
If the shaft is wooden, then the butt plate may be missing. The arrow end of the bow is straight, without a loop for the bowstring. Arrows on sporting bows can be modified to be heavier and shorter.
Selection and preparation of material
Before moving on to the instructions on how to make a crossbow from wood, prepare your materials in advance. Look around the area and try to remember which of the required tree species grow in the area (Figure 4).
Let us repeat that at home, a wood crossbow can be made from the following species: birch bark, acacia, oak, ash, yew, hazel, bean or acacia. Most often, the listed species are found in local forests and forest plantations. If there is a nearby coniferous forest, we recommend looking for spruce and pine forests. Particular attention should be paid to maple groves. Having found the central maple daddy, look for straightened young trees and select one with a thickness of 5 to 15 cm. The search radius around the main tree is from 40 to 50 meters.
Learn the ax factor, or better yet, the chainsaw factor. Try not to harass the forest area too much. Having cut yourself a log, do not rush to carve a crossbow out of it. First, it will need to be dried and then processed. Drying time in a warm, dry room is from two weeks to two months. Cover all cracks, pores and other irregularities with oil paint and place it on the mezzanine.
Figure 4. Weapons can be made from wood and metal
If it is impossible to obtain wood directly from the forest, order a block of the species you are interested in via the Internet. A variable advantage will be saving time on wood processing; operators can often clarify the dryness of the beams and the method of processing them. But this negates all the romance of traveling and finding the right snag.
Working on the shoulders will take the same amount of time as creating the stock. Both processes require basic woodworking tools - a plane, knife, ax, files. The bed can be decorated with carved patterns or adjusted to fit your own hand, whatever you like. There are no restrictions on the use of materials; both components can be made from the same rock. It is recommended to coat the timber with special solutions to avoid corrosion and rotting, as well as with wood varnish. The shoulder blank should also be treated with protective solutions, but not varnished.
The next point is what to make a crossbow bowstring from:
- You can make a bowstring from scratch from Dacron or Kevlar fibers, but to do this you will need to knit the rope yourself (Figure 5).
- Of the ready-made models, attention should be paid to durable varieties of ropes: cord, polypropylene, nylon, hemp, hair. Of these, only the last two are vulnerable to moisture.
- The golden rule is to focus on stretchability: it should be minimal.
- The edges of the rope attached to the shoulders should be treated in a special way, but not tied. To do this, the cord is wrapped around the workpiece to obtain a shape, then the end is applied to the base and tightly wrapped with a thread of smaller diameter.
- The recommended indentation is 5 cm. Along the way, each layer of the winding is covered with heavy-duty glue (anaerobic, epoxy resin, hot melt glue), and at the end the entire structure is tightly wrapped with a piece of felt. Any knots fray the rope, worsening its quality and increasing the chance of breaking under load.
The final stage before shooting is to make arrows for the crossbow, or as they are also called, bolts. Making consumables requires blanks from solid wood or straight branches. If you have woodworking equipment, cut out several bolts from the beams. They can also be printed on a 3D printer, but such shells will not last long. Get two sets of bolts - with and without soft ends.
Figure 5. The string should be strong, but elastic enough
The former are perfect for re-enactment and role-playing battles; the pointed tip should only be used for hunting. A hunting point is made of wire, tin or aluminum. Keep it light! For the plumage you will need separate blanks made of wood and plastic.
Gluing the handle
Now the wooden planks are ready for gluing. Any glue for gluing wooden surfaces will work for us. Next I used wood glue. If after gluing you finish with some kind of polyurethane, then there is no need to use waterproof glue.Cover the surface to be glued with small drops of glue, and then spread it over the entire surface to create a thin, even layer. After the glue has been applied to all the boards, press them together with a clamp and remove any beads of glue that protrude from the edges. Make sure there are no visible gaps between the boards. Leave them in this position overnight.
If you decide to save time and glue all the boards at once, they may move during the gluing process (see photo). Before you continue working, it will be better if they form one surface. In my case, I used a planer. To avoid displacement of the boards when fixing them with a clamp, glue them several at a time, and not all at once.
Making shoulders and stock
Let's say you have everything you need on hand. How to make a crossbow with your own hands, at home, step one - carve the shoulders. They are made from a single piece of wood, not separately. The workpiece must not have defects, knots, etc. The inner part of the arc should have a semicircular relief, similar to the letter D, the outer part should be flat.
Figure 6. Crossbow arms are usually hewn from wood
Initially, the shoulders are carved like a slightly curved board, after which they can be processed and bent during assembly. The shape is diamond-shaped, beveled towards the ends of the arc, the bevel angle is small. Take a closer look at the growth rings on the log: it is desirable that the entire structure of the shoulders be on the same layer. To make a powerful crossbow for hunting, use more resilient wood. In general, the safety margin and performance characteristics should be sufficient for medium-sized game (Figure 6).
The shoulders are secured in two ways:
- The first is the winding.
It is performed both by drilling the stock and making a carving in it, followed by winding the rope around a fixed piece of wood. The main point is that the shoulders are not drilled, maintaining their structure. But this is a labor-intensive process that requires time-consuming winding. For reliable fixation, it is recommended to thread the rope through a ring that presses the frame in the middle. - The second is fixation.
For wooden ones, it is implemented in a cunning way: a conical groove is made at the end of the block with an angle of inclination of the walls in the region of 80-85 degrees, as wide as the shoulders. The frame is squeezed into this recess and then pressed with winding. The implementation of the winding is as follows: another groove, rectangular, is made in the lower part of the log. A piece of wood 5-10 cm thick is taken, a rope for winding is fixed on it, after which this anchor should be pulled to the groove and driven in there. The beam should be wound 5 cm before the groove itself in order to be able to fix the shoulders with its tension.
The steel arms are easily fixed using both the listed methods and ordinary bolts (Figure 7). How to make a crossbow arrow at home?
There are three options:
- The simplest one
is to have a circular saw, a drill with a wide nozzle, and a vice. Using a circular saw, unravel the timber into small bars, no more than 2 cm thick. After this, process it with a plane until the initial roundness is achieved. Next, fix the workpiece in the drill nozzle and, starting the rotation process, pass it through the cutter fixed in a vice. An alternative to this obscenity is a wood lathe. - Medium,
relying on luck and straight pieces of wood. You will need a knife for turning round shapes. An alternative is the processing of small beams sawn on a circular saw. - Difficult
- sharpening a straight branch.
Figure 7. The arrows must be perfectly straight.
For the fletching, use a hacksaw to make a thin, even slit in the back of the bolt. Find a wide plastic lid (a plastic paint bucket, a flat sheet of plastic from the store) and cut out blades for the bolt. You can also secure them by making holes instead of sawing the entire part. The dimensions of the trigger for a crossbow are different; you should mainly rely on monolithic types of levers. They can be made either from metal or from hard and thick wire.
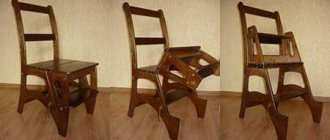
Folding Compound Bow
I once made a compound bow with my own hands, but something was wrong. Based on the first bow, I decided to make a similar one, but with folding bows and a stock.
Materials
- UAZ sources
- Sheet metal
- Durable edge
- Steel rope
- Bolts and nuts
- Aluminum pipes
- Sticks from the back of a crib
- Steel corners
- Steel profile
Tools
- Grinder or hacksaw
- Wire cutters
- Set of fastening tools
- Welding machine
- Emery
- Pliers
- Vice
In this tutorial we will show you how to make a mini bow from items that can be found in every home.
You will need:
- 4 rectangular rods;
- 2 wooden toothpicks;
- pin;
- scotch;
- rope;
- small saw or knife;
- hot glue gun.
1. Boil water in a saucepan, then reduce heat and place two wooden toothpicks into the hot water. Leave for 45 minutes.
2. After 45 minutes, carefully remove the toothpicks from the water, fold them and carefully fold them into a crescent shape. If you have clips, secure the toothpicks in a folded position and let dry. If you don't have clamps on hand, you can simply glue the folded toothpicks to the cardboard with masking tape. Then tape the toothpicks together on top of each other.
3. Fold the 4 rods as shown and wrap them with masking tape.
4. Use a toothpick to cut a groove several inches deep and wide.
5. Insert toothpicks into the groove.
6. Approximately 7mm from each end of the toothpicks, attach a string by wrapping it around the toothpicks and gluing it in place using a hot glue gun.
7. Measure a piece of fishing line equal to the distance between both ends of the toothpicks and tie a loop at each end. Apply hot glue to the ends of the toothpicks and wrap them around.
8. Attach the clothespin to the chopsticks with duct tape, with the end of the clip facing the tension line, and wrap that end with duct tape so that you can barely press the opposite end of the clothespin.
9. Make arrows from toothpicks into paper feathers.
The ideal target for shooting from such a bow will be fruits and vegetables.
Do not point the bow at people or animals - you may seriously injure them.
Installation of the trigger mechanism
The last part remains: the trigger mechanism (Figure 8).
There are three variations in total on how to make a crossbow trigger at home:
- Old-fashioned, wooden:
a certain number of centimeters are measured from the end of the stock (depending on the capabilities of the bowstring) and, having placed a notch, they make a rectangular depression of half a millimeter. It is recommended to take a distance of 15-20 cm from the tension arms. Next, drill a hole in the center of the recess. After this, at the base of the bed from the side of the arc, you should fasten a flat board, exactly adjacent to the previously drilled hole, but from below. A cylinder with a diameter similar to the hole is fixed in the board. Then it’s a matter of technique: the bowstring is lowered into the groove, it is pushed by the rod from below, after which it sends the bolt flying. This crossbow cocking mechanism is well suited for home making during your free time on the weekend. - Sophisticated, aluminum:
sold only if you have metal working tools at hand: grinder, cutters, lathe, files. Requires the creation of a special part. The crossbow trigger mechanism looks like this: a small aluminum disk with a hole in the center and two recesses. Its shape is modified; a sawtooth with a smooth groove in the middle is made on the upper part at an angle of 90 degrees. Parallel to it, in the lower part there is a cutout for a similar tooth, but without a groove. The mechanism takes the load, preventing the bowstring from spilling, resting against the trigger. One press is enough to fire, after which the lever of the locking part will jump out of the groove, the blocker will rotate along its axis and release the bowstring. - Skillful, mechanical:
more than one part at a time. Complex structures with force transmission. In a simplified version, they represent the following trick: an intermediary part rests against the crossbow’s trigger, which in turn blocks the advances of the part holding the bowstring. We advise you to think through the drawing in advance before implementing this option.
Figure 8. The trigger mechanism is the basis for the successful use of a weapon
If you have taken a swing at power, then you have probably thought about springs. A spring crossbow requires a well-functioning cocking mechanism that can withstand greater loads than a wooden one. It will require assembling a starting block made of metal with a lever transmission of force.
DIY onion
To make a bow we need a wooden stick and a piece of iron.
The stick is made approximately based on these dimensions
A spring plate 650Х100Х8 was taken. Using a grinder, slowly separate out what is needed. The arch dimensions are 35 mm in the center and 18 mm at the edges.
Tighten the arms on the sandpaper evenly from the center to the ends to a thickness of 5 mm. We stretch (hollow) steel wire onto the arch in this form. Tighten with a vice. Insert the round beam strictly in the center so that it does not interfere with the arch when bending. We stretch and at the same time check the tension and tension distance. We will continue to dance from these parameters.
As in “The Golden Calf”: we take a weight and saw. And that's what happened.
oh, to make a normal lock, we need a burn and a trigger. A hole is drilled in the top of the pin so that the spring bar bolt fits into this hole and prevents the pin from moving.
Let's start making the lock body
Let's try all this carefully and drill holes for the pins
Let's start making the trigger guard. We take a wooden stick and try it.
Let's dig a place for a castle
Insert the lock
To attach the rear sight we make a dovetail. And we cooked it. I did this with PSR, but it is also possible with POS. It all depends on how we burn (what the temperature will be).
In the arch we make two holes at the edges for attaching clamps. Many people ask whether it is possible to drill a spring. The answer is free. Correct winning drill on a diamond grinding wheel.
Straightening the rollers
We adjust the clamps to the required size. Let's start making the arch fastening clamp.
Making a bracket
This is how I close the ends of the rope. Do not hit, but press with a lathe chuck.
In production stage.
Finished look
Take a stick and make a channel for the conductor
Glue the timber
We remove unnecessary things. I took a wild cherry stick. They will make birch, walnut, etc.
We are grinding
Let's color it. But who prefers which paint?
Redundancy. But, in my opinion, it is pleasing to the eye.
It is important that the gap between the bowstring and the butt is 2 mm. The calculation is simple: half the diameter of the bolt.
Collecting everything
Bottom view
General
And he pulled the shrink film over the arch. And this gives the look and protects it from splinters in case the bow breaks.
Finished look
After 40-50 hits, the bowstring burst.
I decided to add 2 more videos.
To facilitate the design, the rollers were replaced with nylon ones. At 30cm string to hook distance and 85kg force with the addition of rollers the force on the bow is reduced and the hand speed is increased.
TTX
Well in all its glory
Castle work.
- https://diyworkplace.ru/28-handmade-crossbow.html
- https://www.promyhouse.ru/idei-dlya-doma/neobychnye-detali/kak-sdelat-arbalet-svoimi-rukami.html
- https://www.vseznaniya.ru/useful/wild/969-arbalet-draw-2
- https://nowifi.ru/oruzhie/holodnoe/169-kak-sdelat-arbalet.html
- https://VashNozh.ru/arbalety/arbalet-svoimi-rukami
- https://iohotnik.ru/snaryazhenie-dlya-ohoti/98686-d0-ba-d0-b0-d0-ba-d1-81-d0-b4-d0-b5-d0-bb-d0-b0-d1- 82-d1-8c-d0-b0-d1-80-d0-b1-d0-b0-d0-bb-d0-b5-d1-82.html
- https://VKadety.ru/strelkovoe/samodelnyj-arbalet.html
- https://zkm-v.ru/snasti/samodelnyj-arbalet-dlya-rybalki.html
- https://FB.ru/article/231650/ohotnichiy-arbalet-cherteji-harakteristiki-foto-kak-sdelat-ohotnichiy-arbalet-svoimi-rukami
- https://voinvtebe.com/oruzhie/sozdat-arbalet-svoimi-rukami-ne-tak-slozhno-kak-kazhetsya.html
[/spoiler]
Pistol crossbow: review of popular models
The range of modern pistol-type crossbows includes many varieties that differ in technical and operational characteristics.
You can choose a crossbow for any purpose, with any dimensions and weight.
All types of crossbow pistols are divided into three categories. Some options are suitable only for entertainment, others - exclusively for hunting. The third group includes universal options.
The most common models of powerful pistol-type crossbows:
- “Aspid” is more intended for entertainment, it is a universal variety, you can shoot balls, arrows or darts, the maximum projectile speed is 50 meters per second.
- “Tactic” - suitable for hunting small animals or birds; the main reason for the demand is good technical characteristics, low weight and a relatively affordable price.
- “Scorpyd Aculeus” - despite its light weight of 3.4 kg, this crossbow has high speed, ideal for hunting, the arrow speed reaches 140 meters per second.
- “TenPoint Nitro X” - a distinctive feature of this model is its narrow design; this option is ideal for hunting in thickets; the maximum arrow speed reaches 134 meters per second.
- “BARNETT” - the main feature of this option is its lightweight design, this effect is achieved through the use of plastic structural elements, the maximum boom speed is 120 meters per second.
TenPoint Nitro X Scorpyd Aculeus
Tactician
barnett
Plumage
To make this element, it is better to use goose tail feathers.
This option looks obvious to a villager. However, where can a city dweller find material? If possible, you can try your luck at the market or use an alternative option in the form of blanks made from plastic bottles. Feathers can be attached to an arrow shaft in several ways. Let's look at the simplest option.
To do the job, just divide the feather along the axis into two equal pieces, cutting off the tapering upper and lower parts at both edges. Next, all that remains is to glue the feathers to the shaft with reliable glue and, if necessary, additionally secure with threads.
Eventually
Making your own crossbow arrows is an excellent solution in terms of saving money. However, in order for homemade projectiles to be used not only for entertainment, but also for hunting, it is necessary to try to make the shaft parts as even as possible. Even the slightest curvature increases the likelihood that the arrow will be pulled to the side.
Particular attention should be paid to the tip. The heavier this element turns out to be, the greater the penetration ability of the arrow, not to mention the improvement in the smoothness of flight.