| What is it called differently: | polymer fabric, foam rubber, foam, fom |
| Natural or synthetic? | synthetic material |
| How does it feel? | flexible, soft with original texture |
| Application: | handmade (jewelry, artificial flowers, albums and cards, dolls) |
| Fabric structure: | the material has a porous structure, visually similar to foam rubber |
| Does it stretch or not? (Extensibility) | stretches well when heated |
| Recommended washing temperature: | don't wash |
| Kinds: | silk, marshmallow, glitter, textured foam |
| Presence of shine: | matte material, with the exception of glitter foamiran |
| Degree of creasing: | low |
| Edge fraying: | the cuts do not crumble |
| Hygroscopicity: | the material is not hygroscopic |
| Drapability: | medium (increases when heated) |
| Shrinkage: | holds its shape perfectly, does not deform |
| Breathability: | average |
| Fade or not: | fade resistant |
For a long time, people have been doing handicrafts - weaving carpets and embroidering towels, knitting and sewing clothes, and painting products with original patterns. Today there is no need to make textiles and various trinkets to decorate your home, since they can always be bought in stores. However, the craving for the creative process does not dry up. New types of needlework and new materials are constantly appearing, one of which is foamiran. What kind of material is this, how much does it cost and how can it be used for crafts?
Properties of foamiran
Plastic suede is a material that is surprisingly comfortable to work with. You will be able to create an original thing, even if you have never done anything like it.
The main advantages of foamiran
- Plastic. The material stretches well and restores its shape. However, if you overdo it, the sheet may tear.
- When heated, it can be given any fixed shape and position. It is enough to hold the product next to a heated iron. Be careful: if the foamiran is overheated, it will shrink.
- The sheet is easily cut with ordinary scissors, a figured hole punch or a breadboard knife. The edges are clear, have no sharp edges, and do not crumble, so you can cut out small details of any complexity from it and even entrust it to a child.
- The material is highly moisture resistant. If necessary, wash the product with plain water. The item will not get wet, will dry quickly, and mold and mildew will not grow inside.
- Foamiran is friendly with any dyes, since its structure is porous and perfectly absorbs dyes. For example, it can be given the desired color using watercolors, gouache, oil, acrylic, pastel pencils and even decorative cosmetics. In order for the paint layer to adhere well, acrylic varnish must be applied on top.
Cotton box made of foamiran and cotton wool MK with a pattern
Saved
- 1
Add to quote book
0
Save to links
Happy Birthday! I wish you immense happiness, good health, true love, good luck, prosperity, fulfillment of desires! Let life be filled with positive emotions, true friends, joyful days. Bright, bright, happy events to you!
I weave a bouquet from the warmest words, and I gladly give it to you. I congratulate you on your birthday and I sincerely tell you:
Let troubles fly by, And there will be true friends nearby, Let your loved ones respect you, And love you with all their souls.
Be happy every minute, And may time flow like water, May faith in miracles never fade, May hope always live in the heart!
I continue to introduce you to how and from what you can make simple and beautiful flowers with your own hands. Today there will be quite traditional and quite unexpected ideas, as well as a guest master class on how to make a rose from foamiran.
Mom still has a large wooden box decorated with straws. These used to be very popular. As a child, I loved opening this large wooden box and going through my mother’s jewelry. Among them there were always many handmade flower brooches. Mom made some of them herself. She often embroidered little roses on my clothes to brighten them up or hide some imperfections. And once I knitted flowers for my beret and gloves. I embroidered them with beads and wore them for a long time and with great pleasure.
Therefore, when I need to decorate something, the first thing that comes to my mind is flowers . Flowers made from fabric and other materials are suitable for anything, be it a card, gift wrapping, decorative wreath or photo frame. They do not fade and can be of any size and color. Today I will show you how to make a rose from foamiran, a cotton flower from padding polyester, a pompom flower from guipure, a tulip from linen and an anemone from felt. Here is such a motley flowerbed.
Use the links below to get to the desired section of the article:
Rose from foamiran - guest master class from Veronica
Veronica Nekrashevich introduced me to foamiran, with whom we studied in the same class, and now we periodically exchange creative experiences. Once she wrote that she wanted to master foamiran and asked if I had tried this technique. Then I realized that this area of creativity is currently closed to me. While I was thinking whether to master foamiran or not, Veronica began posting her work on Instagram. Among them are beautiful flowers, hairpins and funny things for her little daughter.
Therefore, when I started preparing a new master class on flowers, I definitely wanted to include flowers from foamiran in it. We met with Veronica one Sunday morning so that I could see and describe in person the work with this unusual material. Now I can barely restrain myself from putting everything off, buying foamiran and making flowers from it.
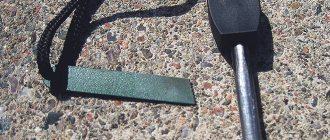
Foamiran, foam, plastic suede, or simply fom - decorative foam material . It is a sheet measuring approximately 40 by 60 centimeters and a thickness of 0.5 to 2 millimeters or thicker. Foam is very soft, elastic, stretchable and heat treatable.
Rose from foamiran - materials and tools
To make a rose from foamiran, a beginner may need about forty minutes. Advanced masters can do it in 15-20 minutes. The diameter of the rose is 7 cm.
- Foamiran - 1 peach leaf and a little green
- Foam sponge for washing dishes - 2 pcs.
- Foil or foam blank for the core
- Scissors
- Iron
- Wooden skewer
- Hot melt adhesive
- A small object with a rounded edge
- Mold to emboss leaves (if available)
- Dry art pastel
- Rose petals pattern.
Rose from foamiran - progress of work
To obtain the required shade, foamiran is tinted using dry or oil pastels, or you can use acrylic paints. Flexibility and a sense of color are important here. The brightness and shades of the petals can be chosen to suit your taste. Some people tint the same petal with several colors, others like a gradient. It is better to make small petals and half-petals brighter, and large ones pale.
1. First, print and cut out the templates of rose petals and leaves.
2. Transfer the templates to foam using a wooden skewer (just push the lines) and cut out the blanks.
For a foamiran rose we will need 8 half-petals, 5 small petals and 5 large ones, 2 green leaves and 1 sepal. During the process, parts that do not fit can be cut off.
When cutting, the top part should be made wavy. The edges do not have to be perfectly smooth and identical to make the rose more realistic.
3. Tint the half-petals. Take a damp sponge, dry pastel and paint over the corner of the sponge. We tint the end part of the half-petals and paint the edge a little.
4. Fold the half-petal like an accordion, twist and knead it with your fingers to rub out the tint and make the upper part thinner.
5. Straighten the petal and give it the desired shape with your fingers. You will notice that the edge is thinner and more pliable. If there is not enough color, apply the tint again and repeat the rubbing process. If you need a very light shade, you can apply the pastel from a sponge first to your fingers, and then knead the foamiran with them.
6. We tint all the petals in the same way.
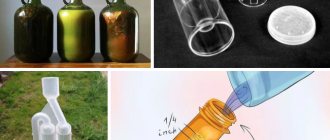
7. Process large petals. We heat the iron to low temperature, take a petal, place it literally for a second with the bottom part of the iron sole, place it on the sponge and press it with a round object. This item could be a light bulb, a children's toy, or, as in our case, a perfume cap. The petal should be voluminous. You need to press the same side with which we apply the part to the iron.
8. In the same way, you need to process 5 small petals.
9. Now we take the foil and form a cone out of it, to which the petals will be attached. We stick a wooden skewer into the foil and fix it with hot glue. This is necessary to make it easier to work with the workpiece.
10. Take the half-petal and tightly glue it to the top of the foil cone. First we attach the middle, and then the side sections. Then we glue another half-petal to cover the top.
11. Add a second row of half-petals. It will consist of three elements glued more loosely. It's as if the rose is opening up a little.
12. The fourth row also consists of three elements. They should fit even less tightly to the base.
13. We begin to glue 5 small volumetric petals. First, we attach the part to the base of the bud, and then add a little glue to the middle of the petal and fix it on the bud. There is no need to fix the top. We glue the first petal of the row only at one edge, and place the last one under the first, completing the row.
14. It remains to add a row of large petals. These elements are glued only at the base. All large parts should be covered by a petal on one side, and cover the adjacent petal on the other. Therefore, the last part needs to be glued under the first. The protruding side parts can also be secured with glue.
15. Cut out the sepals. As a rule, it is drawn by eye and depends on the size of the bud. We gather together and twist the sharp edges of the leaves with our fingers and glue the blank to the base of the rose.
18. Process and glue the leaves. We take a green leaf, apply it to the iron, and then immediately put it on the mold and press it very hard. You can tint it a little and make small cuts along the edge with nail scissors.
19. Cut the skewer and admire our foamiran rose.
This flower can be used to decorate a hairpin, brooch, hairband, decorative bouquet or central table composition. Try it! Foamiran is very pleasant to work with, and it makes excellent durable decor. Once again, many thanks to Veronica for this master class!
DIY cotton flowers
If you love cotton decor, be sure to try making your own cotton flowers. They make excellent decorative wreaths and eco-style compositions.
DIY cotton flowers - materials and tools
One cotton flower will take less than 10 minutes, not counting the drying time of the paint.
- Chicken egg carton
- Brown paint
- Brown thread and needle
- Brush
- Scissors
- Sintepon or cotton wool
- Hot melt adhesive.
How to make cotton flowers with your own hands
Everything ingenious is simple - an excellent sepal can be made from a cardboard egg box, and the cotton flower bud itself can be made from padding polyester or from the same cotton, that is, cotton wool. Much more realistic :).
1. Separate several cells from the box.
2. Cut out blanks that look like a sepal with four petals. It is not necessary to make them perfectly even.
3. Paint the blanks brown. You can use acrylic or even watercolor paint. The color will be deeper and more natural if you mix different shades of brown.
4. You will notice how the cardboard becomes soft and pliable. We wrap the petals in the middle and wait for the paint to dry.
5. To make the sepals more realistic, use scissors to cut thinner short strips from the petals.
6. Tear off a small piece of padding polyester and roll it into a ball. You can use cotton wool.
7. Take a thread and a needle and stitch the padding polyester ball in four or five places to divide the cotton flower into sections.
8. Now we attach the padding polyester ball to the cup using hot glue.
9. Shape the petals to give the cotton flower a realistic look.
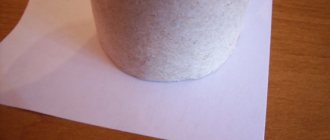
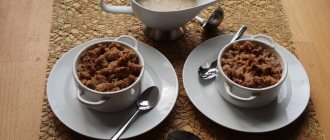
Below, for comparison, you can see what cotton made with your own hands looks like next to the real thing.
Now you can use cotton flowers in decoration or glue them to a branch and place them in a vase. I really hope to use them as a decorative wreath for my door for the New Year.
If you need cotton flowers but are hard to find or don't want to spend too much, now you know a way to make your own cotton flowers.
DIY chiffon pompom flower
Chiffon flowers can be used in a variety of projects. Here are just a few of them - cards, boutonnieres, hats, hairpins, brooches, decorations for children's shoes, photo frames, decorative wreaths, cutlery envelopes, gift wrapping, handbags and wallets. They are quick and easy to make and look very cute.
Chiffon pompom - materials and tools
Making one flower will take no more than 5 minutes. The diameter of the template is 3 cm.
How to make a pompom flower from chiffon
For this flower, it is important to keep all the petals on the needle. We will also try to cut the chiffon through tracing paper so that there are no pencil marks left and the circles are more even.
Such pom-pom flowers will only be obtained if the diameter of the circle is small enough. Large pieces simply don't hold their shape.
1. Draw a circle on tracing paper with a diameter of about three centimeters.
2. Cut a strip of chiffon of a suitable size and fold it as shown in the photo. We place a template made of tracing paper on the chiffon and pin it to the fabric with a needle.
3. Cut out 10 chiffon flower blanks.
4. Fold each circle in half, and then in half again and prick it at the base with a needle and thread. You should get 10 petals mounted on a needle.
5. Hold all the petals with your fingers, stitch them at the base several times and secure the thread.
Now we can open our pompom flower. I was surprised how quickly it was made; I will use it for gift wrapping.
DIY fabric tulips
And this section is dedicated to tulip fans. They are beautiful in all variations and make an excellent spring-summer decor.
Fabric tulips - materials and tools
It only takes 10 minutes to make one flower, so in an hour you will have time to create a whole bouquet of flowers that will never fade.
- Cotton or linen
- Scissors
- Thread and needle
- Sewing machine (optional)
- Sintepon or other filler
- Wire
- Green crepe paper
- Hot melt adhesive.
How to make tulips from fabric
1. Cut a strip of fabric measuring 11 x 15 cm and bend the fabric from the longer side 1 cm inward.
2. Fold the fabric right sides inward and stitch the side edges using a machine or by hand.
3. Now we make a dotted seam along the folded edge, tighten the threads and fasten.
4. Turn the tulip blank out of the fabric and bend the raw edge 1-2 cm inward. We stuff a fabric tulip with padding poly.
5. Now fold the halves of the upper part and grab them with a thread exactly in the middle, as shown in the photo. We fold the opposite sides and also connect them with a tiny seam.
6. Wrap the wire with crepe paper and glue the tulip stem to the bud with hot glue.
A little time spent usefully - and the bouquet is ready!
DIY felt anemone
This anemone is a great way to start getting acquainted with felt. It is simple, but quite stylish, and will perfectly complement the decor of an interior basket or a bouquet of felt flowers.
Felt anemone - materials and tools
Making one anemone from felt will take about 10 minutes. Flower diameter - 11 cm.
- Felt in several colors
- Scissors
- Pencil
- Hot melt adhesive
- Thread and needle
- Petals pattern.
Felt anemone - work progress
1. Draw the anemone petal template by hand and cut out all the elements. In total you will need 9 petals.
2. Cut out a small circle from dark felt and form it into a ball. You just need to make a dotted line at the very edge, tighten and secure the ends of the thread. Instead, you can use a dark bead of a suitable size.
3. Cut out a rectangle measuring 1.5 x 7 cm from black felt and make cuts along the entire length of the workpiece to create a fringe.
4. Carefully glue the resulting fringe to the core ball using hot glue.
5. Now we form the top row of four anemone petals.
6. Glue the lower petals into the gaps between the upper ones.
You can stretch the fabric a little to make the flower more voluminous. And now, our felt anemone is ready.
I hope you have chosen a flower for your soul, and you will have something to do this weekend. Let me remind you that there is also the first article on how to make flowers from fabric with your own hands. And I left to look for ideas for the third part. I will be happy to answer your questions in the comments.
Is this material safe?
High-quality foamiran from well-known brands is completely harmless for children and adults. It does not contain toxic substances and does not emit unpleasant odors or toxic fumes when heated.
The very fact that toys and construction sets for children are produced from foamiran on an industrial scale suggests that the material is absolutely non-toxic.
What bothers some people is that there is a slight odor when opening the package. However, there is no need to be afraid. It is quite natural that when stored in cellophane packaging for a long time, the material “stales.” Within half an hour the smell completely disappears.
Do-it-yourself fishing tackle
To ensure a successful catch, fishermen come up with new means for catching fish. To purchase a good fishing rod, you will have to spend a lot of money.
In addition, you need to additionally purchase bait and know the rules of fishing. Some experienced fishermen buy grabbers in fishing stores, and the most inventive ones offer to make it at home.
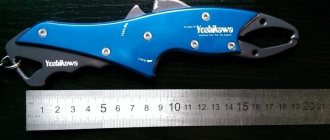
Fishing tackle grabber - description
This device is also called a fishing umbrella. It somewhat resembles a small basket net with unusual lifts at the ends.
This fishing product is not difficult to make with your own hands if you have all the materials at hand. The grabber is a mesh frame in the form of a web, which has a metal frame. It looks like a leaky bucket or a small fishing net.
Fishermen lower this product into the water where there are a lot of fish. The fish, swimming through the water stream, end up there, but can no longer get out. After some time, the device is abruptly taken out of the water.
Grabber design
The tackle turns into a trap immediately after it is lowered into the water. The design depends on what kind of fish is being hunted. The product must contain weights; most often, lead or stones are used to give the structure heaviness.
For convenience, inventors use springs or screw metal rods. To make it convenient to immerse the structure in water, a rod made of durable fishing line is used.
Advantages and disadvantages
The advantages of this device are many.
Let's look at the most important ones:
- Speed of production.
- It can be used without special skills.
- The materials will not require large cash injections.
- You can catch a lot of fish in a short time.
- The device does not require bait.
- If you make several products, you can install them throughout the entire reservoir.
There are also disadvantages to this device. Let's look at the most obvious ones:
- If the reservoir is not heavily populated with fish, then the grabber will not be effective.
- If the reservoir is deep, it will be difficult to get the catch without losing it.
- It is possible to catch only active small fish. Larger specimens will not take the bait.
Grabber, fishing umbrella - make it yourself
Despite the fact that it is fashionable to buy grabbers of various variations in fishing shops, experienced fishermen try to make a more budget-friendly option with their own hands. To make a good device, you should buy special material and not use fake products.
This is a simple device that will not take much time to develop. If you don't rush and follow the instructions, you can make a good fishing umbrella that will catch a catch every time.
Necessary materials, drawings
It is better to first draw up a drawing yourself or find it on the Internet. Experienced fishermen advise watching a video on this topic and only then proceeding with the manufacturing process.
Let's look at the required list of materials:
- Nylon net or product made from fishing line.
- 4 springs or curved metal rods.
- Load in the form of lead blocks or stones.
- Durable fishing line and cord.
- Fabric based electrical tape.
- Wire for frame.
- Ring for form.
- A decent float with a bright color.
Let's look at the manufacturing process:
- The net will be the base that wraps around the frame of wire and rings.
- The springs are wrapped with electrical tape. This will help determine the correct direction of the clapper when closing.
- Springs are attached to the load.
- Rods are pulled through the side cells and 4 rods are secured.
- These devices connect at the top at the ring.
Where and when do they fish for grabbers?
Most often, grabbers are used in Siberia and the east. Some fishermen attach a flashlight to it if fishing occurs at night. The devices are used all year round. It is not as effective on rivers as on ponds.
In places with large concentrations of fish, you can catch several kilograms in 1 hour. You need to fish where the fish are actively moving and not settling on the bottom. If there is a strong current, you may be left without a catch.
Techniques and tactics of fishing for grabbers
The technique is simple, like the device itself. You need to secure the load and float well and lower the grabber to the bottom. If a fisherman fishes from the shore and not from a boat, then to pull the fishing umbrella towards him, he should use a long cane. You need to remove the device from the water with a sharp movement so that the catch cannot escape.
Now only mine bites!
I caught this pike using a bite activator. I’ve never caught one of these before, but now every time I bring back trophy specimens from fishing! The time has come for you to guarantee your catch.
What tools and materials are needed?
When working with foamiran you will need the following:
- sharp scissors or a breadboard knife;
- figured hole punch or scissors;
- toothpicks, a simple pencil for drawing contours;
- brushes and pieces of foam rubber for painting foamiran;
- any paints - oil, watercolor, pastel, acrylic, decorative cosmetics;
- wire for the frame - if you are creating something complex and voluminous, for example, a large flower;
- tape - for stems in flower arrangements;
- molds for creating complex shapes.
It is best to glue foamiran parts using a glue gun or any rubber glue. PVA glue, glue stick, Moment are not suitable.
Making a feeder fishing rod
What does a cotton flower look like?
The feeder fishing rod is very popular these days, because thanks to it you can catch fish in various types of reservoirs.
It is somewhat more difficult to make than a float one, but with a little effort, almost anyone can do it.
To make a feeder you need: a special rod for the feeder, a reel with a spool, a fishing line with a total length of one hundred to one hundred and fifty meters, a feeder, an anti-twist tube, another fishing line for the leash, a hook.
First you need to carefully connect all the elements of the fishing rod together, paying special attention to the guide rings - they should line up along the same axis
By carefully turning and rotating the handle, the line is rewound onto the spool. A loop is also made from the other end of the fishing line, and the equipment is attached to it
The most common method is fastening with an anti-twist tube.
Note!
- Lamp for disinfection of coronavirus (COVID-19) - an overview of the best options, as well as instructions for use
- How to make a medical mask: instructions for making simple and complex masks to protect against coronavirus (COVID-19)
- How to crochet slippers? TOP 8 best ideas from craftswomen. Step-by-step instructions on how to knit beautiful and warm slippers with your own hands
After this, the fishing line must be passed through the resulting structure, immediately placing stopper beads and making loops. At the bend point of the tube it is necessary to attach the feeder, after which the main line is connected to the equipment. The feeder rod is ready!
Chamomile
Read also: Are you too lazy to walk your dog?
Chamomile has long been considered a symbol of family. Despite its simplicity, it is a very sunny and bright flower. It is no coincidence that weddings are so often decorated with daisies. To easily create a charming daisy from foamiran, we suggest using a step-by-step master class and photos.
You will need:
- white, yellow and green foamiran;
- sheet of cardboard;
- protractor;
- ruler;
- pencil;
- glue.
- thin stick for the stem or wire.
- iron or candle.
Master Class
- We cut out 4 circles of different diameters from white foamiran (for example, 9 cm, 8, 7, and 6 cm). To make the circles even, use a protractor.
- Using scissors, we make the shape of the petals around the entire circumference, then cut them, leaving about 3 mm to class=”aligncenter” width=”700″ height=”920″[/img]
- We heat the ends of the petals and give them shape.
- From yellow foamiran you need to cut a long strip (about 27 cm) 2 cm wide. This will be the center blank.
- We make cuts along the entire length of the strip with scissors to create a fringe.
- Next, lubricate the strip with glue and twist it.
- We attach the core to the wire.
- Next, we string the petal blanks onto the stem, starting with the smallest circle, and do not forget to lubricate with glue.
- For the backing from green foamiran, cut out a circle and make cuts. It will be the final row in creating the chamomile.
Chamomile from foamiran is ready!
Tulips
You will need: foamiran in bright colors, green foamiran, floral wire, dry pastel, wet wipes, tape, floral buds, glue, scissors, ruler, iron, cardboard, toothpick.
Master Class
- Draw a tulip petal 6 cm high and 3.5 cm wide in the center on the cardboard, then cut out the template.
- Draw a tulip leaf 25 cm long on cardboard and 3.5 cm wide in the center, then cut out the template.
- Trace the petal template onto foamiran with a toothpick and cut out 6 petals.
- Trace the leaf template onto green foam paper with a toothpick and cut it out.
- Tint the petals and leaves of the future tulip using a damp cloth and dry pastel.
- Heat each petal by applying it to the iron, then give them a realistic shape by stretching them in width and length.
- Heat the tulip leaf and fold it in half lengthwise.
- Glue 3 petals to the flower bud, completely covering it.
- Glue the remaining 3 petals, placing them in a checkerboard pattern.
- Glue a piece of floral wire into the leaf.
- Wrap the stem with tape and attach the leaf.
- Make a whole bouquet of tulips in the same way.
Foamiran tulips are ready!
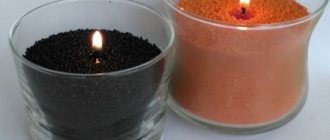
Product “Christmas tree” made of plastic suede
This material is suitable for creating decorations for the New Year. Foamiran will make a beautiful Christmas tree. For the Christmas tree you will need:
- Foamiran is green.
- Various beads to imitate Christmas tree decorations, preferably red, gold or silver colors.
- Sheet of cardboard.
- Iron.
- Pencil.
- Stapler.
- Glue.
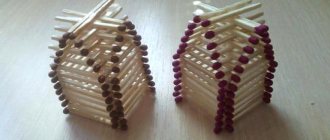
Even a beginner can do this craft, it’s so easy to create. To complete the craft, you need to cut several strips, about 2 cm wide, and cut them, thereby making a fringe out of it. Make a cone out of cardboard, securing the corners with a stapler.
Next, cover the resulting cone and decorate with beads. The product is ready!
“Grapper” is an excellent tackle for winter fish
A great thing with which you can go fishing on the ice. Someone may say that this is a forbidden method of fishing, but I don’t think so - try it yourself and you will see that there is nothing forbidden about it. Moreover, you can adhere to the permitted half-meter diameter of the trap.
And with the “grabber” (also called the “Amur Christmas tree”), on the contrary, as with a catchy reelless fish, some kind of special excitement appears...
There are simple traps in the form of nets on bridges, but with these it is easier to catch fish in open water. When there is ice, you can’t fish like that—you need a hole on a large scale.
But there is a way out, they came up with a fishing trick - they made the trap more compact - folding so that it could fit into the hole.
Many never even dreamed of such equipment. And she is!
Fishermen in Siberia at least successfully catch fish even in winter with such gear.
Let someone say that this is poaching gear, but try it yourself and you will understand that the “grabber” is no different from the same winter supplies - girders with flags.
“Spiders” have appeared for sale on the Internet - “grabbers” for catching winter fish - folding ones - those that will fit into a small hole.
All of them are equipped with a bright large float to make them more visible from afar. Place a few of them like this and walk nearby with a stick and knock on the ice...
It’s interesting - watch the video:
So even on hard water the “grabber” works. It wouldn’t hurt to feed all the holes with such catchy tackle, maybe it would become even more catchy.
NHNCH (No tail, no scales) to everyone! Follow my new publications - it will be even more interesting!