How to make a radio-controlled airplane with your own hands from inexpensive and high-quality materials? This activity is suitable for both beginner aviation enthusiasts and professionals - assembling aircraft is rightfully considered one of the most exciting and painstaking activities.
Anyone can assemble airplane models on their own, but to do this, you need to understand the entire process of creating a design and accurately calculate your capabilities. How to create a mini-plane yourself at home, all the subtleties and features - detailed information is presented in this material.
Model selection
Firstly, it is immediately worth noting that building an airplane, as other craftsmen do, is not entirely realistic. The thing is that each person has an individual style of piloting, because of which you cannot rely on other people’s experience when choosing a model. Secondly, many novice designers are inspired to create after they see quite beautiful and elegant models in the sky. Based only on the appearance of the aircraft is extremely bad. The main criterion for choosing a model should be the purpose of its construction and future use, and not the aesthetic component.
Choosing the right model is also important because it can only be used for the purposes for which it is intended. Let's say building an airplane as a means of air tourism is one thing. But after its completion and operation, you can find that a person is much closer to a regular flight to a picnic somewhere in the mountains, for example, and this will require a completely different model. All this suggests that before moving on to any practical part, it is necessary to fully consider and clearly define for what purpose the aircraft will be used.
Naturally, before moving on to construction, it is necessary to carry out some more preparatory work. It is necessary to conduct a full analysis of the design of the future aircraft. If someone has already implemented such a design, then it is worth contacting this master and inquiring about the success of the aircraft. It is also important to remember that if you choose a model in which the parts and assemblies are of an outdated type, then purchasing them and organizing delivery, if necessary, is much more difficult and expensive. Parts for models that are in demand at a given time will be more readily available.
Practical instructions
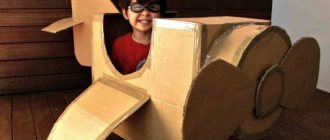
- Paint the cardboard cylinders any color you like. Once dry, cut a hole in one of the tubes to leave enough room for the other tube to fit snugly partially inside.
- Glue the uncut tube in the center to the cut tube. Use a lot of glue and let it dry for several hours before using.
- Make a longitudinal cut at the bottom of the cut tube. Cut a rectangle from a piece of scrap paper or foam and insert it into the slot in the paper tube.
- Decorate with stickers. Successful flight!
Time spent
How to build an airplane? Moving on to the practical part of this issue, it is very important to note that this process is very lengthy. It will take a huge amount of time and effort, and therefore you need to be sure that these two components are available in abundance before you start buying parts and other things.
Experts recommend breaking down such a labor-intensive task as building an airplane into a large number of small tasks. In this case, constant progress in manufacturing will be visible. Working on each task will require much more time, and each successful completion of the work will mean getting closer to the main goal. If you do not break this voluminous task into small parts, then at some point it may seem that stagnation has occurred and progress has stopped. Because of this, many people also give up the idea of assembling an airplane with their own hands.
If the process was correctly divided into parts, then a week you will have to allocate from 15 to 20 hours to complete the assigned tasks. With such an investment of time, it will be possible to build an aircraft in an acceptable time. If you spend less time per week, the process can drag on for a huge period of time.
A simple version of the glider
The paper airplane glider works exactly as it sounds - it floats in the air for much longer than a classic paper airplane. This version of the glider will delight you with its simplicity.
- Fold the colored sheet in half so that the colored side is on the outside.
- Unfold the paper.
- Then lower the top two corners to form a triangle on each side.
- Now lower the entire top section.
- Fold the top two corners down to form a triangle on each side.
- Fold both sides towards each other.
- Fold the wings on both sides.
- Add small flaps on each side of the wings.
- Your paper planner is now ready!
Place to work
Naturally, for such work it is necessary to have a suitable place. However, it is worth noting that size in this case is not critical.
A light single-engine aircraft, for example, can be built in a basement, trailer, shipping container, etc. A great place would be a double garage. In many cases, even a one-person garage is enough, but this is provided that a separate place is planned where finished aircraft components such as wings and other parts can be stored. When considering how to build an airplane yourself, many believe that a city hangar, for example, is a suitable place. In fact, this is far from the case. Firstly, few people live close enough to such a building. Secondly, airplane hangars are places where there is often a lack of light. In summer, it is much hotter in such buildings than even outside, and in winter, on the contrary, it is colder than outside.
Another important note from specialists and those who have already dealt with the question of how to make a flying airplane is the arrangement of the workplace. It is recommended to spend money on purchasing all the necessary things that will make work more convenient and comfortable. You can take care of a simple climate control system, get a workplace that will suit your height, lay rubber carpets on the floor, etc. High-quality, complete lighting of the entire workplace plays an important role. All this will require spending a certain amount of material resources, but when working on such a serious project they will more than pay for themselves. In other words, we can say that everything you need should always be at hand, then construction will be much easier.
Comprehensive support needed
If the dream of flying your own plane does not leave you, and enthusiasm fills you to the very top, then support from like-minded pilots will help speed up work on the project.
- The first step is to enlist the support of your family. Working hours in the workshop can be long and tiring, including for the rest of your family. Spousal and family support in such cases is simply necessary. Any aircraft projects that interfere with the relationship are doomed: “He spends all his time on this damn plane. She nags me all the time about my project,” whether it’s worth starting a project in this state of affairs. Mitch Locke adheres to a simple tactic: “Before I start building a new airplane, I go to my wife and ask her for a list of all the benefits that she wants her life to be better while I spend less time on her.” And it works: Mitch built seven airplanes on his own. At the same time, there are many projects that are carried out by family teams: parents with children, spouses. When shared teamwork brings people together, building an airplane becomes an additional opportunity to spend time with loved ones.
- Support outside the family circle is also important. When choosing a decision in favor of a particular project, it is also important to take into account the service support and experience of previous builders. Is it possible to change the thickness of the ribs without compromising the safety of the structure? Will the aircraft model company be able to answer this question? How quickly will the answers come? Is there a forum for aircraft builders that can help newbies?
Cash costs
How much does it cost to build a plane? Naturally, after setting the goal, deciding on the aircraft model, after selecting the location and allocating the time, the next question is precisely the financial part of the project.
It is impossible to give a definite answer to the question about the cost of the aircraft, since all models are different, which means the materials, quality and quantity are very different. We can only say that on average, from $50,000 to $65,000 (about 3-4 million rubles) is spent. However, the actual amount may be significantly higher or significantly lower. “Building an airplane” is a fairly simple phrase that requires a serious approach not only to the practical part, but also to the financial one. The easiest way would be to consider this action as repaying a loan. In other words, you need to estimate the total cost of the project in advance, break it down into parts, after which you can spend the planned amount of money every month on purchasing the necessary parts, tools, etc.
Another important factor is the understanding that you don’t have to install anything on the plane that you won’t need for the flight. The simplest example is flashlights for flying at night. If such walks are not planned, then there is no point in buying lighting. That is, correctly set goals will help you save a significant amount of money. You can save on installing instruments if they are not needed for the flight. The construction of aircraft requires the installation of a propeller. There are constant pitch and constant speed models. The first model costs about three times less than the second, but at the same time it is not so much inferior to the constant speed propeller in terms of flight efficiency.
Testing build results
Now that you've finally managed to put everything together, it's time to take your device out for a little testing. Here are some tests to test the aircraft:
- Hold the plane slightly above your head and run with it. Then release for one or two seconds. If a plane leans forward, it has a heavy nose. If he tries to lean back, he has a heavy tail. If it remains stable, your device is assembled correctly. This test is great for testing these variables because it removes other influences and simply determines whether your model is robust and balanced.
- Take a model airplane and check out all the different functions of the engine. Make sure you try out all the keys on the controls, including the right and left sticks. Not only will this help you learn what you can do with your plane, but it will also help you become familiar with the remote control. Flying a plane can often be quite challenging, especially for beginners, so being aware of all the different inputs early on can help you avoid feeling lost during the flight.
- A flight test is more like your own test to check if all your designs and calculations are correct. Do a range test to see how far you can launch the device. Once this is done, take out the plane and let it hover about meters away from you. This will give you a good idea of the flight characteristics.
The acquisition of knowledge
Building an airplane with your own hands is a labor-intensive and time-consuming task, but it is not at all as difficult as it seems at first glance. Many novice craftsmen who would like to try their hand at it think that they do not know how to paint, rivet and cook. In fact, learning all these skills is quite simple, it only takes a little time.
It is important to view the problem in this way. A home airplane, built with your own hands, is a mechanical device with a minimal set of electrical components, as well as a complete absence of complex hydraulic parts. All this can be studied and collected independently.
For example, what engine is on the plane? The most standard aircraft engine consists of the same structural parts as a motorcycle or boat engine. These are the simplest and most standard models that are perfect for building your first homemade aircraft. Next comes the practical part of the assembly. Riveting is a fairly simple process that can be mastered in just one day. As for working with a welding machine, everything is also simple here, you just have to spend more time on training so that the welding seams have good performance and are fairly even. As for any work with wood, it is used in everyday life quite often, and therefore the technique of processing it, as well as the tools for performing all the necessary operations, are not difficult to master and acquire.
Common patterns
One of the most common aircraft designs is a single-seat lightweight braced monoplane with a high wing and a pulling propeller. This model of a homemade aircraft first began to appear back in 1920. Since then, the layout, design, etc. have remained virtually unchanged. The finished sample today is considered one of the most tested, reliable and structurally proven. It is because of all these advantages, as well as because of the simplicity of the aircraft drawings, that it is an almost ideal option for DIY construction, especially for a novice craftsman. Over a long period of operation and assembly of such aircraft, they acquired characteristic features. They are distinguished by such design features as a wooden two-spar wing, a welded steel aircraft fuselage, fabric skin, a pyramidal chassis, and a closed cabin with a car door.
Further, it is worth noting that there is a small variation of this type of aircraft, which was used in the 1920-1930s. The type of aircraft was called a “parasol”. This model was a high-wing aircraft, which had a wing mounted on struts and struts above the fuselage of the aircraft. This type of high-wing aircraft is also found in current amateur aircraft construction. However, when compared with the usual standard model, the “parasol” is used much less frequently, since from a design point of view it is much more difficult to manufacture such a device, and in terms of its aerodynamic characteristics it is inferior to a standard aircraft. In addition, in terms of operation, they are also worse, and access to the cabin of such a unit is quite difficult, which leads to the difficulty of using the emergency method of leaving the cabin.
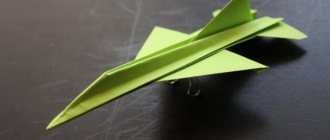
Flying jet plane
If you are used to making origami-based crafts from A4 paper with your children and you are ready to take on a more challenging task, then we would recommend considering this airplane model for children. You can make this fantastic and quite impressive military aircraft craft in just a few easy steps.
- Step 1: Take a piece of A4 paper and find a smooth, flat surface to fold on.
- Fold the vertical center of the paper from side to side, then unfold it.
- Fold the paper in the center horizontally from top to bottom.
- Now you need to fold the paper along a line from the top of the center fold to the bottom corner.
- Next, fold from the top corners to the fold you just made.
- Step 2: Fold the folds you just made so that both are facing each other. Now press the corners down so that the top corners are turned inside the rest of the folded piece of paper.
- Step 3: Fold the top flap and then fold down along the center line. Fold each “wing” horizontally outwards. You may notice that the ends of the wings are forked, there is a reason for this, they are folded and help stabilize the plane in flight. Fold the top of the wing upward from where the top forward flap meets the wing below it. Keep it in line with the rear wind line so that it is straight and perpendicular to the body of the aircraft. The Thunder Bomber is ready!
- Step 4: flight. When throwing the plane, hold it by the middle of the body so it feels balanced, then aim, bring your elbow forward, and gently flick your wrist so it glides through the air.
Now all that's left to do is enjoy the flight!
Simple airplane parts
It is worth considering some design features of these models.
An ordinary high-wing airplane with the name “Leningradets” has the following characteristics.
The engine for such a light single-seat aircraft has a power of 50 hp, and the model is called “Zündapp”. The wing area of the finished model should be equal to 9.43 m2. Take-off weight should not exceed 380 kg. This is very important, especially when choosing a pilot seat. The empty weight of the apparatus is usually approximately 260 kg. The maximum speed that the aircraft can reach is 150 km/h, and the rate of climb at the ground is 2.6 m/s. The maximum flight duration is 8 hours.
For comparison, it is worth considering “parasols”. In this case, an analysis of the model called “Baby” will be presented.
The engine is installed in the LK-2 model, the power of which is 30 hp, which already makes it less powerful than the standard model. The wing area is also reduced to 7.8 m2. The take-off weight of this aircraft is only 220 kg, which includes the pilot's seat and the pilot himself, the weight of the power plant, fuselage and other structural elements. Despite the fact that the take-off weight is significantly less than that of the Leningradets, the maximum speed is only 130 km/h.
Aircraft model making
Among the main advantages of such models, what stands out is that it is not difficult to control the aircraft, as experienced pilots do, since the controls themselves are quite simple. This is especially noticeable in cases where the specific load on the wing does not exceed 30-40 kg/m2. In addition, high-wing aircraft are distinguished by the fact that they have excellent takeoff and landing characteristics and are stable. In addition, the cabin is designed in such a way that it creates an optimal view of what is happening below. In other words, you simply cannot find a more optimal model for self-construction.
It is worth considering in more detail one of the most successful models - the high-wing aircraft, which was designed by V. Frolov.
The wing for such an aircraft was made of materials such as pine and plywood, the fuselage for the aircraft was made of steel pipes, which were connected by welding. All structural elements of the aircraft were made completely covered with fabric using classical technology in aircraft construction. The wheels for the chassis were chosen to be large enough. This was done so that it could take off from unpaved and unprepared sites without any problems. A 32-horsepower engine based on the MT-8 was used as the power unit, that is, the engine. It was equipped with elements such as a gearbox and a large-diameter propeller. The take-off weight of the aircraft with this design and engine was 270 kg, the flight balance was 30% of the MAC. With all these indicators, the specific load on the wing was 28 kg/m2. It was said earlier that it is much easier to fly an airplane like experienced pilots if the load does not exceed 30-40 kg/m2. The maximum speed of the aircraft was 130 km/h, and its landing speed was 50 km/h.
Aircraft model PMK-3
In the town of Zhukovsk near Moscow, the PMK-3 aircraft was created, which can now also be assembled independently. The aircraft differed from ordinary ones in that it had a unique structure of the nose of the fuselage, as well as a rather low landing gear. This aircraft model was designed according to the design of a strut-braced high-wing aircraft with a closed cabin. An entrance for the pilot was provided on the left side of the fuselage. In order to achieve the desired alignment, it was necessary to move the left wing a little back. This is very important to remember when assembling such a model with your own hands. The overall design of the aircraft is all wood, covered with canvas. Wing type: single-spar, with pine flanges.
The basis of the fuselage for this model was made up of three spars. Because of this design, the finished fuselage had a triangular cross-section. A 30 hp engine was chosen as the main power unit. The type of engine is an outboard motor of the “Whirlwind” type, which is liquid cooled. If the aircraft is properly designed, the radiator will protrude slightly from the starboard side of the fuselage.
It is worth saying a little about the fact that it is possible to build airplanes with a pusher type of propeller, but it is very important to remember that this will result in a loss of the thrust force of the device, as well as the lifting force of the wing. Because of these two features, it is important to consider the feasibility of installing such a propeller on a case-by-case basis, based on the builder's goal in creating the aircraft. However, it is fair to say that there were inventors who, while independently building an aircraft with such a propeller, creatively approaching the solution of this problem, were able to eliminate such shortcomings and operate the aircraft without them.
"KIT-set"
How to make an airplane easily? This question has recently become increasingly relevant. In general, it is worth noting that the increase in the number of people who want to build an aircraft with their own hands is ensured by the spread of “KIT kits”. This is a kit that includes all the necessary parts to assemble an aircraft of the selected model. In this case, you will still have to put your hands to assembly, but such a kit helps you skip the stage of selecting elements, adjusting to size, etc. With such kits, assembling an airplane turns into something like assembling a construction set.
Another advantage of a KIT kit is that it will be cheaper than assembling all the elements from scratch. Today there are three ways to acquire your own flying unit. The first is the purchase of a ready-made product, the second is a “KIT kit”, and the third is assembly from scratch. Purchasing a set in this case is an average price option. If we talk about complexity, then assembling an airplane from ready-made and fitted parts is much easier than from scratch yourself.
To sum it up, we can say the following. Firstly, building an airplane with your own hands nowadays is a completely realistic task, but it requires a lot of time and money. If you do not have welding and riveting skills, then you will also have to master them to successfully complete the job. To successfully assemble an aircraft, it is necessary to have drawings available, as well as an assembly diagram in which each stage will be clearly presented. If you don’t want to do all this, then you can purchase a “KIT kit”, which will simplify the task and reduce it to assembling a kind of construction set.
Paper walking glider
When making airplane crafts for kids, you just can't go past this paper glider! You don’t need any special materials to build it, and the result will delight your children.
- The first step is to cut out a 22cm x 27cm rectangle from light colored paper. Tissue paper works best. Wax paper holds its shape much better. The ratio of the dimensions of the rectangle is important to ensure the correct angle of the wing tips (changing the ratio will change the distance between the leading and trailing edges relative to the width of the wing tip).
- The wingtip angle is determined by the distance from the leading edge to the tail (based on the original dimensions of the rectangle of paper used). The leading edges are folded down, the tail wedge section is cut from the tail section, and the wedge fold is added to the center tail section.
- The winglets are adjusted so that the paper airplane flies in a straight line. If the craft tends to spin in one direction or the other, it will have trouble flying in the opposite direction.
- Find a room or area with few drafts. Any wind other than the one you create with a controlled slope will cause the glider to go off course.
- Launch the glider as high as possible to establish stable flight before descending to a controlled grade.