Many novice craftsmen want to have a small but functional circular saw in their workshop. You can buy a factory-made machine, but it will be quite expensive. This is the path taken by professional carpenters, who have a direct material dependence of their financial condition on labor productivity. The invested funds quickly pay for themselves and bring direct profits.
DIY stationary circular saw
Amateurs have a good way out of this situation - to make a circular saw themselves using the tools that most craftsmen have. But before starting work, it is recommended to familiarize yourself with existing engineering solutions and operating features of the equipment.
Design options
Now you need to get a little familiar with possible design solutions.
| Circular saw type | Brief description of technical features and performance characteristics |
With asynchronous electric motor | Single-phase motors must be purchased in specialized stores; in addition, you must have a shaft with bearings. This is the most difficult to manufacture and most expensive circular saw. If you accurately calculate all the costs, including the cost of materials for making the table and lost time, then it is more economically feasible to buy a ready-made machine for home use. In addition, it is impossible to completely manufacture a durable metal saw frame with all the adjustment devices at home; you will have to turn to mechanical trowels for turning and milling some parts. Beginners are not recommended to use this version of a circular saw. |
Washing machine motor | Such solutions are offered by older carpenters; they still remember washing machines with powerful engines. In those days, no one saved electrical energy; power was always set with a significant margin. Today the situation has changed; low-power, economical motors are installed on washing machines. There is no point in making a machine based on them that can only saw plywood a few millimeters thick. |
Use an angle grinder for the drive. | An extremely undesirable option for several reasons. ● Firstly, the recommended rotation speed of the circular saw shaft is no more than 2–3 thousand rpm. per minute, and the grinder gives 9-11 thousand rpm. The material used to make the teeth, the sharpening angles, the amount of spread and other very important parameters of circular saws are calculated based on this parameter. It is strictly forbidden to use them at such high speeds. ● Secondly, the power of the grinder is approximately 1 kW, which is very low for a stationary circular saw; it will not be able to saw thick boards. And for cutting only slats, it is not practical to make a life-threatening stationary machine. |
Conclusion. For a non-professional craftsman, the most optimal option for making a stationary circular saw is to use a portable circular saw as a drive.
Workbench arrangement for a manual circular saw
Essential elements:
- a frame on which the saw itself and the work table are attached;
- Desktop;
- ready-made saw unit, the manual circular saw itself.
Sometimes the frame is covered with sheet material from the sides. Alternatively, such side material can be quite thick and durable and at the same time serve as a frame.
When covering (closing) the sides, two points are taken into account:
- Removing sawdust should not be difficult;
- The space should have open areas so that the engine heats up less.
Advantages of a portable saw
Hand circular saw
There are several very important technical characteristics that make this tool recommended for such purposes.
- The saw can be equipped with a blade with an outer diameter of 350 mm, which allows cutting lumber with a thickness of 70–85 mm. On the machine, this depth decreases slightly; boards with a thickness of 60–75 mm can be cut. This is quite enough for most household wood crafts - from complex furniture to simple toys.
- The engine power is at least 2 kW, it can withstand significant loads, and special effective forced ventilation quickly removes heat, which allows the mechanisms to operate for a long period of time under normal thermal conditions.
- The rotation speed of the saw shaft meets the existing requirements for woodworking cutting tools. This allows you to obtain excellent quality cuts and comply with safety regulations.
- The hand saw can be fixed to the table in such a way that, if necessary, it can be quickly removed and used as usual. At the same time, all initial technical characteristics are completely preserved.
Additional attachments to control cutting accuracy make working with the circular saw easier
Bosch PKS 16 Multi hand-held circular saw - lightweight and compact tool
Rockwell RK3440K corded mini circular saw with laser pointer
In connection with such advantages of portable saws, we will not consider dubious options for manufacturing stationary circular saws, but will only dwell on this.
Video - How to choose a circular saw
Requirements for the sawing frame
Some models and brands include a factory-made frame for fixing the saw in a stationary version. These are devices with a small workbench area, on which it is difficult to evenly place and guide a workpiece longer than 1 m, especially a heavy one, along the parallel stop. Therefore, craftsmen often make such tables themselves for their small workshops.
The design requirements are simple.
- The entire structure must be strong enough, especially the corners or beams on which the circular itself and their fastening are attached.
- The height of the table should correspond to the height of the master. You need to work without bending down or reaching too high a platform. The average height is 65-75 cm. Sometimes low structures are made, which are then placed on a workbench of a suitable height.
- The work table (platform) must have a sufficient support area for the workpieces with which the work will mainly be done. For example, for cutting timber frame bindings or furniture legs, a table length of up to 70 cm -100 cm with a width of 50 cm to 100 cm is sufficient. The wider the table, the wider the workpieces (boards, sheets) on it can be unraveled without overhanging the edge of the table. An area is also provided for mounting a parallel stop (thrust bar) on the work table.
The large table makes it possible to conveniently work with wide and long workpieces. After cutting, it can be used as a self-sufficient workbench. Costs - takes up more space, more material consumption on the bed and platform.
Step-by-step instructions for making the machine
The technology we offer does not involve the use of complex woodworking machines and equipment; this makes the process much easier for beginners. Before starting, it is recommended to make a simple device in the form of a large wooden square. It is made from a 10×30 mm block and a 10×50 mm strip of plywood. It will greatly simplify the process of marking and checking the correct dimensions of individual machine parts.
The table is made from old laminated chipboard, but special moisture-resistant plywood for concrete work is excellent. If you have the opportunity, buy this material, you won’t regret it. It is better to choose foreign manufacturers, but it will cost more.
Step 1. Cut out the material for the tabletop.
Cutting the material for the tabletop
The specific dimensions do not matter much; proceed from the size of the shield and the free space in the workshop. You need to understand that workpieces are better held on a long table, which makes cutting long boards easier.
To ensure an even and perpendicular cut, use the prepared device, the rail should rest against the edge of the chipboard, and the saw should slide along a strip of plywood secured with a clamp.
Fixed rail
Sawing off chipboard
Our central part of the machine table is 36 cm wide, two side parts are 18 cm wide. Between them, wooden slats made of hardwood will be installed for attaching the cross-cut carriage. This carriage makes trimming and cutting parts much easier.
Measuring the distance for sawing chipboard
Sawing process
Three parts of the tabletop, between which there will be loose slats that move along with the carriage while cutting materials
Step 2. Place the saw on the center of the table and use an awl to trace the outline of the metal pad.
Marking
Step 3. Drill holes in the corners of the table; this can be done with an ordinary drill or on a drilling machine.
Drilling holes
Step 4: Using an electric jigsaw, carefully cut out the opening for the saw.
Cutting an opening for a saw with a jigsaw
Using this as a template, draw the liner and use a jigsaw to cut it out.
Liner markings
Cutting out the liner
There are options not to make an insert; in this case, the maximum cutting depth is reduced. Make a specific decision depending on the planned use of the saw, but practitioners always advise relying on maximum parameters. The fact is that no one can foresee the requirements for a machine in the long term.
Step 5. Attach the saw to the table. Adapt various available materials for this, select them according to length and thickness.
The saw needs to be secured
Photo of a saw on a tabletop
Important. Never screw screws into chipboard without first drilling a hole. The slab is not designed to withstand such loads and may crack.
Secure the saw to the back of the table.
The saw is secured with a block and a metal plate
Bottom view
Step 6: Reinstall the liner. It is made from durable material, preferably steel or aluminum, but plastic will also work. The liner must withstand strong shock loads that occur during sawing; chipboard cannot cope with such tasks.
Liner markings
Hardware used for fastening
The part is fixed to the saw blade, you need to prepare holes and use various hardware.
Fixed liner
Step 7. Make markings for the sides of the tabletop; they will be fixed using self-tapping screws. Attach all parts of the table to the cross rods with glue. On the front side, they are additionally screwed with self-tapping screws with countersunk heads; the holes for them must be countersunk.
Step 8: Check the movement of the wooden slats. If they jam in some places, then you need to find the cause and eliminate it. The slats should slide freely, but without wobbling.
Checking the travel of the racks
Practical advice. It is much easier to install metal profiles instead of slats. This requires less time, and the quality of the machine’s work increases significantly.
Example of a table for a circular saw, metal profiles installed
You can buy profiles at any hardware store; if possible, purchase aluminum elements. They have a low coefficient of friction, which is very important for the smooth movement of the cross-cut carriage.
Step 9. Attach chipboard or plastic boards to the bottom of the table; they prevent the slats from falling out.
Test the operation of the machine. Temporarily place it on a flat surface, plug it in and cut a few boards.
Switch for easy switching on of the saw
Immediately pay attention to uncharacteristic sounds and vibrations. It is necessary to find out the reason for their appearance and eliminate them immediately. At this stage of manufacturing a stationary circular saw, adjustments are much easier to make than on a fully assembled mechanism. Everything is normal - continue assembling the equipment.
Video - Simple sawing machine
Video - Circular saw table
Manufacturing of table side supports and sawing devices
Once you have corrected any problems found during testing, use your saw to make blanks for the sides of the table. The sizes are arbitrary, you can link them to your actual needs and the parameters of available materials.
Step 1. Prepare blanks for the sidewalls.
Practical advice. To speed up the trimming process, attach a temporary device to the saw - attach a small piece of flat board under the square to the rail with self-tapping screws.
After trimming the workpieces, the temporary device is removed and the machine returns to its previous state.
Step 2. Place the table on permanent legs, drill holes and countersink them for countersunk screw heads.
Step 3. Attach boards of the appropriate length to the bottom of the sides. They strengthen the structure and increase the support area. This increases the stability of the structure, which is very important for a compass machine.
Interesting fact. Have you ever wondered why all the old machines have a heavy cast frame? In those days, the domestic industry could not produce precise parts for high-speed mechanisms, because of this, beats inevitably appeared during their operation. The heavy bed dampened vibrations and improved the quality of processing. This is to point out how important the quality of all circular elements is.
Step 4. Test the structure again, this time applying maximum loads.
Device for feeding sawn materials
Side support of the table
Video - Homemade stop for a circular saw
Making the carriage
Carriage diagram
It is made from a chipboard shelf 16 mm thick.
Step 1. Drill holes for the runners along the edges and countersink them. The distance between fasteners is approximately 10 cm.
Step 2. Screw the base of the carriage to the wooden slats installed on the tabletop. Check its progress; if there are problems, the sliding wooden surfaces can be smeared with soap or paraffin. Large jams will have to be sanded with fine sandpaper. Work very carefully, check the progress, do not remove excess material.
Step 3. Screw the two backs, constantly measure the corners, they should all be straight.
Step 4: Cut the hole for the saw. This is done in several stages.
- Place the carriage in the grooves, lift it up, the plane should not touch the saw teeth.
- Turn on the saw and slowly lower the carriage. The hole is sawed until the carriage is lowered to a horizontal position.
- Carefully make a hole along the entire length of the carriage.
- Check the angle, achieve the correct position. If everything is normal, then you need to additionally secure the carriage backs.
Step 5. Install a stop parallel to the saw and make sure it works.
Carriage for table circular saw
Front view. For ease of movement, the carriage is equipped with a handle
The stationary circular saw is ready for use; you can make various wood products with your own hands. This is a very exciting and rewarding process.
How to saw a board evenly lengthwise and crosswise
Video - Carriage for circular saw
A stationary circular saw greatly increases productivity and improves safety. Every novice craftsman should have such a machine; it can be made using a minimal set of tools. We talked about only one option for making a saw, but there are many other equally interesting solutions. How to make different types of tables for a circular saw can be read on the pages of our website.
Ready-made solutions from the store
In addition to the simplest small beds for stationary work in the kits of some models, there are many other ready-made solutions on sale. Among them are folding workbenches priced from 1.5 to 10 thousand rubles, which can be adapted (modified) for working with a manual circular saw in a stationary mode.
Disadvantages of such solutions: folding workbenches are not designed specifically for circular saws and require modification. These are often flimsy structures, especially cheap ones, and may not be suitable in principle. Because they won't withstand the load.
There are also special tables that allow you to mount both a circular saw and other power tools: jigsaws, milling cutters. But the price for such products is high, sometimes more than 40 thousand rubles.
As an example, in the photo there is a WOLFCRAFT Master cut 1500 workbench:
Special tables are a serious decision, but at a serious price.
In addition, the special table has a small area. And when making a homemade version, it is possible to make a desktop of exactly the dimensions that a particular master requires for his tasks.
The important thing is that you can assemble both the simplest version of the machine and a more complex one - with a carriage (sled) that moves along guides, with a marking ruler along the edge of the table, etc.
Now the guides
There is no point in specifically describing the limit bar. The design is clear from the photographs. To prevent the bar from moving after adjustment, two side screws are used. The front guide (slider) has a rather complex design. This is due to the fact that it has been redone and refined many times. If I did it again, I would do it differently. In addition to the usual requirements - rotation at an arbitrary angle with position fixation, easy movement, there were also special requirements. I wanted it to be non-removable, and at the same time not to interfere when there is no need for it. As a result, it is made reclining. The slider itself moves along a guide and with the help of a bearing along the surface of the table. The bearing was not chosen immediately. From the beginning there were experiments with plates from wood to fluoroplastic. But all this created scratches on the aluminum table. If you make a table out of steel, then there will be no such problem. Thus, the slider moves along the guide. It can be folded back by rotating around this guide. To do this, pull the spring-loaded handle. She pulls back the plastic cracker preventing the slider from reclining spontaneously. Clamps were made as additional bells and whistles. They will, of course, not be secured with clamps. But, so far, we haven’t gotten around to fastening it. So that the circular saw could be stored in a closet without any damage to it, a plywood casing was made. In this case, it can be safely removed.
Drawings with dimensions for homemade products
There are dozens of drawings and examples of a wide variety of designs online. However, no two homemade machines are alike. Even if they are made according to the same drawing, there will still be any differences in materials, sections, fasteners, and dimensions. Although no one forbids a master to accurately copy any machine. As an example, here are drawings of a simple frame for a circular saw.
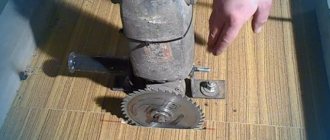
How to make a mini lathe with your own hands
In general, today consider how to make a mini lathe with your own hands. Using this machine you can process small wooden blanks, but it is made very simply and from readily available materials. Well, I think that's enough of the long prefaces, let's go.
And so, for this mini machine we need:
- wooden slats - a large wooden board - a powerful electric motor - large bolts and nuts for them (with washers, of course) - one ball bearing - three nails
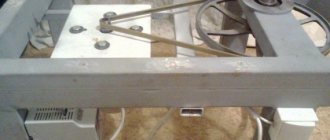
Let's get started. First of all, we need to take a large wooden board (the entire lathe will be located on it, so it’s better to take the size you need), two wooden slats and four squares, also made of wood.
For the base of the structure, you should cut a blank from the board with dimensions of 25 by 45 cm. On the larger side of the board, you need to glue one of the wooden slats; as you probably already understood, it should also be 45 cm in length. The author of the homemade product glued it using paint glue.
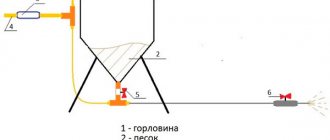
Device for cutting beams
To cut a large number of identical beams, it makes sense to make a device called a saddle. It consists of three parts connected in the form of the letter “P” (back and two sides). The width of the backrest should correspond to the width of the timber being cut. The width of the sidewalls is selected to such a length that they can provide sufficient support for the edge of the circular saw sole until the saw blade enters the workpiece material. It is also necessary to provide grooves or holes in the sidewalls for reliable fastening of the device to the timber being processed using clamps.
Workbench assembly diagram.
Work with this device is carried out as follows:
- the cutting line is marked;
- at a distance equal to the working distance from the cutting line, the device is set and fixed;
- The beam is cut by moving a circular saw along the side surface of the device.
The advantage of this device is that there is no need to reconfigure when cutting timber whose thickness exceeds the reach of the saw blade. To do this, two saw passes are made from opposite sides.
The design of the device for working with bars can be slightly improved by analogy with the modernized guide bar. To do this, bars are attached to one or both sidewalls at a distance equal to the working distance, serving as a stop for the sole of the circular. This way, the edge of the side piece will coincide with the required cutting line.