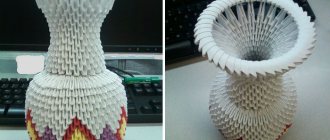
We study the popular crazy-wool technique: ideas for all occasions
The crazy vul technique literally translates as “crazy thread”. The name itself conveys the entire message of products made using this technique. According to the principle of technology, it is a bit like felting. Not a single person is able to calmly and indifferently pass by the things of Crazy Vul.
The technique is used both to create interior elements, such as pillows, and to create accessories and clothing. All items carry the dynamism and boldness of color, texture and other combinations. At first glance, it may seem that the product is made carelessly, but this impression is very deceptive, because when laying out the craftswoman thinks through every detail, every stroke. Many hours of work and a lot of labor are put into one thing.
There are two ways to create things using the crazy vul technique: the first method is using wallpaper glue and thick film, the second is without glue, using water-soluble interlining instead. The operating principle is the same in both cases.
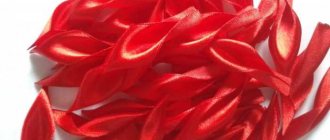
Let's consider a master class on making a product using non-woven fabric. You need to cut two pieces of non-woven fabric to the desired size. Then cut pieces of yarn, lurex, cord, braid and other decorative elements. Threads can be selected in the same key, or you can play with contrast. Next, you need to spray the base with a fixative, it can be a special temporary fixation spray, or you can take the most ordinary hairspray. Both products are equally good.
After this, we begin to lay the yarn on the base. After the first layer of yarn, you can add decorative elements, then switch back to threads. We alternate this way until the color scheme is completely satisfied, and the filling density should also be taken into account. You can create a very delicate and airy thing, or you can fill it so that you end up with a full-fledged warm fabric.
When all the planned elements are placed on the base, you need to spray the entire work again with a fixing agent and cover it with a second layer of non-woven fabric. The fixing agent acts as a light glue, so you need to connect the parts quickly enough.
The resulting workpiece must be carefully stitched on a sewing machine, the direction of movement should be from edge to edge. These can be straight lines or zigzag, forming diamonds or squares. Silk threads are best suited for this work. During operation, you must monitor the machine so that the film does not move. When the density of the stitches allows the fabric to be integral, the work is lowered into a basin of warm water until the non-woven fabric is completely dissolved. This process can be accelerated if you influence the canvas through friction and creasing. After dissolution, rinse the product additionally, wring it out and dry it flat on a towel.
Crazy Wool. A little about technology
Hello, dear friends! I decided to use this opportunity as a personal blog and tell you a little about how I make my products using the Crazy Wool technique. I became interested in it at the same time as the passion for felting overwhelmed me - yes, it happens! Both felting and crazy wool provide enormous opportunities for creativity. If only taste and a sense of proportion would be enough! Well, my air zodiac sign had an effect - I like a change of activities.
And so, about the Crazy Wool technique. The author of this technique for creating non-woven fabric is German designer Jeannette Knacke. Her books can be bought, but rather more for inspiration, because... The technology itself is given no more than 2 pages of large text. In a nutshell, yarn is laid out on water-soluble interlining and covered with a second piece of interlining on top. Everything is chipped or swept away along the contour and inside, very often, so that nothing moves! And it is sewn - it can be randomly, or in parallel lines. The first line is laid along the contour of the part, and all the rest must cover it. This is necessary for the “network” we create to last. Finally, we immerse the parts in warm water and get rid of the auxiliary material, which, by the way, is not very cheap. We dry and collect.
My idea usually comes from the materials I have collected. I spend a long time sorting through threads and yarn, trying to find the most interesting and harmonious combinations. If something doesn’t work out, I put it off until the very yarn appears that will connect and transform everything. Well, it happened, in a separate package there are from 3 to 5-7 types and shades. Next, I make a sample, measure before and after water procedures. The fact is that during the process shrinkage occurs, not the same as in felting, but also not small - 5-15%. Taking into account the shrinkage, I make a pattern. For crazy vultures, very simple patterns are recommended, based on rectangles, but I like to use ones that are closer to the curves of the female figure, with darts and fitted ones. I cut out parts from water-soluble non-woven fleece, enlarged by the calculated factor. 2 for each part. And I begin the layout. Although the very name of the technique hints that the thread does what it wants, I do not allow it to do so. Otherwise, you will end up with a very non-uniform canvas - thick in some places, empty in others. I fill the area of the part for a long time and carefully. I fix each layer with hairspray (replacement for fixing glue). Then comes the process of laying out the top decorative layer. When the result suits me, I cover it with a second non-woven piece and chop everything off for a long time and carefully. There is another important point. It is advisable to lay out all the parts at the same time so that they do not differ in density and the decor fits together more clearly (if this is intended). If the yarn is winter, fleecy, then it’s also good to put large, heavy books and magazines on these sandwiches for several hours - to make them flatter. Then I sew on a manual sewing machine. Once I sewed it on an electric one, I really didn’t like it - I spent the day correcting the fabric. I make frequent stitches, on average every 8-12 mm. This process is not very fast. Then everything is rinsed under streams of water. A butterfly hatches from its fleece cocoon. Before sewing the product, you need to seal all the ends, because the threads on the bobbin ran out more than once and suddenly. I thread them into a needle and hide them in linen. And I decide how to design the neckline and bottom edge. Sometimes scallops made of threads look very organic, when a smooth edge is asked for, I tie it.
Summer yarns - cotton, linen, viscose - are heavier than wool, and knitted items made from them have a lot of weight and stretch. For products using the Crazy Wool technique, you need 1.5 - 2 times less thread, accordingly, the weight of the product also decreases, the stitches fix the fabric well - as a result, it does not deform either when worn or after washing. In general, the technique is not complicated, but it is painstaking and time-consuming. But it is worth the expense - the items look very unusual, are incredibly comfortable to wear, and care is not difficult. I just don’t recommend carrying handbags on a metal chain on your shoulder - you can damage the fabric. But this also applies to knitwear and other delicate fabrics. And use quality yarn. Loosely twisted or roving are acceptable for knitted fabric, but you should not use them for Crazy Wool - the item will quickly lose its appearance.
I hope my story didn’t bore you, was interesting and you were inspired to do something in Crazy Wool. I will be glad to hear your feedback and questions!
I decided to post some of the products, I wear most of them myself, some of my favorites have been around for 4-5 summer seasons!
My own master
How I love all these crazy things!
Another amazing technique in my opinion is crazy-wool. It’s like a “pizza” made from flaps, only working with threads.
Here is a video of MK from Olga Bulanova, the lesson is really long, super detailed, with cute chatter on abstract topics, but a very interesting process and result. The craftswoman took on the most difficult type of thread - slippery viscose threads, but she finally completed the job. Well done Beauty!
And this is an amazing coat and a very detailed master class from Elena Anfinognnova with all the descriptions and photos.
For several years now I have been working with this wonderful technique - “Crazy Wool”. Very often I get asked questions in my personal email regarding this technique. The technique is truly limitless for imagination, and the models and play of colors fascinate the eye. Of course, it is impossible to tell the entire process of sewing a coat in one master class, so I will tell you, using the example of a sleeve, how I make parts for a coat.
For a coat using the crazy technique you will need:
- water-soluble interlining or Avalon brand Guterman or Madeira;
- the usual thinnest interlining (I use covering material);
- silk for lining;
- sketch of the drawing (optional);
- threads to match the main yarn, pins, scissors.
Stages of working on a coat:
1. Manufacturing of parts - blanks from which the coat will be cut out. To do this, we take insoluble non-woven interlining and make a larger blank for the future part by 5-7 cm (on all sides), not reaching the bottom by 15-20 cm. From soluble we make the same blank, but only this time the length of the entire future part + 15- 20cm. We start laying it out on the part where the insoluble interlining meets the soluble one. That is, the inside of the sleeve will be lined with insoluble non-woven interlining, which in turn will prevent its further deformation during wear.
2. We begin to lay out the drawing. Using a sleeve as an example:
We do the same for all the details. And we sew it on the machine randomly with a very frequent line.
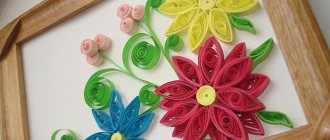
Masterpieces using crazy wool technique
Today we want to introduce you to the amazing crazy wool technique - “crazy threads (yarn)”. Surprising as it may seem, it is not at all necessary to have remarkable patience and be able to work with knitting needles or crochet in order to create masterpieces using this technique.
Crazy Wool is a fashionable and interesting way to create non-woven knitwear. Thanks to it, in a short time you can create large things, knitting which would take much longer. And a pleasant bonus is the fact that with this technique, the yarn consumption for any product is reduced by 4–5 times and less time is spent on its manufacture.
Jeannette Knake came up with this technique for those who are not very “friendly” with either knitting or sewing and at the same time want to have beautiful and exclusive things.
The crazy wool technique is used to create beautiful openwork stoles, shawls, coats, skirts, dresses, tablecloths and much more, including accessories.
Another name for this technique is “sandwich”, as the threads are laid in layers, creating an openwork pattern. If there are few layers, the result is a light, airy product; with five layers, the product is dense and very warm. In the crazy wool technique, you can use any thread and wool for the pattern.
How to make a product using the crazy wool technique
There are several techniques
Let us consider in detail the manufacture of such a stole
source MK
You will need:
1. Water-soluble interlining or water-soluble stabilizer for embroidery (sold in craft stores), or tracing paper (as in MK)
2. Special fixative or strong hold hairspray
3. Yarn.
4. Sewing threads
5. Scissors, sewing needle
6. Sewing machine
Manufacturing:
From a roll of tracing paper 42 cm wide, cut two pieces 185 cm long.
We draw one segment with squares (diamonds) 2*2 cm and set it aside. Those who scribble chaotically may not do this.
We lay out the second piece of tracing paper and spray it with varnish or a special fixative.
We begin to randomly lay out the yarn.
We lay out the yarn in two colors at once
Lay out the first layer.
Now we pass the yarn along the edge of the product. Only after this we fix the first layer with varnish.
Lay out another layer of yarn and fix it with varnish. We do the same with the third layer. Now let's do the final touch. We take white yarn and pass it over the product.
Then - red
Fix with varnish and press the yarn by hand
The laying out of yarn is finished and so is the creative process. Cover with a second layer of tracing paper.
Then we put the load (pillows, blanket) and forget for 20-30 minutes. After 20-30 minutes we begin the routine. We sweep away the product. We start basting from the edge of the product and move towards the center.
We sew along the squares along and across, across and along, or chaotically. Doesn't matter!
Those who have used water-soluble non-woven fabric go to wash their product. Well, if you use tracing paper, then stock up on patience and a garbage bag. We begin to remove the tracing paper. Hooray! The tracing paper was removed. Now we can see our stole in its original glory. Let's go do the laundry. Dry on a towel.
Another interesting execution of the crazy wool technique
New technique - “crazy wool”
To dress fashionably and beautifully, you don’t have to buy expensive clothes. Let's learn a new technology for making wardrobe items called crazy wool. If translated from English, it would be “crazy wool.” What kind of technology is this?
The author of this unusual technique is Jeannette Knake. She came up with it for those who like to wear bright clothes that are different from others. But this is not knitting or sewing, but a completely unusual technique.
When mastering the technique, non-woven knitwear is created, from which you can then sew anything you want - from a blouse to a coat.
Sequence of work
To get a working fabric, you need to take knitting threads. These can be scraps or remnants of threads of different thicknesses and textures. Suitable scraps of fabric that can be knitted into a pattern as you work. Pieces of wool for felting and thread for sewing will be suitable.
You will also need the following materials:
- Water-soluble stabilizer for embroidery;
- Spray fixative.
Stabilizer is a translucent fabric that can be purchased at embroidery stores. You will also need a sewing machine. For beginners, you can create an openwork scarf.
- Lay out a piece of stabilizer according to the size of the product you plan to make. If the product is complex, then the stabilizer must be cut according to the pattern.
- Then the fixative should be sprayed over the surface of the stabilizer.
- To create a pattern, you need to lay out threads on the stabilizer. In the first layer, the threads are laid out in a chaotic manner.
- The second layer of threads is also laid out randomly. If you want to create a drawing. Then, already in the second layer, begin to lay out its outlines with threads of the color you need.
- The third and all other layers are laid out in accordance with the selected pattern. Here you should already maintain the selected color. How many layers of thread will be required? It all depends on the complexity of the image. For a simple openwork scarf you will have to apply only 5 layers of threads.
- So, you have already laid out the required design, now secure it with a fixative or hairspray. After this, cover the product with another layer of stabilizer on top.
- Sew the resulting fabric on a machine in any direction. Make the distance between the seams no more than 2 cm, and if the ornament is small, then 1.5 cm or even less.
- Place the stitched product in warm water to dissolve the stabilizer.
- Wait until the product is completely dry, only then tie the edges with a hook or treat it with a suitable braid.
Sewing master class: “Lazy” sweater using the Crazy wool technique
Author: Svetlana Gordon
Author's store
The basis of the whole process is water-soluble interlining and temporary adhesive spray. I used primitive patterns, like knitting, although, in principle, you can make things of any complexity of cut. Jeannette recommends laying the yarn between two layers of water-soluble, but I don’t really like the “holes” between the threads, so I laid the threads on silk (you don’t have to use silk, you can lay it on any fabric, but silk is more pleasant to put on))).
The fabric was drawn with chalk into even stripes, so that when laying out the yarn, one could be guided by them and not warp the rows. Then I sprayed the fabric with spray and laid the yarn in rows (you can do it in an artistic mess, but in this work I did it in rows). Be careful with the spray - it tends to put “blots” on the silk, then they don’t wash off. I tested different types of glue and didn't notice much difference.
You can lay it out immediately according to the cut out pattern, this will save fabric, but will add headaches with edges (zigzag processing or overlock). In this model, I tucked the edges under the knitted patchwork.
Silk is very slippery, so to prevent the fabric from moving, I pulled it with pins onto the travel foam. Once again I sprayed the spray on top and pressed the water seal. I drew it out in advance with a simple pencil and outlined future lines.
I secured the entire “structure” with pins. It is not for nothing that the spray is called “temporary”; the gluing effect decreases quite quickly and, during the quilting process, the interlining is held mainly by pins. We have a “sandwich”: fabric - yarn - water-soluble interlining.
I stitched on the machine along pre-marked lines across the laid out rows of yarn.
On the finished canvas (silk reverse), I drew a pattern with chalk and laid a line along it, then cut it out and finished the edges with a zigzag.
I dissolved the interlining with water. It is better to soak for a while and then rinse under pressure.
That's all, actually). The sweater is sewn. In this model, the edges are decorated with knitted patchwork, the cuffs and collar are decorated with elastic.
Oh, I almost forgot... It is always very difficult to perfectly and accurately sew a knitted piece to the fabric.
Here I used this method: on the fabric, along the line of connection with the future knitting, I first laid a large machine stitch, and then, already on it, using a hook I picked up the first row of knitting. Then knit as usual. The junction is very neat.
And from the inside it is convenient to knit a small strip using the same method; From the same line (wrong side), pick up loops and knit a couple of centimeters, close the loops and hem to the main collar. So a piece of fabric was neatly hidden on the reverse side.
It’s even easier to do without knitting
Thank you for your attention
In the crazy vul technique, every stroke is important.
It just seems that the threads are arranged as they should. Each craftswoman thinks about the pattern for a long time, then selects the threads and only after careful preparation begins production. For beginning craftswomen, a detailed description of the work progress.
Master class using non-woven fabric
- Cut 2 pieces of non-woven fabric.
- Spray the base with a soluble spray or hairspray.
- Lay out braid, yarn, all decorative elements, and threads on the base.
- Lay it out until the pattern or filling density suits you. You can make a delicate, airy thing, or you can fill it so that you get a warm, dense canvas.
- When you are satisfied with the density and pattern, spray with fixative.
- Cover with another layer of non-woven fabric.
- Sew the resulting fabric on a sewing machine with silk threads. The lines can be very different - straight, zigzag. It may turn out to be circles or squares, it doesn’t matter, the main thing is to make sure that the base does not move.
- After receiving a solid piece of cloth, place it in a container of warm water. Hold until the interlining is completely dissolved.
- After dissolving, rinse the product, wring it out, straighten it well, and place it on a towel.
If you're just starting out with this technique, try making a small decorative piece, such as a notebook cover.
If you want to do without interlining, then use regular tracing paper or paper towels and a gelatin solution. Once you learn how, you will make yourself a dress that will make everyone delighted!