Probably many of you watched concerts of different styles and it was impossible not to notice how the electric guitar plays, how the masters of this instrument perform stunning solo parts. Perhaps many would like to try to play something themselves, play with the sound of an electric guitar, pluck a few strings and feel the power of this instrument...
What is a pickup
What is a guitar pickup? In simple terms and briefly, these are metal cores with magnets placed inside an inductor.
Steel strings, changing their position above the metal cores, create magnetic vibrations. With the help of an inductor, these changes in the magnetic field are converted into weak electrical signals.
The leads of the inductor are connected to the sensitive input of the device for amplifying and processing audio signals. As a rule, this is a special input with a high signal gain, an example would be the microphone input of a personal computer sound card or other low-frequency signal processing device (20-20000 Hertz).
The microphone input has a high gain and is excellent for these purposes; we will use it in the experiment.
Piezoelectric effect
- the ability of some materials to generate an electrical charge in response to applied mechanical stress. Piezoelectric crystals exhibit the piezoelectric effect. This piezoelectric effect has two properties. “>The first is the direct piezoelectric effect, which means that the material has the ability to convert mechanical deformation into electrical charge. The second is the opposite effect, in which the applied electrical potential is converted into mechanical strain energy. The piezo element of a lighter is an example of this effect.
Carcass for pickup
First we need to make a frame for the future guitar pickup. Below is a drawing of such a frame:
Rice. 1. Drawing of the frame design for a homemade guitar pickup.
As can be seen from the drawing, two plates are attached to the base with six holes at the top and bottom, thus forming a shuttle for winding the inductor wire.
Now I’ll tell you step by step how you can make such a pickup for a guitar, everything was done in haste, so it didn’t turn out very neatly, but it was quite functional - I was pleased with the end result.
Let's start production
First, the frame was made of wood, the upper and lower plates were cut from double-sided thin foil fiberglass. It is advisable to take a tree that is hard and dense; ash and beech are good choices. Instead of wood, you can use other materials without magnetic properties - plastics, plastic, etc.
Rice. 2. Wooden guitar pickup frame.
Rice. 3. Wooden guitar pickup frame with fiberglass plates.
Why plates made of foil fiberglass? - later, the contact with the foil for each of the plates will be connected to the ground (common wire), thus forming an additional screen and protection from interference and interference.
I did not round the corners of the fiberglass plates; later this area will be useful for mounting in the resonating hole of an acoustic guitar.
Next, it was necessary to find material for the cores - steel rods with a diameter of about 4 mm. For this purpose, a steel guide from an old dot matrix printer was used; it has a slightly large diameter - 5mm, but nevertheless it is an excellent material for cores.
Rice. 4. Steel guide from an old dot matrix printer.
Having prepared all the materials and knowing the diameter of the cores (5mm), you can drill six holes in the base, and then in the side plates of the future frame.
Using a ruler and pencil, six holes were marked, as shown in the drawing in Figure 1. To make sure that everything is correct, the base of the frame was immersed under the strings of the guitar, in this position you can check whether the axes of the intended holes correspond to the axes of the strings - I had to make a little adjustment.
For convenience and safety of drilling, the wooden base was wrapped twice in thin cardboard and then clamped in a vice.
You need to clamp it carefully, with little force, the main thing is to hold it firmly. We drill holes slowly, with a very sharp new drill and at high speed. With the use of a hand drill, this turned out to be not an easy task...
Rice. 5. Drilling holes in the wooden base of the pickup frame.
After drilling several holes with a hand drill, it became clear that things were bad. It was impossible to get the holes clearly in the center. A drilling machine would work well here, but I didn’t have such a unit.
It was decided to abandon the use of wood; a material with a higher density and, again, without magnetic properties was needed - a piece of organic glass was found.
With plexiglass we managed to drill all the holes more or less accurately the first time.
Rice. 6. Drilling holes in the base of the plexiglass pickup frame.
The result was this frame-base for the future pickup:
Rice. 7. Ready frame-base for the future pickup.
The base of the frame was attached to one of the fiberglass plates, using an awl to mark where the two outer holes on the plate needed to be drilled. We do the same with the second plate and drill the intended holes in them.
It's time to make the cores. As previously written, for the cores I used guides from an old dot matrix printer with a diameter of 5mm.
It is necessary to cut off six cores of equal height - for this we take the height of the plexiglass base of 10 mm and add about 4 mm to it (the thickness of two PCB plates + reserve), as a result it turns out that we need cores with a height of about 14 mm (the excess can then be filed off with a file and accurately fit).
After the cores are ready, we take two of them and insert them into the outer holes of the base, place one of the plates on the cores, and drill all the other holes in the fiberglass plate using the holes in the plexiglass. After this, we place the second plate on the other side and also drill holes in it.
This is what happened as a result of the work:
Rice. 8. Frame blank with drilled holes.
The edges of each of the plates, along the entire perimeter, need to be sanded a little so that they are not sharp and, when subsequently laying the wire on the reel, do not damage the enamel on it.
Rice. 9. Pickup frame with cores assembled.
To securely fasten the frame, I decided to screw the plates to the base using small self-tapping screws, the kind that can often be found in small-sized Chinese-made toys.
First, I drilled holes in the plates and the plexiglass base, using a drill slightly smaller in diameter than the diameter of the screws.
Rice. 10. Fastening the plates to the base using self-tapping screws.
The frame of the future acoustic guitar pickup is ready:
Rice. 11. Frame for a homemade pickup assembly.
Note:
Phase/antiphase switching is also used in tone block mods through Push-Pull potentiometers and toggle switches. Although you can wire it to normal volume, although this is a dubious idea.
These are all the options for connecting a humbucker. Some of them most likely will not be useful to you. The same Jimmy Page took his modified Les Paul to live performances, and there it helped him a lot, but when recording, you can achieve the desired sound with equalizers and post-processing. It is also worth remembering that frequent re-soldering of the guitar can have a bad effect on the potentiometers, and it is highly advisable to remember the standard humbucker connection.
Magnets for pickup
The next important part of a homemade pickup is MAGNETS. We need powerful magnets of small height, at first I thought of using magnets from old Soviet latches for furniture, but they are quite large in height and I had to go to the store.
A solution was found very quickly - neodymium magnets from old hard drives (hard drives), they are very strong and small-sized, quite a good solution!
Rice. 12. Neodymium magnets from old hard drives for the pickup.
Piezogenerators are new sources of electricity. Fantasy or reality?
A thin piezoelectric film on window glass that absorbs street noise and converts it into energy to charge your phone. Pedestrians on sidewalks and metro escalators, which charge autonomous lighting batteries through piezo converters. Dense traffic flows on busy highways, generating megawatts of electricity, which is enough for entire cities and towns.
Fantastic? Unfortunately, yes for now, and it may remain so. There is a high probability that the hype around sensational reports about the wonderful prospects of energy generators using piezoelectric elements . And we will again dream of safe, renewable and, to be honest, cheap electrical energy obtained using other phenomena. After all, the list of physical effects is remarkably long.
The phenomenon of piezoelectricity was discovered by the brothers Jackson and Pierre Curie in 1880 and has since become widespread in radio engineering and measurement technology. It lies in the fact that a force applied to a sample of a piezoelectric material leads to the appearance of a potential difference on the electrodes. The effect is reversible, i.e. The opposite phenomenon is also observed: by applying voltage to the electrodes, the sample is deformed.
Depending on the direction of energy conversion, piezoelectrics are divided into generators (direct conversion) and motors (reverse) . The term “piezoelectric generators” does not characterize the conversion efficiency, but only the direction of energy conversion.
It was the first phenomenon associated with the generation of electricity under mechanical action that engineers and inventors became interested in in recent years. As if from a cornucopia, messages poured in about the possibilities of obtaining electrical energy by utilizing street noise, the movement of waves and wind, and the loads from the movement of people and cars.
Today there are several examples of the practical use of such energy. At Marunuchi Subway Station in Tokyo, piezo generators are installed in the ticketing area. The crowd of passengers is enough to control the turnstiles.
In London, in an elite discotheque, piezo generators power several lamps that stimulate the dancers and... sale of soft drinks. Piezoelectric lighters have become commonplace. Nowadays every smoker carries his own “power station” in his pocket.
Relatively recently, the world community was blown up by a message about testing systems for obtaining energy from moving vehicles. Israeli scientists from the small company Innowattech have calculated that 1 kilometer of highway can generate electrical power of up to 5 MW. They not only performed the calculations, but also opened up several tens of meters of the highway surface and mounted their piezoelectric generators underneath it. It seemed that a breakthrough in the field of alternative energy had finally arrived. But serious doubts arise about this.
Let us consider in more detail the physics of the processes occurring in piezoelectrics. To become familiar with the principles of energy generation by piezoelectric materials, it is enough to understand several basic mechanisms. When a piezoelectric element is subjected to mechanical action, atoms in the asymmetrical crystal lattice of the material are displaced. This displacement gives rise to an electric field, which induces (charges) the electrodes of the piezoelectric element.
Unlike a conventional capacitor, the plates of which can retain charges for a long time, the induced charges of a piezoelectric element are retained only as long as a mechanical load is applied. It is at this time that energy can be obtained from the element. After removing the load, the induced charges disappear. In fact, a piezoelectric element is a source of current of negligible magnitude, with a very high internal resistance.
Since Innowattech specialists did not consider it necessary to share the results of their experiment with the general public, we will try to make rough numerical estimates of the efficiency of piezoelectrics as an energy source. As an object for calculations, we will take an ordinary household piezo lighter - the only product that is now widely used.
Of the abundance of technical characteristics of piezomaterials, we will need only a few. This is the value of the piezoelectric module, which for common (and others are not yet produced by industry) piezoelectrics ranges from 200 to 500 picoculombs (10 to the minus 12 power) per newton, and characterizes the efficiency of charge generation under the influence of force.
This characteristic does not depend on the size of the piezoelectric element, but is completely determined by the properties of the material. Therefore, trying to make more powerful converters by increasing the geometric dimensions is pointless. The capacitance of the piezoelectric element plates of lighters is known and is about 40 picofarads.
The lever system for transmitting force to the piezo element creates a load of approximately 1000 newtons. The gap in which the spark jumps is 5 mm. The dielectric strength of air is taken to be 1 kV/mm. With such initial data, the lighter generates sparks with a power of 0.9 to 2.2 megawatts!
But don't be afraid. The discharge duration is only 0.08 nanoseconds, hence the huge power values. Calculating the total energy generated by the lighter gives a value of only 600 microjoules. At the same time, the efficiency of the lighter, taking into account the fact that the mechanical force through the lever system is completely transferred to the piezoelectric, is only . 0.12%.
The energy extraction schemes proposed in various projects are close to the operating modes of lighters. Individual piezoelements generate a high voltage, which breaks the discharge gap, and the current flows to the rectifier, and then to a storage device, for example, an ionistor. Further energy conversion is standard and of no interest.
Let's move on from lighters to the problem of generating energy on an industrial scale. Let the most efficient elements be used, generating 10 milliwatts per element. Collected into clusters (groups) of 100-200 elements, they are placed under the road surface. Then, to obtain the declared power value of about 1 MW per kilometer of road, everything will be required. 100 million individual elements with individual energy collection patterns. There remains the task of summing it up, transforming it and transmitting it to the consumer. In this case, the currents of the elements, taking into account the changing load on the roadway, will lie in the nano- or even picoampere range.
Getting acquainted with similar projects for obtaining energy from the piezoelectric effect, an analogy with a hydroelectric power station involuntarily suggests itself, in which turbines operate from the moisture of morning dew, carefully collected from the surrounding fields.
But what about the experiment of the Israeli company? A report on the results of the “sabotage” on the highway never appeared. But ahead is the fulfillment of the contract for obtaining energy from the Venice-Trieste highway, which was concluded by Innowattech.
There is one version about this: this, i.e. with high risk investment capital. Having received more than modest preliminary results from the researchers, its founders decided to justify the investors' money spent and pulled off an excellent marketing move - they conducted a spectacular test with the participation of the press. And the whole world started talking about the small company. And in this noise the main question was lost: where are the megawatts of cheap energy?
Coil winding
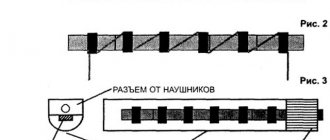
Once the magnets have been found, you can confidently proceed to winding the inductor for the future pickup. It is advisable to wind approximately 2000-3000 turns of thin enameled copper wire with a diameter of 0.08-0.1 mm.
I decided to wind the coil until it was filled with wire with a diameter of 0.15 mm - it is convenient for winding and reduces the likelihood of breaking the wire during the winding process.
When wound with thin wire with a diameter of 0.08-0.1 mm, the quality of the pickup will most likely be better and will accommodate 2-3 thousand turns.
The wire can be found at the bazaar or ordered from an online store. As a last resort, you can unwind it from some kind of transformer or coil from an electromagnetic relay.
Rice. 13. Coil with wire for winding the coil of the future pickup.
We clean the beginning of the wire from the enamel and tin it using a soldering iron. We cut off a piece of insulated conductor 12-15 cm long, remove about 5 mm of insulation from one of its ends and tin it with a soldering iron.
We screw the beginning of the enameled copper wire to the tip of the conductor and solder them. We cut a strip of insulating tape and isolate the soldering area.
Rice. 14. We begin winding the pickup coil.
We place the insulated end of the wire into our frame and wrap it with several dozen turns for reliable fixation. Now you can safely wind the rest of the coil without fear that the wire will crawl out or go to the side.
Here is an example of fixation (the magnets are not yet fixed, they are simply held due to the force of attraction to the cores):
Rice. 15. Fixing the beginning of the coil in the pickup frame.
After an hour or two of winding (a slightly tedious process), the pickup inductor was filled to capacity with wire.
Rice. 16. The pickup coil is ready.
We tin the end of the coil conductor with a soldering iron and solder it to the second insulated conductor. Use electrical tape to insulate the connection. Using a thread, we wind the insulated junction of the conductors to the coil to securely fix it.
Break, don't do
“>The current discharge produced by the piezoelectric element of a lighter can break a smartphone. It will be enough to “click” the metal connectors of the gadget, the headphone input, and the exposed parts of the board 8-12 times. If exposed to this, the phone will refuse to work. In this case, there will be no visible damage or melted elements. Now you can happily take your broken gadget to the salon and demand a refund. The service center should not understand anything.
But the piezoelectric element of a gas lighter cannot disable ordinary “dialers” made in the PRC. I don’t know why, but even after 50 shocks with a weak current, the push-button telephone continued to function properly.
Shielding the pickup
The next very important and “tasty” stage is shielding the pickup coil. The screen is needed to protect the coil from interference and interference. Without a screen, there is a chance that instead of the sound of a guitar you will hear some kind of radio, to which you will act as an antenna. ))
We will shield the coil using foil removed from the chocolate bar (it’s not for nothing that I said that the stage is “delicious”). After you have savored the chocolate and rested after a long winding of the reel, you can get down to business.
Cut a strip of foil large enough to wrap around the pickup coil. You can take several strips, the main thing is to completely hide the coil under the foil.
Rice. 17. The chocolate was delicious, and we will need the foil.
IMPORTANT: when shielding, you should not get a closed turn around the coil - the foil strip should not close into a ring, otherwise you will get an additional single-turn coil from the screen, which will interfere with the normal operation of the pickup!
In the place where the foil ring closes after laying, you need to insulate the ends of the strip from each other using a dielectric. Simply put, make sure that the ends of this annular screen do not short-circuit with each other. You can use electrical tape, tape, thin film, etc. as insulation.
You also need to make a connection to the screen - take a piece of insulated wire and attach its stripped end of insulation to the foil, and then secure it all with tape or tape.
The connection is best made at a point that is evenly spaced from the ends of the foil, which are isolated from each other and do not close together.
__________________ connect / \ here ———>| \_________________/
To prevent the resulting screen from spreading and to hold securely, you can wrap it on top with electrical tape or thread.
In my case, the situation is slightly different: since the side plates are made of foil fiberglass, the foil has contact with the copper surfaces of the two plates (top and bottom). In this case, the foil coil can be closed, since the result is a “closed container” (a parallelepiped from the screen).
Rice. 18. The pickup coil is in a screen made of foil and side copper walls of fiberglass, shielded on all sides.
As a result, we have an almost finished pickup with three conductors coming out of the structure: two from the coil, and one more from the screen.
Rice. 19. The pickup with a coil shielded on all sides is almost ready.
The last thing to do is attach the magnets to the bottom of the pickup. The fastening must be done so that each core is in contact with the magnet; later the magnets can be fixed with fusible silicone or simply wrapped with thread.
Rice. 20. Ready-made homemade acoustic guitar pickup.
The pickup is actually ready for testing and operation!
Piezoelectric transducer
A piezoelectric plate is a device that uses the piezoelectric effect to measure pressure, acceleration, strain, or force by converting it into an electrical charge. Piezoelectricity is electricity generated by a piezoelectric element, the effect of which is called the piezoelectric effect. It is the ability of some materials to generate alternating current (AC) voltage when subjected to mechanical stress or vibration, or to vibrate when subjected to alternating voltage, or both. The most common piezoelectric material is quartz. Certain ceramics, Rochelle salts, and other other solids have this effect. When a sound wave hits one or both sides of the plates, the plates vibrate. The crystal raises this vibration, which results in weak AC voltage. Consequently, an alternating current voltage is generated between the two metal plates, with a waveform similar to that of sound waves. Conversely, if an AC signal is applied to the plates, it causes the crystal to vibrate in sync with the signal voltage. As a result, the metal plates also vibrate and create acoustic interference.
Almost every person has used a gas lighter, for example the IMCO TRIPLEX model, with a piezo element at least once in their life. This simple and useful device allows you to start a fire with just one click. A fire is formed due to the ignition of gas upon contact with an electrical discharge produced by the piezoelectric element of the lighter when the corresponding key is pressed.
When we press the button on the piezo lighter, we hear the crackle of a spark, then the gas burner flares up.
Connecting a pickup
To connect the pickup to the microphone input of the computer, I used a 3.5 mini-jack plug (as in standard headphones from a player).
A thin shielded coaxial cable was used as a connecting cable (a 2-meter piece was lying around somewhere, so I used it), it is advisable, of course, to buy a shielded microphone cable, but for experimental purposes, this option will do. )
Here is the diagram according to which the pickup was connected:
Rice. 21. A simple experimental circuit for switching on a homemade pickup.
To adjust the volume, the pickup can be connected through a variable resistor, but this will most likely be superfluous here; such a circuit turned out to be quite workable, and the volume can be adjusted without problems in a computer mixer.
Well, that’s all, such a pickup is quite suitable for trying out what an electric guitar is, and for playing complex compositions and fast solos you can’t do without a full-fledged electric guitar with sensitive and high-quality pickups.
The pickup was secured to the resonator hole of the acoustic guitar using electrical tape and pieces of rubber. Rubber pads are needed to raise the pickup a little higher to the strings, so that when the strings are clamped they do not touch the pickup cores, and also to avoid scratching the varnished surface of the guitar body.
This way I didn't have to drill or cut anything into the body of the guitar. You can remove the pickup at any time without leaving any trace of its presence on the guitar.
Rice. 22. Homemade acoustic guitar pickup.
Rice. 23. Homemade acoustic guitar pickup, angled view.
Rice. 23. Homemade acoustic guitar pickup, general view.
LiveInternetLiveInternet
- Registration
- Entrance
—Categories
- Colme drops for alcoholism where to buy (50)
- where to buy drops for alcoholism (49)
- drops for alcoholism colma buy (49)
- drops for alcoholism reviews (49)
- Colme drops for alcoholism price (49)
- buy drops for alcoholism (49)
- drops for alcoholism price (49)
- Colme drops for alcoholism (49)
- drops for alcoholism (49)
- buy alcostop drops price (49)
- where can I buy alcostop drops (49)
- alkostop price buy (49)
- where to buy alkostop drops (49)
- buy alcostop at the pharmacy (49)
- where can you buy alcohol stop (49)
- alcostop where to buy (49)
- alcostop drops buy (49)
- buy alcostop (49)
- buy an alcohol barrier in Moscow pharmacies (49)
- alcohol barrier price and reviews where to buy (49)
- alcohol barrier where to buy and price (49)
- alcohol barrier reviews buy (49)
- buy an alcohol barrier in Moscow (49)
- where can I buy an alcohol barrier (49)
- buy medicine for alcoholism at the pharmacy (49)
- alcohol barrier product buy at the pharmacy (49)
- alcohol barrier drug for alcoholism buy (49)
- alcohol barrier buy price (49)
- buy alcohol barrier at the pharmacy (49)
- where to buy an alcohol barrier (49)
- buy alcohol barrier (49)
- treatment of alcoholism without the knowledge of the patient (49)
- alcoholism treatment center (49)
- alcoholism treatment methods (49)
- treatment of patients with alcoholism (49)
- alcoholism treatment without (49)
- alcoholism treatment at home (49)
- alcoholism treatment reviews (49)
- alcoholism treatment clinic (49)
- alcoholism treatment (49)
- alcoholism coding in Moscow (49)
- alcoholism coding at home (49)
- alcoholism coding in Yekaterinburg (49)
- alcoholism coding clinics (49)
- alcoholism coding in St. Petersburg (49)
- certificate of coding for alcoholism (49)
- alcoholism coding prices reviews (49)
- coding for alcoholism by injection (49)
- how coding occurs for alcoholism (49)
- laser coding for alcoholism (49)
- alcoholism coding dovzhenko (49)
- coding methods for alcoholism (49)
- alcoholism coding addresses (49)
- alcoholism coding reviews (49)
- alcoholism coding prices (49)
- alcoholism coding (49)
—Search by diary
—Subscription by e-mail
-Statistics
In conclusion
You can come up with a good mount for the pickup and make everything better. But my goal was simple - to play around and try, to make it quickly and so that it would function, the goal was achieved 100%. The pickup turned out to be quite sensitive, and there was no obvious interference or background.
I feed the signal from the guitar to the microphone input of the computer’s sound card, and then run it through the Guitar Rig 4 program to obtain various combinations of effects - from simple amplification and echo to deep Distortion. ))
I wish you all creative and musical success!
Eternal flashlight made from a lighter piezoelectric element
Although now I think everyone has a flashlight at home, and most likely even more than one, but sometimes a situation arises when you urgently need to illuminate somewhere, and suddenly it turns out that the batteries have already run out in all the flashlights at once or the battery is discharged. Therefore, the best emergency option would be to have a so-called “eternal” flashlight, which works without batteries or accumulators, for example, as a dynamo flashlight, a water-powered flashlight or a Faraday flashlight; we described the last two how you can make it yourself. Today we’ll look at and make another homemade eternal flashlight from the piezoelectric element of a lighter.
Eternal flashlight made from a lighter piezoelectric element
Details for the Eternal Lantern:
- Transformer from a monitor or TV for CCFL display backlight lamps;
- Lighter with piezoelectric element;
- Capacitor 68 pF x 6.3 kV;
- Capacitor 1000 uF x 35V;
- Capacitor 100 nF x 250V;
- Resistor 10 kOhm;
- Bright white LED;
- Diodes 1N4007 – 4 pcs.