The concept of a console table appeared during the reign of Louis XIV. In those distant times, these interior items were very popular, and they are no less in demand today. Console tables come in a variety of designs, but they have one thing in common: console means narrow. This type of furniture is very convenient to use in small spaces; it does not take up much space and is not far from the wall.
Console is a narrow table with straight or curved legs, suitable for different interiors.
Such different tables
Decorative console decorated with carvings
We will not talk about variations of console table models, because there are countless of them. Let's talk about the scope of application of this piece of furniture. The furniture looks great in hallways and living rooms, acting as an alternative to a buffet.
The console table in the hallway has both decorative and practical significance.
In the living room, consoles replace tables attached to sofas.
You can turn this furniture into something like a mini bar, or place a framed photo on it. An original idea to use a console table in a boudoir or for storing cosmetics.
Modern console table in the bedroom
Store your keys on a table in the hallway and place a candlestick or picture on it. And in the bedroom space, you can install a DVD player or TV on the console.
Forged console table for figurines in a modern interior
If you have your own office, store cigars or beautiful figurines on the table. And in the children’s room, place toys on this piece of furniture, put markers or boxes with construction sets.
White console table with drawers for various small items
Console with drawers for children's room
We'll tell you about creating a console table with your own hands - it's a simple, fun activity that will help you save a lot of money. To do this, you will need to purchase some tools and be careful and patient.
Design
A console table is essentially a table.
And therefore its design is similar. In this regard, craftsmen who assemble furniture with their own hands do not have any big problems with how to make a KS. The console consists of two main elements. This is the tabletop and supports, that is, legs. Classic and modern variations look slightly different. Classic designs are characterized by the presence of rich and multiple decorations in the form of mosaics, paintings, balusters, stucco moldings, gilded inserts, etc. Also, methods of artistic wood carving and natural stone are used on the base.
Modern models are more concise and functional. Therefore, the design often additionally includes cabinets instead of legs, drawers, mirrors, etc. Transformer functions are also found, which allows the console to be turned into a spacious dining table with a few movements.
Currently, console sets that can replace dressing tables are considered in demand. It uses mirrors, pull-out seats, shelves, drawers for various small items and cosmetics. The table can be either corner or straight, or hanging. The choice is yours.
How to make a DIY console table from an old table
We cut the table into two parts lengthwise
You can use an ordinary old table that has served its purpose to create your own masterpiece.
| Old table | Main part |
| Saw | Saw off the required part |
| Sandpaper | Clean up |
| Dye | Paint |
We fix the metal corners on the back side - in the center and edges
Glue the fabric to the tabletop in order to get an original console
We attach it to the wall and get an original console in the hallway
Saw off the required part from the table and process it. The photo shows examples of such creations. If you want to create a masterpiece from scratch, read on for a step-by-step guide to action.
A bedside table on two legs from a sawn table is made in a similar way
Console under the TV in the bedroom and a bedside table in the hallway from one table
Where is the best place to put the console?
Very often, console tables are placed in the hallway. This saves space, since a large bedside table can get in the way in a limited space. A narrow table is suitable for storing keys, gloves, and useful items.
In modern times, it is a separate piece of furniture, something like a mantelpiece, on which almost anything can be placed.
Tables are also placed in bedrooms and boudoirs. Usually they put a mirror on them (or they are attached to the wall under the mirror) and cosmetic accessories.
Depending on its purpose, the console looks like a long narrow table or a miniature shelf.
Using the console, you can organize a dining area on the balcony. In the living room, narrow tables are placed next to the TV, above the fireplace.
Steps to creating a console table
Step 1. Make or buy legs. The console table has beautiful legs. Surely you do not have a suitable machine for turning curved baluster legs: this is not a problem. Visit a hardware store: you will find a variety of table leg models and choose the appropriate part.
Large and massive wooden legs for a console machine
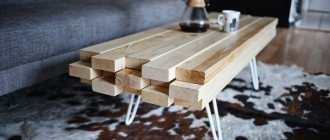
Step 2: Cut the board. To create the top and bottom of the table, use a three-meter board, ten centimeters thick, 20 centimeters wide. Cut the board with a saw. You will need four boards with a length of 150 centimeters. Cut out the parts with a saw.
We cut the board to make the top and bottom of the table
The table will take four boards, ten centimeters thick and 145 long. You will place them in a vertical position, attaching them to the previously cut boards. Four squares will be placed at the edges, you will see this in the picture.
Cutting the board
Also, in order to make the upper and lower parts of the table, we need a board 3 meters long, 10 cm thick, and 20 cm wide. We cut it into pieces using a circular saw.
You need 4 boards for the top and bottom of the console table, 150 cm long. We cut it with a circular saw and, as you can see in the photo below, we get these components of the table.
Additionally, you need four boards 10 cm wide and 145 cm long. They will rest vertically on the boards cut above. We need 4 squares along the edges (see photo), 10 cm on each side.
Decorating
Finished painted table in the living room interior
We recommend simply painting the resulting table. Nowadays a wide range of different wood varnishes are sold. For example, paint a walnut-colored finish on the table and use Vaseline to lubricate the structure after the paint has dried. Apply the last layer of gray paint (when this coating dries, sand the end elements). As a result, you will get a shabby table with beautiful legs. This piece of art is perfect for any living room or hallway. As you understand, making a table is very simple.
Long console table with decorative elements in the interior
Types of consoles
Console tables differ mainly in design. They can be either classic design with ornate decor, or minimalistic. Some models are based on 4 legs, others have only two or three supports.
With it, the design of the space becomes sophisticated, elegant, and completely thought out.
An interesting option is a console table with two legs, attached to the wall.
Most often, furniture is made with balusters - curly legs. This is a reference to the era of console tables.
Video: Making a console table with your own hands / DIY Making a Console Table
Making furniture with your own hands is considered a creative and interesting process. Every person can create stylish and budget-friendly products. The master has the right to independently choose an interesting design for furniture, equipping it with interesting details and high-quality fittings. The easiest way is to make your own console that will fit perfectly into the interior of the living room.
Product for a narrow room
If you have an old table that has lost its former appearance, then it can be used as the main raw material. This option attracts many craftsmen because the work requires a minimum of tools and financial investments:
- Pieces of beautiful fabric 130 cm wide.
- Rectangular table (IKEA or ISALA are ideal).
- Screwdriver, pencil, jigsaw, aerosol glue, sandpaper, sharp scissors, one metal corner, two self-tapping screws.
The prepared table must be cut lengthwise into two even parts. All edges should be cleaned with sandpaper. If the table has removable legs, then you need to securely fix two of them. On the back side of the console you need to secure a corner (in the center). The edges of the table are covered with regular masking tape to prevent glue from getting in. A piece of fabric prepared in advance is sprayed with an aerosol product. There should be no bubbles on the surface. Excess fabric on the sides of the tabletop is cut off with scissors. After the glue has dried, you can carefully remove the tape. The free part of the metal corner is screwed to the wall as firmly as possible so that there are no gaps.
Carved furniture from solid Mahogany Indonesia. Buy!
- Regular price RUB 21,720. Discount price RUB 17,376.
- Regular price RUR 42,031 Discount price RUR 33,625
- Regular price RUB 25,313. Discounted price RUB 20,250.
- Regular price RUB 21,875. Discount price RUB 17,500.
- 40% Regular price RUR 76,875 Discount price RUR 46,125
- 40% Regular price RUR 76,875 Discount price RUR 46,125
- 40% Regular price RUB 17,750 Discount price RUB 10,650
- 40% Regular price RUB 84,000 Discount price RUB 50,400
- 40% Regular price RUR 116,250 Discounted price RUR 69,750
- 40% Regular price RUR 116,250 Discounted price RUR 69,750
- 40% Regular price RUR 12,625 Discount price RUR 7,575
- 40% Regular price RUB 25,375 Discount price RUB 15,225
- 40% Regular price RUR 16,125 Discount price RUR 9,675
- 40% Regular price RUB 58,000 Discount price RUB 34,800
- 40% Regular price RUB 18,375 Discount price RUB 11,025
- 40% Regular price RUB 37,500 Discount price RUB 22,500
- 40% Regular price RUB 22,250 Discounted price RUB 13,350
- 40% Regular price RUB 19,875 Discount price RUB 11,925
- 40% Regular price RUB 27,375 Discount price RUB 16,425
- 40% Regular price RUB 27,375 Discount price RUB 16,425
- 40% Regular price RUB 31,000 Discount price RUB 18,600
- 40% Regular price RUB 26,250 Discount price RUB 15,750
- 40% Regular price RUB 32,500 Discount price RUB 19,500
- 40% Regular price RUB 65,000 Discount price RUB 39,000
- 40% Regular price RUR 38,125 Discount price RUR 22,875
- 40% Regular price RUB 19,750 Discount price RUB 11,850
- 40% Regular price RUB 25,375 Discount price RUB 15,225
- 40% Regular price RUR 94,750 Discount price RUR 56,850
- 40% Regular price RUR 94,750 Discount price RUR 56,850
- 40% Regular price RUR 43,750 Discount price RUR 26,250
- 40% Regular price RUR 43,750 Discount price RUR 26,250
- 40% Regular price RUR 54,750 Discount price RUR 32,850
- 40% Regular price RUB 56,000 Discount price RUB 33,600
Application of cinder block
From this material you can make your own console with an original design. To work, you need a minimum of materials: two strong wooden boards and four cinder blocks. This option is quite simple, since it only takes 30 minutes of free time to make it. A cinder block is placed on both sides, and varnished boards are placed on top. Then the actions are repeated again. You can lay out your favorite books on the middle board, but it’s better to put photo frames, candles and flower pots on the top shelf.
Idea
...I decided to make PS Vita X, or 2, or Next, whatever you want to call it. Against the backdrop of the growing trend of portable PC consoles, I will try to do the same. But let's create a goal and some rules. The goal will be to create a portable set-top box running on a PC OS and having a touch screen. To make it more interesting, we will set a limitation. We will try to keep within a certain amount of money. And as a basis we will take the cost of a full set of the new PS Vita with cases, headphones and a 32 GB memory card. On average, such a kit will cost you 18,000 rubles, so we’ll try to meet this amount. Let's get started!
Here are examples of the most popular PC consoles. Aya Neo and GPD WIN 3
Aristocratic model
This option is in greatest demand. Using a minimum of materials, you can make your own console, which will decorate not only the living room, but also the room of a young fashionista. The master will need:
- Roller and brush.
- An old console or chest of drawers.
- Plain gift paper with an interesting pattern.
- White paint.
- Sandpaper.
- Wallpaper glue.
- Scissors.
You need to sand the surface of the chest of drawers and remove all the fittings. The product is cleaned of dust. All surfaces need to be coated with two coats of paint. It is necessary to cut a blank from gift paper to the size of the table top with a small margin. The product is glued to the chest of drawers. It is necessary to remove all air bubbles by running a cloth from the center to the edges. Excess paper needs to be trimmed and the outline highlighted with white paint. All that remains is to screw on the fittings and the product is ready.
Compact and refined
From scrap materials you can make a console with your own hands, which will look harmonious in any interior. To work you will need an old dining table, two blocks and wood paint. All actions correspond to the standard scheme, but there are some differences:
- It is necessary to shorten the legs quite a bit, since the bedside console is not high.
- The table should be cut crosswise rather than lengthwise.
- Those products that are painted in a bright, solid color look more aesthetically pleasing.
- The console is attached to the wall not with corners, but with a pair of wooden blocks. They are fastened together in advance and screwed to the wall. The prepared bedside table is simply “put on” on top of the bars.
Screen
It was decided that instead of buying a regular mini touch screen, it would be a little confusing and buy separately a special screen and a touch “sticker”, which is noteworthy that both of these elements are from the same LattePanda campaign. We need to stick a “touch sticker” on the screen itself (after removing the films from both). There will be two connectors from these elements on the computer board; the only thing you have to work with is the case. You will need to make a special mount for the screen. Minus 4000.
Both required elements
Transforming old drawers
Long cracked and shabby chests of drawers are considered an excellent material from which you can make stylish furniture for your home. For a clear example, you should study numerous photos of consoles. You can build unique products with your own hands from standard wooden boxes. To make furniture you will need:
- Boards for the frame.
- Two plywood boxes.
- Screws.
- Primer.
- Screwdriver and drill.
- Sturdy board.
- Dye.
- Circular.
- Wood glue.
- Furniture clamps.
First of all, the craftsman needs to sand the drawers and coat them with paint. Using a circular saw, you need to make the necessary parts and frame. The blanks are fastened with screws and glue. All irregularities are carefully filled with putty. After complete drying, the product is coated with primer and paint. Boxes are placed on top of the frame and secured with glue and self-tapping screws.
Sarah Dorsey's proposal
You can make such a console table with your own hands in just a few hours. The technology is in great demand in different parts of the world, since it is possible to use both sawn parts at once. One blank can be used as a stylish TV stand, but the second can be installed as a bedside table in the living room.
- You need to take an old round table and remove all the paint or varnish from it. Thoroughly sand all uneven surfaces to apply a thick layer of primer.
- A jigsaw is ideal for cutting tabletops.
- The edges need to be sanded and painted in the desired color, which will harmoniously match the interior of the room.
This is a great option for transforming an old table into two original consoles.
A budget option
Experienced craftsmen know many options for making a console with their own hands. You can make interesting products from PVC and old kitchen furniture. For beginners, it is best to make multifunctional products from suitable-sized cabinets, which must be connected into one, long structure. Be sure to put a strong board on top. A small bar is attached to the back of the table. The board itself may be rough and unpolished. If desired, it can be refined, thereby constructing a less weighty and bulky product. If the master has the necessary skills, then you can use all your imagination to create a truly original console.
Variety of materials
To furnish your personal home, you can use different types of furniture. A console for the living room allows you not only to emphasize the existing design, but also to create an additional corner for placing personal items, flower pots or cosmetics. In order for a handmade product to last as long as possible, you need to choose the right consumables. In factory conditions, pine, oak, ash, mahogany, and beech are most often used. Of course, such furniture is not cheap, which is why not all citizens can buy it.
To save your family budget and get high-quality furniture, it is best to choose veneer products. This material is absolutely safe for humans and is resistant to the negative effects of moisture and mechanical damage. The surface of the slabs can be decorated at your discretion: stick a laminate, fill it with high-quality polymer, use PVC film. Not only the amount of costs, but also the durability of the console depends on the choice of a specific material. Among ready-made furniture, stone models have become very popular: granite, marble, turquoise. These materials are durable and expensive. A forged product will fit perfectly into a classic interior. Thin rods make refined coils.
A console table makes it possible to complement the interior with a compact and beautiful object. At the same time, the creation of this piece of furniture does not require high professionalism. Next, we offer simple instructions that make it possible to get not only high-quality furniture, but also aesthetic pleasure from independently creating a high-quality product with your own hands.
Filling
Initially, I thought of assembling a PC from the beginning, on a printed circuit board, but as it turned out, firstly, I could not make a powerful start, and secondly, I did not have the special skills for this. Yes, this would greatly reduce the cost, but I still decided to take the path of least resistance and buy a regular single-board computer. Yes, not a man, but we have overcome one of the main problems; almost any modern single-board computer will be more powerful than PS Vita systems.
And after a long search, the choice fell on LatePanda. Yes, the option is far from the best, but overall it suits us. -11 thousand rubles.
But as a result, we have 2GB of RAM and 32 built-in, quad-core CPU and GPU from Intel, at a purity of 1.9 GHz and 350 MHz, respectively. There are small losses, but since we have limited funds, we can’t complain. There are also 2 USB connectors, a connector for the Internet (although there is a Wi-Fi module).
There are other versions of this computer that are more powerful, but noticeably more expensive.
The essence of a console table
This furniture option is extremely narrow, it measures half the size of a simple table or even less. They say that these tables appeared quite a long time ago and were first used at the royal court in France, starting in the 17th century. It is likely that some palaces had rather narrow corridors, and such furniture could also be relevant for the bedroom.
For the most part, these tables stand against the wall and fit tightly to it with their canvas. Therefore, it is quite possible to use only two legs that support the canvas, and simply use wall mounting.
The simplest option
First, let's point out the simplest option, which requires the least amount of work. Almost any old table can be used for this. The task is to cut such a table in half or even make a narrower part, which will remain as a console table.
Note. This means old tables that can be used normally; if there are defects somewhere in such a table, then only the normal part should be left.
After the workpiece is received, you need to perform decoration. Since we are talking about an old table, as a rule, such a table is sanded, and then primed and painted. It is quite possible to use other compositions, mixtures and decor.
Additional Variations
Of the additional variations, quite interesting are those that use improvised materials, things that can be thrown away and not used:
- old door leaves;
- window frames and windows;
- furniture parts;
- simple boards (unedged);
- leftovers from plastic window sills.
In general, any planes that will look more or less aesthetically pleasing and at the same time have sufficient size and strength.
Here the question arises of what to make the legs from and the answer will also be to search for available and free materials that could perform such a function. For example, if you approach the work competently and with imagination, then it is quite possible to take, for example, PVC pipes, which are used as a support for the table cloth. Also, the legs can also be simple boards or bars; if the table is made in the style of natural materials, then halves of untreated timber can be used.
Note. When choosing legs, evaluate the likely load; you should make a design with a sufficient margin of safety, even when talking about a simple coffee table.
It should be noted that the console table is not always attached to the wall; it may be separate. At least there are such models. Then they are simply a separate thin table for a variety of purposes.
Types of transformable coffee table in the living room
Before you start buying a transformable coffee table for your living room, it’s worth finding out what types of these products exist. After all, this furniture has a varied design, which can simply fascinate with its features.
With inserts
The most popular transforming model is a folding coffee table with inserts. The main feature of this design is that it has additional tabletops, which, when unfolded, increase the length or width of the table.
The features of these products are as follows:
- The folded design is small in size. The only difference is the presence of a seam in the center of the tabletop;
- the operation of the mechanism of the entire structure is based on an insert, which is usually located under the table niche;
- if you need to increase the size of the product, you need to move the side parts of the furniture, remove the additional part from the niche and insert it exactly into the grooves. This results in a large tabletop, which can be an excellent option for a dining area.
With automatic mechanism
Another interesting option would be coffee tables with an automatic mechanism. These models provide maximum ease of disassembly, during which little effort will be required.
Typically, such products have two additional parts that are hidden under the main tabletop. As soon as there is a need to increase the size of the entire structure, the main tabletop will come into action and start the movement mechanism of additional parts. Usually the entire disassembly process is carried out using springs or a gas lift. These models can be made of solid wood; additional decorative elements made of plastic, metal, and glass may be present.
Folding
If a few decades ago this table design was simple, it was used to store magazines, and it was also possible to install a vase of flowers on it, but now these models have become much more diverse. A folding coffee table with a transformable design will be appropriate in almost any room with small dimensions, due to the fact that this item has a compact size.
There are folding structures with different types of folding:
- increase in height - here the tabletop is raised by raising the legs. This transformation system belongs to the vertical transformation systems;
- Sometimes there are products in which the legs can move apart, while forming a support for an additional stand for the table;
- designs with two sections - when these sections are unfolded, one can serve as a dining area, and the other as a stand for a computer or laptop;
- book table - tables with a book folding system are considered the easiest to use. The folded structure takes up very little space, and when unfolded, it forms a large structure that can be used as a dining area or for entertaining guests. It looks like an ironing board due to the similarity of the legs.
The design of these products can be multifaceted. Various inserts, decorative elements, patterns, multi-colored coatings make these items stylish, beautiful, and aesthetically pleasing. Convenient options would be those on wheels; if desired, they can be easily moved from one part of the room to another.
Sliding
An extendable table is similar in appearance to a table with inserts. There are models that can be expanded both in width and in length. The presence of inserts allows you to increase the size of the product several times. Thanks to these elements, you can make tables almost twice as large; such options are suitable for use as a dining place or for entertaining guests.
Turning
Often there are products with a rotating design. The features of these pieces of furniture are similar to tables that have one insert. But the difference is that the insert is divided into two parts, and the presence of special fittings makes it rotary.
The main features of these models: