DIY hygrometer photo
DIY hair hygrometer
Integrated Security Part 1
Air humidity sensors
Package from China 3 hygrometer – AgaClip – Make Your Video Clips
Presentation "Air Humidity"
Lesson presentation Air humidity
The dry bulb reading is 18 degrees, relative humidity is 70%. How to determine a wet bulb reading? —AskFo
DIY air humidity meter
Moisture meters, humidity regulators, electronic hygrometers - VTorge. Free classifieds of Ukraine.
DIY hygrometer photo
Dehumidifier ND-20AH – CLIMATEBOGS
Boneco 1355n Air Washer Hygrometer Stand – AgaClip – Make Your Video Clips
Homemade air humidifier with your own hands
Buy humidity devices
How to make a psychrometric hygrometer yourself - Watch the show homemade Valek and Ilya.
DIY air humidity sensor for a fan
DIY hair hygrometer
Easyelectronics.ru * View topic - Air humidity indicator
Digital moisture meter in everyday life and beyond: where it is important to monitor air humidity
Information about the indoor microclimate is important for many: from farm owners to those who have health problems. But not everyone knows that you can make an air humidity meter with your own hands.
Moreover, it’s free. And there are many options for this...
How to make your own humidity sensor
Using a circuit based on a single transistor, you can make a simple humidity sensor. A plate with a sensor that will warn of increased humidity levels. It is made from trimmed fiberglass laminate. The area is divided into two sectors and well tinned.
The essence of the robot: moisture enters the contact of the clinger, they form a rebuff and detect a device that enhances electrical oscillations. And electrically charged particles run through the device.
For robots, an LED kligger and a piezo emitter with a paradigm and a relay winding are suitable. Its contacts will serve as an electrical starter or circuit breaker.
The sensitivity of the device is determined by a construction resistor that responds to any level of passing current.
What is special about the Assmann psychrometer?
The Assmann psychrometer is a much more complex and more reliable device for measuring air humidity. Both thermometers of the design are located at the lower ends in a special metal case, which protects them from sunlight, thermal influences, and also from various damages. The air moves at a constant speed due to the operation of the fan. This fan, also known as an aspirator, blows the thermometers at a speed of 2 m/sec.
Determination of humidity using this psychrometer: the device is suspended at the test site at a height of 1.5 m from the floor; results are obtained after 10 - 15 minutes in winter and after 4 - 5 minutes in summer.
What the August psychrometer and Assmann psychrometer have in common is that both have glass-mercury thermometers in their design. The disadvantage of these devices is their fragility and, accordingly, the inability to carry out measurements remotely.
Diagram of a household hygrometer and thermometer
The circuit is based on the PIC 16F628A microcontroller. It is connected to the DHT-11 sensor using a single-wire line. The resistor connects the wire to 500 volts.
The mechanism of pressing the data bus to the common wire or releasing it allows communication between the controller and the sensor.
Two microcontrollers are used to receive and issue commands. The first one is used to receive data changes. The second is for data bus communication.
LED indicators are used to display information.
The brightness of the indicator depends on the register value.
A transformer or transformerless power supply is used to power the device. Their diagram can be found here: https://www.kondratev-v.ru/bloki-pitaniya/blok-pitaniya-s-gasyashhim-kondensatorom.html
To make such a device, you can use another board you made yourself.
The circuit diagram and drawing of the board can be downloaded here:
So, you can make an air humidity meter yourself. However, they are not highly accurate. And they are only suitable for obtaining approximate data. To obtain accurate data, you will have to buy a factory hygrometer.
A site dedicated to measuring instruments...
The need to measure humidity
A humidity meter may be needed both for a family living in a small city apartment and for a farm. This is especially true for those who have incubators and breed chicks.
In order not to buy this device, you can try to make it yourself. There is nothing complicated about this; even someone who has never done this can easily do it. But you will still need several elements or ready-made devices. It all depends on which meter option is chosen.
Even human hair can serve as an element that is ideal for making a homemade device to measure humidity
Next, we will look at several homemade options for an air humidity meter, and each has its own advantages and disadvantages.
Some devices are very easy to make, but others will require a little tinkering. As a result, you will be able to find out the exact or approximate percentage of humidity. It all depends on the choice of device.
In order to independently assemble more complex instruments for measuring humidity, you may need a soldering iron, as well as other tools.
Why do you need a hygrometer?
A hygrometer allows you to determine the relative humidity of the environment, which is one of the most important components of the microclimate of the room. The moisture content in the air affects people's well-being. This indicator must be within the average range. Low air humidity can lead to difficulty breathing and dry mucous membranes, while high humidity can lead to deterioration in physical condition. People with respiratory diseases need to monitor this value especially strictly.
To control indoor humidity, you can purchase a special weather station. However, from available materials you can also assemble a device that can replace a hygrometer.
What is a psychrometer
The “responsibilities” of the device include measuring air parameters. The device is used in poultry farming to accurately determine the humidity value. If the humidity is insufficient, the chicks will not be able to hatch from the shells and all the chicks may be lost at the last stage of incubation. The psychrometer is based on the physical ability of a liquid to evaporate. The result is a difference in temperature between the one shown by the thermometer in a dry environment and the one immersed in a humid environment. Then use the table to find out the exact values.
Analogue of a psychrometric device
To get accurate information, you need to know how to make a hygrometer at home. To create an analogue of a psychrometric device you will need:
- two mercury thermometers designed to measure air temperature;
- distilled water;
- board;
- a thread;
- cotton fabric.
You will also need any available means with which you can secure the thermometer.
You need to install two thermometers on the board in a vertical position so that they are parallel to each other. It is necessary to install a small container with distilled water under one of the measuring instruments. You can use a small flask or an ordinary vial as a container. The tip of the thermometer (mercury ball), under which the “reservoir” is installed, should be wrapped in ordinary cotton cloth, and then not very tightly tied with thread. We lower the edges of the fabric approximately 5 millimeters into a container that was previously filled with distilled water.
We make a psychrometer with our own hands
For many, store-bought options are either inconvenient or cost too much. Therefore, some owners prefer to make the devices themselves. Is it possible? If you have special materials and basic knowledge, it is possible to make a psychrometer yourself and at home.
First you need to decide what you need for this.
Materials and instructions for creation
Manufacturing the device will require:
- standard alcohol thermometer – 2 pcs.;
- wooden slats of different sizes - 2 pcs.;
- self-tapping screws – 4 pcs.;
- cambric (fabric) – a piece of 2x2 cm is enough;
- water container;
- distilled water or antifreeze (in the volume of the container);
- PVA glue;
- screwdriver;
- pliers;
- hacksaw for wood.
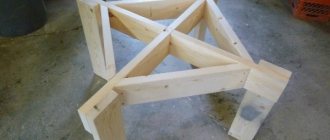
This is what the future design looks like
To begin with, take the largest rail. From it you need to cut a piece measuring 5x12 cm. In the future, it will become a stand for the device. The thickness does not matter, but it is not recommended to take plywood less than 5 mm.
To complete the central part of the device, you will need another rail, which will later become a stand. Its height should correspond to the length of the thermometers themselves. Therefore, the unnecessary part of the plywood is cut off with a hacksaw.
A traverse is installed on the finished rack
It is important that it is mounted at a right angle. Using screws, the thermometers themselves are attached directly to the traverse. The alcohol-containing ends should be directed towards the stand
The alcohol-containing ends should be directed towards the stand.
One of them is wrapped with a pre-cut piece of cambric fabric. The fabric should be applied to the thermometer with maximum density. About 1 cm of cambric is left hanging, since in the future it will serve as a connection between the thermometer and the container with liquid.
The finished tripod with thermometers attached to it is mounted to the stand. The easiest way to do this is to cut a hole in the middle of the plywood stand, equal in area to the stand itself. To keep the structure in place, it is fastened with PVA glue. Place a container of water under the thermometer with cambric.
Do-it-yourself psychrometer for incubator is ready!
How to use
You need to use it according to the following instructions:
the container is filled with liquid (antifreeze); the finished structure is placed in an incubator. It is best to place a homemade psychrometer close to the walls, since in the middle the liquid under the influence of light will quickly evaporate and distort the data
It is also important to take into account that the apparatus must be visible when the incubator is closed; After 15-20 minutes you can already take the first readings. The results obtained are substituted into the table for determining relative humidity in an incubator using a psychrometer:
The results obtained are substituted into the table for determining relative humidity in an incubator using a psychrometer:
Table of values for psychrometer
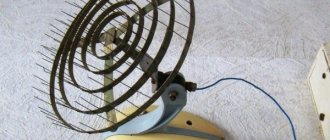
"Natural" meter
To make a meter at home, you can use the ability of a cone to straighten or, on the contrary, to compress its scales, depending on changes in environmental humidity. All you need to create the device is the cone itself and a piece of plywood.
A lump is attached to the very center of the plywood using a nail or tape. To determine humidity, you should monitor the rate of opening of the scales. If they open quickly, the air humidity is slightly below normal. If the position of the scales does not change for a long time, the microclimate of the room corresponds to average values. If their tips begin to rise upward, the humidity in the room is high.
What are the pros and cons of a psychrometer?
The main advantage of the psychrometer is its simple structure. Accordingly, determining air humidity using a psychrometer is much simpler compared to other measuring devices. Plus, it is much cheaper to manufacture than any other device.
But besides the positive aspects, the psychrometer also has disadvantages. The readings of this measuring instrument are greatly influenced by the movement of the surrounding air. That is, the higher the air speed at the measurement location, the greater the difference in the final result of both psychrometer thermometers. This error was corrected in an aspiration-type psychrometer or, as it is also called, an Assmann psychrometer.
Might be interesting
Waterproofing
How to choose the right floor waterproofing for screed?
Waterproofing
Foundation waterproofing: optimal choice of technology
Waterproofing
Clean water is the key to health, waterproofing concrete…
Waterproofing
Instructions for waterproofing a swimming pool
Hair device analogue
Anyone who asks the question “how to make a hygrometer with your own hands” very rarely starts creating a hair device. However, it is quite simple to do. For this you will need:
- hair;
- petrol;
- glue;
- nails;
- drawing supplies;
- high density paper;
- plywood sheet;
- pen rod;
- steel wire;
- video clip.
Human hair can be replaced with high quality cotton thread, which also reacts sharply to changes in air humidity.
The hair or thread must be at least 40 centimeters long. If we are talking about hair, it needs to be degreased (wetting in gasoline is used). At the end of the hair it is necessary to attach a weight that is heavy enough to straighten it. A small part of the pen refill, previously rinsed of ink, can be used as such a plumb line. To secure the load you need to use glue. A plastic tube about five millimeters long is placed on a small nail. You can also use the refill of a fountain pen as it. It is important that the tube rotates freely around the nail without jumping off it. To assemble the hygrometer, prepare a horizontal base on which the vertical part of the device will be fixed - a board or plywood. A pre-prepared nail is driven into its center. It must be placed so that the hair thrown through the plastic tube (one third of the entire length) can be attached to the horizontal part with its free end. Fastening is also done using glue. The final stage of the work is attaching a scale, which can be created from a strip of paper by marking divisions on it.
To calibrate the device, bring it into the bathroom in which a hot shower was turned on. Mark the point at which the plumb line will be sharp as 100%. To find the zero mark, you need to put the device in a heated oven (not very hot, so as not to burn the device). After this, exactly between the two points you need to put a mark of 50 degrees. You can calculate decimal or even unit marks in a similar way.
The mark at which the plumb line will be located at the end of the hair will be an indication of the relative humidity of the environment.
Assembling homemade devices
Not all of the devices described are worthy of attention, so it’s worth focusing on those that are easier to manufacture or give more accurate readings.
Option 1 - the simplest hygrometer
Many people who use glasses have long noticed that if they enter a warm room from the cold, the glasses usually fog up. But everything depends not only on the temperature in the room, but also on the humidity.
In some cases, the glass becomes almost wet, so you have to wipe it well with a napkin. But in other rooms they dry out very quickly on their own.
A home-made device made from improvised means is built on the same principle, with the help of which it will be possible to determine the air humidity in the room. Only the readings will not be accurate, but approximate.
For this purpose you will need the following:
- an ordinary transparent glass;
- some clean water;
- fridge.
You also need to take into account that this will be a disposable device, and in order to find out the humidity readings again after a while, this experiment will have to be repeated again.
Take an ordinary glass glass and pour water into it. You can also use a glass for this purpose. You need to fill the vessel almost completely. Then it must be placed in the refrigerator. There it should remain for several hours at a temperature of 3 to 5 ° C
Then remove the glass of water from the refrigerator and place it in the room where you need to check the humidity level. You just need to place it away from heating devices, otherwise it will give completely inaccurate results.
You can see not just condensation on the glass, but dripping drops. This means an increased percentage of humidity in the room where measurements are taken.
As a rule, as a result of such a simple and accessible experiment, you can get one of 3 options:
- When the air in the room is overdried and there is an insufficient percentage of humidity, condensation will appear on the walls of the glass within 5-8 minutes, which will begin to gradually disappear.
- If there is excess moisture in the room, after 5-8 minutes the vessel will no longer be covered with condensation, but with drops that will flow down the walls.
- But when there is no condensation or drops of water on the walls of the glass, this indicates that the humidity in the room is normal.
- if it is fast, then there is not enough humidity in the air;
- when the tips rise up, excess moisture is felt;
- if the scales do not change their position for a long time, this indicates that everything is in order.
What percentage of air humidity is no longer possible to say with accuracy. Only one thing can be stated: it is lowered, exceeded, or we are talking about an acceptable reading.
Option 2 - device made from natural materials
Not everyone knows that almost all plants react to air humidity in one way or another. To make your own meter from natural materials, it is not at all necessary to be able to “read” the behavior of plants, you just need to be careful.
The percentage of air humidity can be easily determined by looking at the buds. They can both close and open their petals. And this even applies to the situation if you pick the pine cones and bring them into your house
The cone necessarily reacts to changes in humidity both outdoors and indoors. You just need to watch its scales.
To carry out the experiment, you will need another small piece of plywood. A lump is attached to its center, which can be done either with a nail or using tape.
If the cone has fully opened its scales, this indicates insufficient environmental humidity. In the case of normal humidity, the scales will remain closed
Only here you will have to observe how quickly the scales will open:
In the latter case, the microclimate in the room corresponds to average readings. But even in this situation, using such an experiment, it will not be possible to obtain accurate data.
Option 3 - hygrometer made from a napkin
The simplest home hygrometer can be made from available materials. It will already be more accurate, because in this case a homemade reading scale is used. It just needs to be configured correctly.
To create a homemade product you will need:
- white plain napkin;
- a piece of plywood;
- several nails;
- wire 3-4 cm long.
You also need to find glue with which a paper napkin is glued to the plywood so that it does not move.
At both ends of the fixed napkin, 2 nails are driven into the plywood. Then 2 pieces of wire are attached to the napkin. But one of them must be attached to the nail. It will act as an arrow.
The principle of such a hygrometer is based on the fact that a paper napkin is able to absorb moisture that is in the air. This leads to a change in her condition
For accurate measurements, you first need to use a real mechanical hygrometer to draw the appropriate scale on the plywood. This homemade device can be used in the future; it will definitely not be disposable.
A wire attached with one side to a nail and the other to a napkin will move if the humidity in the room begins to change. To verify this, it is enough to install such a device in the kitchen while preparing food.
An analogue of a hair device is also offered for measuring the required readings of relative air humidity. But it has its drawbacks. Firstly, its production will require significantly more different materials.
And secondly, it will take time. The third problem is that you will need long hair of at least 40-50 cm. Everything here is based on the fact that human hair reacts well to any changes in air humidity. It is much easier to make a device such as a psychrometer yourself.
Option 4 - homemade psychometer
Although it will take time to manufacture a psychrometric device, such a device will give more accurate readings.
Schematic representation of the manufacture of an accurate psychrometer for measuring air humidity, where in addition to two thermometers you will need a few more simple structural elements
When making it, you cannot do without several important elements:
- two mercury or alcohol thermometers;
- glass jar with distilled water;
- a small piece of cotton fabric;
- small plywood board;
- several screws and thread.
Thermometers are taken to measure temperature. They must be attached to the board so that they are in a vertical position, but always parallel to each other. For this, in addition to the board, you may also need wooden planks.
And then you will need to saturate one of the thermometers with moisture. A flask or vial containing distilled water is placed under it. Then take a strip of fabric and wrap it around the mercury ball.
If it is an alcohol thermometer, then this procedure is done with its canister. To prevent the wrapped part from unraveling over time, it must be tied with thread. And then the free end of the fabric is placed in a vessel with water to a depth of 5-6 mm.
This device, in its operating principle, is almost the same as a conventional psychrometric hygrometer. But to use it, you need to immediately create a table. Here you will need to compare the readings of each thermometer and make certain calculations.
A homemade hygrometer made from thermometers will last longer if it is well secured to the stand, so this issue should be taken care of at the stage of preparing the stand materials
The readings of both the “dry” and “wet” devices are taken into account, and thanks to the calculations made, it will be possible to determine the level of humidity in the room. Such a homemade device is advantageous in that it is possible to obtain more accurate and correct readings.
Application of sensors in practice
Sensors are used for the following tasks:
- maintaining a given microclimate in residential and office premises: ensuring a comfortable stay for people;
- ensuring the necessary air parameters in warehouses and storage facilities: for example, archives, museums or vegetable warehouses;
- maintaining a given humidity environment when working with biological objects: incubators, laboratories, medical institutions;
- ensuring climatic conditions in the production of dry mixtures or using humidity-sensitive equipment;
- control in boiler rooms or water treatment plants: prevention of condensation;
- compliance with hygiene standards in any premises: high humidity promotes the development of mold and mildew.
Using a hygrometer in an incubator
It should be remembered that when a hygrometer is installed in the incubator, opening the housing lid leads to a rapid drop in the humidity stored there; the previous readings of the device will only be restored within an hour.
To successfully operate the device for many years, you must follow the manufacturer’s recommendations:
- The moisture meter should be protected from shocks and falls, as well as mechanical damage to the wire and touch sensor;
- Avoid exposure to direct sunlight and exposure to drafts;
- observe the recommended temperature regime for normal operation of the moisture meter (-40...+70°C);
- Avoid direct contact with moisture and contamination of the device.
Sensors for solid media based on operating principle
As we have already said, some humidity and air temperature sensors are universal: they can work in soil or granular mixtures. There are also specialized devices for solving such problems. Actually, there are not many technologies for measuring moisture content in granular media (soil, dry mixtures, etc.).
Resistive sensors
These detectors operate on the principle of ammeters: the measuring medium acts as a resistor in the circuit. The soil or dry mixture, depending on its saturation with water, changes its electrical conductivity (or resistance). The strength of the flowing current also changes accordingly. Such sensors can only be electronic, since mechanically measuring humidity in a solid medium is costly and impractical.
Two (or more, to improve accuracy) electrodes are immersed in the measurement medium.
The control module applies a small voltage to the contacts and measures the electric current. The more moisture, the stronger the electric current. A reliable and fairly accurate design, but not without its drawbacks. Firstly, the electrodes must be made of a material that is resistant to corrosion and mechanical damage. Secondly, when calibrating the device, it is necessary to take into account the salt content in the soil (or material).
Capacitive soil moisture sensors
Perhaps the most popular devices among apartment “farmers”. Today it has become fashionable to grow some food products not in the garden, but, for example, in an apartment in Moscow. To ensure a good harvest, intensive farming technologies controlled by electronics are used. The controller receives information about temperature, humidity and light levels, and simulates the natural conditions for your garden bed on the windowsill.
If the control system is debugged, there is no need to monitor the plant growth process on a daily basis. It is enough to replenish the watering container and harvest in a timely manner.
The advantage of such a device is the ability to work “automatically”. In addition, such a sensor can be made with your own hands.
How does a remote psychrometer differ from other devices?
A remote psychrometer is another example of a device for measuring humidity. The design of this measuring device uses electronic devices such as a resistance thermometer or thermistors.
Main types of remote psychrometers:
- manometric;
- electric.
A manometric psychrometer is one or two manometric type thermometers. Electronic psychrometers, like all other remote meters, use silicon transistors that replace dry and wet bulb sensors.
Functions
Breeding poultry under incubation conditions is very popular, both in private farming and in mass production. Every owner knows that a chicken can hatch from an egg only if all the parameters are met.
Scheme of a homemade psychrometer
The main points in this matter are:
If these indicators are lower or higher than standard, then even the most modern technologies will not be able to turn an egg into a bird. Therefore, it is very important to monitor the humidity and heat in the middle of the incubator. This is where a psychrometer comes in handy.
This device is used on the farm to measure air parameters. In most cases, its purpose is to determine the percentage of air humidity.
But, with a complicated design, it is possible to additionally set the temperature in the middle of the incubator.
The device operates on the basis of a physical property – liquid evaporation. Having two thermometers, one of which is immersed in water, and the second remains dry, two indicators are determined.
Using a special table compiled by specialists, the humidity of the air in the incubator is directly displayed. That is, a psychrometer is a special device that can calculate air humidity using the difference in the readings of two thermometers.
In practice, using this device is very easy and convenient. A psychrometer for an incubator can be purchased in specialized stores. There is also the option of making the device yourself.
echome.ru
Poultry farmers involved in incubation understand the importance of such a parameter as humidity for the success of the process.
At the first stages of the incubation process, humidity is not significant, provided that the room is not too dry - 60-70% is quite sufficient. In the middle of the period, the humidity should be reduced to 40-45%.
But in the last days of incubation, it is recommended to maintain a high level of humidity (RH 75%) - the shell will become softer and it will be easier for the chicks to hatch.
Monitoring the provision of such a multi-stage process will be possible using a digital hygrometer used in the incubator.
The most popular device models and their characteristics
Devices available on the modern market can be divided into three groups, using their operating principle as a criterion:
- aspiration;
- stationary;
- remote.
An aspiration psychrometer for an incubator is characterized by the presence of two thermometers, which are located in a special frame. This ensures that the device is less susceptible to negative influences and damage.
Air from the incubator is constantly blown onto the thermometers themselves with the same power using a special fan. As a result, the temperature is determined on thermometers. One of the advantages is the accuracy of the data, but the main disadvantage is the high price.
Stationary devices are located in the meteorological booth. It, in turn, is attached to the incubator using a tripod. The calculation of indicators occurs due to the circulation of air flow through the booth.
The disadvantage of the device is that a humidified thermometer can change data depending on the strength of the air flow, which is not the case in the previous version, since it is constant there. On the plus side, it is very easy to use and easy to repair.
Remote technologies involve the use of:
- resistance thermometers;
- thermistors.
The main characteristic of the devices is that the results are displayed on a part of the device outside the incubator. At the same time, in the middle there is a special sensor that constantly measures indicators.
The main advantage is the accuracy of the indicators. The errors of these devices are minimal, and the results are displayed to hundredths. The disadvantages include the high cost and complexity of repairs in the event of a breakdown.
Popular models
The most popular models among buyers from the types discussed above today are:
- stationary psychrometer VIT-1 (average cost - 450 rubles);
- CEM DT-3322 Professional remote psychrometer (average cost - 2,000 rubles);
- CEM DT-321S remote psychrometer (average cost - 2,500 rubles);
- aspiration psychrometer M-34M (average cost - 20,000 rubles);
- aspiration psychrometer MV-4-2M (average cost - 21,000 rubles).
As you can see, the cheapest option is a stationary device, and the most expensive is aspiration. But the high cost is justified by the high accuracy of the results.
How to choose?
Various moisture analyzers are usually chosen by engineers and other professionals who have a clear understanding of what they need. For your home, you can limit yourself to the simplest hygrometer. But it's not that simple. It is imperative to take into account, for example, the design features of each device so that it fits into the interior. Psychrometric models are best left to professional meteorologists - they are quite accurate, but difficult to use.
Since air humidity drops significantly in winter, it is very important to focus on the measurement range of 20-70% at a minimum. For garages, basements, baths, saunas, bathrooms and greenhouses, it is better to choose models that can measure humidity up to 100%
There is definitely no need to skimp when purchasing. In everyday conditions, an error of 2-3% is quite sufficient. In the children's room it is recommended to place models that resemble toys.