I would like to devote today’s article to a very broad and popular topic – master classes on kanzashi leaves. In almost every flower arrangement we use leaves, sometimes very small, barely noticeable, sometimes large, to add volume to the work, sometimes to hide any imperfections. In any case, you need different leaves, large and small, simple and intricate. I have put together this selection so that you have a choice of which leaves to diversify your flower arrangement.
We will make leaves from ribbons 5 cm and 2.5 cm wide.
How to make leaves from satin ribbon?
Many crafts are made from satin ribbons, but flowers are more popular. With the right approach, they look like natural ones, but to complete the picture they lack leaves, which add a natural look to the work or hide minor imperfections. Having studied the basic rules of the techniques, you can easily learn how to create various leaves with your own hands.
Materials and tools for creating leaves from satin ribbon
Experienced needlewomen prepare in advance the materials and tools that will be needed for the job. For any technology the list is the same:
- sharp scissors;
- tweezers, long with curved ends;
- threads;
- thin and thick needle;
- ruler;
- chalk or soap;
- candle or lighter;
- satin ribbons of various widths.
Having been well prepared, you can safely begin to create.
Important! Many craftswomen use a special soldering iron instead of scissors, which simultaneously cuts and melts the edge.
Practical tips for creating kanzashi
The back side of the satin ribbon is easy to distinguish from the front side - it does not have a glossy sheen and has a rough surface.
It is advisable to work with tapes on a flat surface, so the workpieces will not “dance.”
In multi-layer kanzashi flowers, the bottom row of petals is planted on a felt base using Moment glue. The second and subsequent layers are strung on a thread. Needlewomen with experience in kanzashi recommend leaving one petal on the needle so that subsequent ones are put on evenly and the level is not lost.
When working with satin ribbons, you constantly have to use fire to connect the elements. The tape has the property of melting and hardening quickly, so burning the edges is much more effective than gluing - an invisible, weightless scar is formed at the place of fixation. In creative work, needlewomen use fire from a candle or lighter.
How to make leaves for a flower?
There are many types of leaves for flowers: simple and complex, large and small, voluminous and flat. Depending on the style of composition, the technique is determined, colors and quantities of materials are selected. The size of the finished sheet depends on the width of the tape, so tapes of any width are suitable for all methods.
Simple
From the name it is clear that this method is suitable for beginners. Simple petals are used in combination with any flowers. To make them you need:
- cut ribbons 5 cm wide into 10 cm rectangles, the length is equal to the width multiplied by two;
- singe the cuts over a candle;
- bend the top corners to the center of the bottom and secure with a pin;
- At the bottom, place a hand stitch “forward with the needle”, sewing both layers together;
- tighten the stitching and secure it;
- Sew the edges on the reverse side, the leaf is ready.
For a rose
To make leaves for a rose, you will additionally need wire and glue. They look beautiful and natural, and are made easily and quickly:
- cut a 5 cm wide tape into 7 cm pieces;
- coat the wrong side with glue and place a piece of wire diagonally and place a second piece on top;
- smooth out so that the wire stands out well, it will be the middle vein of the leaf;
- when the glue dries, cut out the shape of a leaf and make serifs;
- burn the edges over the fire and while the sheet is hot add curves to it for a natural look.
Important! It is advisable to use transparent glue that does not leave marks on the fabric.
Corrugated
For a textured sheet, a tape 5 cm wide is suitable:
- Cut it into 6 cm pieces and wet it with water.
- Fold it diagonally, inside out, so that the edges are aligned on one side.
- Place this piece between two layers of thin synthetic fabric, such as organza.
- Place a heated iron on top and, pressing it with one hand, roll the fabric under it.
- Then pull out the workpiece, unfold it and cut out the shape of the leaves.
- Finish the edges over the candle.
- The resulting corrugated leaves are used for various flower arrangements.
Important! The finished product should not be wet or wrinkled, otherwise it will lose its relief. To give it an aesthetic appearance, it is periodically sprayed with hairspray.
Big leaf
If you need a large leaf, then use two pieces of 25 mm tape, each 12 cm long. To make it you need:
- fold the two strips right side inward, cut the corner and melt the cut;
- sew a hand zigzag stitch to the bottom;
- pull together to form a tight gather;
- Sew gathered ribbons together along the wrong side and secure at the bottom.
Important! For crafts made from satin ribbons, synthetic materials are chosen so that the cut melts and does not burn.
Spicy
The first master class will tell you how to make a simple sharp petal.
- To make it, you will need a piece of satin ribbon 5 cm wide. The edges must be melted.
- A piece of tape must be folded diagonally, while holding it with tweezers.
- Cut off the corner and base of the triangle. You will get a petal. Burn the cut line so that the thread does not unravel.
In this not very tricky way they make a double or triple leaf. To do this, you need to fold several petals together before trimming. You can use multi-colored pieces of material. Silk thread is used to fasten several products together.
Sharp petals can be used to create a crown or complex compositions based on patterns.
Master class of Kanzashi leaves
In this master class I will look at the most popular ways to create leaves for Kanzashi flowers. All examples can be seen in my works.
I took two types of tapes: width 5 cm and 2.5 cm. We will also need tools, a soldering iron or burner, and a needle and thread.
First I will show leaves from a 5 cm wide ribbon.
A. Cut the ribbon 5-6 cm long (how long do you need the leaf).
Fold the ribbon in half and cut out the leaf.
Carefully singe the outline of the leaf.
We received a simple piece of paper. You can leave it like this, and we will move on.
Again, fold it in half and scorch the bend with a lighter or candle, carefully so as not to burn the tape, and squeeze the bend with your fingers.
Next, we also make veins from the middle of the sheet to the center - according to the drawing. We clamp it with tweezers (if you don’t have tweezers, you can make a fold with your fingers, singe it and press it).
Turn the front side towards you, pinch the sheet in the bottom center and scorch it a little, press (not too hard.)
Now we have received the first piece of paper.
B. _ We will make the second leaf using a knife (preferably with a blunt end). We also cut out and singe the outline.
Take a terry towel and place the sheet inside out. We heat the knife over gas or a candle and begin to draw veins.
First the central vein, then according to the pattern from the middle to the edges.
We turn the leaf over and draw two more along the central vein along the edges (you can see it in the photo).
Then again, using a dull hot knife, draw stripes according to the pattern.
We get another leaf. It’s not very visible, the photos are reflected, but this is my favorite leaf, it turns out very beautiful.
B. You can simply draw veins randomly with a hot knife. Fantasize.
G . The third method: cut out the leaf, and do not singe the entire outline at once. 1-2 cm were singed, the edge was carefully stretched to make a wave. And so, along the entire contour of the sheet.
You can leave it like this, or you can make a central vein, and you can decorate the entire leaf with veins. But I like this type of leaf without any veins.
And remember, there are no identical leaves in nature. Therefore, there is no need for templates.
Also, a lot of craftswomen cut out the outline of a leaf in a zigzag and singe the cut. It also turns out to be an original leaf!
We take and make a leaf according to the MK “ Kanzashi master class of a sharp petal from a 2.5 cm wide ribbon .” We make such a leaf (also don’t forget) from 2.5 wide ribbon.
If you collect the bottom of the leaf with a thread, you will get this look.
E. Cut a ribbon approximately 10 cm long (width* 2 times, for example: a ribbon is 3 cm wide, which means the length of the piece will be 6 cm).
Fold in half. We singe the cut or cut it off with a soldering iron, shown in the photo.
Turn it right side out.
We sew along the bottom of the corner with thread and collect it, making a knot.
We got another type of leaf. I mainly use this leaf to create potted flowers or to create fans.
AND . Also suitable for leaves are sharp petals and inverted sharp petals “Kanzashi”.
Tape 2.5 cm.
A. Take a piece of 8-10 cm (it all depends on the length of the leaf).
Fold in half. And cut it off with a soldering iron or burner as in the photo (you can use scissors and scorch the cut with a lighter).
Turn the left side right side out. This is the leaf we use for the buds.
If we straighten the leaf relative to the center, we get another type of leaf. This petal can be used individually and when creating the flowers themselves.
The corner that remains can also be used as a leaf for flowers.
B. _ Now I will show how such a leaf can be decorated. We take identical pieces of different shades of ribbon.
Place one piece on top of the other and fold it in half so that one edge comes out.
We cut it, as in the first method, turn it right side out, our leaf is ready.
B. We cut the ribbon -7 cm and fold it as in the photographs (here is more detailed MK “ Master class of the lush Kanzashi flower” ). At first I wanted to fold and show the finished leaf, then I decided to do it step by step, so the ribbon is crumpled...
We received another piece of paper.
All the leaves at once.
That's all for now.
Chamomile using the kanzashi technique
For those who have just begun to get involved in Japanese art, I advise craftswomen to make a kanzashi daisy. It only has seven petals, no felt base, and the petals are attached with hot glue.
On a daisy, it is easy to master folding the ribbon and fixing it over the fire.
Step-by-step making of kanzashkas - daisies with your own hands:
- Prepare squares of white satin ribbon 5 cm wide;
- Grab the middle of the square with tweezers and fold it in half so that the sides wrap around the tweezers;
- Use your fingers to smooth the folds;
- Using tweezers, grab the workpiece again so that the top is hidden between the tweezer legs;
- Wrap the tweezers around the sides of the workpiece and remove it, holding the tip of the petal with your fingers;
- Gently straighten the top so that the petal is round;
- Holding it with tweezers, cut off the bottom corner and seal it with fire (from a lighter or candle);
- Gather the petals on a needle and thread;
- Glue the petals with hot glue, applying a drop at a time to the side walls, pressing with tweezers until gluing.
The white tape is very capricious, so you need to hold it over the fire for a split second. otherwise black marks will appear on it. In order for the workpieces to fit well, you need to cut off excess material from the wrong side.
Following the example of chamomile, simple and beautiful kanzashi are available for beginning craftswomen; you just need to take ribbons of different colors.
Simple kanzashi leaves
In the first tutorial we will make simple and universal leaves from 2.5 cm ribbons that will suit almost any kanzashi flowers. Let's take a green satin ribbon, I won't cut it into pieces to show that the petals can be made of any size. Turn the ribbon inside out towards you, bend the left edge at an angle of 90 degrees and place the right edge of the ribbon over it. The result is an angular petal.
Let's cut the ribbon and make two folds at the base, fix them by melting them over the fire.
Working with fire - pay attention to safety
The main rule when working with fire is to be careful and follow simple safety rules:
- Do not place the fire source on a flammable surface;
- Do not leave a candle unattended, especially if there are children in the house;
- Do not work with fire near open windows, curtains, fabric or paper decorative items;
- After work, be sure to extinguish the source of fire;
- Have a container of water on hand in case something goes wrong when burning the tape;
- Hold the workpiece over the fire with metal tweezers.
The unusual sharp shape of the petals of kanzashi flowers leaves no one indifferent. The glossy surface of the satin ribbons plays in the light. Jewelry made using the kanzashi technique looks chic.
Leaves for rose
Cut the satin ribbon into 5x7 cm pieces; 1 sheet will require 2 pieces. We apply glue to the wrong side, I use “Titanium”. Lay the wire diagonally and cover it with a second piece of satin ribbon on top. Smooth out the sheet, carefully highlight the wire, it serves as the central vein. When the glue dries, cut out the shape of a leaf from the workpiece and make notches.
Carefully process the edges of the sheet over the fire and while it is still hot, give it a slightly curved shape. Leaves can be of different sizes, shapes and textures. You can see how to use such leaves in a composition in MK on roses made from satin ribbons.
Modular technology
You can also make a water lily from modules. They are prepared in advance from double-sided colored paper. Green ones will go to the leaves, and, for example, pink and white ones will go to the calyx of the flower. The modules are simply inserted into one another, but if desired, the structure can be secured with glue.
Work begins with assembling the foliage. Paper parts are laid out in rows. The first consists of two modules, the second - of three, and so on until there are 7 elements in the row. Further assembly proceeds in descending order: in each subsequent row there will be one less module than in the previous one. The latter consists of one single module. The sheet is ready. In total you need to build five such leaves. Next, they are all combined into a single platform on which the flower will rest. The sheets are fastened together with additional green modules.
Corrugated leaves
Unusual textured leaves from satin ribbons are obtained if it is pre-corrugated. To do this, we use a satin ribbon measuring 5x7 cm, moisten it with water. Fold it diagonally with the front side facing you.
We need thin synthetic fabric, I use a piece of organza. I wrap the piece of tape in it and put an iron on top, heated on the second level. I take the edge of the organza and, pressing on the iron with one hand, I scroll the organza under the iron. As a result of such manipulations, an interesting relief is obtained.
We cut out the shape of a sheet from the blank, make small notches and process the edges with a lighter. The result is leaves that can be used for any kanzashi flowers.
Another option for making leaves for flower arrangements.
What can leaves be made from?
You can make artificial leaves together with your children: participation in the process will arouse interest in the kids, and some of the crafts can be taken to school or kindergarten for an arts and crafts competition.
Leaves can be made from almost anything, including the most extraordinary raw materials: thick fabric (for example, felt or felt), beads, satin ribbons, modeling paste, or corrugated or other paper.
If you still want to use natural material, collected or plucked leaves (maple, birch, rowan and others) can be pre-preserved in glycerin - then crafts made from them will be stored much longer.
Large sheet with folds
We use 2.5 cm tape, 12 cm long; 1 sheet will require 2 pieces. Place the pieces together with the right sides facing inward. Cut the corner and melt the cut.
We will make 5 folds on both sides and secure them with pins. From the wrong side we sew both ribbons.
Fold the sheet at the base and melt it with fire. Iron the leaf so that the folds lie evenly and do not puff up. These leaves are more suitable for voluminous flowers such as chrysanthemums, asters or dahlias.
Leaf for tulips
2.
Take the satin ribbon and fold it right side inward (it turns out to be a square).
3.
Then cut diagonally. We've got our first leaf. Here I used a soldering iron to cut the square, but you can do all this with scissors and a lighter, as you prefer.
4.
In order to save material, I also cut off one triangle and this will be another leaf.
5.
The next step is to cut off the tip of the receding triangle.
6.
Turn it inside out and burn the edges with a lighter.
7.
The leaf is ready)))
Kanzashi maple leaf. Master class with photos
Such a leaf will help create a good mood on gloomy autumn days. This maple leaf can be a wonderful interior decoration, an attribute for autumn dancing, a decoration for a hat or a brooch. For this we will need: Satin ribbon (yellow / red / orange) (width – 5 cm, length – 85 cm);
Brocade ribbon (gold) (width – 5 cm, length – 30 cm) Decorative cord (7 cm) Scissors Pin (for brooch) Ruler Glue (hot gun and glue for it) Bead (for the middle of the leaf) Candle Tweezers Step-by- step process making a maple leaf from satin ribbon
We cut the satin ribbon into squares (5x5), singe the edges over a candle so that they do not crumble
We fold a triangle from a square, 2 corners adjacent to the long side, fold them together... And scorch the folded corner over the candle. In total, you should get 17 satin petals We make the same petals from a brocade ribbon (6 pieces) Take a satin petal and “put” a brocade petal into it. Thus, we get a double petal
For our maple leaf you need to make 6 double petals
Now 6 double petals need to be glued together in a circle. You will get a flower that will be the basis of our leaf.
From the remaining satin petals we make 3 “branches”. To do this, glue two petals and glue a third one between them. We proceed to the final assembly of the leaf: glue 3 “twigs” into adjacent spaces between the petals of the base flower. On both sides of the glued “twigs”, between the petals of the flower, glue one satin leaf into the remaining unused one. Glue the gap between the petals of the base flower with a decorative cord that imitates a leaf stalk
If the maple leaf is to be a brooch, then glue a pin on the back side and cover the gluing area with a piece of satin ribbon. Glue a bead into the center of the base flower. Our maple leaf is ready!!!
How to make a maple leaf from ribbons step by step
1. Start making your planned autumn kanzashi with triple sharp petals. For them, take red, orange and gold squares with a side of 5 cm.
2. For one petal you need all the squares of the indicated colors. Bend each one diagonally.
3. Place the orange triangle on top of the red one and add a layer of gold between them.
4. Round the multi-layer triangle by closing the sharp corners, singeing them. Trim the bottom of the petal to make it flatter.
5. For the inside of the petals, prepare a gold satin and lurex ribbon - squares with a side of 2.5 cm.
6. Fold the indicated pair in half diagonally.
7. Place the shiny triangle on the satin one and start folding the double corners.
8. Form a diamond with a bright layer in the center.
9. Use a clamp to secure the bottom corners, rounding the top. You should get a golden droplet petal.
10. On the reverse side, the excess edge of the tape should be trimmed.
11. For the central flower, prepare 6 triple petals and the same number of droplets.
12. Make similar details for the outer part of the maple leaf. Form triple petals using orange and gold satin ribbon and gold lurex. Make single kanzashi petals from small red squares.
13. Insert small rounded petals intended for the central flower into the middle of the large ones. Gather the flower on a string. Glue a 1.2 cm red half bead into the center.
14. Make 11 petals for the outer part of the leaf. Insert small red petals inside the triple ones.
15. Leave two petals unchanged and glue small half-beads to them. Glue the remaining 9 into branches, combining 3 parts. Also decorate the resulting blanks with half beads.
16. Glue the resulting branches into the voids between the flower petals.
17. From 2.5 cm gold lurex fabric, make 3 small sharp petals.
18. Small parts are designed to disguise the places where branches are attached.
19. Take wire and thin gold ribbon.
20. Wrap the ribbon around the wire and glue it to the back of the flower. Also glue on the little gold pieces. Cover the entire structure from behind with a felt circle.
The maple leaf made from ribbons is ready. All that remains is to think about the purpose of the product and choose a base. The size of the finished decoration is 8*10 cm without the stem.
Making a snow-white lily from ribbons
The Japanese kanzashi technique has long been a part of applied art in our region. Silk has long been the main material for crafts, but over time, needlewomen transferred silk to satin and grosgrain fabric strips, which are also perfect for practicing the kanzashi technique. Here is a list of materials that will need to be prepared for work:
- silk or satin ribbon six centimeters wide;
- thick glue;
- glue gun;
- candle;
- semolina;
- dark green food coloring, cotton wool for rubbing the shade into the fabric;
- shine with a golden tint;
- thin wire or fishing line;
- a piece of felt fabric, a towel and a knife.
First of all, let's cut out a template for the lily petals. Take thick cardboard and apply a design on it. Plastic can also be used for these purposes. It will last much longer in such needlework. The length of the template should be seven centimeters and the width five centimeters. One flower bud will consist of seventeen petals. Five of the pieces in this set should have a slightly deeper cut than the others.
Cut the petals according to the template you made yourself and singe them one by one over a candle fire. While scorching, try to pull the satin in different directions so that it becomes a wave.
Next, you need to give the workpieces more texture. Place the elements on a towel after folding it in several layers. Heat a knife over the fire and run the non-sharp part along the petals, pressing slightly until longitudinal stripes - veins - form. The five petals, which should have a deep cut, should be painted green. Food coloring will help you with this. Take a handful of grains and start rubbing them into the material. It will be easier for you to do this with a cotton pad. If such a dye is not available, take a dark green pencil and crumble a little lead. The effect will be almost the same.
Now we begin to prepare the stamens for the Kanzashi lily flower. You need to cut the fishing line into small pieces, approximately six centimeters long, and dip the edge of each piece in glue, and then in pre-prepared cereal. You can repeat dipping several times so that the semolina sticks well. The stamens should dry well, and only then will you need to cut the fishing line even shorter.
The first row of the lily should consist of six kanzashi elements. Glue them one by one to the felt piece. Wait until the workpiece dries, and then glue the second tier, also of six petals.
Elements that were painted green are attached in the third row in the amount of three pieces, and in the fourth row two pieces are needed. When the craft has dried a little, apply a glue gun in the center and insert the stamens. Hold them with your hands so they have time to stick.
This lily, made in the kanzashi style, can be a wonderful decoration for a hairpin, suitable for headbands or elastic bands. Or you can leave everything as is, making a few more copies for a wonderful bouquet.
A lily flower can be made not only white, but the shape of the flower can be given volume and splendor. Then such crafts decorate the home interior, decorative panels and gift wrapping. Show your imagination and you will succeed. And as an example, we invite you to watch several video options for composing a lily flower using the kanzashi technique.
Master class handicrafts. Ribbon leaves.
Today I will tell you how to make beautiful leaves from satin ribbons. I will show two options for leaves. They are made quite quickly and very harmoniously complement flower arrangements.
I was very interested in flowers and somehow paid little attention to the leaves. But they are the ones who give flower arrangements a finished look. They “revive” and add color to products. And what to be disingenuous - they often hide some defects and the reverse side of the products, as a result of which we get jewelry that is perfect both from the front and from the back.
I use these leaves most often in my products. I offer you a master class - leaves from ribbons.
To make these leaves we will need: 1. Green satin ribbon 2.5 cm wide. 2. Burner or simple kitchen knife 3. Metal ruler 4. Glass or glass cutting board 5. Sewing supplies
Let's get started.
Cut the ribbon into 10 cm long pieces.
Let's put the ribbon on the glass. Next, fold the strips in half, wrong side inward.
Place the ruler on the tape diagonally.
We cut the ribbon along the ruler with a burner or a hot knife.
We have one leaf ready. If desired, the bottom part can be turned out. I prefer to leave these leaves unchanged.
Here is an example of using these sheets. MK flowers can be viewed here.
We still have the top part of the tape. We won't throw it away. We will also make beautiful leaves from it.
We cut off the bottom part with a burner so that it becomes even.
We collect the bottom of the future leaf on a thread.
We tighten the thread, fasten it and cut it. The leaf is ready.
I used these leaves to make a wreath.
Good luck in your creativity and new ideas.
Photo gallery of leaves in kanzashi style
Video master class: making leaves for flowers from ribbon
I would like to share with you a master class on making leaves for kanzashi flowers. Using this method, you can make not only leaves, but also various products for decorating gifts, compositions from ribbons and not only from ribbons. I think that this method of making leaves will be useful to you in your creativity. You can find out all the details from this video master class.
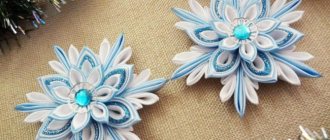
Flower assembly
- Prepare a felt circle with a diameter of 5 cm;
- Glue the first row of petals in the amount of 27 pieces onto the felt with Moment glue;
- Sew the petals of the second row (22 pieces) with a needle and thread, stringing several pieces on the needle;
- Move the leaves from the needle to the thread;
- After all the petals are strung on a thread, thread the needle through the first petal;
- Do not tighten the thread, but do not make it too loose, there should be no gaps;
- Fasten the thread and cut, hiding the tip;
- Apply Moment glue to the bases of the petals of the bottom row and carefully glue the second row, pressing lightly with your fingers;
- Align the petals, slightly lifting them to the top;
- Sew small petals (16 pieces) for the third row;
- Glue the third row to the second with Moment glue;
- Glue a beautiful crystal in the center with polymer glue.
As a result of the master class, a beautiful flower appears. Volumetric raised petals are obtained due to the fact that they were sewn together during the work process.