Today the site “Mom can do anything!” offers several ideas on how to make a cookbook beautiful and convenient for you. Every woman has to cook. And we all, regardless of whether we like to spend time in the kitchen or not, are trying to find new interesting recipes. Some people are looking for simple, quick cooking ideas, while others are constantly searching for and creating culinary masterpieces. We download recipes from the Internet, save them on the pages of our social networks, write them down on pieces of paper, in our phones. And in this sea of information they quickly get lost, and for half an hour now we have been looking for where did we write down the recipe for that wonderful pie?
There are two ways to store recipes:
- electronic;
- paper version.
Preparation
Step 1
Collect all the recipes for delicious dishes
COLLECTION
The recipes you want to include in your cookbook can come from a variety of sources. You will have to spend time collecting them. These can be traditional family dishes, the recipes of which are passed down from generation to generation. Ask your mother or grandmother in detail, find out all the subtleties and little secrets of their preparation. Often successful recipes are shared among friends. A lot of information about cooking can be found on the Internet, in culinary blogs and thematic communities. And of course, use your personal experience, remember your masterpieces in the kitchen.
Don't be afraid to keep up with the times and apply new technologies. Sharing albums and online documents are easy ways to allow multiple people to contribute to a book at the same time. This will significantly speed up the recipe collection stage.
DIGITIZATION
Most likely, as a result of collecting, you will end up with a mixture of recipe papers, notes on your phone, and bookmarks in your browser. To use all this in a photo book, you need to convert them into digital form. Scan handwritten sheets of paper, insert into a Word document, convert images into text.
As long as you change smartphones, the photo book will save your photos for 100 years!
Print your photos in our premier thick-sheet photo book.
Glossy surface, accurate color rendering and 180-degree rotation will give you incredible emotions! Look
SYSTEMATIZATION
Once you have enough recipes and the process of collecting them is complete, create a rough table of contents. As you work on creating a photo cookbook, this will help you take inventory of your recipes and organize them in a logical order.
Step 2
Find or take your own photos
Image from: milenio.com
There are several ways to create illustrations for your recipes. You can ask the chef to send you a photo of the dish he prepared. Many professional chefs have their own pages on social networks and will be happy to help you. Look for a suitable photo on the Internet. You can also draw a simple illustration with your own hands or take a photo of a freshly prepared dish yourself.
Cooking food and then photographing it can be a very fun and creative process, so have fun! One of the best tips for creating a family cookbook is to involve the kids or your spouse in the kitchen. Photos with their participation will give the whole event additional meaning, because you are creating not just a collection of recipes, but a future family heirloom. Why not use pictures from small home parties? What will they be like? Will it be carefully thought out (perhaps you will buy new dishes for this occasion) or will everything flow naturally? It's up to you to decide! Try any options. Experiment!
Step 3
Choose a photo book that is convenient for use
It's easy to get confused among the large number of offers. What type of photo book should I choose? We consider photo books that open 180° to be the most convenient options for saving your recipes (for example, Photobook (printbook) in Premium hard cover). The pages will lie flatter and stay open without assistance, so you can follow the recipe without having to adjust the page with dirty hands during cooking. A photobook on a spring (Paperback Photobook Standard on a spring) will also do an excellent job of this function.
To ensure that your cookbook photobook lasts for many years and retains its original appearance, choose thick sheets reinforced with cardboard with a high degree of wear resistance. In the kitchen, this option will undoubtedly be relevant.
The number of spreads depends on how many recipes you have collected and how you plan to arrange them on the page. Start from a minimum of 10 reversals.
Personalize your own creation to your liking with a custom cover. This could be a glossy laminated photo cover with a nice photo and title, you might want to include your name as the author. Or choose a cozy velvety fabric cover from a whole palette of colors.
Regardless of what type of photo book you choose, the end result will look good and high quality, thanks to modern printing technologies.
Step 4
Come up with a clear title for your cookbook
Image from the site: erentraut.ru
When it comes to a DIY recipe book, its title can be whatever you like. Choose simple, uncomplicated names, perhaps understandable only to your circle of loved ones. Try using these ideas as a starting point:
- Ivanov family recipes;
- Dinner and dessert;
- Quarantine Cookbook;
- My favorite diet foods;
- Kitchen routine;
- Taste 2022;
- Lunches for kids;
- Wonderful grandma's recipes;
- Home Recipes;
- Recipes for dishes and baked goods.
Step 5
Write an introductory note
Image from: wallpapermaiden.com
Including an introductory note from the author can help set the tone for the entire book or dedicate it to someone special. This is a great way to tell the backstory of the recipes that will be inside, to thank everyone who helped in collecting them, and therefore in creating the entire book. An introductory note will help inspire the future reader to culinary exploits.
Master class with photographs
We will need the following materials:
- Sheets of white office paper A4 size;
- Instant coffee;
- Figured hole punch;
- 2 stationery clips;
- Glue “Moment Crystal”;
- A small piece of cotton fabric;
- Kraft paper;
- Cover from an old notepad or book;
- A sheet of scrapbooking paper with a checkered print;
- Paper for watercolors or pastels;
- Ink Distress;
- Decorative elements for decorating the cover (ribbons, brads, paper flowers, silicone stamp “Handmade”, eyelets;
- Threads.
Think about a format that will accommodate all the recipes
Now we have come to the layout of the photo book. Think about how you would like to place the recipe on the page. If the recipe is not accompanied by a photograph, then it would be correct to devote a separate page to it. Recipes with photographs will look great on a full spread: text on one side, illustration on the other. At the same time, it is not necessary to adhere only to this format when collecting a photo book. Some recipes may require more emphasis or space in the book than others. Try not to overload the pages with lots of text in small font. The clearer and more logical the format for placing information in your cookbook, the easier and more convenient it will be to use it in the future when preparing a family dinner.
Step 7
Post Recipes
Once you have roughly imagined the layout of the future cookbook, you can start posting recipes:
- Upload the collected recipe photos to the Multiphoto account. You can create a separate “Recipes” folder for this;
- To insert text, right-click anywhere in the editor and select “Insert Text”.
Find out more about how to work in the photo book editor in
VIDEO
Design
- Use ready-made page designs, backgrounds, decorations;
- Create your own design for the entire cookbook if desired.
Step 8
Add illustrations
Whether every recipe comes with a photo, or you've chosen to illustrate just a few of them, now is the time to post those images. Cookbook illustrations can be ordinary photographs taken on your phone, or more advanced graphic files that you can export using any of the programs we named in the previous step.
Decide on a Layout
Once you've chosen the size format you want, you'll need to look through some templates and choose the layout you like for your book. This should be done before you begin any photography or text work.
About the hidden threat of refrigerator magnets
Plant Jerusalem artichoke: how to grow wheatgrass and hogweed in the garden without chemicals in spring
Harvest ring: a neighbor taught how to properly “wake up” potatoes
Seal
Step 9
Bringing a recipe book to life
By creating your own cookbook, going through every step of its birth, you will get a lot of positive emotions. But the greatest pleasure is when the book is printed and you and your whole family use it in your daily life. Thinking about what to give to your friends or relatives? Print several copies of your author's culinary photo book, and you will always have a duplicate on hand that you can give as a gift at any time.
Each of us will be pleased to bring our ideas to life, to see our own recipes, designed in the form of a beautiful illustrated culinary photo book, which you will keep for many years.
Now, having learned all the secrets, create your own unique recipe book!
Outline the chapters
Once you have selected the recipes you want, organize them into chapters. You've probably seen cookbooks with separate sections such as appetizers, soups and salads, main courses, and desserts. If this option doesn't work for you, consider organizing your recipes by season, main ingredient (such as beef and seafood), cooking technique (baking, pressure cooker, stovetop), or another logical format that works for you.
How did life turn out for Georg Ots’s youngest daughter: photo
He wrote many books that became bestsellers: Around the World by Bicycle
The ex-wife of Vladimir Kristovsky about relationships after divorce
Making endpapers
We fold each of the endpapers between the cover and the paper mass, glue one of its sides to the outer sheet, masking the kraft paper, and the other to the inside of the cover. By the way! The endpapers should be subjected to the same aging procedure using Distress ink.
The originality and uniqueness of the finished product will be given by a tag made for this purpose, on which the inscription: “Handmade” is applied. Such “chips” are made using special inks and stamps. A grommet is inserted into the edge, through which a satin ribbon is threaded and tied into a bow.
Testing
This step is by far the most important of all the steps in creating a cookbook. You should check each of your recipes to make sure you haven't missed any steps, ingredients, or other items.
Venus entered the constellation Aries: forecast for all signs
14 years of difficulties and love: how Anton Khabarov manages to keep his family together
For those who still mark holes with a finger or pencil: a special device
Since it's very difficult to do this on your own, ask family members, friends, or professional recipe testers to test each chapter and report all the good points and mistakes. Then make adjustments until you're sure each recipe is perfect.
Volumetric option
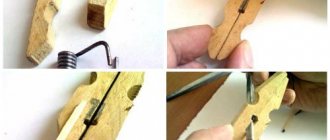
If the notepad type does not suit the cook, he should take a master class on how to make a real book. For this you will need:
Coffee is essential for coloring sheets of paper, giving them an aged effect. To do this, the warm solution with coffee is poured into a baking tray, where sheets of paper are placed one by one until they are completely wet, after which the paper is hung out to dry. After drying, the sheets are smoothed with an iron. We bend each sheet evenly in half, decorate the edges with a hole punch, making them openwork.
The paper should be folded into an even stack, the top and bottom of the workpiece should be pressed with paper clips, placing squares of paper under them so as not to spoil the sheets.
On the spine of the workpiece we make 6 marks with a pencil along which shallow cuts are made with a stationery knife.
To sew the sheets, you need to take two strips of fabric, place them along the intended areas so that two areas from the edges and the middle are free.
We thread a thread through the notches of each sheet with a snake so that it passes along the top of the areas with fabric strips. All sheets are sewn together in the described manner into one tight binding, the end of which is secured with a good strong knot. Having placed the clamps on the workpiece again, coat the spine with transparent glue and place it under a press, for example, from several heavy books. Drying should take several hours.
We wrap the cover with kraft paper, folding 4 cm into the inner edge, carefully cutting and gluing the paper.
Read the text carefully
Once everything is written, you will need to proofread the material more than once. Typos and poor grammar can seriously damage your credibility, effectively ruining all your hard work. If you can fit it into your budget, consider hiring a professional editor to give your cookbook a final review.
Myasnikov warned Russians about the outbreak of a dangerous disease due to the Covid epidemic
18% will travel throughout Russia, 7% abroad: Russians spoke about plans for the summer
Carrots growing between boards: how to sow seeds to reap the harvest twice