An old tire can turn into a beautiful swan in a couple of hours.
Once every few years, all motorists replace old tires with new ones, leaving used tires in tire shops, taking them to a landfill or storing them in a garage. It’s scary to imagine how much such rubber trash is generated every day in a single city or town. But some part of it, once in the hands of a skilled person, is still useful, turning into mini-fences, flower beds and funny sculptures for the playground.
There is even a separate direction of design art based on the use of garbage, junk and used items to create decorative elements. It has its own name - trash art.
Every day a huge amount of old car tires are taken to landfills.
Swans have become quite popular products made from old tires, with which zealous owners decorate their plots or adjacent areas. Rubber birds can be found in public walking areas and on children's playgrounds.
Someone would also like to have such a swan, but does not know how to make it. But after reading this article, which will describe in detail the technology for making swans in two versions, he will eliminate this gap in his knowledge.
Getting ready for work
First of all, you need to choose the necessary tire that is most suitable for the job. This means that it is better to find the most “bald” one, for the reason that it will be easier to cut. It is very good if there is a longitudinal pattern on it - this will also greatly facilitate the process.
Some tires have steel cord reinforcement (breaker). It is difficult to cut such a tire; in addition, there may be sharp ends of the cord sticking out at the cut site, which can cause injury both during the work and on the finished product. Therefore, preference should be given to an old tire with a nylon cord (the marking should contain the words “Steel”).
The selected tire must be thoroughly cleaned of dust and dirt, washed and dried - it is simply more pleasant to work with clean material.
We immediately prepare the instrument. You will need:
- chalk for marking;
- roulette;
- electric drill;
- drills 3 and 10 mm in diameter;
- sharp knife (with a powerful blade, like a shoemaker's);
- jigsaw;
- “grinder” with a cutting disc;
- pliers.
From additional materials:
- wire for staples;
- plastic metal rod (or thick wire) 1.2 - 1.5 meters long;
- paint to give the finished “swan” the desired color.
Of course, you need to be patient - the process ahead is quite labor-intensive and complex. For work, it is better to choose a fine day in order to carry out the entire process in the open air - during the drilling or cutting process, the rubber burns, which is accompanied by an unpleasant and difficult to remove odor.
Decoration figurine
This swan is of aesthetic value only. Making it is no more difficult than the previous one, but you will have to work a little on the shape of the bends. But such a figurine will decorate the site no worse than an antique statue!
When choosing a tire for a swan, make sure that it does not have a metal cord - it will be much easier to cut. In order to subsequently fix the neck, take aluminum wire or an elastic iron bar. Arm yourself with a sharp knife and a jigsaw for cutting very dense areas. To attach the iron bar to the tire you will need a drill.
Please note: for processing it is better to take “bald” tires of domestic production. They are softer and easier to cut.
- Using chalk, divide the tire into two equal parts. On one side there will be the beginning of the tail and head, and on the other - the base of the neck. Outline the silhouette of the head and the lines of the wings.
- Cut the tire along the marked lines. If you are using a knife, soak it in soapy water to make the process easier.
- Now you need to turn the tire inside out. You will need a helper to do this, but you can do it yourself by stepping on the outer rim of the tire. The frame of the future swan is almost ready.
- Secure the neck: drill paired holes in the tire and attach the neck with a thin wire to an iron bar on the outside. Once you paint the swan, the fastenings will be almost invisible.
Paint the swan's body with white paint and its beak with red
A flexible iron plate will help give the neck the desired bend shape. The plate should be slightly longer and narrower than the neck itself. Make holes in it with a drill and secure it into the desired shape.
You can make another version of the swan using this pattern. Just don't turn the tire inside out, this way the shape will be slightly different and the fenders will drop more towards the ground.
Swan from an unturned tire
This swan will serve as a decoration for shrubs, lawns, garden beds or flower beds. It will also look great near a decorative pond or fountain.
Do not forget that for safety reasons, it is necessary to handle the sharp parts of the wire and iron plate so that children do not get hurt when they play in the area.
Product marking
So, for example, we are working with an R13 tire, 165 mm wide. Its circumference is 180 cm.
Marking should begin by drawing two marks (lines) dividing the circumference of the tire approximately in half; this, in fact, is the length of the “neck” of the future “bird”.
Marking the future neck
Next, the “beak”, “head” and “neck” of the swan are drawn successively on the tread part of the tire. It’s good if there is a visible center line on the old tread pattern - this will greatly simplify the marking. If not, then it will not be difficult to carefully draw it with chalk.
So, from the first mark, symmetrically to the center line, a “beak” is drawn, the length of which is 8 - 9 centimeters, width - 3-4. The “beak” goes into the “head”, 10-12 centimeters long and 7-8 wide.
It is clear that where the “head” ends, the “neck” begins, which gradually expands towards the “body”, at its beginning it is 4 - 5 centimeters wide, by the end it reaches 8 - 10. The marking of the “neck” ends on that line, which divided the tire in two.
The last element of the markup is the “tail”. Partially it is already outlined, its fork is what will happen when cutting out the “beak”. All that remains is to draw two parallel lines with a distance between them of approximately 8 centimeters (across the width of the “head”) and a length of about 30 centimeters.
We've learned how to make the Swan's tail
, now figure out the flower beds from scrap materials.
Including tires. We plant rhododendron in the garden according to our instructions.
Location of swans on the site
The natural habitat of swans is ponds. Therefore, they look harmonious near water or its imitations. If there is a pond on the site, then you can plant the swan near it or install it using a stand in the pond. Then the swan will rise majestically above the surface of the water.
It is possible that you may need material on making drip irrigation from plastic bottles with your own hands.
Rubber birds will decorate your lawn or flower bed. You can pour soil inside the sculpture and plant your favorite plants there. For stability, use a stand in the form of another tire. It needs to be painted to match the color of the swan or the surface on which it is installed.
You can arrange a special pond for swans. To do this, you need to make a small pit, line it with a thick film, secure the edges with stones, pour pebbles onto the bottom of the film and pour water. Swans will look extraordinary near such a lake.
Other ways to use tires on the site
Fans of original decor will love other decor ideas. A swan can easily be turned into a parrot. To do this, you just need to make the cuts a little differently and paint the product in a suitable way. Tires can easily be turned into a garden bed or even a mini-pond.
Used tires are used by summer residents not only for arranging flower beds and small architectural forms. This material was not ignored by adherents of practicality in design. Craftsmen make wonderful furniture from tires. These are not only simple poufs, but also more complex chairs and tables in the colonial style. Such ensembles are complemented by swings on playgrounds and tire fences.
Cutting process
Perhaps this is the most labor-intensive manufacturing stage, requiring patience, dexterity and extreme caution to avoid injury. It would probably be useful to remind you that work should be carried out in strong work gloves in order to protect your hands as much as possible.
Remember safety! Do not neglect protective equipment: gloves and special glasses.
The cutting is carried out from the base of the neck to the head.
Depending on the material of the tire and the degree of its wear, this can be done in different ways. A heavily worn, thinned tire may succumb to a shoemaker's knife. Thicker treads can be cut using a grinder, but this process is quite dangerous and is accompanied by a lot of smoke and the smell of burning rubber.
If you have a jigsaw of sufficient power, then after making the initial holes with a grinder, it is better to use it.
First we make the holes with a grinder, then we will use a jigsaw
Experience shows that it is better to choose a jigsaw file with fairly frequent teeth pointing upward - this will greatly simplify the process. The operation should not be carried out at high speed of the tool; on the contrary, it should be reduced by half.
To insert the jigsaw file into the right place, you can make a slot with a grinder or simply drill holes on the edges of the “neck” with a 10 mm drill. By the way, the work will be greatly simplified if the same holes are drilled at all the turning points of the marking.
It would be a big mistake to cut out one side first and then switch to the other; working with a jigsaw in this case will be complicated by strong vibration that interferes with the process. It is better to cut both sides in parallel, in small sections of 4–5 centimeters. You can simplify cutting by resting the tire from the inside against a piece of wood (board), gradually moving it as needed.
We saw along the marked lines with a jigsaw
Having finished cutting, it is necessary to carefully process the edges of the resulting parts. If there was a metal cord in the thickness of the tread, you will need a grinder to grind off the protruding steel wires. If the cord was nylon, it will be enough to trim the edges with a sharp knife.
Materials, tools, basic concepts
You've probably seen these figurines in the form of swans near private houses in rural areas or on summer cottages. And perhaps they wanted to do something similar near their home. So why not, if you have a pair of old, outdated tires lying around in your barn? Even if they are not there, you can find several at any auto repair shop.
I won’t say that making a tire swan is a very simple task. The rubber is quite hard and elastic, so you will have to make some effort, as well as be careful and careful. But the activity will not take you much time, only about an hour per swan. And you will see that it was worth it!
So, what we need in our work:
- old car tire;
- Bulgarian;
- jigsaw;
- wire for fixing the shape;
- paint, white or black - for the swan, red - for the beak.
Old tires are an excellent material for using your imagination
In some cases we will use additional materials and tools. But we will dwell on them during the description.
Please note: try to immediately decide what you will use to cut the tire - a grinder or a jigsaw. Using a grinder will help you get the job done faster, but the smoke and smell of burnt rubber can be very harmful.
Where can such swans be used? You can install the figurine anywhere in your garden. The swan will simply serve as a toy and decoration; it can be used as a flower bed and even the basis for a small country fountain.
Now let's look at several options separately.
Turning the tire inside out and giving the “neck” the necessary bend
In order for the “wings” resulting from the sidewalls of the tire to gain the proper scope after cutting, the cut tire must be turned inside out. This will not be much work - a little effort with your hands and the help of your feet will easily turn out a tire that has lost its integrity.
Turn the tire out; it will take some effort on your hands and feet.
As a result, the “swan” has already spread its “wings”, but its “neck and head” lie limply on the ground - they need to be strengthened and bent properly. For this you will need a prepared steel rod.
First, you need to drill paired holes with a diameter of 3 mm along the center line, symmetrically to it. They are drilled starting from and to the beginning of the “tail”, with a distance between pairs of holes of about 15 centimeters.
We drill paired holes along the neck every 15 cm.
The required number of staples are prepared from soft wire, which are threaded into the holes made. These brackets will hold a metal rod that gives rigidity to the structure.
We insert these staples into the paired holes made in the swan’s neck
Insert the staples like this
It is better to start laying the rod from the bottom, twisting the protruding ends of the brackets around it with pliers. After cutting off the excess, the “swan neck” can be given a characteristic bend.
Some may find it simpler or more accessible to use a steel strip instead of a rod - this is also a completely acceptable solution. In this case, steel and rubber can be connected using bolts or rivets.
We secure the metal rod along the neck with prepared staples
Next, the neck, with the rod already attached, is bent to the desired shape of the neck of a real swan.
Essentially, the “mechanical” part of the work is completed.
Do you like flowers? Read about planting and caring for phlox.
We grow heather in the garden, an article about this unpretentious plant.
The garden needs to be lit. But with what? Overview of types of lamps - https://greennirvana.ru/osveshhenie/svetilniki/ulichnyie-svetilniki-dlya-dachi.html
Why do you need a tire swan in your backyard?
- Symbol of fidelity and purity. When creating a “hacienda”, you plan to make it the most beautiful and “speaking” of your character and views, then think about whether swans made of tires may appeal to you. How to do it? – There will be no particular difficulties at the time of “sculpting” the rubber figures. Maybe everything will turn out tastefully, turning into the highlight of the summer cottage. Everyone knows the deep symbolism of the noble bird, its choice of a mate only once and for life. And swans, such sophisticated and mysterious birds, are covered in so many poems, songs, legends and beliefs.
Tire Swan
Therefore, if you sculpt a “monument” of fidelity and purity in your garden plot, then you will really create a swan, and not an ugly duckling. Your creative goal is swans from tires; decide how to make them without any problems in advance, and not at the moment of sculpting. That is, prepare drawings, tools, tires in advance, and then decide to become a master, a conqueror of a stubborn tire. Your task is to breathe life into it.
- Decoration of an artificial pond at a summer cottage. It looks original when neatly carved figures - swans made of tires - are buried in greenery on the shore of a small lake. We will discuss how to make them a little later in the article. And when implementing such a plan, it is important to think through the design of not only a free-standing figure made from a tire, but also the surroundings - the shape of the flower bed, different types of flowers, greenery. The composition where swans made of tires are woven into the overall plot of the picture, invented by the landscape designer, looks interesting. It seems that we are carefully spying on a noble bird hiding in the thickets, we are afraid to disturb it with our presence, because we respect its ability to be faithful and devoted.
Lake with swans - Funny benches for household members. In the front garden, arranging benches in the image of snow-white swans is a bold decision, because you need to create a composition that is both practical and beautiful. One of the options is to create a bench seat from dense wood, and the task of handrails will be performed by swans made of tires. Be sure to think about how to make such a design in advance, discuss your options with experienced craftsmen, so as not to miscalculate and make a really beautiful and high-quality bench for your household.
Garden furniture made from tires
What swans made from tires can be: photos, tips
Before you start solving the question of what tire swans can be, first look at the photo, study the available instructions, and then go ahead in practical terms.
- A figure made from a one-piece tire. That is, you only need one tire and a sharp knife to perform openwork cutting. Carrying out the necessary manipulations, you will cut through the rubber so as to create the outlines of a graceful neck and spreading wings. Herculean efforts will be required, since it will be necessary not only to carefully cut everything out, but also to turn the tire inside out. Yes, it is hard, but the beauty you create will be worth it.
Tire Swan - Beautiful swans made from tires with your own hands, acting as a flower bed. Take a tire of the required diameter and follow the drawing to correctly trim, the purpose of which is to create a beautiful swan. In a fake, the tire will be placed horizontally. On its upper part we draw the contours of the pattern so that we get two mirror elements of the neck, then we will need to connect them together in the center, and figure out how to secure them. It is recommended to align the remaining edges of the tire and make it ribbed, as if feathers protrude from the huge wings of a snow-white bird. And then all that remains is to fix the structure in place and paint it white. Swans have already appeared from tires on your summer cottage, all you have to do is take a photo and brag to your friends, stating the fact of how great you are!
You can plant flowers of any color in a white swan flowerbed.
The second version of this design is when the void is filled not with earth, but with water, and in such a small pond egg capsules, lilies or lotuses will soon appear. Beautiful, no doubt!
- Crafts from tires “Swan and Swan” are formed for children, when the shapes of birds are cut out and hung on chains on strong tree branches in the garden. As a result, children are provided with leisure time - not everyone in the dacha yard can afford such an elegant and fast swing! When making figures for children, think three times about how the kids will climb into them, whether they can be fixed well so that it is both fun and safe. Think about the fastenings, a place to sit, because nothing should put pressure or interfere. You yourself understand that where there is no comfort, children will not play, and if they do, it will not be for long and without desire.
Painting and installation
“Swan”, in principle, is already ready, all that remains is to bring its appearance to the required state.
It is necessary to carefully check again whether the resulting figure has sharp, cutting edges or protruding wires. Children are very curious and will definitely want to explore the “bird” with their hands - the possibility of scratches and wounds must be excluded.
You can paint it in the color characteristic of swans - white or black, but this is not particularly important, the main thing is that the paint is resistant to atmospheric influences. The beak will stand out well if it is made red. If desired, you can make “eyes”, for example, using the wide heads of large bolts.
Here is the resulting swan
You can install the finished “bird” on a stump, a post, or simply on the ground, sprinkled with earth for stability. A good option is to use another tire for the base, painting it, say, blue.
By the way, having gained experience and still having bad tires in stock, maybe it’s worth making a “girlfriend” for the first-born “swan” next weekend?
Small flower bed
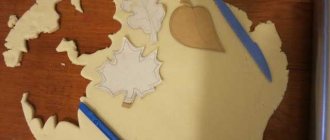
This is perhaps the simplest option, and at the same time functional. In order to make a swan flowerbed, use a simple diagram, applying it to the tire in advance.
Diagram of a swan flowerbed made from a tire
- Using a jigsaw, cut along the black lines along the head and neck. The red lines in the diagram indicate the tail, the blue lines the wing plumage. Make cuts along them.
- Now comes the hardest part: you need to turn the tire inside out. Do this carefully and turn it out carefully so that the tire is not damaged.
- The main work is done, only little things remain. Make a beak (from plastic, plywood, or a piece of another tire) and paint it red.
- Place the two halves of the head together. To do this, you need to bend the rigid cord, insert the beak and secure the entire structure with self-tapping screws. They need to be screwed in place of the eyes.
- Raise your head and press it slightly into the wheel. Secure the resulting fold in several places with self-tapping screws. Tighten as tightly as possible to keep the head in place better.
- All that remains is to paint your structure white or black, depending on your imagination and desire. The screws in place of the eyes can be painted over with black paint, or better yet, covered with circles of electrical tape.
This flowerbed in the shape of a swan can be made from a tire
Now install your mini-flowerbed in the planned location, fill it to the top with prepared soil and plant flowers inside. These can be pansies, marigolds, matiola, begonias or any other low plants.
How to decorate
In order for the birds to look extraordinary and aesthetically pleasing, they need to be painted correctly. For swans, the color usually chosen is white or black. Silver and gold sculptures look good. Any durable paint for exterior use will do.
It is good to decorate rubber with oil, enamel and nitro paints. Do not forget that any paint is applied to a clean, dry surface. Correctly applied paint adheres well to the sculpture, does not deform and lasts quite a long time. Leftover car paint aerosols will do. Then the work will go quickly. An evenly painted surface can be decorated using acrylic paints. Draw the head, beak, plumage. Such swans look more naturalistic.
Useful tips
Here are some things to consider before making a tire swan:
- When making products, especially if electrical appliances are used, you should follow safety precautions, and also wear gloves and goggles to prevent pieces of material from getting into your eyes.
- The product is cut out in the open air, because when using a grinder and a jigsaw, there will be a lot of smoke and an unpleasant odor coming from the tire.
- It is better to cut the cord - this is the inner part of the tire that holds the entire structure tightly. If you don't cut it off, it will be more difficult to make a bird.
- The tire must be of old production, they are softer, without spikes and additional metal structures, additional metal reinforcement on the cord.
- To make cutting easier, it is better to choose a tire with a tread that roughly matches the pattern, for example, in the form of rectangles.
- When the neck of a bird is cut out, you can install a block under it that will help support it, and it will be more convenient to cut it off. An old tree stump can serve as a similar support. It is better to start the cutting process from the base of the neck to the nose, and then continue cutting out the neck.
- After making the bird, it is better to install it on another tire or dig a shallow groove under it so that it has stability.
- The paint for the animal is chosen to be resistant to weather changes. For example: for facades or enamel, automotive spray paint, forge.
- If the tire had metal cord reinforcement, then the edges of the product must be processed with a grinder so that the sharp edges do not cause bodily harm (cuts) in the future.
- It is better to apply the paint in 2-3 layers, after each time allowing the previous layer to dry thoroughly, then such decoration will not need to be processed for 3-4 years.
Step-by-step instructions
A creative event requires caution and attentiveness. Before starting work, put on thick gloves and safety glasses. Then follow the step-by-step instructions on how to cut a swan from a tire:
- Take a tire and make a mark with chalk along which you will cut out the desired bird. The future type of decoration depends on this scheme. First you need to divide the wheel into two parts, mark the head and neck, they should correspond in length to half the wheel. Then outline the body, wings, tail. A photograph with a swan marking diagram will come to your aid:
- After this, you need to cut the swan out of the tire, for which you can use a jigsaw or a sharp knife. You need to cut according to the diagram drawn in chalk.
Advice! Don't cut out one side first and then try to do the other. The process will be very labor-intensive and inconvenient. It is recommended to cut the swan parallel, working on each side.
- Cut it out? Let's start giving the bird a realistic shape. To do this, lay the material with the cut part down, step on it with your foot and pull to turn out the side elements.
- Now you need to fix the swan's neck from the tires, otherwise it won't hold on. This can be done according to the following scheme: make two holes along the neck for every 10-15 centimeters (using a drill or an ordinary nail, if you don’t have the first tool), such holes need to be made in the body of the bird. Then insert metal staples into the paired holes, secure the wire to the neck and torso, and secure it with staples using pliers.
- The next step is to paint the swan from the wheel. It is necessary to choose durable paints, so nitro paint, oil paint, enamel paint, and car paint in aerosol form are suitable. Traditionally, white is used, but you can use any other color to create a custom bird on your site. The tip of the head should be painted orange or yellow to imitate the beak. In addition, you need to highlight the eyes with black or blue, and you can also paint on the feathers. To design such details, you can use acrylic paints.
Video: step-by-step instructions for making a swan from a tire.
Decorating your garden using improvised means is not only easy, but also pleasant. After all, such an activity can bring the whole family together, and everyone will find something they like and can handle. Today we will tell you how to make a swan from a tire with your own hands, and look at several forms of these figures and ways to use them in the garden and flowerbed.