Technologies are changing so quickly that once revolutionary devices do not even have time to exhaust their service life, turning into an unnecessary dust collector and a habitat for spiders. Unused electronics are the scourge of the modern world. Many of us probably have fully functional gadgets sitting around gathering dust, like old computer monitors, that can be put to a variety of uses.
♥ ON TOPIC: How to make a barbecue, an aquarium, a bench, a lamp, a mailbox, motorcycle cases, etc. from old Macs. (30 photos).
Just recently, we were happy that they fit on our desktop, making the computer a truly compact and affordable device. Today it’s just a plastic container stuffed with electronics. It's a shame to throw away the monitor, because it's still working. Nevertheless, this device may well get a second life, albeit in a different quality.
Old CRT monitors are not difficult to disassemble, but it can even be dangerous if done incorrectly. Therefore, before implementing any of the projects below, please read the step-by-step instructions for disassembling your device. It should not explode and harm you during the remodeling process.
♥ ON TOPIC: 5 functions of old mobile phones that are not present in modern smartphones.
Miniature set-top box with micro-USB OTG
If you are a radio amateur, then on the radio market you can purchase all the components for a homemade digital receiver. Such a homemade product may turn out to be several times cheaper than its certified counterpart. But you'll have to work on it.
Main components
In general, if everything is done correctly, the set-top box will work on mobile gadgets, TV and PC. As an example, you can assemble a DVB-T2 set-top box like a small stick. Main technical characteristics:
You can create an exact copy of the Geniatech PT360 whistle. The differences will only be visible on the body. Since the manufacturer will not be indicated there. This small gadget can work with a smartphone, tablet, Android TV-box, and even a Windows-based PC.
It is important to understand that soldering all elements of the console requires certain skills, knowledge and equipment. But you can do it easier and purchase a Chinese copy of the original DVB-T2 set-top box on the radio market or AliExpress, modify it to an adequate level and use it everywhere.
Reconfiguration
To create a copy of the Geniatech PT360 set-top box for digital television with your own hands, you need to open it in order to finalize it. It is recommended to modify the whistle if it gets very hot. Otherwise, you don’t have to go into its insides.
To open it, you need to carefully remove one half of the case. It should be taken into account that the body is fastened quite tightly.
Inside the case there is:
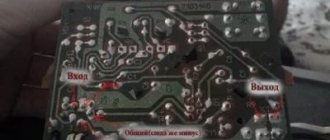
Datasheets indicate that the receiver supports terrestrial digital DVB-T/T2, cable digital DVB-C/C2 and analog. As for the heat sink, it is constructed as follows: “heat leaves the microcircuit through a through heat sink on the board (indicated by a red arrow) and along the copper substrate into the antenna braid.” In fact, the role of a radiator is played by a banal copper braid. With this approach, after a long period of operation, the heating reaches such a limit that you can simply burn your finger by touching the antenna output.
To prevent this baby from floating along with the microcircuit elements in a closed case in the summer, you can build a small radiator. Any 2.5 mm aluminum sheet is suitable for riveting it. For example, you can cut a primitive radiator from a profile. Then, using copper foil and hot glue, bring the foil layer out. In this way, heat is transferred to part of the board on the opposite side.
You can glue such a heatsink onto a memory chip using superglue and thermal paste:
Do everything as carefully as possible, since you only try once and it will be impossible to clean the glue that has been dropped in the wrong place.
For greater efficiency, glue the plate and copper foil together and bring it out.
Assembly and testing
After installing the homemade heat sink plate, close the housing cover and connect the antenna to the antenna input. You can also check operation with a whip antenna. And the experimental device will be a smartphone with OTG support and Android version no lower than 4.1. The same conditions apply to other gadgets.
Since the connected receiver will receive power from the device, the energy consumption will be equal to 1000 mAh battery for 3-4 hours of operation.
The gadget works with the PadTV HD application, but can also work with other programs for watching a television channel.
If the signal level is high-quality, then the found channel will remain in memory.
Using a microUSB - USB adapter, the TV tuner works perfectly under Windows. The OS can detect the drivers on its own.
Watch your favorite movies and TV series on any device thanks to More TV for only 299 rubles per month. Don't miss out on your 7 days FREE subscription!
Cat's house
Your cat is constantly sitting on the computer system unit, so give her the opportunity to finally win. Let the monitor become her comfortable home. This project gives you the opportunity to express yourself creatively. You can decorate the house with feathers or colored paper, glue wooden handles on the bottom and place the house at the desired height. A heating pad placed under the bed will make this place not just cozy, but also warm.
♥ ON THE TOPIC: 70 interesting facts about IT technologies that you might not know.
What is a TV tuner and its types
A TV tuner is a type of equipment that is used to work with a digital TV. It has advanced functionality that differs depending on the tuner model.
There are several types of TV tuners. Conventionally, they are divided into three categories:
Broadcasting involves decoding, which is carried out by a TV tuner. This is possible if one of the following standards is available:
The output can have several standards: built-in and external for PCs, as well as external for TV. The only difference between them is the port connection. The latest TV models, as a rule, have a standard USB connector, which replaces any port and does not require synchronization between the computer and television.
The operating system type is specified separately by the manufacturer. Each type corresponds to one of the computer programs: Windows, MacOS and others. Mobile operating systems, such as Android, are also found.
Bin
This project is worth noting for its sense of humor. After a little refurbishment, a broken old monitor turns into a trash can with a standard volume of 50 liters.
♥ BY TOPIC: The best thrillers: List of the best 35 films with descriptions, trailers and links.
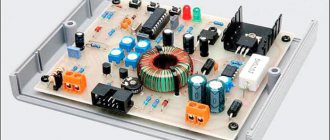
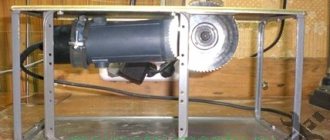
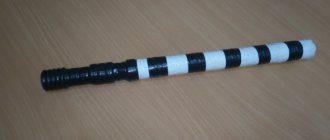
How to make an SDR all-wave receiver and TV tuner in one bottle. My personal experience. I share with everyone.
It has been written and said many times, How to make an SDR all-wave receiver and TV tuner in one bottle? Yes, in fact, you don’t really need to do anything, with the exception of a civilian antenna on the roof for the required range and a foil cable (to eliminate losses and interference). I had a very simple task, to make an Internet connection link to the Internet (such as an echo signal repeater) without buying expensive equipment for radio communication, since there is a dedicated server and IP, and the Internet works on fiber optics. Why not do that!? I started looking for information on the Internet. Some fancy circuits or expensive equipment didn’t suit me at all. Soldering and etching boards takes a long time and is a hassle - RF connector on the cable, please. Looks like a USB flash drive. The antenna there is complete crap, but I use my J-antenna on the roof . I understood only one thing: the digital-analog receiver of the scanner should be based on a microcircuit from the well-known company Realtek RTL2832U / FC0013 and R820! Why is that? You ask. Because the Internet is full of all kinds of software specifically for it. Starting from TV receivers with a digital HD signal, to an SDR all-wave amateur receiver (for all frequencies). Frequency range from 25 to 1700 megahertz! Step 300 hertz. Not bad? Input - took a standard TV-female - easier to solder (adapter from PL-male, to TV-female - pitgale). Built-in MPEG, DUB/SUB, DVB-T decoders. Modulation? All types: AM, FM, CW, USB, LSB, NFM, SSTV, WFM, NMT, AMPS, DAMPS, GSM, and others. You can listen to amateur HF stations, here is an example, of pretty good quality . (Reception frequency 3666.6 kHz, LSB modulation). Not bad really. Listening to your neighbor's radiotelephone is no problem. It’s easy to listen to the ISS astronauts on 145800 mHz FM! Eavesdrop on: Cops, Ministry of Emergency Situations, ambulance, easily (but some have a specially encoded signal). Listening to bugs is easy and simple! And other uses for this toy! While it’s summer and not severe winter, what not to do and make 2 in 1: SDR all-wave receiver and TV tuner.
Picture frame
There is nothing stopping you from making a digital photo frame out of your monitor, but you will have to use an entire computer to do this. But an outdated monitor can become a good analog frame. You can put anything in it - from photos to handmade creations.
♥ ON TOPIC: Why do cats love to sit/lie down in small spaces (boxes, bags, etc.).
How to choose the right tuner for digital TV
Watch your favorite movies and TV series on any device thanks to More TV for only 299 rubles per month. Don't miss out on your 7 days FREE subscription! Subscribe
A TV tuner for a TV must be selected based on several rules:
Useful: Which set-top box to buy for digital television
World Vision or BBK is considered one of the most reliable and at the same time budget brands. Manufacturers of these devices always focus on the latest digital TVs and multimedia updates. They take into account the wishes of customers, creating a better and more convenient device.
Flowerbed
Once safely disassembled, your monitor can enjoy its new life outdoors or help you bring a little bit of nature into your home or office. Why not turn a plastic container into a stylish flowerpot? The authors of the project claim that the rework will take about 2-3 hours.
♥ ON TOPIC: 6 ways to use old speakers.
What is a built-in TV tuner?
After studying the characteristics of the equipment, the following question may arise: what is a built-in TV tuner for a TV. This is a TV tuner for a TV that is factory installed. This model has advantages, since during operation you will not need to connect the TV separately to the Internet. You can also avoid lengthy setup of functionality, which usually happens when using an external tuner. In addition, the built-in TV allows you to select broadcast standards.
Useful: Which TVs do not require a set-top box
Magazine rack
This project emerged as a result of a design competition. An old monitor can become a magazine rack. To do this, you just need to take old furniture legs and drill them to the base of the device. The author of the project even included a secret compartment for correspondence in the rack.
♥ ON THE TOPIC: Cosmic speeds - how fast do you need to fly to leave the Earth, planetary system and galaxy?
Alternative programs and drivers
First you need to worry about replacing device drivers. To do this, use the Zadig program, which can be found either together with the downloaded software or on the website www.rtl-sdr.com/tag/zadig/. The above website shows installation instructions in pictures. On my own behalf, I’ll add that to search for a device called RTL2838UHIDIR, in the program settings it would be good to check the boxes next to “List all devices” and “Ignore Hubs or Composite Parents”.
What I liked the most was the SDRSHARP program. airspy.com/download/. I haven't looked into all of its settings, but overall it's quite functional. Changing the frequency is done by clicking on the upper or lower part of the digits of the displayed current frequency. The type of received signal is selected automatically, depending on the range. But almost everything can be selected manually. Using this program I was able to receive a signal in the range from 21 MHz...
... up to 940 MHz. The FM band even displayed RDS station information.
If you need to change the drivers to native ones from Realtek, then I found them here. Choose depending on the chipset. www.ukwtv.de/cms/downloads-aside/281-dab-player-von-andreas-gsinn.html RTL2838U + E4000
Nest for laying hens
Swap the pillows for straw and you can set up your own small bird farm. Laying hens will love this house.
♥ ON TOPIC: How to correctly pronounce Xiaomi in Russian and what this word means.
Homemade antennas for DTV reception
On the territory of the Russian Federation, the implementation of the federal digital broadcasting program in 2022 was marked by the commissioning of two multiplexes with a completely free state package of 20 TV channels and 3 radio programs. The channels are not encrypted; they are transmitted in clear text in the UHF wavelength range. That is, for high-quality reception of digital public television, any antenna operating in the UHF range is suitable.
A little theory. The dimensions of the vibrators (the active elements of any antenna) must be equal to the full wavelength, half or a quarter of it. In the decimeter range, a radio wave has a length of less than one meter. This means that the dimensions of the elements must be consistent with this value.
The radio engineering literature describes many receiving designs for the UHF range. Most of them will perfectly receive modern digital television. The popular devices described below, which anyone can make with their own hands, have the following characteristics:
| Design option | Gain, dB | Reception range without amplification, km | Reception range with amplifier, km | Operating range, MHz |
| Cable loop | 0 – 3 | 15 | 15 | 440–800 |
| Antenna made from aluminum cans | 3 – 5 | 15 | 40 | 470 – 622 |
| "Butterfly" | 5 – 11 | 20 | 70 | from 300 MHz |
| "Triple square | 9 | 15 | 60 | 300 MHz and above |
| Antenna Kharchenko | 5 – 6 | 10 | 50 | from 300 MHz |
| Log-periodic antenna | 8 – 12 | 30 | 100 | more than 300 MHz |
Of course, these are not all designs of receiving antennas for digital television that can be made at home. There are a huge number of alternative options, but most of them have certain disadvantages:
A digital TV antenna recommended for DIY production must be effective, easy to replicate, and not contain expensive parts and materials. The designs discussed below fully comply with these parameters.
Home | Design services | Assembling a gaming monitor with your own hands
Recently, widescreen UHD monitors and monitors with high frame refresh rates have become increasingly popular. Over the past two years, new models with high resolution and high refresh rates have been increasingly introduced to the monitor market, but manufacturers are asking very serious money for these devices. The most interesting thing is that until 2022 we still do not have a well-established production of monitors with support for 4k 120hz due to the long absence of a generally accepted format and specification of connectors with the necessary bus (bandwidth) for such a data flow. But that’s a completely different story... Today we’ll talk about 2k monitors with Hertz at 144hz, which first appeared two years ago. Back then, they were the most advanced monitors and had a corresponding price tag. Now Yandex Market offers such matrices in the shell of one or another manufacturer from 21 and a half thousand rubles. Again, I would recommend taking 2k from 27 inches, so as not to squint too much at the screen and not to scale the image. This will bring us closer to 26 and a half thousand rubles with the well-known matrix from Benq XL2730. 32-inch panels look more interesting, but they already cost from forty kilorubles, which indicates the novelty and uniqueness of these products and the corresponding marketing approach to them.
The pioneer in the development of such matrices is AUO (or AU Optronics, to be more precise). All the newest and most expensive monitors appear with matrices from this manufacturer. Samsung is breathing on their heels, and, my dear friends, they, although belatedly, are making very good and cheaper alternatives in comparison with the above-mentioned monopolist. So, within a year and a half, I predict that 32-inch Samsung matrices at 2560x1440 will appear in the form of monitors for a price of around 30 thousand rubles. More interesting are their solutions in the 21:9 area with a resolution of 3440x1440 pixels. Unlike monitors based on AUO and LG matrices, Samsung managed to make a sensible VA alternative in the form of the LTM340YP03(4), capable of delivering the coveted 100 (in certain cases 115 hertz, squeezing the maximum out of DisplayPort 1.2). And although the native Samsung C34F791WQI costs around 50 kilo rubles, solutions based on these matrices from Korean colleagues offer the same blackjack with attractions at almost half the budget. When considering monitors with such performance characteristics, I advise you to pay attention to Microboard and Crossover, which you will have to order from Ebay or Ali. Looking ahead, I can say that these 21:9 matrices can be found on Aliexpress or Alibaba, but due to the curvature and novelty of the matrix and, as a consequence, the high price, it would be more profitable, from my point of view, to try to find a 4k matrix with 120hz c 40 to 50 inches in size for about the same money. For example, at the time of writing, LTM340YP03(4) on Aliexpress cost 15-16 (the matrix itself) + 10 (delivery) thousand rubles, which is equivalent to buying a full-fledged UHD matrix.
So, what am I trying to tell you by describing this kind of analysis of the market for gaming monitors with a resolution of 2560x1440 and a refresh rate of 100Hz? Considering that these matrices have been in production since 2014, in my humble opinion, the prices for monitors with them seem to me to be slightly overpriced. And, remembering the first appearance of 144Hz FullHD, I also remember the prices for these devices in the years of their release. For the first versions they also asked for about 700 dollars, and now, at the beginning of 2022, these screens start at 14 kilorubles, which leaves the manufacturer 2-3 thousand rubles per device. This arrangement looks much more affordable in comparison with the price tags of high-end equipment, which, at the time of writing, includes ultrawide monitors with a resolution of 3440x1440 and in some places standard 2560x1440, in some places with fancy design and additional features such as G-sync. The ROG and Predator versions are the most inhumane to their customers in this regard. Biting their lip, many enthusiasts trying to get the most for their limited budget are looking for opportunities to do without overpaying for a brand and find a solution in more affordable Korean nonames. And although these alternatives may in some places be inferior in picture quality and additional modifications to famous manufacturers, the difference in price in some cases outweighs all the risks with delivery and a kind of beta testing of equipment with all the possible ensuing consequences. For example, level1tech has long been free to use ebay to find the most interesting desktop display options and present their reviews to the general public.
But what if you go completely hardcore? If you have about 15 kilorubles, free time, experience with computer hardware and, most importantly, the enthusiasm to “make something interesting,” it is quite possible to set yourself a more difficult task. You can try to imagine yourself as an employee of some service center, where, due to the nature of their work, many non-working TVs, laptops and monitors flock, many of which are easily written off. Many representatives of these repair services actually use the most advanced matrices at their workplaces, although due to the familiar laziness, most often such monitors look like this:
Having access to free matrices and boards, you can assemble all these advanced monitors yourself, although this will require some time and money. I set out on this project in an attempt to build some kind of monitor with a high refresh rate matrix. But I want to note that I do not work for any service and I did not have the above-described advantages and, unfortunately, do not. Initially, I planned to assemble a 34-inch 3440x1440 matrix with the ability to overclock to 100Hz, since if successful and possible for further sale, the margin would be more impressive compared to 2560x1440, which is what I settled on. But, taking into account the curvature of all 21:9-2k monitors and the high cost of the matrices themselves when ordering from China, as well as their absence in domestic dismantling shops, the idea of assembling 3440x1440 at 100Hz had to be postponed. This thought had been in my head for a long time and was an interesting project that I wanted to do without even thinking about possible material benefits. So, without planning for long, I started scouring forums and Avito for cheap matrices with fun characteristics. After some time of searching and viewing several options, my choice fell on the AUO M270DAN02.3 matrix, which I managed to purchase for 6 thousand rubles.
Please note that this article describes only a private project and the experience of assembling a monitor with your own hands with an eye to a certain period of time. At the time of writing, by assembling according to the scenario described below, you can still save some money by exchanging it for free time. However, in six months or a year, the point of going down this path will disappear completely due to the reduction in the cost of such monitors in stores and on the secondary market. The whole story is directly related to the opportunity to get an expensive 2k monitor for the lowest possible price. I foretell and perfectly understand people who will say that it is easier to find such a monitor on the secondary market and not make brains for yourself or other people. I agree with them, and at the time of writing, it would actually be easier to look through the same Avito and buy a similar monitor, if not on the same day, then after waiting a few days, which will definitely be faster than all the adventures described below. Speaking of standard 60Hz, the entire article described makes no sense at all, because... It is impossible to find anything better than offers on Avito or assemblies on Ebay or Aliexpress, which include a matrix and all the necessary internals. In fact, it will be much easier to come to an agreement with the Chinese, who sell such sets. If you have some kind of matrix, then I advise you to stupidly write to five sellers of such equipment that you just want to connect such and such a panel, and they will easily assemble the entire set of boards and wires for you and even conduct testing. In my particular case, I couldn’t find ready-made kits for a “130Pin LVDS with 8 channels” matrix, so I had to fiddle a little with all this connection.
When thinking about a project for self-assembling a monitor, in addition to searching for the matrix itself, special attention should be paid to the type of connection, the wires themselves, the controller board (a board that converts the signal from your GPU directly to the TCON (timing controller) of the matrix itself), the design on which it will be installed each element, and the monitor stand. In this article, we will not consider options for changing the native TCON LCD panel or using a matrix without backlighting, which will require additional investments and dances with assembly and compatibility and will only further complicate the project.
The most difficult items in the general list of tasks will be the search for a controller, matrix and wires, with the help of which we will connect everything to each other. I strongly advise you not to make hasty purchases without a clear plan and understanding of how everything will be connected to each other. Be sure to immediately plan which matrix you plan to use, and which controller can provide all its functions. Take the time to describe your project in detail and discuss the feasibility and compatibility of the controller with the matrix with the sellers of these components. When buying a controller, ask to check compatibility with the planned matrix and the possibility of supplying wires, a backlight controller, a board with buttons for menu control, and in general all additional accessories necessary for assembling the monitor. They will almost always be able to find all the necessary boards and tell you how and what to connect. Once you have a plan for your major components and weigh the costs against the benefits, you can start ordering parts. The frame, body and stand - although not an easy task at first glance, are still quite easy to accomplish. I can recommend a frame made of aluminum profile, which can be easily made for you in any framing workshop. But I recommend contacting us at FrameExpert.ru, because we have the entire profile and framing supplied to Russia, as well as experience and understanding in both matters. The stand can also be easily obtained at flea markets, since nowadays a lot of monitors are hung on brackets. The only difficulty may arise when finding a plate or box, with which you will have to combine the assembled panel with the stand. But, I am sure that searching and communicating with metal craftsmen on construction markets will easily solve this problem.
When I brought my project to life, I was not so far-sighted. Having seen a good offer on the matrix and knowing what monitors were made based on it, I easily purchased the M270DAN02.3, not suspecting that this eight-channel panel has a number of features. The seller told me that to connect this panel I would need a controller with four LVDS connectors, of which there is only one on Aliexpress: RT66. Not to mention that I was looking for this controller for almost two days and was seriously stressed that there might not be anything like it at all; it took four days to communicate with the seller and check the compatibility and the ability of the controller to provide 144Hz in a resolution of 2560x1440p. As can be seen from the characteristics of the controller, I had to take one of the top versions, which can handle 4K at 60Hz. It’s sad that having already ordered the controller, I was unpleasantly surprised by the fact that the LVDS wires used in the monitors are very unique and have little in common with the LVDS connectors in laptops, at the disassembly of which I was hoping to find them. But on Savka they clearly hinted to me that I would need to look for all these wires on the same aliexpress. Having again reached out to the sellers with a request to pick up wires for me, taking into account the model of the matrix and the controller I ordered, a fiasco awaited me, and the seller said that they did not have such wires.
It took me some time to find and understand the pinout of these same wires. The matrix itself has 4 LVDS connectors: one 40-pin and three 30-pin, two channels per connector. Pinout at both ends: 0.5mm intercontact distance at the matrix connector and 2mm when connected to the controller. Moreover, the set of wires had to have 2 channels and support 8 bits. It was not possible to find full compliance with the required characteristics. In addition to isolated coincidences in terms of performance characteristics, they all had inappropriate pinouts on the controller side, which for the time being also caused certain concerns. Fortunately, on ebay I was able to find a kit for connecting the M270DAN01.0 matrix
Having searched the documentation for models M270DAN01.0 and M270DAN02.3 and compared their connectors and pinouts, I came to the joyful conclusion that these are panels of the same series with almost the same connections. The only difference between them is that two additional connectors achieve this additional volume of increased Hertz power. Having agreed with the seller, I asked him to assemble for me a set of two sets of wires (since they only sold them in pairs): 40+30 and 30+30; backlight controller boards with wires, boards with buttons and an IR signal receiver and remote control for ease of use. The only problem with these wires was their correspondence with another controller that came in the kit - MHD7021DX
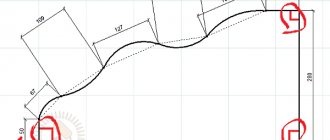
After waiting for the wires and additional utensils, I could begin assembly. While waiting for delivery, I started analyzing the connection of the matrix to the controller. To do this, I had to place a pin diagram in one image according to the datasheet of the matrix, a photo with pin designations on the controller boards, tracking the logic and comparing the values with each other. According to the characteristics of the controller that came with the M270DAN01.3 matrix, its capabilities are limited to 144Hz at 1080p and 60Hz at 1440p, which is explained by two connectors and 4 channels. Considering the logic of the principle by which a 144Hz picture is assembled, you could try using the MHD7021DX controller, installing connections in the 1st and 4th connectors (as experience suggests). However, in this case, the capabilities of our matrix would be limited to 60 hertz, and it is not a fact that the matrix would work correctly without connecting the 2nd and 3rd connectors. So, after taking the remaining components and getting a 12V/5A laptop power supply, I started assembling. According to the documentation for the LVDS matrix, the channels were in order from the first to the eighth; from the rightmost 30pin connector to the leftmost 40pin connector. According to the datasheet of the LCD panel, if you look at the back of the matrix, the leftmost 40pin connector is number 4, and the rightmost 30pin, accordingly, is numbered 1. The RT66 controller has a pair of dual connections 40pin + 30pin with two main forty-pin connectors with power supply and additional functions such as I/O. The first in this case is the 40-pin connector, the last is the 30-pin. Based on the logic, A, B... (ports on the controller board) must correspond to Port 1, 2... (channels in the connectors connected to the matrix). Having assembled the correct layout for all four LVDS ports, I got the following picture: If I split the image in half, then the right and left parts were mixed up, moreover, every 2 lines of pixels were mixed up across the entire area of the LCD panel. If you take the picture, you can imagine the following result:
⇒
The good news was that there were no color distortions or artifacts; Overclocking to 144Hz is already working. Having tried to rearrange the connections in the 30-pin connectors, I managed to assemble a picture with the right and left parts mixed up, but without mixing the even and odd lines. Using the substitution method, I came to the conclusion that the reverse connection order should be correct: the 40pin connector on the matrix (referred to as the 4th connector in the datasheet) should be connected to the first 40pin connector on the controller board and further in order. As a result, the picture came together and worked as it should. A couple of important points: 1) Since the wires have a connection corresponding to the MHD7021DX controller, for RT66 it was necessary to place each wire in turn in a new corresponding place. When connecting for the first time, I cut the block and put the wires in pairs in the right places. However, good friends advised me to purchase plastic BLD-40 for this connection and assemble the connectors in a human way / 2) In the pinout of connecting contacts to the matrix 13,14,28,29, the M270DAN02.3 contacts of the matrix, unlike M270DAN01.0, should not be connected. Otherwise, you will see a matrix test mode with a constantly changing multi-colored fill of the display, with which you can check the matrix for dead pixels. You won’t be able to switch the mode and use it normally, so leave these contacts free, as stated in the documentation for the panel itself.
Having assembled and checked the LCD panel, you can begin assembling the monitor.
At this stage, each of you will be able to independently show creativity and design the matrix as he wants. I'll just tell you how I assembled it myself. For the main frame I used Designer Molding 29-x12 . You can take any color, width and profile from the catalog .
I settled on matte silver, because... this color matched the shade of the stand for a 24-inch Dell monitor purchased on Avito. As the main mounting plate, I used a piece of stainless steel that I had in my workshop. By drilling eight holes and securing the plate using aluminum profile hanging fittings, I was able to firmly secure the frame with the matrix to the stand. To mount the controllers and all the boards, I used a piece of plywood painted silver. Using self-tapping screws and electrical tape, I secured all the pieces of PCB to a wooden base. All connectors were covered with aluminum tape; the board with the IR sensor was placed under the frame using foam construction tape for ease of use from the remote control. To make it even more beautiful, the back part can be closed using a simple plastic profile and cardboard for a passe-partout. Thus, you can assemble an analogue of the BenQ XL2730 yourself with very good characteristics. By the way, due to the presence of the native TCON matrix M270DAN02.3, which contains information about the panel, timings and its name, in the Nvidia Control Panel or Crimson settings the monitor will be called XL2730. In any case, that’s exactly how it was for me. By analyzing the costs of this entire project, you can get the following amount: 6000 rubles. (matrix M270DAN02.3) + 6000 rub. (controller RT66) + 1000r. (power supply) + 1000r. (set of wires and boards for the matrix) + 500 rub. (pads BLD-40) + 750 rub. (Dell stand) + 2000r. (aluminum profile frame + fittings) = 17,250 rubles. Plus some little things from what I already had: various adhesive tapes, a can of spray paint, an iron plate and some fittings with a set of simple household tools. Thus, we managed to save around 10-12 thousand compared to buying from a store and about 5 thousand when considering similar options with Avito, which looks less interesting. However, I implemented my project already during the period of “democratization” of prices for such devices. For example, if you ask yourself the question of assembling an ultrawide monitor with a high frequency in a resolution of 3440x1440p or assembling a widescreen 4k panel (of which you can find a bunch at TV showdowns), as the cunning Koreans practice, it will bring much greater benefits in the near future. In these cases, greater savings can be achieved.
I am sure that for many of you I did not discover anything new in this article. Moreover, understanding all the pitfalls of assembling the monitor described above was quite difficult and hemorrhagic, and also took a lot of time. From the point of view of benefits for myself, I cannot evaluate this project as “extremely profitable”, given all the difficulties and time spent. However, using a ready-made recipe, it will be much easier for you to repeat the steps described and limit yourself to less time, if you still decide on such a story. But it was definitely “fun” to implement this project and finally achieve the expected result, even though I was prepared for a total fiasco. Below I will provide links to all materials and components: 1) Matrix M270DAN02.3 and, in fact, the resource itself on which you can find and compare panels.l 2) Resource on which you can learn more about this or that monitor or TV, including name of the matrix used in it: https://www.displayspecifications.com/ 3) Archive with documentation on the matrices and connection diagrams 4) Kit on Ebay for M270DAN01.0
Old CRT monitor
Everyone knows that the cathode ray tube (CRT) display has long been a thing of the past, giving way to liquid crystals. But many Russians still have these “rarities”, stashed away for later. If this copy is preserved in your home, it can be turned into a TV receiver. We invite you to find out how to make such a transformation.
The easiest way is to remove the control unit, along with the board responsible for the graphics. You also need to buy additional components (they are sold in specialized stores).
The main condition is the presence of a VGA connector: otherwise it will not be possible to transform an ancient CRT monitor into a TV receiver. But there is no reason to worry: all outdated screens are equipped with such a port designed to connect a computer system unit.
Attention! If there is no understanding of fundamental computer technologies, then it will be difficult to remake your old CRT - monitor with TV - receiver on your own. You should still have basic skills/knowledge.
To use a CRT as a TV, you will need to purchase a number of components/components:
- This module is a key device of television equipment. He is responsible for the color of the image. The quality level of the broadcast image will depend on its functionality:
- This radio channel is designed to separate intermediate frequencies from all other signals that are necessary for television broadcasting:
- This is a control unit - a part responsible for the ability to configure/control the TV, both manually and remotely:
To assemble a home TV from a CRT monitor on your own, you should:
- first connect all missing nodes;
- then introduce these units inside the screen body, not forgetting to combine them with harnesses with other modular elements.
Perhaps, to enhance the picture quality, you will also need resistors, but they will have to be soldered. After final assembly, it is necessary to conduct a comprehensive check of the quality of operation of all functions of the resulting TV receiver.
Note board
The main complaint about CRT monitors is their volume. But no one is stopping you from making the device compact with a small modification and giving it a new life. It can no longer become a flat monitor, but it can become a board for attaching notes, memos and papers. You just need to attach a cork board to the front of the monitor instead of glass. And wooden handles can be attached to the back for structural stability. In this way, you can also convert a flat screen monitor that has become unnecessary.
Read also: How to properly make cottage cheese or cottage cheese