Do-it-yourself color music - what could be more pleasant and interesting for a radio amateur, because it is not difficult to assemble if you have a good circuit.
In modern radio engineering there is a huge variety of radio elements and LEDs, the advantages of which are difficult to doubt. A wide range of colors, bright and rich light, high speed of response of various elements, low energy consumption. This list of advantages can be continued endlessly.
The principle of operation of color music: LEDs assembled according to the circuit blink from an existing sound source (this can be a player or a radio and speakers) at a certain frequency.
Advantages of using LEDs over those previously used in CMU:
- luminous saturation of light and a wide color range;
- good speed;
- low energy consumption.
The simplest schemes
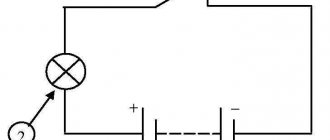
A simple color music that can be assembled has one LED and is powered by a 6–12 V DC source.
The simplest circuit for one LED
You can assemble the above circuit using an LED strip and selecting the necessary transistor. The disadvantage is that there is a dependence of the LED blinking frequency on the sound level. In other words, the full effect can be observed only at one sound level. If you lower the volume, there will be a rare blinking, and if you increase the volume, a constant glow will remain.
This drawback can be eliminated using a three-channel sound converter. Below is a simple circuit; it is not difficult to assemble it with your own hands using transistors.
Color music circuit with three-channel sound converter
This circuit requires a 9-volt power supply, which will allow the LEDs in the channels to light. To assemble three amplification stages, you will need KT315 transistors (analogous to KT3102). Multi-colored LEDs are used as a load. A step-down transformer is used for amplification. Resistors perform the function of adjusting LED flashes. The circuit contains filters for passing frequencies.
The scheme can be improved. To do this, you need to add brightness with 12 V incandescent light bulbs. You will need control thyristors. The entire device must be powered from a transformer. You can already work according to this simplest scheme. Color music using thyristors can be assembled even by a novice radio technician.
Color music circuit with thyristor control
How to make color music using LEDs with your own hands? The first thing you need to do is select an electrical circuit.
Below is a diagram of a light and music system with an RGB strip. For such an installation, a 12 volt power supply is required. It can work in two modes: as a lamp and as a color music. The mode is selected by a switch installed on the board.
Electrical circuit with LED strip for CMU
The principle of operation of the design
The device has several basic methods for transferring and converting music. As a rule, there are high rates, normal and low rates. Each of them is assigned a specific color, and when a melody is played, the light is automatically adjusted to the playing decibels.
Typically three primary colors are used. Most often it is green, blue and red. Different flickering durations, as well as color combinations, can create amazing effects.
Reference! The frequency and strength of the signal are distributed using special filters. Thanks to them, the main work of color music is carried out.
Filters are configured according to the following parameters:
- Up to 300 Hz is the lowest frequency filter, which is responsible for the color red.
- 250-2500 Hz refers to the mid frequencies and is responsible for the green color.
- Above 2000 Hz are among the highest frequencies and are responsible for the color blue.
This is what concerns the basic characteristics of color and music settings in the system.
Manufacturing stages
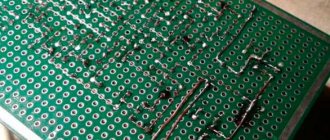
It is necessary to make a printed circuit board. To do this, you need to take foil fiberglass with dimensions of 50 x 90 mm and a thickness of 0.5 mm. The board manufacturing process consists of several stages:
- preparation of foil PCB;
- drilling holes for parts;
- drawing paths;
- etching.
An example of a prototype of a printed circuit board.
The board is ready, the components have been purchased. Now begins the most crucial moment - the wiring of radio elements. The final result will depend on how carefully they are installed and sealed.
List of required radioelements
We assemble our printed circuit board with the components soldered on it into such an accessible lampshade.
Do-it-yourself color music console
Steps
- Decide on the size of your garland show.
You can hang the whole house with garlands - both inside and outside - or choose a separate area in your house and in the front garden. Keep the following in mind as you plan your garland display:
- A strip is a section of garlands that can be individually controlled. For example, a single branch in a patio can be a stripe if you hang it with one set of garlands.
- All garlands in a strip work as a single section. Unfortunately, you cannot light a separate string light.
- Strips ranging from 32 to 64 are a great size to start with if you've never programmed lights to match music. Any streaks that are larger than this will result in you cursing the day you decided to take on the project (or the day your wife forced you to take it on).
- Stock up.
The best time to buy garlands is the day after Christmas. So, you will find garlands for 20 rubles, although they cost 80 rubles. Compare prices at different department stores so you don't make a mistake. Compare prices online.
Buy a regulator.
You will need hardware that connects to your computer. This control can be purchased assembled, as a kit, or as a homemade system.
- The entire assembled system works right out of the box. It will cost approximately 700 - 800 rubles per strip. This regulator can be purchased in online stores. Go with this choice if you don't want to bother with any electrical work (especially soldering) or have no idea where to start.
- The do-it-yourself system costs from 200 rubles per strip. The price depends on how much you have to do yourself. The system consists of a controller, which is adjacent to the computer, and a semiconductor relay (SPR), which actually lights the garlands. You can buy PPR or make it yourself. If you bought this system, you will have to spend a long time making this equipment, but you save money. You will also have the opportunity to fully customize your equipment, and you can easily troubleshoot problems.
The kit partly requires control via a keyboard. It costs from 500 rubles per strip, but it is almost the same as the whole control, only without the housing. Since it's so easy to fit the electronic board into the case, this kit is a great option if you're looking to save money. Some dealers sell everything you need to assemble a regulator, including the bare circuit board and parts. If you want to do some soldering, check it out.
This project can be very significant and challenging, so you may be overwhelmed at first. Recruit your friends and family or join the forums below for help.
- Depending on the level of complexity, give yourself 2 to 6 months of preparation before your garland show is fully completed. It sounds terrifying, but that's exactly how long it will take you.
If you are a low-tech specialist, buy software that will help you program the blinking lights. There is also a free program for homemade systems (see links section). If you are ambitious and claim to be a technical master, codify this program manually in any major programming language. However, please note that you will not be able to use this option for pre-built products, as most of their protocols are closed source.
- The software you choose will break down the song you want your lights to sync to into very short segments (.10 seconds), allowing you to program each strip of lights to turn on, turn off, sparkle or twinkle. There are three commercial software options. Light-O-Rama is the supplier for most residential string lights displays. However, it is very complicated, so to match a minute of a song with 32-48 strips you will have to spend a whole four hours.
Animated Lighting is much more expensive, but easier to use. Some residential garland displays also choose Animated Lighting.
Create exterior decorations. Common elements to include are:
- Mini lights or bare garlands that extend throughout the garden area.
Light icicles or moon garlands that hang from the roof.
But here you will have to work hard! Choose the music with which you will synchronize the flickering of the garlands. And then start programming on the timeline. Don't grab everything at once. This will likely take a couple of months, depending on the length of your show and the number of strips available. The show will depend on which software you choose.
Take advantage of the effect that creates great sound that keeps everyone calm. The same music blasting from the speakers over and over again will drive the neighbors crazy, so in most cases you will need to broadcast the music on the FM frequency. Please see the warning section at the end of this article.
- Be sure to inform your neighbors of your intentions to create an animated display. It is important that your neighbors support you if you want your demonstration to last long enough for other people to see it.
Play one show at the top of every hour, and once or twice a night. If your neighbors know that the show is only three minutes long and will air at 8 or 9 pm, they will be more understanding than if you aired it from 6 to 9.
Color music from a garland
Color music from a garland will add a good mood not only at home or in a bar where parties and discos are held. A motorist also needs it so as not to fall asleep while driving in many kilometers of traffic jams, and simply - the color music flashing in time evokes only admiration. From this article you will learn how to make color music from a garland without spending a lot of time and effort. If you are a motorist and have decided that color music is very necessary in the car, then discard the idea of purchasing it in a store. Of course, you can find everything today, but why spend extra money if you can assemble a completely unique example of color music from ordinary garlands according to the scheme.
The figure below shows a diagram of a color and music installation that works with 3 different lamps. At the same time, the power of the spotlights reaches 100 W each.
Thanks to this simple diagram, you can assemble the installation yourself.
Let's consider the most important provisions of this scheme:
- The main input is for wires going to the amplifier output. The connection is carried out as follows: remove one of the speaker wires (see) and in its place put the wire from the color music or in parallel, leaving everything as is.
Note. With this connection, the lights will blink in time with the music. In this case, lamp VT1 or VL1 will flash on the high frequency, and the other two, respectively, on the mid and low frequencies.
- The lamps themselves are connected by thyristors, which have control electrodes, and these, in turn, are supplied with voltage through filters on resistors and capacitors.
Note. To ensure that lamps or spotlights, as they are also called, operate at full intensity and the thyristors do not burn out, the network voltage is corrected using diodes. They are responsible for converting the voltage value from alternating to pulsating.
- The transformer in this circuit can be used from a single-program radio point. If you couldn’t find one, then an audio output transformer will do. The ideal option is from an old tube TV;
- As for thyristors, they are placed in metal cases. Their anode is brought out to the housing, and the cathode is located on top, and the control electrode is located below. The thyristors are fastened using nuts directly to the board.
Brief description of radioelements
Radioelements for an electrical circuit are quite affordable; purchasing them at your nearest electrical goods store will not be difficult.
For color and musical accompaniment, wirewound resistors with a power of 0.25–0.125 W are suitable. The amount of resistance can always be determined by the colored stripes on the body, knowing the order in which they are applied. Trimmer resistors can be both domestic and imported.
Capacitors produced by industry are divided into oxide and electrolytic. It won’t be difficult to select the ones you need by doing basic calculations. Some oxide capacitors may have a polarity that must be observed during installation.
You can take a ready-made diode bridge, but if you don’t have it, then a rectifier bridge can be easily assembled using diodes of the KD or 1N4007 series. LEDs are taken as usual, with a multi-colored glow. The use of LED RGB strips is a promising direction in radio electronics.
LED RGB strip
Purchase of a ready-made CMU
If you don’t want to make a color music system for use at home, you can purchase a CMU, that is, a color music installation. This is a ready-made functional solution that includes a controller. It will process the sound, converting it into a light and music visual representation. In the process of reproducing the light, its intensity and color scheme will change, thereby creating the effect of a real disco. The CMU device also includes a panel with built-in diodes.
These devices may be based on a spectral decomposition into frequencies, where each of them will have a specific color scheme or preset adjustments with a variety of effects and their alternation. They can be configured using the included remote control.
Important! Modern CMUs are very simple to install and configure. This is an ideal solution for organizing a home party or disco.
Possibility of assembling a color and music console for a car
If you manage to please with color music from an LED strip made by yourself, then a similar installation with a built-in radio can be made for a car. It is easy to assemble and quick to set up. It is proposed to place the set-top box in a plastic case, which can be purchased in the electrical and radio engineering department. The installation is reliably protected from moisture and dust. It is easy to install behind the dashboard of your car.
You can also make a similar case yourself using plexiglass.
The plates of the required dimensions are selected, two holes are made in the first part (for power supply), and all parts are sanded. We assemble everything using a heat gun.
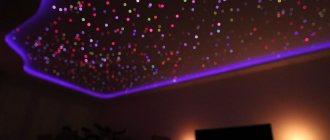
An excellent lighting effect is achieved if you use multi-colored (RGB) tape.
Advantages of LED products
The modern electronics market presents a wide variety of LED strips that have a wide variety of color effects. With their help, you can create high-quality spot lighting; it is possible to create color music with flashing or blurry effects.
Unlike conventional light bulbs, LEDs have many positive characteristics. Among the main advantages of LED strips are:
- wide and varied range of colors;
- rendering rich colors;
- different design options - rulers, modules, discrete elements, RGB strips;
- high response speed;
- minimum amount of energy consumed.
The ribbons can be used at home, in clubs and cafes, and can be used to effectively illuminate shop windows. This article will describe in more detail the option of LED color music for ordinary home use.
Making a garland from an old keyboard
To quickly create a garland, you can use one of the most budget-friendly options associated with disassembling old computer input devices - mice and keyboards.
In the process of completing the work you will need:
- several old keyboards that may not even function;
- soldering iron;
- resistors;
- electrical tape or tape;
- heat shrink casings;
- solder and rosin.
First, remove the wires from the keyboard and disconnect the USB cable. To increase your chances of doing quality work, you will need about 5 input devices: perhaps your friends and relatives have them, ask around on the city forum.
Each keyboard is equipped with 3 LEDs indicating the operation of the 3 main functions of the product on the Num Lock, Caps Lock and Scroll Lock buttons. If you come across an unnecessary gaming keyboard, then everything will be much simpler, because it often includes a huge number of LEDs.
Disassemble the product and remove the small board with the controller from it. It will be used to connect different light bulbs. Create a product from 12 elements connected to resistors in a parallel circuit. You should not exceed this value, since the standard USB cable from which the keyboard is powered transmits voltage up to 5 V at a current of 500 mA.
The operating voltage of individual elements does not exceed 5 V. When connected directly without a resistor, overheating will occur, which will sooner or later lead to burnout of the components. That is why the voltage is reduced due to additional resistance or by pairwise soldering of elements. In the second case, each individual component will reduce the voltage of its “neighbor”. Unfortunately, this option is considered less optimal and effective: it is best to monitor the established voltage limit and not go beyond their limits.
Next, you should take a simple cable and remove the braid on one of its sides, and then solder. After creating the product of the desired length and shape, all that remains is to insulate the exposed parts.
Creating a homemade New Year's garland from LEDs is as easy as shelling pears: stock up on the necessary elements and tools, do the calculations (specialists can help with this) or find any proven connection diagram on the Internet. Then follow our instructions and you will end up with a functioning, high-quality and safe product.
Do-it-yourself color music
This simplest light music has only one element. Yes, absolutely alone and nothing but: no resistors, no transistors... It is quite possible to assemble such a light and music installation in 30 minutes. All you need is one solid state relay. Solid-state relays appeared on the market relatively recently and have already confidently conquered the radio electronics market. It’s understandable, I’ll give you the main advantages.
- - Performance.
- — Galvanic voltage isolation.
- — Silent, compared to a conventional relay.
- — Zero crossing detector.
There are many more advantages, I have cited only a few.
A solid-state relay, in essence, apart from the name, has nothing in common with a mechanical relay, which everyone usually imagines when hearing this name for the first time. This is a regular triac switch, with control and decoupling circuits. This miracle is very inexpensive and can easily be bought on our favorite Aliexpress.com There are many different versions of relays on the radio market: small and large, powerful and low-power. I took this: Firstly, it has screw terminals for connection. Secondly, it can switch a load with a voltage of 24-380 V and a current of up to 60 A. Of course, I took it overkill for other purposes. To control a garland, it is enough to take from 2 A. Thirdly, the control voltage is from 3 to 32 volts, pulsed. Just what we need, since we will control the relay directly with the sound supplied from the output of the low-frequency amplifier.
Peculiarities
Modern industry readily supplies such products. But the external effect does not always satisfy consumer needs. In some cases, the use of retro garlands, which you can even make with your own hands, brings very good results
Before such work, it is very important to prepare properly and select suitable design ideas. Finding suitable design options, photos is very easy
There are a few things to think about:
- will it be possible to fit the product into the decor;
- will it be possible to implement the plan using available components;
- how much is it.
This is interesting: How to choose a “LED fringe” garland? (video)