Moving on ice and snow has many features. This type of transport, like an snowmobile, combines a lot of advantages. However, there are also disadvantages. You can make a snowmobile with your own hands, using the largest number of available materials and ready-made units. Moreover, they will be no worse than many industrial analogues.
When independently manufacturing any equipment from scratch, you must first complete a design project. It, in turn, is divided into four stages
- Design of technical conditions, characteristics;
- Technical proposal, at the stage of which the general layout of the product takes place;
- A preliminary design, where a drawing of the product and its parts is made with the necessary calculations;
- A working project in which product drawings are made taking into account current standards, existing components, mechanisms, and manufacturer capabilities.
Naturally, a do-it-yourselfer in a workshop will not carry out all the drawings in detail, and his education usually does not allow it. However, you need to try to make at least some drawings and calculations, especially if we are talking about complex off-road equipment, such as a snowmobile.
Making doors
To make the doors, it is necessary to use the same technology that was used to make the body. That is, here you will have to prepare the tubes that will form the basis of the frame. In addition, plywood stringers and foam filling will be used. As for the window located, as well as those windows that will be on the doors, the use of 4 mm plexiglass will be useful here.
If you decide to make a snowmobile with your own hands, it is recommended that you first view the drawings to choose one of them.
The side parts of the rear area of the snowmobile body, which go into the keels, must be trimmed with pre-prepared plywood sheets. When carrying out this work, it is necessary to use 4 mm sheets. Keels are areas located behind the doors of the installation. The plywood must be fixed to a tubular frame, and it is recommended to use M4 screws. After this type of work is completed, you can proceed to gluing the external surfaces; in this case, you will need to use fiberglass, which must be laid in two layers. The inner surface of the plywood sheathing must be protected from moisture; for this it is necessary to use parquet varnish, which is applied in two layers.
Features of ski manufacturing
Before you make a homemade snowmobile, you need to study the design of skis. It should be box-shaped. Using galvanized iron intended for roofing work, you need to make a running sole. It is necessary to choose iron whose thickness is 1.2 mm. Two undercuts should be mounted on the sole, which must be made from a metal corner; it must have dimensions equal to 8 × 20 mm. The frame of the ski must be paired with screws that have countersunk heads. A toothed steel scraper, which must be mounted on a steel wooden lever, mates with the brake pedal. If you press it, the lever will be lowered, and the toothed scraper will provide braking to the structure, while it will cut into the snow. The brake will be returned to its natural position by a spring.
How to make it yourself
You can make a snowmobile with your own hands: the bodies of homemade snowmobiles are created taking into account the laws of aerodynamics, so all elements of the equipment should be made in strict accordance with the plan. The quality of the assembly directly determines the operation of all components and the service life of homemade equipment.
Drawing of a typical snowmobile:
Frame
The assembly of the snowmobile begins with the body; it consists of a durable frame, which is covered with casing. It is given an aerodynamic shape, tapering towards the front. The case has 2 compartments: front and rear, into which the motor is installed.
The necessary rigidity of the structure is provided by 2 spars and power stringers. Frames are installed, there should be 4 of them. They are placed at equal intervals. Plywood is used to make them; it is best to purchase material 10 mm thick. Wide frames are reinforced with transverse beams.
The frame is glued; this can be done by applying casein glue. Gauze is applied to the joints, then it is impregnated with glue. Another option is also possible, when the gauze is first cut, the bandage is soaked in glue, and then a strip is wrapped around the joints of the elements.
To cover the body, you should purchase sheets of plywood; they are covered with a duralumin coating on top. The driver's seat is made of plywood, but you can install a factory one made of plastic.
Space for cargo is allocated in the rear of the structure, located behind the seat. In this compartment you can store spare parts and tools; a can of gasoline, fishing gear and passengers’ belongings can also fit here. There are different options for assembling snowmobile transport; design drawings must be studied before starting work.
Propeller system
The propeller system consists of several elements. The most common option is to install a motor removed from the IZH-56 on a snowmobile. The propeller shaft is mounted on a bearing; it is mounted on the frame. A wooden plate is required to mount the motor.
To regulate the V-belt transmission to the screw, a plate made of plywood or textolite is required. A fan is installed to cool the engine. It is fixed to the crankcase using a bracket for this purpose.
Suspension
Skis for snowmobiles are made of plywood 10 mm thick, and the bottom is sheathed with stainless steel. The skis are bent, for this purpose the plywood is placed in boiling water. The bend is made using a slipway.
When assembling, it is necessary to correctly select the thickness of the rear skis; different drawings are provided. A thick beam is used for reinforcement; the skis are attached to the body with M6 screws. In order for the snowmobile to be stable when turning, undercuts are made. They are constructed from pipes flattened at the ends.
How to equip it correctly?
The speedometer, ignition switch, fuel gauge and all main instruments are installed on the front panel. The control levers, brake pedals and engine start pedals should also be located here. If you are planning trips to unfamiliar places, far from populated areas, it is worth installing a GPS navigator on your snowmobile. A rear-view mirror is placed on the left; the air and throttle valve levers should be located in the cabin.
Snowmobile with chainsaw engine
The chainsaw motor has low power, which does not exceed 4 hp. This is not enough to travel long distances. The minimum engine power must be at least 12 hp.
If a body of water is nearby, then a low-power motor is sufficient. The chainsaw motor, despite this, will move the lightweight structure. Such snowmobiles can be used to transport fishing gear.
Alternative options
A car body can be used as a body for a snowmobile.
Here, for example, is a snowmobile made from a “loaf”.
Budget snowmobiles: manufacturing process
The following describes a conventional snowmobile of a classic ski design with a frame. They can be used for fishing, hunting and trips for one person.
Frame
The manufacture of the frame of the snowmobile should ensure that it is light in weight. Usually the lower part of the frame is made to accommodate the seat, rectangular or trapezoidal in shape. It must be placed slightly ahead of the center, since an engine, tanks, propeller, luggage will be added, and it is advisable to place the center of gravity in the middle of the frame. Next comes the manufacture of the frame for the engine, transmission and propeller. It is made triangular, the top will be the bearing on which the drive screw rotates.
The frame for the screw must be no less strong than the bottom one. It must withstand serious loads, because the force driving the snowmobile is applied to it.
This frame has wide gussets in the form of rods that are attached to the triangle posts and extend forward. It is not advisable to take up space at the back, as this will interfere with the rotation of the propeller.
The frame material is selected from thick polypropylene pipes with reinforcement. These pipes provide satisfactory strength, but may lose shape over time under load. If possible, it is advisable to use aluminum pipes and connect them using bends and tees. Aluminum connections for welding at home are quite a complex thing, and even with argon welding it will be inferior in strength to connections made with angles.
Propeller and engine
A fairly powerful Lifan 168f-2 four-stroke engine is used. Four-stroke engines start a little worse in cold weather, but are much quieter. A plastic additional gas tank from a walk-behind tractor is used. The power supply itself is quite sufficient for a snowmobile with a total traveling weight of up to 500-600 kilograms.
The propeller is manufactured independently, two-bladed, has a diameter of 1.5 meters, increased in size according to drawings for aircraft models. Making a screw yourself is a fairly complex process and will require carpentry skills. In addition, you will need wood from maple, hornbeam, beech, Karelian birch or other fairly durable wood, dry. If possible, it is better to purchase an aluminum screw with pre-known characteristics in the store.
From the engine to the propeller, a reduction gear is used on belts with a 1:3 ratio from a woodworking machine, with a tension roller. With the choice of speed modes for snowmobiles, everything is quite sad, and it’s difficult to talk about the gearbox here due to the fact that the propeller itself will only work effectively at fairly high speeds, and reducing them does not increase traction, quite the contrary.
Victoria Leshchenko
I've been working hard in the fishing tackle department for the past six years. I can help you assemble almost any gear.
Ask a Question
The propeller must be completely enclosed on all sides! Most homemade snowmobiles you see on YouTube or other sources don't have one! The fence should be painted in a bright color and made of mesh with a maximum pitch of no more than 7-8 cm.
Layout, skis and handling
The seat is located immediately in front of the engine, and underneath is the trunk. There is additional storage space near the running boards. The engine is controlled using the gas pedal and clutch. You can take them from an old car and connect them to the engine using cables.
There are two additional handles on the front. They are connected using cables to the front pair of skis, which can turn left and right on a vertical thrust pad, and also synchronously with the steering flags, which are located in pairs at the rear left and right of the propeller. The left handle controls the left side, the right handle controls the right. They can be used independently, and when braking it is enough to bring the skis and flags inward by pulling both handles towards you.
The snowmobile has four skis, two front and two rear. The front two skis are short, made of alloy steel. The back two are longer, made of plastic. The rear skis take part in steering the snowmobile. The skis are mounted on special triangular supports, have a swinging stroke and are sprung in the front part.
Painting and lighting fixtures
The snowmobile must be painted in a bright color that will be visible from a distance in the snow. It can be red, brown, blue, purple or another similar color. It is also necessary to paint the propeller guard brightly, preferably in a color that is different from the main body of the snowmobile. Typically the color used for painting is orange.
Of the lighting devices, it is imperative to install side lights, as well as lights on the propeller - green to the left of it in the direction of travel, and red to the right. Headlights must have sufficient power. The fact is that daylight hours are short in winter, and it is usually not possible to move only in daylight.
To reduce weight, the headlights and lights are powered by a battery, which is charged separately from the snowmobile before the ride, without the need for a generator system.
Usually the battery lasts for 3-4 hours of travel, which is enough to get home in the dark. If you want to protect yourself so that the headlights stay on all night if you get lost, we can recommend installing lighting coils from an old motorcycle.
Equipment for homemade snowmobiles
The driver's cabin has an instrument panel made of sheet PCB, with instruments mounted in it: a fuel level indicator powered by two flashlight batteries, a tachometer, an ammeter, an ignition switch, etc. There is a mirror on the left side. Visor 22 is made of plexiglass 3 mm thick, and lantern 23 is made of 2 mm thick.
In the cabin on the left there are control levers for the throttle and air dampers of the carburetor; on the floor there is a brake flap control handle; On the top of the handle there is a decompressor lever. The brake flap is made of half a thin-walled V-shaped pipe and a duralumin sheet. It is hingedly attached to the lower board of the spring. In the non-working position, it is held by a rubber shock absorber, and when braking, it is deflected down and forward by the control handle.
Using this scheme, it is possible to build two- and three-seater snowmobiles with a more powerful engine. You'll just have to increase the size. You can make a frame of a welded structure from thin-walled tubes, improve the rear suspension of a homemade snowmobile - make it with spring-hydraulic shock absorbers.
| Share this page on social media. networks or add to bookmarks: |
Homemade tractors with a VAZ engine
The Zaporozhets car has long been considered a rarity. The body metal used in its production is criticized by all car owners. However, they also admit that the “filling” of the car is in fact of higher quality, so much so that it can be used in many developments. One of the most popular conversion options is to create a tractor from Zaporozhets.
General view of the design and rationality of development
When designing and assembling a tractor with your own hands from Zaporozhets, you should take all the main mechanisms from this car. The exception is the gearbox, which is not designed for high traction force. Because of this, parts quickly wear out and break down. Instead, you can install any other one with higher power characteristics. To connect the gearbox directly to the engine, a cardan drive must be provided. If it is preferable to install an original gearbox, you need to supplement it and the engine with a cooling system.
An engine taken from the original vehicle will provide an additional reserve of traction force compared to specialized analogues. In addition, for the most part they are much more reliable and durable. With the right approach, a homemade tractor from Zaporozhets can be used for all types of work related to soil. High traction and power indicators will complement the functional list with the ability to transport various cargo.
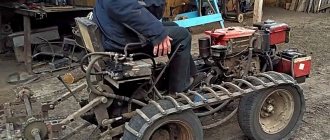
WHAT IS THE TRACTOR MADE FROM? . | Topic author: Joys
+TWO BRIDGES FROM MOSKVICH (preferably ONE MODEL TK DIFFERENT MODELS HAVE A DIFFERENT NUMBER OF TEETH ON THE GEARS) +ENGINE IS OPPOSITED FROM THE DNIPPER OR URAL OR FROM PLANET ITD! +ONE BOX FROM MT AND THE SECOND FROM MOSKVICH (SHORTENED) +SPROCKETS FROM AGR EQUIPMENT AND THE CHAIN TO THEM (GEAR RATIO 1:3 OR 1:4) +CHANNEL 8 OR 10 5.5 METERS +PARDAN FROM MOSKVICH +HUB FROM UAZ + SHEET IRON + STEERING COLUMN (ZAZ, MOSKVICH) + CROSSBOW ONAJE GUK (FROM STEERING MTZ OR OTHER CX EQUIPMENT) + CORDAN FROM ZIL OR URAL (FOR STEERING FRAME) - STEERING KNAST FROM UAZ (FOR THOSE WHO DECIDED TO MAKE IT EASIER FOR THEMSELVES WORK, REPLACING IT ROTARY MECHANISM!) + GOOD TURNER! (THE WILL NEED TO BE SHARPENED - HALF AXLES, SHAFT IN THE MOSKVICHEVSKAYA BOX, COVERS FOR SEALS ON THE MOSKVICHEVSKAYA BOX, SHAFT CONNECTING THE SPROCKET AND THE HOOK AND SOMETHING ELSE.) Joys (Lilian) I WILL ADD THEN!
Joys (Lilian) I LIKELY FINISHED IT! I’LL STILL THINK ABOUT WHAT AND HOW!
Kirill (Jayan) why hydraulics should be aged to the dump
Joys (Lilian) AND THERE IS A LEVER!
Misha (Grahish) Hi, I want to make such a tractor for myself, if you have one, can you send me the drawings or photos.
Joys (Lilian) Have a look at sites like lunar rovers and others.
Joys (Lilian) Download the model designer manual and there are drawings there.
Yuriy (Ermelinda) If I make a motor and a box with MT and a friend has a Muscovite box, you won’t tear the MT box.?
Evgeny (Bernward) And if, according to this principle, we install an engine from OKI, approximately what will the speed be?
Joys (Lilian) The MT transmission will not tear as it is unloaded with reduction gear ratios.
There is no such load.
Joys (Lilian) https://minitractor.0pk.ru/viewtopic.php? There are already such tractors, you can ask the owner directly!
Evgeny (Bernward) One more question. What is the best way to create a PTO? I have a hydraulic motor from a hiller, the NSh10 pump will handle it, or should I install 32 or somehow make a mechanical drive.
Sergey (Vela) Evgeniy, The speed will be from 5 km/h to 40 km/h. MTs with the Oka engine have been working for a long time, only there is no Moskvich gearbox, but there is a transfer case from the Niva, there are no chains either.
Igor (Franco) I want to install a Zaporozhets engine on the GAZ-53 bridge. If it’s straight from the Zaporozhets box to the bridge, will it be any good?
Igor (Franco) Yura, you won’t tear anything, just put Ganovskaya if you want
Igor (Franco) this is probably how it will be.
Viktor (Kudyauku) Igor, Won’t the speed be very high?? If it is a tractor, it will be difficult to catch up with it.. :-))
Igor (Franco) is not normal. I went to look at such a tractor. The gearbox is tight to the bridge and through the belt to the engine from the Zaporozhets. The man pulls a two-ton barrel of water with ease. There’s nothing complicated damn it. But I can’t find the gearbox. I want the gearbox take it from Zil together with the NSh pump.
Snowmobile control and comfort
To turn the sled, a motorcycle handlebar is usually used. It is welded to the front pillar or screwed onto clamps. Add engine speed using a standard handle with a hummock. The entire kit is easy to find at any auto store.
To ride comfortably, you need to make a comfortable and soft seat. To do this, two parallel tubes are welded into the middle part of the frame triangle. Small arched racks are installed vertically on them, and a seat with springs is attached on top. Often, additional springs are placed on ski racks under the frame. This noticeably softens the ride and dramatically increases comfort when riding a sled with a motor.
It is no secret that the wind is always blowing in the open spaces of reservoirs in winter. And the propeller increases the air flow even more during operation. Because of this, in winter, when traveling on snowmobiles, fishermen become very cold. Therefore, in front of the frame they always make a protective visor with glass on top. And then sleigh rides will become more comfortable. When all the parts and assemblies are built, all that remains is to attach the fuel tank. The snowmobile is ready, and now only luck will always accompany you when fishing.
Advantages of winter fishing
In winter, fishermen have to travel long distances. Using homemade equipment makes casting to a pond quick and convenient. The vehicle is equipped with runners, making it possible to move on ice, crust and snow. The snowmobile is driven by an aircraft propeller. It rotates a motor that runs on gasoline.
When riding, the sled reaches speeds of up to 150 km/h. This is how they compare favorably with snowmobiles. With a soft suspension, the vehicle provides riding comfort. If we talk about the smoothness of the ride, then the snowmobile is comparable to a car. Cabins are often installed on them, this provides additional protection from wind and frost.
The bottom frame serves as the base of the structure; it is made in the form of a panel. The frame is assembled from beams, it is best to use pine. Foam filler is also required, and the structure is given rigidity using wooden cross members.
The frame is sheathed; for this purpose it is necessary to purchase plywood. Together with torsional bending and high rigidity, it demonstrates high quality characteristics.
Snowmobile for fishing
It is optimal if they are:
- Have positive buoyancy
- Have a removable propulsion unit with the ability to rearrange it on the boat in the summer
If the snowmobile can be used as a full-fledged boat, then there is no need to remove the engine for the summer period.
Snowmobiles are mainly made by fishing enthusiasts in rural areas who live near large expanses of water. It is most rational to use them in the spring on clear ice, when the snow cover on it is minimal. There are very strong arguments here in favor of abandoning the classic ski design, and using the classic three-rib design for gliders on the bottom.
The stiffening ribs are reinforced so that they can perform the function of skates. When there is water on the ice, it will make movement easier. At the same time, the snowmobile will reach almost full planing mode, reducing the drag of the environment. In the summer, such a hull will be a full-fledged boat with high seaworthiness - overcoming small flooded spits and rapids on the river will not be such a problem for it as for a regular motor boat.
However, it is not advisable to use “Kazanka” or the old “Progress” for such things. The fact is that their bottom is not strong enough. And depreciation will suffer. And from hard impacts the bottom will fall apart even more. The design of most modern snowmobiles and airboats for fishing assumes the presence of a rigid bottom, which has an inflatable deck with flooring. This absorbs impacts when moving. Other designs should be considered not very suitable.
Homemade snow sled with a low-power engine (drawings)
Homemade snow sleds are not capable of negotiating steep terrain. This is their design feature. The thing is that the propeller of the installation is a propeller, sometimes it is also called a propeller. If you decide to make your own snowmobile, you can use a system of three skis. Some craftsmen use 4 skis; a load-bearing body can also be used when carrying out work. The latest type of snowmobile allows the structure to move not only on snow, but also on water.
Recommendations for making snowmobiles
Homemade snow sleds can have all sorts of designs. The system can be single-seat, then you have to use three skis. During manufacturing, a body beam will be used, as well as a transverse beam intended for mounting the rear skis. Among other things, you will need to use a sub-frame. The set of bars used in the work must have a cross-section equal to 35×40 mm. The elements will be fixed using M6 bolts. In the place of the connecting points, it will be necessary to install steel angles, as well as washers of significant diameter; they will act as a retainer that will prevent deformation of the wood.
Case manufacturing
Homemade snowmobiles with a low-power engine are made in this case from bars. Before starting work, it is necessary to prepare spruce boards, which should have a thickness of 16 mm. Skis must be mounted symmetrically in relation to two transverse boards. The front skis will be controllable. They will include brackets. Fastening must be done with an M10 bolt, which will act as an axis. The center responsible for control will be combined with the plug. The method of pairing the control levers of the left and right skis, as well as the control cable, will be rigid. The cable must be directed through the rollers, from there it will go to the steering column drum, where it is secured with an M6 bolt. The crossbar has tips at both ends designed to adjust the parallelism of the ski. The rotating bracket in the area of the axis on the front board passes through the bars, which have a cross-section of 30x30 mm. The skis located at the rear are attached using angles and M10 bolts.
How to make a snowmobile: snowmobile body
The body design of a homemade snowmobile includes a stacked frame and skin. The frame consists of two spars 9 measuring 35x35x2350 mm, two power stringers measuring 25x16x2850 mm, five stringers measuring 20x12x2100 mm in the front part of the body and three measuring 22x18x745 mm in the engine compartment. All parts to the front ends are narrowed and brought to the following dimensions: spars - 28x28 mm, stringers - 18x10 mm.
Four frames 20, 21, 25, 26 are cut from 10 mm plywood (see templates in Fig. 2, view A), and frames 20, 21 are reinforced in the upper part with spacers. First, the lower frame with struts 49 is mounted, then the frames, which are connected to the struts with angles, and stringers are installed. The entire frame of a homemade snowmobile is assembled using casein glue, and the joints are carefully bandaged with gauze soaked in glue. The dimensions of the frames can be changed depending on the height of the driver, and the fastening of the stringers in the frames can be done so that the frame forms closed triangles and trapezoids. Fire partition 17 is made of duralumin sheet 1.5 mm thick; a linden cover is attached to it, in which a hole is drilled to install a remote tachometer sensor connected by a flexible shaft to the propeller shaft.
|
The sides of the cabin and the fairing of the shaft housing are covered with three-millimeter plywood. The skin of the snowmobile is made of duralumin sheets 0.5 mm thick. The cabin has a seat made of three-millimeter plywood. Behind the seat there is a trunk where spare parts, tools, and a spare fuel canister are located.
Key Features
In general, any snowmobile consists of a body, chassis, propeller-motor system, brake system, and steering. The body is understood as a supporting frame, sometimes covered with plastic or duralumin. The chassis consists of wide, curved skis that distribute the load from the weight of the sled and the driver onto the snow.
A variety of design solutions allows you to choose an engine for snowmobiles based on the needs of a specific user: low-power engines from chainsaws are suitable for light mini-sleighs of the “Zipper” type, while larger engines will become the basis for massive high-capacity machines with cabins and soft suspensions. The presence of the latter two brings the ride comfort closer to that of a car while maintaining mobility. Snowmobiles will go where a car without special training will never go: they can conquer both untouched deep snow and thin ice.
Some models can even cross water obstacles. Such amphibious snowmobiles are called airboats; their chassis is made of an air cushion, the bottom of which is protected by plastic scales. The protection allows you to move on gliders even on dry ground. However, you should not abuse this, since a breakdown of the rubber can completely disable the sled. In homemade units, the role of an air cushion is played by an inflatable boat.
The maximum speed that snowmobiles can reach varies depending on their individual characteristics:
- the literature indicates a limit of 150 km/h;
- on compacted snow, an ordinary sled will travel up to 50 km/h;
- on compacted untouched snow - 80 km/h;
- on ice - 110 km/h.
However, it is worth remembering that as speed increases, the stability of the sled decreases and the risk of capsizing while moving increases. Load capacity also depends on the individual design. Compact models can barely carry a driver with his equipment, while an aerobus with a cabin based on an engine from, for example, a Zhiguli will carry up to five people in full gear and with their catch. The range varies depending on the engine size and load. On average, 40 liters of fuel is enough for 300 km. It is recommended to pack fuel tanks for a long journey.
Motorized scooter made from a lawn mower
If you like to make something in the garage, or make a unique type of transport, this instruction is just for you. Here you will learn how you can equip your scooter with a gasoline engine. The author decided to use an unnecessary motor from a trimmer as a power unit. Similarly, you can install an engine from a chainsaw, lawn mower, and so on.
Materials and tools for homemade work: - an old scooter (can be made from scratch); — engine from a lawn mower; — bicycle wheels (will be used for spare parts); - bicycle chain; — metal pipes (found in an unnecessary chair); — cable for throttle control; — welding; - Bulgarian; - paint - wrenches, screwdrivers and more.
The process of making a gas scooter:
Step one. Freewheel device
A special feature of this homemade product is that the rear wheel is connected to the engine through a bicycle hub. This means that having gained a certain speed and releasing the gas, you can roll by inertia. But this is very convenient, because it allows you to significantly save fuel and also prevent engine overheating.
In other similar options, the torque is transmitted directly to the tire, which is not very professional.
As for installing the carriage, you will have to tinker. You may need to make some spacers, bushings, etc. to connect everything together.
Step two. Installing the sprocket on the engine
Petrol mowers come in different varieties; the author needed one that was equipped with a centrifugal clutch. Otherwise, if it is not there, it will be very difficult to use the scooter, because when you start the engine it will immediately drive away. And so the engine will idle without problems, and will only begin to move when the crankshaft speed increases.
From the scythe engine you need to cut off a piece of the shaft that goes to the knife, that is, the area behind the clutch. As a result, a shaft will remain, to which the sprocket is welded. The star needs to be well centered. Most likely, you will have to select or make a bushing.
Step three. Frame diagram
The author first made the frame wooden in order to decide on the creation of a metal one. The problem was that the new rear wheel mounts did not fit the old frame.
As a result, it was necessary to make a different rear fork. It must hold not only the wheel, but also the engine. A chair came to the rescue as materials, in other words, steel pipes are needed. Well, then the pipes are cut exactly according to the diagram and welded thoroughly. It is necessary to make a mount under the engine; for such purposes you will need a piece of strong steel plate. You need to cut a hole in the center for the clutch, and also drill four mounting holes for mounting the motor. Well, this sheet is welded to the rear fork.
Step four. Assembly
Now everything can be put together.
Step five. Painting
At this stage, the author paints the frame. If the original board has become bad or is not there at all, then it can be made from a sheet of plywood and then painted. The size is selected depending on your needs.
Technical characteristics of snowmobiles
In terms of technical properties, snowmobiles differ little from chainsaws. However, with low thrust it is possible to develop high speed.
- 4700 rpm engine power;
- 15 hp;
- 62 kg - maximum propeller thrust;
- screw diameter 1300 mm;
- 2300 — maximum number of propeller revolutions per minute;
- 1.85 — gear ratio;
- 0.68 sq.m. – area of the sliding surface of the runners (skis);
- 40-50 l. — volume of the fuel tank;
- 40-50 km/h – maximum speed;
- 50-70 km/h - maximum speed on packed snow;
- 75-80 km/h - maximum speed on virgin snow;
- 100-110 km/h – maximum speed on ice;
- 90.7 kg – weight without driver (dry weight);
- 183 kg – total curb weight.
Load capacity
Carrying capacity refers to the weight of the driver, passengers, cargo and additional fuel. The snowmobile carries 1-5 passengers on board. The weight of cargo on board reaches 300 kg.
Thus, snowmobiles become useful in moving goods and people between remote settlements in snowy areas. They will also become indispensable during a hunt to drag away a carcass or get to the desired square.
Range
If a snowmobile has a small-displacement engine, then it has one standard tank of 40 liters. At cruising speed it is possible to cover up to 300 km.
Fuel reserve
The amount of fuel in the car directly depends on the volume of the fuel bank. On average it is 40-50 liters. In relation to weight and occupied volume, this is considered a standard that harmoniously distributes the load.
Therefore, it is possible to cover long distances without refueling. In addition, an additional canister of fuel with a volume of up to 20 liters is taken on board, and when the reserve in the tank is used up, add an additional one and get to your destination.
Speed
On compacted snow, the speed of the sled is 40-50 km/h. When driving in deep snow and virgin soil, 75-80 km/h. Nast allows you to accelerate to 110 km/h. However, it is dangerous to move at such a speed, the stability of the machine is reduced and there is a risk of capsizing.
Engine braking and starting system
The brakes on a mechanized sled are installed in the form of a scraper on the rear ski. When the driver presses the brake pedal using a cable system, the scrapers are lowered to the ground and slow down.
The engine is started either by spinning the flywheel using a cable, or by using the ignition system via a key.
Communities › This is interesting to know. › Blog › Friday chainsaw crafts!
Light weight and solid power combined with compact dimensions allow this “lumberjack’s dream” to be combined with an ice auger and a bicycle, a sawmill and a winch.
Anyone who can confidently work with a welding machine, an angle grinder, and, if necessary, can even use a lathe, can make interesting homemade products from a chainsaw with their own hands.
In this case, knowledge of the basics of design and drawing will be very useful, since the accuracy of all dimensions and quality of assembly are the main conditions for the normal functioning of a unit driven by a chainsaw.
Without going into technical details, we will consider the most interesting designs using it.
Options for homemade chainsaws
The first thing that comes to mind when you think about what can be done with a chainsaw is its use as a sawmill. Many developers had to split logs onto beams with this tool.
In this case, the log lies motionless and is neatly sawn along its entire length without wobbling or oblique seams. If you equip such a mobile carriage with four lifting screws, you can accurately set the thickness of the sawn timber.
A lightweight homemade snowmobile made from a chainsaw is more complex in design than a sawmill, since here you need to move the gas and clutch to the steering wheel, and also take care of the shock-absorbing suspension of the supporting frame.
To increase traction, a “traction” gear is placed on the caterpillar drive shaft, the diameter of which is larger than the size of the chainsaw drive sprocket.
There are usually no problems with the steering mechanism, since it is taken from a regular bicycle or scooter and modified so that the central axis moves the rods that turn the skis. The snowmobile engine power must be at least 5 horsepower, so it is better to use a Ural chainsaw for this purpose.
The winter line of homemade vehicles will be complemented by snowmobiles
from chainsaws, which are structurally simpler than a snowmobile. The driving force is provided by a large diameter screw, which directly rotates the gasoline engine.
Those home inventors who would like to make a backpack-type helicopter from a chainsaw should know the same thing. Such a machine will require not one, but at least two engines operating in a coordinated mode.
This vehicle is most often made for the sake of principle rather than practical use. The main driving force of its creator is the desire to test his strength as a mechanic and prove to others the original use of this cutting tool.
The basis for the design is usually my grandfather’s old Druzhba chainsaw and an equally ancient bicycle, with which you can carry out any experiments on converting the frame for mounting the drive.
Power is transmitted here through a gear pair using a bicycle chain, and the start of such a homemade product is reminiscent of preparing for cutting firewood.
Less common are more advanced models, the basis for which is a mountain bike equipped with reliable brakes and shock absorbers. This chainsaw moped is equipped with a gearbox with a gear ratio of 18:1 and a CVT transmission, which allows you to comfortably move on it at the speed of a regular bicycle.
This option for using a chainsaw is quite simple, since the task here is to transfer torque from the saw motor to the propeller. A homemade outboard motor does not need to install a transmission. For it you will need to make a reliable adapter on a lathe from the saw drive gear to the propeller shaft. The propeller can be used from a standard outboard motor.
It is difficult to make a full-fledged walk-behind tractor from a chainsaw due to lack of power and traction. But many home craftsmen were able to build a lightweight motorized cultivator based on it.
The design of such a machine is very simple: the motor rotates a pair of gears and transmits increased traction force to one drive wheel.
The chainsaw motor is no different from rotating the cutting chain or the auger mechanism of a snow blower. Here everything depends only on the design abilities of the creator and his ingenuity.
Using a Stihl chainsaw with a power of about 3 kW, you can easily build a good device for clearing an area of loose snow. To simplify the design, some craftsmen refuse to install wheels and use conventional sled runners.
Safety precautions
First of all, you need to pay attention to the normal protection of the screw from the unwanted entry of foreign objects into it. That is, a person or animal standing next to the machine should not be harmed by a rotating propeller
To do this, it is installed in a special protective mesh box.
During the assembly of the snowmobile, it is necessary to strictly adhere to the dimensions and requirements of the drawings, if they are taken from an official source
If production is carried out independently from scrap materials and your own ideas, then you should pay attention to the correct level of tightening of bolts and nuts. They should hold the parts together tightly enough, but not overtighten, so that during use they do not crack or fall apart while moving.
The ski should have a raised nose so as not to dig into the snow. The engine must be in good working order and have sufficient fuel and oil. The propeller must be constantly checked for defects.
Aerosleighs make life ten times easier for a fisherman who wants to make an excellent catch on a large body of water in winter. A properly planned and manufactured snowmobile will not only delight the owner with its practicality, but will also help with housework. Therefore, for a person who often faces winter forays into untouched nature, a snowmobile will turn into the best assistant.
To St. Petersburg and back
Let us remind you that last spring, a real sensation in social networks was caused by a video in which a 19-year-old young man rushes forward along the road with the trunk of a VAZ-2106 (“Six” by Sergei Artyushenko - “RG-Nedelya” from 03/06/2019). This converted machine stunned not only hundreds of thousands of Internet users, but even the famous inventor Elon Musk.
This time Artyushenko used a Soviet sidecar, which he bought almost a year ago. The car, rusty from time to time, naturally had to be completely redone.
— The body was rotten, the hood was completely changed. Friends helped with tuning, installed a cool sound in the “disabled car,” he says.
And on August 22, the legend of the domestic automotive industry went to St. Petersburg. True, 500 kilometers from the city the trip almost fell through.
Finishing the propeller
You can make a snowmobile from a chainsaw with your own hands, but if you decide to use the technology described above in your work, then at the next stage you need to cover the propeller with fiberglass in two layers. Afterwards you need to grind to complete the balancing. Next, the surface is primed and also painted with auto enamel. The ski located in front must be glued with epoxy resin using strips of plywood, the thickness of which is 4 mm. In this case, stainless steel strips of 0.8 mm should also be used. The gluing thickness is equivalent to 30 mm. The front area of the ski should look like an arc made of a 16 mm metal pipe. In the middle part, this element must have guide cuts made of stainless steel sheets of 3 mm. The ski will have a spring-hydraulic shock absorber, borrowed from the Ural.
The rear skis have a box-like appearance. Their soles are glued together from plywood and stainless steel, but the sides must be prepared from 25 mm boards. These elements are not cushioned. The steering is taken from the SZD motorized stroller. You can also get a heater from it. The brakes are installed on the rear skis. The drive is combined: from the pedal to the lever it will be a cable drive, while from the lever to the scraper it must be made rigid. If you want to make the installation more complex, you can make your own radio-controlled snowmobile.
Components of the structure
A homemade snow sled requires the presence of a steel plate, brackets, and squares in the area of mounting the rotary stand in front of the ski. Skis must be made of wood. The front area of the body is covered with an element that will serve as a hood. There are steel brackets on its sides. A bicycle headlight will be mounted on the top of the hood. The driver's seat can be made from plywood; you need to take a sheet whose thickness is 8 mm. The front part of this element will rest on two springs borrowed from a bicycle saddle. The cross bars on which the motor is mounted have different lengths. The rear bar will be long, it is attached with tubular struts and acts as a guard for the propeller. At its ends you need to attach plates curved along the radius of the propeller. The latter will need to be painted red during the work process. The rear skis have hog clips. They can be made from strip steel, from which a blank with a size of 5x30 mm is pre-cut.
A homemade snow sled will contain, as already mentioned, hog brackets, with the help of which the skis are mounted on M10 bolts to the corners. The latter are mated with the bars of the transverse beam.
Propeller installation
The propeller-motor system is placed on a wooden tabletop covered with plywood; rubber pads can be used in the support structure to dampen the vibration of the motor. The engine is fixed using brackets and struts. The power unit is selected individually. Larger volume does not guarantee better ride quality. Therefore, you should not try to install a motor from an old VAZ on a small sled.
It is better to use a ready-made propeller, providing it with additional protection in the form of a metal mesh on both sides. An open propeller rotating at high speed can cause serious harm to the health of the driver and others. The geometry of the propeller is selected based on the power of the motor and its rotation speed. For an engine from an IZH-56 motorcycle with a power of 15 horsepower at a speed of 1400-1600 per minute, a diameter of 1500 mm with a blade pitch of 500-600 mm is suitable; at a speed of 2200-2400 per minute, the diameter should be 1200-1300 mm with a pitch of 650- 700 mm.
Motor part
Homemade snowmobiles, the drawings of which must be reviewed before starting work, must be made with a motor that is similar to that installed on the model described above. The engine must be installed with the cylinder facing down. Using strip steel, you need to make a sub-engine stand. First, you have to prepare metal elements measuring 8x30 cm. The gas tank needs to be mounted above the engine, the fuel will be supplied by gravity. Ignition is provided by a unit magneto. The ignition timing is adjusted by turning the magneto bracket. Using a tin can, you need to make an air collector, which should be placed on the carburetor. The inlet of this element must be closed with a filter, which must be assembled from a steel mesh. The latter is laid in 10 layers. This manipulation will prevent the engine from splashing and snow getting into it. Homemade snow sleds with a Lifan engine will allow you to enjoy winter hunting and fishing.
Body construction
At the initial stage, the necessary characteristics of the sled are determined. The parameters of the aeroprop and engine are set, a strength calculation of the supporting structure of the body and components is carried out, and the type of steering and braking system are assigned. Upon completion of the calculations, a package of design documentation is created, after which they begin to assemble the snowmobile with their own hands according to the drawings.
The broken frame consists of two semi-frames, hinged. The front half houses the cockpit with controls and rotates in conjunction with the rotation of the steering wheel, to which it is connected via a worm gear. The rear carries the power unit. Both the solid frame and the supporting body are based on spars - longitudinal rods at the bottom of the structure.
The cabin is hingedly mounted on the frame through spacers, and the spars are rigidly welded into the supporting body. The frame is welded from hollow metal pipes, the dimensions and wall thicknesses of which are determined by calculation. A wooden frame structure is allowed, with the elements glued together with casein glue and gauze.
Next, the longitudinal elements of the upper chords (stringers) are installed. Suitable for the role of cladding:
- plywood sheets;
- duralumin;
- plastic.
The windshield is recommended for use on all models capable of speeds exceeding 30 km/h.
Working on a propeller
A do-it-yourself snowmobile propeller can be made using the same technology that was used by the German one. Before making the screw, you need to make a blank using 60x20 mm pine bars, which are to be glued together with epoxy resin. When carrying out this process, the layers of wood must be positioned symmetrically to the mating planes. After gluing is completed, the workpiece must be planed so that it matches the dimensions of the screw. For templates, you need to use a screw drawing. But the templates themselves should be prepared from plywood. To carry out the work, it is necessary to use several options - a plan view, as well as a side view, lower and upper blade templates. If you decide to make a snowmobile with your own hands, photos of which are presented in the article, you need to make markings and use an ax and a plane in the next step. But the final work on finishing the propeller should be done in the slipway. Its base must be made from a 60 mm board.
When should you use a snowmobile?
Of course, no permit is required to use snowmobiles in extreme conditions to ensure the livelihoods of a village or an individual. In order to drive them on ice, where you can meet a fisheries inspector, or even on dirt snowy roads, you will need to register them with the Technical Supervision authorities.
This is a rather complicated and lengthy procedure. You will need to obtain a safety certificate and design verification calculations. The cost of the procedure itself negates the process of making a snowmobile yourself in order to save money. It will not be possible to do without registration, since the engine capacity for them is usually from 150 cubic meters. You can’t install a smaller one, it simply won’t pull the propeller. To drive a snowmobile, you will need to obtain a special driver's license.
Therefore, in most cases, a snowmobile is not the best choice for an all-terrain vehicle, primarily due to bureaucratic reasons. The second reason is increased fuel consumption, especially in deep snow and in soft snow during the thaw. Compared to a snowmobile with a tracked design, snowmobiles consume 1.5-2 times more fuel for the same needs. The third is the inability to pass through the forest.
Therefore, snowmobiles, although they are a fairly simple and reliable form of transport, are not always a good choice for those who want to have their own all-terrain snowmobile, especially for a fisherman who would be more interested in focusing on fishing.
Ice screw
An ice drill made from a trimmer is a low-power unit for winter fishing enthusiasts, characterized by its low weight and easy transportation. In order to save money on the purchase of new equipment and the effort required when manually drilling ice, fishermen make them from old trimmers. For this you need:
- petrol mower;
- factory or homemade drill;
- improvised materials.
It is difficult to make an ice screw at home. The parts to pay attention to are the screws and the blade base.
To create augers you need:
- Calculate the sizes of product segments.
- Prepare metal blanks, mark, cut out a sector, weld the segments together. The result is a steel spring welded on one side.
- Stretch the spring by a given step on a special machine in order to weld the segments on the other side.
- Grab the flange and weld it to the pipe.
- Boil the screw connections and paint.
- When choosing auger rotation, take into account the direction of rotation of the gas-powered tool.