Costume base
The cherry suit should be made in bright colors of green and burgundy. Being a prototype of a delicious fruit, the outfit should be associated with a berry, a twig and a couple of leaves.
How to make the basis of a suit from an existing dress
The cherry outfit differs from many suits in that it is based on red, crimson or red-white dress already in the wardrobe
It can be of completely different lengths and fluffiness, with or without sleeves.
How to sew the base of Cherry's costume
If you don’t find a suitable dress in your wardrobe, then you should prepare a set consisting of a green turtleneck or T-shirt and a fluffy tutu skirt.
It is easy to make within a few hours, following a certain sequence of actions.
IMPORTANT! A tulle tutu skirt is also made multi-tiered. For example, it may be shorter in front than in the back.
You can also sew your own top from green fabric .
To do this, just circle any children's T-shirt and cut off the top . Next, you need to sew two sections on a machine, and decorate the top with an elastic band . This way the top will be easy to put on and will fit well on the child’s body.
A stalk is cut out of brown fabric and adjusted to a top . Next, we add a strap to it, to which we sew several organza leaves.
How to decorate the base to create an image
A dress or T-shirt can be decorated with applique.
To do this, you need to take red material and cut out several circles with a diameter of up to 4 cm. These will be cherries. You can attach them to the dress using non-woven fabric, and then additionally sew them along the edge using a machine or by hand.
It is better to choose threads that match the cherries or contrast.
You can use acrylic paints on fabric and paint a couple of large berries or, conversely, many small ones over the entire area of the dress.
ATTENTION! If the costume is intended for a New Year's celebration, then it is better to decorate the outfit with rain and multi-colored garlands. You can also glue a couple of snowflakes.
Deciding on the size
Beginner knitters often have troubles - a beautiful product, but too small or very large, falls off the head. However, mistakes happen even among experienced craftswomen.
This depends on various nuances, including the quality of the yarn and the correct number of loops.
The main measurements are head volume (for adults – 53-58cm) and the depth of the product.
Dividing the depth of the product in half is the length of the finished hat. A beanie hat or another model with an empty crown (flat or pointed) - an increase of another 7-8 cm.
According to the general principle (depth of the product + reserve for a sagging crown), it is easy to calculate a set of loops for a hat using cross knitting.
How to correctly calculate the number of loops
When calculating the set of loops, the pattern is taken into account - some “elastic bands” shrink greatly after washing, others spread out. For elastic products, it is better to add 7-10 loops.
The main calculation is carried out based on the base - the elastic band or lapel adjacent to the face. If the hat is knitted in two patterns (rib and puffy strands), it is important to make sure that both panels have approximately the same width, but different densities.
Helpful advice! To ensure that the hat fits tightly to your head, knit the elastic tightly - on thinner knitting needles.
To calculate the number of loops, knit a sample with the same pattern and on the same knitting needles (with the same crochet) as in the upcoming work. It is enough to use a 10x10 square sample and calculate the number of loops (without edge loops).
Example. Head volume 55 cm. In the sample with a pattern there are 18 loops. We calculate the number of loops - 18 by 5.5. You will get 99 loops. You can round to 100 to make it more convenient to calculate the decrease in the crown.
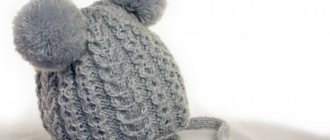
Headdress for Cherry's costume
A cherry-shaped hat
will look good on your head . It is done in the following way:
A hat is also a good choice as a headdress . It’s better to take a ready-made hat, or you can cut it out of cardboard in the shape of a circle. A tulle drapery sewn to the hat will add mystery to the look.
You can make a beautiful headband . Its base is usually taken from an old headband and wrapped in green cloth. Artificial cherry berries and leaves are sold in flower shops. You can even make berries from plasticine or felt.
REFERENCE! For the crown, draw two cherries together so that they touch. When cutting them out, they should not be separated so that they do not move apart when putting them on.
DIY sweater hat
Cutting and sewing a beanie hat with lining. Beanie pattern. Video
I propose to consider the cut and sewing of a beanie hat with a lining. This is a popular headdress that, from season to season, wins the hearts of designers and “stars,” but not only.
Beanie has long been firmly established in street fashion. She is loved by adults, teenagers, and small children. Worn by women and men. You've probably worn a beanie at least once in your life, and perhaps you still wear it now.
Attention! If you like the video format, look at the bottom of the publication for a video where there is a step-by-step diagram for constructing and sewing a beanie hat. To get a more complete picture, I recommend studying both versions.
Beanie hat - what is it?
Beanie hat:
The main feature of this model is the absence of ties and a tight fit on the head. Wear the hat close to the eyebrows.
Who is the beanie hat suitable for?
Surprisingly, such a hat suits almost everyone. The main thing is to find your model, color and material.
With the right choice, a hat will help correct the shape of the face, for example:
Note: In the previous publication about useful online assistants, I talked about one service that will help determine your color type, face type and figure. If in doubt, go to the website and take a simple test.
How to sew a hat with your own hands at home
The hat itself can quite create an image.
Leading designers regularly release collections of hats - ironic, comfortable, funny and bright - they help create an individual style, combining fashion with convenience and comfort .
But sometimes choosing outerwear is easier than finding a decent headdress to go with it. And then the craftswomen get down to business - they can sew anything, even a hat.
How to sew a hat with your own hands
How to sew a Wolf hat with your own hands (pattern with explanations)
Many women do not wear thick hats for fear of ruining their hair, preferring to throw a spacious hood over their heads. For cases when your outerwear does not have a hood, the designers have come up with a comfortable and original Wolf hat. The hood, which can be pulled over the head and lowered in a warm room, has become a real hit.
You will need:
The hood will be double, so you need to cut it in two copies.
Operating procedure:
You can choose any fabric - fleece, jersey or lace silk . Just decide for what weather and for what occasion you are sewing a hat.
How to sew a turban hat with your own hands (pattern with explanations)
The turban or turban is experiencing another surge of worship. Urban fashionistas wear them with pleasure, decorating them with a brooch or a small veil. But it won’t be difficult for real craftswomen to create such a hat to match the color of their outerwear.
The most fashionable colors of this season are blue, chocolate brown and rich gray. You can sew a knitted turban hat for women using a very simple and accessible pattern. When sewing knitwear, you need to take into account some nuances, so first, ask yourself how to sew knitted parts.
You will need:
Operating procedure:
How to make a knitted sweater hat with a fleece lining with your own hands
Sometimes it happens that you no longer want to wear your old favorite sweater, but you just can’t bring yourself to throw it away. There's no need for that. Sew a new hat from your favorite clothes - this will be a creative solution to the problem.
You will need:
Operating procedure:
In case you still have a lot of old sweaters and original ideas, look at how to sew a bag yourself.
How to sew a hood on your head instead of a hat
The hood can be worn completely separately and does not necessarily have to be part of the outerwear. In addition, you can make long ties to a large and loose hood that can replace a scarf. If the idea of loose hats interests you, look at how to sew a snood yourself.
You can sew a hooded hat from any fabric, the main thing is that it is soft and pleasant to the body. You can tailor the lining from a contrasting fabric, then the hood can be worn on both sides.
You will need:
Operating procedure:
How to sew a fly agaric mushroom cap for a child
On the eve of the holidays, all mothers, in addition to the usual chores, are also preoccupied with making costumes for children's parties. Someone is sewing a princess dress or a musketeer costume, and someone is thinking about how to sew a fly agaric hat for a boy or girl for kindergarten.
The hat is sewn on the basis of a beret pattern, so first ask how to sew a beret with your own hands using a beret pattern.
You will need:
Operating procedure:
How to sew a fleece hat with your own hands
Children's hats must cover their ears and, in the cold season, their necks. A helmet is a children's hat that covers the baby's head, not giving the wind the slightest chance. Soft fleece will not cause the slightest irritation, and additional decor can be made to please the baby.
Operating procedure:
Video
You may have already created your own hats. How did you like this creative process? Write about your achievements, we will be grateful to you.
Modern manufacturing techniques
Over time, new directions for creating fabric flowers have appeared, one of which is the Japanese Kanzashi technique - folding petals from squares of fabric or satin ribbons.
Flowers made of synthetic textiles, made by the “hot method” - by treating the edges of the petals with a burning candle - look as if they were alive. The petals, melted at the edges, curl up and take on a curved shape.
You can create your own flowers from fabric using the method of crimping, stitching and gluing petals. Needlewomen learn the art of creating flowers using instructions, recommendations, and videos that help them learn the intricacies of this type of creativity.
Knitted hat pattern: how to make a life-size pattern and sew a beret according to the pattern
466 Reading time: 7 min.
Fashionable models of knitted hats
Exclusive knitted hats
How to make a life-size knitted hat pattern
IMPORTANT! When using dense fabric, you should slightly increase the width of the workpiece so that it does not cause inconvenience and discomfort.
How to take measurements for a hat
What you will need to create a pattern and sew a knitted hat
IMPORTANT! If you are going to make a lining, then you need to additionally prepare for this material the same dimensions as the main part.
Women's knitted sock hat
Hat-sock pattern for women
A quick sewing method includes creating a pattern, cutting and stitching the parts together. We are sharing an easy way to build a base for cutting fabric.
We sew a hat-sock with our own hands
DIY beanie hat
Beanie hat pattern
Build the pattern according to the following diagram
ON A NOTE! Do not throw away the resulting layout; save it for future work.
How to Sew a Beanie: Step-by-Step Guide
From the resulting part you can make the final version and sew the product.
DIY women's knitted beret
Berets add something unusual and even mysterious to the image. Perfect for cool weather and will complement your look. A good combination would be a coat and a pencil skirt.
Knitted beret pattern for women
To create a pattern you will need: paper, a ruler and a pencil. To begin, draw a diagram that consists of the bottom, sides and cache. All sizes and shapes are selected individually for each person.
IMPORTANT! The cache-pin is directly adjacent to the head, so its length must exactly match the circumference of the head.
Sew a knitted beret step by step
First of all, sew the sides of the side together (front and back), and then stitch the bottom to the side base. Finally, sew on a cache-pin that will hold on the head and should correspond to its size. In the final stage, go over all seams with an iron. The stylish beret is ready.
A simple knitted hat for a child
It is not necessary to spend many days and nights on production. There is a way to quickly complete all the steps to please your baby with a new thing.
Making a hat pattern
The pattern is built according to the following instructions.
How to sew a simple knitted hat for a child
Transfer the diagram to the fabric folded in half and cut along the contours. You can sew the details:
The single-layer simple hat is ready. For other models you can use this type of base pattern.
Children's hat made of jersey with lining
For lower temperatures, the thin version is no longer suitable. It is necessary to insulate yourself, and for this you should make a hat with a lining.
Making a pattern for a hat with lining
There are no differences in construction from the previous version. Do everything strictly according to the instructions. Only now this operation will have to be repeated twice: on the knitted material and on the lining fabric (you can choose warmer cotton).
Sew a hat with lining
Now we sew together the details of the outer and inner parts. After preparing both parts, you need to sew them together. To do this, place the pieces next to each other and stitch, leaving a small gap at the top. Bend the product outward with the side that will be on top. Sew the remaining window all the way down.
Hat with ears for a child
If your baby doesn’t like to wear a hat, but because of the cold weather it has become necessary, you can use a trick and sew ears on the product. A child definitely won’t be able to refuse this!
Pattern of a children's hat with ears
For such a model, a standard pattern is suitable, which we described in detail above. All changes concern only the decoration of the product with ears.
Methods of creating flowers - master classes
An exciting version of needlework is not limited in the choice of techniques and materials. Textile flowers can have round or acute-angled petals and any number of them. They can be flat or voluminous. You can learn how to quickly create real masterpieces very simply. To do this, just study the master classes in detail, select photos for inspiration and feel free to start working step by step.
Required materials and tools
The basis for textile flowers is fabric. It can be any type and size of material. Ribbons, canvases and even multi-colored scraps will do. To make fabric flowers yourself, you will need the following consumables and tools:
- Paints. They will help give the flower a natural shade. You can use gouache, ink, photo paint, ink, food dyes, aniline dyes;
- Plastic palette, wide brushes;
- Carpenter's glue, office glue. Should provide reliable fixation and harden quickly. You can also use a hot gun;
- Floral wire. It will be necessary to prepare material of various thicknesses for the manufacture of leaves and stems;
- The fishing line is transparent, colored. Decorative elements are attached to it - beads, seed beads, small flowers;
- Crepe paper. Needed to create relief, wire upholstery;
- Viscose wool. It is filled with buds and flower cores;
- Needle and thread. For stitching elements, making stamens;
- Brass set for needlework. It includes balls of different sizes, a hook for curling petals, scissors, wire cutters, tweezers, hand cutters;
- Rubber cushions, hard and soft. With their help, leaves are corrugated and petals are squeezed out.
In order for fabric parts to keep the desired shape, they must be specially processed. In addition to materials and tools, you need to prepare one of the following ingredients that increase the rigidity of matter - starch, gelatin, polyvinyl alcohol, wallpaper glue.
Fabric roses
You can complement the soft, homely interior in Provence style with the help of textile flowers. Fabrics with romantic, picturesque patterns are suitable for work. To create a composition with a different mood, you can safely change the colors and textures of materials. Lace, knitwear, chintz, burlap are suitable.
The work process is very simple. We cut strips 5 cm wide, fold them lengthwise and coat the ends with glue for convenience. We form the middle - tightly twist one end of the tape. Then we wrap the remaining flap around it, tucking the edges a little. The fabric must be periodically fixed with thread or glue. The rose can be made neat or deliberately careless by ruffling the textile petals. You can create an original composition from several colors.
Tulips in tilde style
One of the cutest things in the tilde style is a tulip. You can sew a beautiful spring bouquet from any fabric. Flowers made of satin and satin look impressive. Beginners should start with soft, pliable fleece.
First you need to cut out the parts according to the template. You will need a blank for the stem, bud and leaf. The dimensions can be any, but it is better not to exceed the scale of the original. We start with the stem, bend the rectangle and sew its long side. We fill the inverted part with cotton using a pencil. We do the same with halves of leaves and buds. Finished elements must be sewn with a hidden seam.
If you decide to work with synthetic fabrics, their edges should be singed. Otherwise, the material will crumble and will not hold the seams. It is also not recommended to make latex tilde tulips from chintz.
Delicate peony
The best materials for making an airy peony are satin, chiffon, and silk. The fabric should be chosen in pastel colors so that the flower turns out as natural as possible. To work you will need patterns, scissors, glue.
We prepare eight identical round blanks and one of slightly smaller diameter. The contour does not have to be perfectly smooth. Now each petal needs to be given a natural bend. To do this, burn the edges of the circles with a candle. We cut the prepared parts on four sides, not reaching the center, and also scorch them with a flame.
The center of the peony will be yellow threads. They should be wound and cut, creating an imitation of fibers. Having prepared all the details, you can begin assembling the flower. We stack the petals on top of each other and glue the centers together, placing a yellow pestle in the center.
Carnation made of fabric and braid
You can make beautiful carnations using a simple assembly method. You can use a long piece of fabric or braid. The size and volume of the bud inflorescence can be adjusted by the width of the stitch. The final result will also depend on the type of fabric and the length of the strip.
The manufacturing process is very simple. You can be creative with young children. It is enough to gather the braid or ribbon onto a strong thread, pull it together and secure it. We decorate the center with a beautiful bead.
For a large fluffy carnation, a piece of satin fabric is suitable. We make a blank, crumple the fabric with an accordion. We tie the center of the future peony with thread or fishing line and give the flower the desired shape. We straighten the material and form a bud.
Flowers using kanzashi technique
The principle of decorative art lies in the ability to collect and roll petals of various shapes from pieces of fabric. Using tweezers and glue, entire compositions are formed from miniature parts. Petals can be round or acute-angled. For work, use synthetic fabric or tape.
We start by cutting even, identical squares. The number of blanks depends on the design and size of the flower. At the next stage, we make even triangles by folding the pieces of fabric three times. All folds must be carefully aligned. You can fasten the edges with glue and using the flame of a lighter or candle. Having leveled the workpiece, we get a sharp leaf.
To create rounded petals, you will need to bend the square in half and tuck both edges into the center. We move the side corners back and melt them. After processing all the blanks, you can begin assembly. We glue the round parts of the flower, form the correct outline, and fix the leaf on the sides.
Costume base
The cherry suit should be made in bright colors of green and burgundy . Being a prototype of a delicious fruit, the outfit should be associated with a berry, a twig and a couple of leaves.
How to make the basis of a suit from an existing dress
The cherry outfit differs from many suits in that it is based on a red, crimson or red-white dress already in the wardrobe .
It can be of completely different lengths and fluffiness, with or without sleeves.
How to sew the base of Cherry's costume
If you don’t find a suitable dress in your wardrobe, then you should prepare a set consisting of a green turtleneck or T-shirt and a fluffy tutu skirt.
It is easy to make within a few hours, following a certain sequence of actions.
IMPORTANT! A tulle tutu skirt is also made multi-tiered. For example, it may be shorter in front than in the back.
You can also sew your own top from green fabric .
To do this, just circle any children's T-shirt and cut off the top . Next, you need to sew two sections on a machine, and decorate the top with an elastic band . This way the top will be easy to put on and will fit well on the child’s body.
A stalk is cut out of brown fabric and adjusted to a top . Next, we add a strap to it, to which we sew several organza leaves.
How to decorate the base to create an image
A dress or T-shirt can be decorated with applique.
To do this, you need to take red material and cut out several circles with a diameter of up to 4 cm. These will be cherries. You can attach them to the dress using non-woven fabric, and then additionally sew them along the edge using a machine or by hand.
It is better to choose threads that match the cherries or contrast.
You can use acrylic paints on fabric and paint a couple of large berries or, conversely, many small ones over the entire area of the dress.
ATTENTION! If the costume is intended for a New Year's celebration, then it is better to decorate the outfit with rain and multi-colored garlands. You can also glue a couple of snowflakes.
Materials and tools
The materials needed to make a costume will depend on its complexity and the personal preferences of the craftsman. In most cases, the following materials and accessories may be needed.
- Tulle of medium hardness (about 3 m) for sewing a tutu skirt. You can use several colors of fabric, combining different shades of green and red.
- A piece of fabric . Satin or satin is perfect for sewing an elegant sun and half-sun skirt.
- Elastic band 3.5 and 2 cm wide.
- Thick paper or cardboard.
- Paints for fabric and paper.
- Sewing supplies.
Headdress for Cherry's costume
A cherry-shaped hat will look good on your head.
. It is done in the following way:
A hat is also a good choice as a headdress . It’s better to take a ready-made hat, or you can cut it out of cardboard in the shape of a circle. A tulle drapery sewn to the hat will add mystery to the look.
You can make a beautiful headband . Its base is usually taken from an old headband and wrapped in green cloth. Artificial cherry berries and leaves are sold in flower shops. You can even make berries from plasticine or felt.
For the crown, draw two cherries together so that they touch. When cutting them out, they should not be separated so that they do not move apart when putting them on.
Graduation cap
It became a rule of good manners for higher educational institutions to present diplomas to masters dressed in the robe and cap of an academician. You can purchase such a hat at retail stores.
Watch video lessons on specialized websites. It will become clear that it is not at all difficult to make a master’s cap yourself.
Note!
DIY vase: step-by-step photo instructions, master class for a beautiful and unusual craft
- Paintings from buttons, panels, appliques and compositions with your own hands: how to make flowers, a butterfly, a fish or a tree craft from buttons
Flowers made of wool (85 photos) - how to felt a flower from felt or a wool brooch. Step-by-step instructions for beginners
The master's hat is a cardboard cylinder with curved triangular bends at the front. The upper part has a square shape. The tassel is made of bright yarn and attached to the bend in the forehead area.
The ends of the cardboard form are secured with staples. The square base should be glued with polyvinyl acetate glue. Now paint the hat with black paint. Glue a two-centimeter wide strip of gray color to the bottom of the hat.