Handicrafts are a great hobby that allows you to have a good time, relax your soul and create beautiful paintings to decorate your apartment. You can learn at any age, because you can find very detailed instructions on how to embroider with beads pictures of any complexity. Start with simple ones, get acquainted with different types of seams, and gradually improve your skill. Very soon you will be able to take on work of any complexity.
Necessary materials and features of the right choice
How to properly organize a place, what materials to use and what the basic basics are - for beginning craftswomen, these are the main questions at the beginning of the journey. The work begins with the selection of good and necessary material. Go to a craft store and buy from the list.
Scheme for beginners
If this is your first time using a thread with beads, then it is better for you to purchase a special pattern for beginners. This way you will understand how to work on a painting correctly and gain experience.
Usually ready-made kits already have diagrams, but if you are not satisfied with their drawings, you can always buy the diagram separately. It allows you to better navigate the embroidery, and also has a color designation. That is, each cross or square on the graph means a certain color, which allows you to navigate well and not get confused.
With its help you can learn how to embroider with beads easily and simply.
Beads
The first difficulty in choosing a material may be finding the right, high-quality beads of a certain size and color. The quality of the beads must be excellent. If you make the wrong choice, the work will quickly lose its beautiful and respectable appearance.
Choose convenient containers for storing beads.
There are three types of beads:
- plastic;
- glass;
- ceramic.
All three types have bright and rich colors, they are practical and retain a beautiful appearance on the fabric for a long time. The main thing is to take into account the diameter, and it is important that it matches the density of the fabric and thread.
Thread or strong fishing line
It is better to choose cotton or silk threads. They do not stretch, do not rub, are not afraid of moisture and ultraviolet exposure, which makes it easy to sew on beads.
Polyester threads, as well as wax-impregnated products, are also excellent.
It is better to choose threads similar to the color of the beads.
Be sure to prepare a white color, because it universally matches the color of the canvas. If it’s difficult to decide on a thread, use it and you won’t go wrong.
Canvas
Canvas is a special canvas made from linen fabric.
Most often, thick linen or cotton fabric is used as a base. Although you can embroider on other materials, such as velvet, synthetic materials, etc. This fabric greatly simplifies the process of transferring patterns to embroidery.
However, if you want to make things easier for yourself, buy a ready-made canvas with the pattern you like on it.
Hoop or frame
Thanks to these devices you will significantly speed up the embroidery process. This is because the area of fabric will be smooth and slightly stretched. You don't have to constantly align the material and make sure that the threads don't break or get tangled.
beading needle
Beading needles differ from regular ones in that they have the same thickness along their entire length. Typically needles from 10 to 16 are used, depending on the size of the bead itself. For small beads – 15-16.
If the needle penetrates the beads freely, then it is suitable.
The choice depends on the embroidery method, so it’s easier to buy a set of such needles.
Scissors
Crafts require good sharp scissors. And in beadwork they will be simply irreplaceable. You may not need to buy them at all - ordinary nail scissors are also suitable for this type of needlework.
Important! Keep materials out of the reach of children.
Thread Requirements
They should be designed for this type of embroidery. The threads also need to be selected carefully so that they match the colors of the beads or canvas. They can be cotton, silk or lavsan, but they must be durable and not deformable. Polyester threads prevent the beads from twisting.
The thread color is selected in two ways:
- To make the pattern smooth, the threads must match the color of the beads;
- for an ornamental type pattern, the threads are selected to match the color of the base.
The craftswoman also needs scissors and a needle intended for beads. It is special - very thin, sharp and with a small ear that will not allow it to get stuck in the beads and break them. There should be a supply of such needles, because they are fragile and break quickly.
Workplace organization
For productive work, as well as in order not to harm your health, it is necessary to provide sufficient lighting, so it is better to place your workplace near a window, or get a good lamp.
It is better to select separate furniture for work. Traditionally, artisans embroider with beads on a lightweight folding table on which an embroidery frame can be conveniently placed.
Practical advice:
- In order to store the smallest parts, it is very convenient to use special zipper bags.
- For needles, pads or separate boxes with soft segments are traditionally used.
- It is recommended to store scissors in special cases.
It is also better to choose a secluded place where you can calmly create.
Beginning of work
So, the materials have been purchased, the choice of design has been made, now let’s look at:
- How to embroider with beads, lessons for beginners.
- First, you should carefully process the edges of the fabric.
- This can be done in two ways, using an overlock stitch or PVA glue.
- The edges are overcast or glued carefully so as not to pull the fabric.
- In this case, you can use a hoop.
- Then you can proceed directly to embroidery.
- Beginning needlewomen are recommended to watch a detailed master class on how to embroider with beads.
Basics of bead embroidery
Beginners make mistakes at the very beginning of embroidery: they leave knots while securing the thread. Ideal embroidery has no knots or tails.
How to attach the thread
Fastening methods:
- We make a stitch, pierce and stitch.
- We stretch the thread on the canvas, then press and secure the tip by making several stitches.
- We pierce the fabric in two places with a needle to form a loop, skip it, and then tighten the thread.
- We take the needle out from the wrong side, then from the front, without pulling it out completely, we make several yarn overs on it with thread, and then take out the needle.
These methods allow you to create perfect paintings without deforming the fabric.
Securing a single bead
One bead is sewn into the material like a button. You can use smaller beads to create a small column or put glitter on it.
Little tricks
If the edge of the work still crumbles, and there is no time for stitching, you can use adhesive web. They are sold in specialized stores. Apply a piece of tape to the cut and carefully iron it, keeping an eye on the glue (it should not melt). The edge is sealed, everything is smooth.
The frayed thread is usually wiped with pieces of beeswax. This way it keeps its shape and doesn’t interfere with work.
Types of seams
Bead embroidery can be done using several types of stitches. Before you start working on a large scale, you need to study them. This will allow you to avoid common mistakes: strong wire tension, weak wire tension and skew.
Monastic
Refers to the main method of attaching beads to fabric. These steps are similar to those taken when doing half-cross stitch.
The stitches on the front side of the work are inclined, and on the back side they are vertical. In this case, the needle is taken to the front side of the lower left or lower right corner (as it is convenient for you), string a bead onto it and insert it into the wrong side in the opposite upper corner. Then continue to embroider in the same way.
stalked
This seam allows you to firmly attach the bead to the fabric. After securing the thread, it is brought to the main side and a bead is put on. Afterwards, the needle and thread are transferred to the front side behind the sewn bead and, having pulled the thread through it, the next one is put on. The needle is brought out onto the face from the inside out between the beads. Then continue to sew according to the same pattern.
Arched
A needle and thread are threaded up from behind, several beads are put on it, then we pierce the fabric near the last bead and bring it back in front of it. Then we thread the thread through the hole of the beads and put new ones on the thread and fasten them again.
From the picture below you can see that this seam is elastic.
Lowercase
Here the beads are attached in a circular pattern (this is clearly visible in the diagram). The principle is that after securing the thread, it is on the front side at the desired point. Beads are attached to it, and then the fabric is pierced exactly in front of the bead. He returns after a short distance and the beads are strung again.
The seam is fastened
This seam creates a line in any picture, step by step it looks like this:
- Fasten the thread and bring it to the front side and string several beads.
- They place it around the office and begin to sew it on.
- They fasten from the inside out, leading behind the bead and clasping the thread on which it is attached and returning back.
- Continue working until each one is recorded.
Cretan stitch
We bring the needle out in the middle, string one bead and make a loop, passing the working thread under the needle. Then we bring the needle out at the top point and repeat the same steps.
Loop attached and with added beads
To make a double-sided seam, a thread (thread on which beads are strung) is placed on the front side of the fabric along the contour of the pattern. During the fastening process, beads are also strung on each stitch on the other side of the fabric.
For additional strengthening, the thread can be pulled through the beads at the end of the row.
Feather seam
We proceed according to the figure below.
Herringbone
The implementation is clearly visible in the diagram below.
Double-sided stitch forward needle
The stitch is almost identical to the “forward needle” stitch, only the stitch on the wrong side is longer, and it also has a bead threaded on it.
Stitch back with a needle
Let's look at it step by step:
- Secure and remove the threads from the front side. Place the beads on the needle.
- Slide the beads along the thread onto the fabric. Run the needle along the wrong side of one side of the bead.
- Tighten the thread. Bring the needle to the front side of the other side of the bead.
- Run the needle over the beads.
- Tighten the thread. Pass the needle along the wrong side behind the bead.
- Tighten and secure the thread.
Combined seam
It is also called “Double-sided stem-line stitch”. As the name suggests, it is achieved by a combination of a stitch and a stem stitch. The embroidery is tough.
Exquisite handicrafts
The word "beads" comes from the ancient Arabic name for tiny droplets of glass. It was in Arab countries that in ancient times they began to decorate festive costumes and accessories with such embroidery. Bead embroidery is in fashion in the Western world.
Beads are tiny round beads with holes through which they can be conveniently strung on a thread or sewn to a product. They are made of glass or plastic, various in color, shape, size, often adding mother-of-pearl, silvering and gilding.
At first glance, bead embroidery seems like a complex craft. In fact, the lessons in mastering this technique are not difficult for those who are passionate about creating beauty. The process of embroidery itself forces you to concentrate, show taste and imagination, at the same time calms your nerves, relaxes and distracts you from problems, and even has some healing effect.
Children can begin to learn this art from the senior preschool age.
The bead embroidery technique allows you to develop in the lesson:
- taste;
- fantasy;
- fine motor skills and many other useful qualities.
Recommendations for beginners
Before you begin your own experiments, be sure to read the tips below. They will help you take the first steps correctly:
- To begin with, it is better not to use cotton thread, as it may break.
- To make the embroidery stronger, you can fold the thread in half.
- Use thin needles.
- Remember to line the fabric from the inside out to prevent the fabric from sagging.
- Pull the thread evenly.
- Choose the desired thread color that matches the color of the beads.
These simple rules and good material will make your work easier.
Framing
When a beaded picture is embroidered, it means that most of the work is done. The needlewoman has only the last step left - to frame the picture. Do this slowly and think through all the details, since it is with the help of a frame that the painting can fit into even the most non-standard room design.
Please note that the frame should look harmonious with both the painting itself and the interior. If your painting is oval or round, the frame should be the same shape. Rectangular and square embroidery will fit into a frame of a similar shape. The color of the frame is best matched to the interior elements.
Simple patterns for embroidery with beads
In any business, you need to increase the complexity gradually. This also applies to bead embroidery. The first step is to sew a simple and small picture. With a small number of colors and a smooth transition between them. Most often, such schemes are created for children, but in a sense, you are now akin to a child - you are taking your first steps in a new area.
Don't be shy or ashamed of your first works. No one will see them except you, and over time you will look at your first attempts at embroidering with a smile.
Many schemes can be found in VKontakte groups, look through the albums. For example, https://vk.com/album-88069967_211948789. All you have to do is transfer the photo onto the canvas, and you can embroider.
For children
There are special kits for children's embroidery. They are distinguished by easy, colorful patterns and step-by-step instructions with a selection of the necessary seams.
A pattern such as a ladybug is often chosen. Start embroidering also from the top row, gradually moving down. It is better to choose a drawing with large details, which will simplify learning.
For adults
Start with small items or with paintings that combine print and embroidery. A monastery stitch is suitable for the job. In some patterns, bead embroidery is combined with other embroidery techniques: for example, when an outline or fragment is embroidered with floss threads.
Other tools
Embroidery for beads is a pattern that is drawn on a sheet of paper or already completely drawn on fabric, in order to make it more convenient to embroider. Usually, such embroidery is necessary for beginners, since real craftswomen have already gotten used to doing it on their own.
To choose the right diagram, you need to carefully examine it: the drawing must be clear, with sharp boundaries and smooth contours throughout the entire picture. In addition, ideally, such an auxiliary tool should have marked dots or crosses where the bead needs to be sewn. Embroidering a picture with beads is a real art, so choosing the material is a responsible step.
Forest inhabitants embodied in jewelry
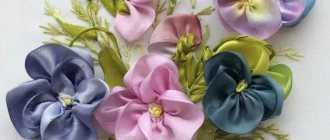
Embroidering flowers with beads
Decide on the seam and pattern. And attach the beads in accordance with the picture. It is advisable to start with small and simple flower images, where only a few contrasting colors are used. Such flowers turn out neat, the image does not actually “float”. Due to the different sizes of beads, distortions may appear in a large image.
For example, you can start with cornflower. The cornflower pattern is simple and does not require much time to work. It is also better to immediately embroider this flower on the finished product.
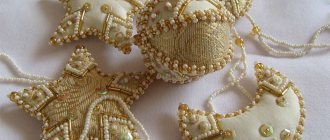
Images
Icons embroidered with beads look amazing. However, certain restrictions are imposed on their production:
- you cannot work on holidays (Christmas, Easter, Sunday);
- It is prohibited to sell finished products;
- women are not allowed to interact with church symbols during their period (this also applies to going to church);
- It is forbidden to display such paintings in the church - according to the canon, the images must be handwritten.
For a long time, before painting an icon, the master prayed and fasted for a long time, cleansing his body and soul. Then I received a blessing to work. According to the priests, needlewomen should do the same.
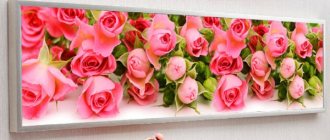
The paintings embroidered with beads are no less beautiful. A pleasant landscape or still life will fill your home with comfort and warmth.
How to embroider a thing
The technique is no different: we choose a seam, a pattern, and the desired material. We transfer the selected pattern onto the fabric with a special marker or chalk and get to work. Tops and T-shirts are usually made from knitted fabric, so heavy, voluminous patterns won't work.
You can embroider patterns from beads.
Embroidery on a dress allows you to show maximum imagination. Bead embroidery is very common on jeans, since the dense material allows you to use a wide variety of beads and beads.
How to embroider a picture from beads: tips and reviews
Some tips regarding the selection of beads
Plants
It is customary to embroider tree trunks with matte beads without shine. The color is dense and rich. Work on leaves and flowers allows the use of glazed beads.
Building
It is not customary to use transparent beads. Bright matte beads are used to embroider buildings and their elements. Church domes are embroidered with metal-coated beads
Water
The depth of water and the beauty of snow will be conveyed by transparent beads with a painted center
Air
The blue of the sky is perfectly conveyed by translucent beads. And matte translucent beads will make the clouds in the picture extremely realistic
Heavenly bodies
Bright matte beads suit the Sun, Moon, and stars
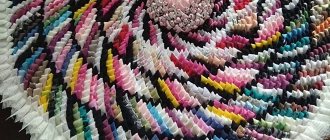
Creating jewelry with beaded embroidery
When creating jewelry, it is important to choose the canvas and fabric. Creation occurs in several stages:
- We embroider the drawing.
- Let's cut it out.
- Cut out the required size circle from cardboard.
- We sew the embroidery in a circle.
- We stretch it onto the cardboard.
- We sew the embroidery from the inside out.
- We can attach decorations to the base.
Most often, bracelets are made from beads.
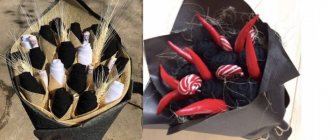
Brooch "umbrella"
The set of materials is standard, you just need separate templates for the “hat” and the handle.
Finish the outline of the “hat” with black beads. Then fill each sector of the umbrella with its own shade. Cut out.
Take a black wire, approximately 12 cm, and put the grains used for the outline on it. You can also use larger beads. Sew the wire to the hat so that you get a pipe and an umbrella handle. Glue the cardboard seal and fastener to the backside.
Cut out another hat from felt and attach it to the almost finished brooch. Feel for the lock with your fingers and make slits in the workpiece. Glue it to the umbrella, sew the edge, for reliability. The charming decoration is ready.
Beginner mistakes
Many beginners make a number of mistakes, which as a result reduce the pleasure of work. Let's take a closer look at them.
- Trying to start a project that is too complex.
- The thread is too long.
- Thread splitting (this happens when you pass a beading needle through the thread of a finished stitch).
- Using bad materials.
- Distortion of the scheme.
- Incorrect bead size.
- Using different seams on one pattern.
- Uneven rows.
- The sewing is too tight or loose.
- Wrong thread choice.
Having analyzed these errors, you can easily avoid shortcomings.
Equipment attached
There are a huge number of different techniques for regular embroidery and bead embroidery. One of the simplest and most popular is the “attached” technique. Let's take a closer look at the step-by-step implementation.
Floral decor with beads
Preparation:
- thread the needle, tie a small knot at the end of the thread;
- thread the needle through the fabric so that the knot remains on the back side of the fabric;
- thread the required number of beads (for beginners, preferably no more than 3-4 beads at a time);
- secure them to the canvas by threading the needle so that it is on the back side and the beads are on the front side;
Extraordinary accessories embroidered with beads
Next begins the “attached” method:
- thread the needle next to the beads;
- re-pull the needle through the hole in the beads (it will not come loose because the first thread that was threaded is already secured by the canvas);
- the needle was again on the wrong side of the canvas;
- bring the needle to the front part, next to the beads;
- take the outermost bead, thread the needle between the last and penultimate bugles;
- do the same with the glass beads on the other side.
The beads are now completely secured. This is done for the safety and security of the product. The more threads a bead holds, the longer it will decorate the picture. The main thing is to do this carefully and practically unnoticeably, so that others do not see a huge skein of thread near each bugle bead.
Video lessons for beginners
On the Internet you can find videos that teach beginners the art of bead embroidery. With the help of them you can disassemble and choose a comfortable seam for yourself. Here are some similar options:
There are also special channels run by masters of their craft. Find your mentor and move on to creating the perfect painting.
We've covered the main points that will allow you to tackle your project with ease. It requires effort, a desire to develop and boundless imagination.
Four-leaf clover brooch
Prepare several pieces of felt. Embroider the outline of the clover using a silver ribbon with lurex; the leaf should be divided into four “sectors”.
Fill each part of the craft with green beads, matte beads or sequins. A variety of materials will add sophistication to the work. However, you need to place it all so that the brooch turns out harmonious. Trim excess fabric.
Make the stem by analogy with the handle of an “umbrella”. Attach the seal and the second piece of felt. Place the fastener on the glue. On top - leatherette or other material you like. Process the edges.
It turned out to be a wonderful gift for February 14, St. Patrick's Day (more recently it has been celebrated in Moscow) or March 8. The four-leaf clover symbolizes good luck and happiness, so this brooch will appeal to many. Perhaps she will even become someone's talisman.