There is less and less free space left under the hood of a modern car. The manufacturer strives to use every square centimeter of space around the engine. For a car mechanic, these are additional problems, since it becomes more and more difficult to get to dismantle a part, and there are more and more hard-to-reach places.
Here, I have put together a very interesting list of 19 special professional tools and devices that can help solve this problem. Of course, some tool may seem very exotic and rarely used in work, but there are some items that every auto repairman who is more or less involved in professional car repairs would want to have in his garage.
So, let's take it in order.
Comfortable bright light
LED lamp, made in the format of a “police baton” with magnetic mounts. It is very convenient to use when working under the bottom of a car or under the hood. Strong magnets will hold the flashlight in place without any problems, and the tube, which rotates along its axis by 200 degrees, can be turned exactly where you need bright light. It can operate both from the on-board network and from its own battery.
The ability to switch brightness up/down and its own rechargeable battery allow the lamp to operate autonomously for up to 8 hours. And as a bonus, this is a great option for lighting the garage during a power outage.
Wrench for hard-to-reach places
When working under the hood in the engine compartment, sometimes you have to face the problem of unscrewing and tightening a bolt, especially if it is in a hard-to-reach place and is tightened with a decent torque. And this is where a special wrench that works in ratchet mode can come in handy.
Metal stripping and stripping tool
A very interesting hand-held pneumatic tool, one might say a percussion one. In some ways it reminded me of sandblasting, only it’s much simpler. By connecting it to a compressor, you can easily remove rust, welding scale or old paint.
The principle of operation is simple - steel needles (options from 12 to 19 needles are possible) at a speed of 4000-4600 beats per minute (depending on the model) will tap out corrosive areas to clean iron. It is especially convenient when used in hard-to-reach places that cannot be reached with a brush.
When working with this tool, you should use personal protective equipment: thick gloves, goggles and headphones.
Nut breaker
Using this special tool (I call it a nut) you can break any nut if it is impossible to unscrew it. Surely any of you have encountered rusted nuts, especially when overhauling the chassis, tearing off the splines and swearing. Now everything is simple: put on the ring, bring the hardened “tooth” to the nut and twist until it simply breaks the nut. The big advantage of such a tool is that the threads on the bolt or stud are not damaged; all that remains is to remove the broken nut and run a new one with oil along the threads.
Kiwi pliers
You probably have a lot of pliers in your arsenal of tools, but you definitely don’t have these! Have you noticed that when you try to grab a small part in an inconvenient place with ordinary pliers, your hand interferes with your view of the process, blocking it? “Kiwi” pliers, so called for some resemblance to this New Zealand bird, will solve this problem - it will be more convenient to work.
Set of movable heads for hard-to-reach places
Having such a set, where each head has its own cord, you get additional opportunities when working in hard-to-reach places of the car. These heads have a much shorter body than normal ones when used with the stock kit driveshaft. There is one minus, this set is not cheap.
Set of hooks
When disassembling a car for repairs, you often have to disconnect various electrical connectors. In the latest car models, they are often combined with plastic fasteners and, when disconnected without a special tool, they can be easily damaged. With this set of hooks, almost any connector can be conveniently disconnected without breaking it.
Spark plug pliers
If you try to pull out the spark plug cap with ordinary pliers, you can easily damage the rubber cap or the wire itself. So they came up with such an interesting gadget - special pliers for removing high-voltage wires from the spark plug terminal.
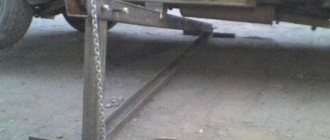
Two point jack
There are times when, when performing repair work, you need to jack up two places at once. This problem can be solved by using a jack attachment with two independent (adjustable) saddles. This device is installed instead of the standard saddle. You can lengthen the arm to the desired size, and also rotate the crossbars around the central axis of the jack.
Recommendations for arranging a garage
For comfortable operation of a room intended for car storage, you should adhere to certain recommendations:
- the tool must be as accessible as possible;
- storage spaces equipped with shelves/racks are much more convenient;
- workbenches, inspection pits, homemade machines and do-it-yourself garage accessories expand the capabilities of the car owner;
- the cellar allows you to save space;
- The productivity of work and minor repairs depends on the quality of lighting.
Organization of work space inside the garage
Depending on the dimensions of the building, the area occupied by equipment, fixtures, and communications should not be more than 10–20% of the size of the garage floor.
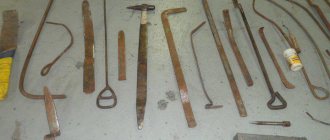
Files
Straightening files are similar to ordinary files, but have large cross, arcuate or diagonal notches.
The tool itself is thin, long and wide; it is usually fixed in the machine. This device can be used in different ways. With its help, it is possible to establish the boundaries of the damaged area. For this purpose, it is enough to move it across and crosswise the dents.
Also, such tools for straightening cars are used to level the metal after it has been processed with hammers, pulled out with hooks, treated with solder or putty.
Storage areas, racks, workbenches
In 80% of cases, do-it-yourself garage fixtures are built to store accessories, tools, and vehicle equipment. It should be taken into account that the most bulky parts of the car are sets of winter/summer tires, depending on the season.
Tire storage rules
It is more convenient to store wheels on brackets of the following design:
- two triangular frames from a corner, connected by jumpers from any rolled metal;
- the triangles are attached to the wall, the wheels are installed perpendicular to the supporting structure, falling slightly between the jumpers.
Wheel storage brackets
This is the most economical option for storing tires in the off-season. The most popular among car enthusiasts are straight and corner workbenches. The lower space is usually filled with shelves or drawers; sharpening machines and a vice are located on the tabletop.
Homemade garage workbench
A folding workbench can be very convenient
Wood is a universal material for both workbenches and shelving
It’s easier to build a wooden workbench yourself, but it has a shorter lifespan than its rolled metal counterpart, which needs to be welded. If corners for shelves are not built into the load-bearing walls during construction, it is easier to make racks from rolled metal or lumber.
Homemade garage shelving
Use for glass bottle racks
Built-in wardrobes are very compact
Original hanging shelves are suitable for storing long items
The design and arrangement of shelving inside each garage is too individual to follow general recommendations.
Grinding
An electric drill is often used as a grinding device. For this purpose, a threaded steel rod is clamped into its chuck. A disk made of hard rubber, which has a thickness of 8-15 mm, is fixed on it.
A circle cut from sandpaper is pressed against the disk. You can easily assemble such a device yourself. The rubber and emery wheels are fixed to the rod using two nuts and washers.
You can also use shoe sanders; they are especially effective for leveling large flat areas. When you have neither an electric drill nor a grinding machine at hand, then it becomes necessary to grind manually - using sheet sandpaper. To make it easier to work with, you can stretch it over a block of wood or a piece of hard rubber.
No one is insured against car damage. Many body defects can be eliminated yourself, without the help of professionals.
Inspection pit and cellar
A necessary accessory for a DIY garage is an inspection hole. Moreover, the owner does not have to carry out all the repairs himself. Underground communications can be used in the following cases:
- inspection of the chassis, steering, and brake systems before a long trip;
- oil change, which allows you to save money and does not take much time;
- minor repairs that can be carried out by the owner's qualifications.
Inspection hole in the garage
It is more convenient to make the entrance to the cellar from a hole, as this will allow you to concrete several steps instead of using an extension ladder.
Cellar under the garage
The main nuances of these designs are:
- swelling of clay soils is harmful to underground structures;
- therefore, all elements of the pit and cellar are insulated from the outside with expanded polystyrene;
- sand or crushed stone is used in the underlying layer before concreting and backfilling of the pit sinuses;
- Drains are laid along the perimeter of underground structures at the base level to collect and drain water.
The width of the pit should allow the driver to enter it without lighting.
Lighting and ventilation
In garages, parallel circuits of lighting fixtures are more often used. One lamp allows you to use a specific area, several devices are turned on during a major renovation or a visit to the cellar. Minimum energy consumption is ensured by LED lamps. Daylighting devices have a great resource.
Cars use toxic, harmful fuels and lubricants, so do-it-yourself garage ventilation devices that allow you to create air exchange are becoming relevant. The influx is organized from below:
- garage - vents in the masonry, protected by bars;
- cellar - pipe from the garage or from the street.
Ventilation of the garage and cellar underneath
The hood is mounted under the ceiling of the cellar, the roof of the garage, or has the form of vents in the main walls at the highest points.
Related article:
Ventilation in the garage with your own hands. From this publication you will learn why garage ventilation is so important, what air exchange schemes exist, and installation nuances.
Video: homemade garage gadgets
Save time: selected articles delivered to your inbox every week
A garage is more than just a place to park a car. It is also a workshop, a place of relaxation, and a club of interests. Therefore, the arrangement of the garage should be convenient and thoughtful. You need to place a lot of things in a small area, and they should be convenient to use. Homemade products for the garage will help with this. What people don’t do with their own hands. From a simple shelf to a complex device. You can make all this yourself. But you need to know how. Several ideas for modernizing a garage and a plan for their implementation are in the article.
Homemade garage: ideas for arrangement
Setting up a garage is a long process. You won’t be able to do everything right away. You have to constantly modernize, change, and create something new. In this case, they mainly use homemade products for the garage. It requires less money and is also a pleasure - making the right thing out of garbage is worth a lot.
Even in a small area you can fit everything
Tire and wheel storage
Every car owner is faced with the problem of storing out-of-season “shoes” for the car. Where to put the tires is a sore point. In general, the way tires are stored depends on whether they are mounted on rims or not.
Tire storage methods
So tires with rims can be hung or stored lying down - in the form of a stack, stacking them one on top of the other. To hang tires, you can use luggage straps, chains, or a metal cable with a diameter of 4 mm or more in a polyethylene sheath. Fasten the belts to the ceiling, wall, or beam located above.
Another available method is to drive pins or hooks with a small bending radius into the wall. The distance between the hooks is slightly larger than the diameter of the tires. The length of the pins should be such that they do not protrude beyond the tire. You can fill them almost to the ceiling so that the wheels fit.
Tires without rims can only be stored standing up. Special shelves are made for them. They are usually welded from profiled pipes. 20*20 mm, maximum 30*30 mm. You can also use a corner. It is inconvenient to weld a round pipe, but cross members can be made from it - the tires fit and hold better in this case.
The width of the shelf is 4 times the width of the tire, plus a margin of 10-15 cm for some freedom. The height of the rear wall is slightly higher than the outer diameter of the wheel. The design is simple = from the side it resembles a right triangle. Having an inverter welding machine, welding such a shelf will not be difficult.
Such shelves are usually hung on the wall. But the place must be chosen so that light does not fall on the rubber - this will deteriorate it. Not the most complicated DIY projects for the garage, but very useful.
Workplace
Probably the largest number of homemade projects for the garage is related to the equipment of the workplace and tool storage systems. Moreover, shelves and racks in the garage are not the only way to solve this problem. First of all, you need to decide where the workplace will be located. There are three options:
- The entire width of the far wall. If the garage is of sufficient length and it is possible to “steal” about 1.5 meters. The advantage is that everything is located compactly, at hand, and does not interfere with walking along the car. The disadvantage of this solution is that you have to carry tools far away if work is carried out outdoors.
A table or workbench for a garage is made of boards and covered with plywood. Inexpensive, quite reliable. If you have a welding machine and verification skills, you can weld a frame from a corner or profiled pipe. Again, it is better to sheathe it with moisture-resistant plywood. The result is a smooth, abrasion-resistant surface. You can, of course, use laminated chipboard (chipboard), but the laminating layer is quickly damaged.
Special purpose equipment
Any car repair specialist uses devices that can hardly be called standard, but they make your life a lot easier. Let's look at some of them:
- gates for areas with difficult access. If you have trouble getting to the bolt, a ratchet collar will help you get it out without any extra effort;
Gate with ratchet
- needle hammer. Removes any scale, rust and paint no worse than a sandblaster. Needles (12 or 19 pcs.) are located on the handle, which is attached to the compressor. Using pneumatics, this device taps and cleans the surface very effectively;
- nut - a union ring with a cutting tooth inside. If the rusted nut does not budge, put on a ring, press the cutting tooth and apply force until the nut breaks. In this case, the bolt thread remains intact: put on a new nut, make a passage with lubricant - and the problem is solved;
Guycolom
- a set of hooks for detaching plastic fastenings of electrical connectors;
- electronic digital adapter for a ratchet wrench - it shows the torque with which you tighten the threaded connection;
- magnetic plate - place all the nuts and bolts on it. Then they won't get lost;
- mirror and handle with magnets. Used for visual control of working with nuts in hard-to-reach places. To remove the nuts, use a handle with a magnetic attachment;
- regular torque wrench;
- a set for drilling bolts with a broken head;
- digital electrical tester.
Professional Electrical Handheld Tester
Homemade carriers for the garage
Even with very good lighting in the garage itself or on the street during the day, visibility under the bottom of the car is very low. To illuminate the front of the work, portable lamps are used. These are the simplest DIY projects for the garage. With them you can begin the epic of arranging and equipping your garage space.
The most common type of garage carrier. Homemade ones are usually made very similar
In its simplest form, it is a cartridge attached to a wire; a small screen with a hook can be attached to it. This is such a simple thing. The light bulbs used are ordinary ones - incandescent or economy ones with a standard socket. Everything is not bad, except that these light bulbs break very often, you need to figure out how to hang them so that they shine in a specific place. In general, the design needs improvement. There are several modification options.
Unbreakable lamp socket
This plastic bottle lampshade perfectly protects the fragile bulb of an energy-saving lamp. You can also use an LED lamp, but an incandescent lamp will not work - it gets too hot. The design is simple - a cord with a plug and a cartridge at the end.
The main task is to find a plastic vessel with walls made of translucent milky plastic of medium thickness. Transparent will not work - it will not scatter light, too thin walls will not save the lamp from impacts. After you have found a suitable vessel, some small change remains:
- cut a window approximately ¼ of the diameter of the bottle;
- cut the neck so that you can insert the lamp, but so that the screwed-in bulb presses it against the socket;
When can straightening of body elements be used?
Such work is not performed in all cases:
- Most often, straightening is resorted to if it is necessary to restore the original geometry of a deformed body part. Typically, such damage occurs during an accident, and repair work may include operations such as welding, grinding, fitting using special tools;
- if correction of local deformations present in a limited area is required. Straightening allows you to “cure” minor damage with virtually no consequences. As a rule, in such cases, hammers are used that have different geometry of the impact surface and different coating materials; straightening involves applying small, frequent blows to the damaged area;
- If the car requires full or partial painting. In such cases, straightening the metal before applying paintwork makes it possible to avoid using a thick layer of putty.
But if the damage to body parts is too serious, with the presence of tears and stretches of the metal, in such cases straightening is not able to restore the original geometry of the part, so it will need to be replaced.
Attach the carrying cord to the ceiling
Convenience comes from little things, and very simple homemade products for the garage help with this. For example, you can remove the cable from a portable lamp that always gets tangled under your feet. Carrying is usually done with a cheap cable. It is not the most flexible, does not fold well, and its coils on the floor get under your feet. In general, it is inconvenient to use. You can protect yourself and carry it by hanging the cable from the ceiling. The solution is simple but very effective.
You can make this “suspension” to the ceiling for carrying with your own hands in an hour
- Two anchors with a ring at the end.
- Cable tie.
- Clamp clamp.
- Metal cable. The length depends on the size of the garage - it needs to be from one wall to the other.
- Steel/plastic rings or steel wire and a piece of pipe to make these rings.
- Carrying with a long cable - its length is approximately double the length of the garage.
The cable is stretched along the long side of the garage. It’s more convenient - not far from the “working” wall, where the workbench or other equipment is located. A little work:
- On the ceiling, on one side and the other, at a distance of 30-50 cm from the corner, drill a hole in the ceiling and screw in the anchors.
- On one side we attach the cable to the tie.
We install anchors with loops, fasten the cable
We hang the carrying cable on the rings to the cable
We make a hook (or several) for hanging cable loops
Well, that's all. You can use it. With such a device, the carrier can be carried to any end of the garage without the cable getting tangled or caught. Convenient, takes little time.
Common body straightening technologies
Before starting work, regardless of the method used, it is necessary to carefully inspect the area where the dents are located. This must be done either during the day or in bright light, otherwise minor defects may go unnoticed. It is the size of the defects and their shape that determines which restoration method is best suited.
If there are chips and scratches at the damage site, straightening without painting is impossible. But since modern car enamels include polymer components, such paint usually does not crack, but stretches along with the metal.
Let's look at popular straightening methods.
Mechanical removal from inside
This method is recommended only if you have considerable experience and skills, so it is most often used in car repair shops. When removing dents mechanically, the risk of damage to the paintwork is minimal, since the tool acts on the inner, unpainted area of the body part.
The main tool is levers. The process itself is called extrusion, carried out by applying force to the defective area.
In the area of the dent, they look for a technological hole, insert a tool through it and press on the convexity (which will outwardly look like a concavity) until a click is heard. It indicates the successful completion of the operation.
Editing using PDR method
This technology for straightening a car body is considered one of the most false, so the method is rarely used in garage conditions. It contains many technological operations that only a professional can perform.
PDR technology is used to eliminate defects of any complexity. Their main tools should be mentioned hooks, but others may be required, since it is often necessary to dismantle the inner lining and other interfering elements. A large set of hooks is required, with different bending angles, lengths, and shapes.
Straightening algorithm:
- we clean the surface that needs to be treated, dismantle parts that impede access;
- we reduce the metal stress in the deformed area;
- we heat the area with a hair dryer to 40 degrees, we pull out the most convex defects if subsequent straightening is not required;
- tap the dent around the perimeter;
- use a suitable tool to squeeze out the dents.
External leveling with special equipment
It is not always possible to eliminate defects using internal processing of irregularities. In such cases, external straightening technology is used. The list of required tools includes:
- vacuum suction cups;
- adhesive composition;
- special adhesive applicators;
- fluoroplastic bumpers;
- mini lifter.
DIY garage compressor
A compressor is needed in any garage. And, by the way, this is not the most difficult homemade product for the garage. A low-power compressor for the garage for inflating tires and other small jobs can be made with your own hands from auxiliary materials. For example, from a compressor from a refrigerator. For this you will need:
- refrigerator compressor;
- a sealed cylinder with thick walls (you can use a fire extinguisher flask or a small gas cylinder);
- safety valve 8 atm;
- pressure gauge;
- fitting;
- oxygen hoses with couplings (select the length based on the size of your spare parts);
- base for the compressor - a thick board or piece of plywood will do.
In order not to pump any nasty stuff into the tires, it is advisable to also install a filter to separate oils, dust and other contaminants. The diagram of a homemade compressor is shown in the photo.
Homemade compressor diagram
The compressor must have a starting device. We plug it into the network, see which tube the air is sucked into, and mark it. You can put a car filter on it - clean air will be pumped in.
We assemble an oil separator receiver from a cylinder and a safety valve. To do this, we cut two fittings into the cylinder - for air inlet and outlet. We place a safety valve on the inlet hole and connect the compressor outlet to it using an oxygen hose.
Homemade compressor for the garage based on a compressor from a refrigerator
We install another automobile oil filter at the outlet of the oil separator receiver to completely remove the oil. We connect the filter to the pressure gauge, and from it comes a hose, which is connected to the tire through the appropriate adapter.
Assembly is complete. But in order to carry this device comfortably, everything needs to be secured in some way. You can weld the frame to size, attach wheels and a handle for easy transportation. One of the compressor options for inflating wheels is described in the video. There is no receiver, but its functions are performed by an oil filter. You can do it this way, but with a receiver the design is more reliable.
Since the compressor in the refrigerator is low-power, it may take a long time to inflate the tires. You can make it more powerful by installing two compressors that will start simultaneously. Accordingly, the pressure will build up twice as fast. But such an installation requires a more robust security group. Such homemade products require a little more equipment, since the circuit is still more complicated.
How to choose the right set of straightening tools? Tips and tricks.
If you are an absolute beginner in body repair, then aside from the general technology of carrying out the work, you will need to know about the set of necessary tools. It can be divided into three large groups:
- percussion instruments (mallets, hammers);
- support;
- hooks for leveling metal.
You also simply cannot do without a stand for straightening the car body, with the help of which most of the work is carried out.
Also included in a separate group are improvised tools: files, sanders, etc. They are necessary for additional types of work.
Let's look at each of these groups of tools in more detail.
Percussion instrument
This group primarily includes straightening hammers and mallets. It is their varieties that we will consider.
This type of hammer is different from the ones we use when carrying out construction work or other work around the house. They differ not only in the material from which they are made, but also in shape.
If we talk about the material of the striker, it is usually made of non-ferrous types of metal - copper, aluminum, or durable plastic. The use of such materials is primarily aimed at reducing the deformation of the body metal. Varieties include rubber strikers, which are also often used in practice.
Now let's look at the types of hammers based on functionality and striker shape.
Straightening hammer. It is used to carry out the first stage of work; it is used to roughly level out dents. A skilled craftsman using such a tool will be able to carry out complex straightening without any problems. There are a variety of shapes for such devices, but the most popular is a round surface on one side and a flat surface on the other. An example is shown in the figure.
Embossed. The main purpose of this hammer is the final stage of knocking out a dent. It can be said to complement the work of the previous type of tool.
Inertial type. It is used in cases where the body has areas with a complex curved shape. Professionals have several attachments of this type of hammer at their disposal.
Flange hammer. The striker has two tails, which are turned to each other at right angles.
Mallets are made of wood or rubber. They are usually sold with a replaceable set of strikers, the most popular shape being cylindrical.
Anvil supports and backing dies
This is the second group of dent repair tools.
They are used when working with a hammer or mallet. The supports take on the load when hitting the surface of the body being processed. What are they? These are spherical metal bars that are applied to the back side of the surface being processed with a percussion tool.
They come in various diameters and sizes. If you plan to professionally engage in straightening, then you cannot do without a full set of such devices, since you need to use different supports for each part of the body.
You can also use improvised means, such as a sledgehammer or a channel, as supports, but they need to be prepared, namely sanded and polished. The more ideal the surface, the less deformation there will be on the car body.
Spoons and impact blades
First of all, this group of straightening tools is aimed at leveling and bending the surface of the metal.
They are often used as support, where access to the back surface of the body is difficult. When choosing a spoon for work, you need to focus on two things: the shape of the surface to be leveled and ease of access to it.
There are different types of spoons, let's look at the most popular ones.
Universal
This type of tool can be used to level the surface of a car roof. A protective substrate is installed on the surface, which evenly distributes the load during work. The operating diagram of this spoon can be seen in the figure below.
Spoon for leveling the interior of the body
A specific example would be straightening a car door. Its structure consists of a double wall. In order to use this type of tool, you must first place the part, in our case the door, on wooden blocks and, placing a spoon, process the damaged area of the body. An example is shown in the figure below.
Pulling
This type of spoon is used to separate the surfaces of the inner frame from the outer panels. The principle of its use is shown below. You need to insert the spoon into the area to be treated and use up and down movements to achieve the desired separation result.
Convex
Due to their shape, such spoons are made wide, which allows them to be successfully used as support on limited types of surfaces.