To watch online, click on the video ⤵
foliage cleaning with a homemade electromechanical brush!
More details Garden vacuum cleaner, gives water. More details
Do-it-yourself garden vacuum cleaner for removing leaves from the lawn Learn more
DIY leaf collector No. 1 Read more
A chic homemade product made from PVC pipes and an ENGINE from a VACUUM CLEANER! More details
Craftsman High Speed Brush 24222 More details
Mechanical grass and leaf collector Gardena More details
Homemade cyclone in 2 minutes DIY Easy cyclone separator More details
HOW TO MAKE A BLOWER WITH YOUR OWN HANDS FROM A VACCUUM CLEANER\\ WILL Dr. DEW APPRECIATE? More details
Do-it-yourself solar power plant! Based on SILA K 5000 MO Read more
DIY lawn. Garden vacuum cleaner Caiman VIRO 160H More details
DIY garden vacuum cleaner leaf blower Read more
Source
Other recommendations
Today, there are a huge number of options for making a vacuum cleaner bag with your own hands, the only difference is what material and technology to choose for this. This can be either a disposable product or a durable, reusable product. For example, instead of gluing and fastening the edges of a homemade bag with a stapler, you can simply stitch it.
For reusable use, the edge that remains open is treated with Velcro or a large-tooth zipper so that the fastener will not be damaged when removing debris from the dust container.
The material for the bag can be not only spunbond, but also a piece from an old jeans or trousers leg with intact thick fabric. You can fix a problem with a weak plastic frame (pinch) and create a tightness in the bag for collecting dust and debris of the vacuum cleaner using a regular office clip.
You can quickly and efficiently remove debris from a vacuum cleaner bag using old nylon tights. A small piece of tights is taken and tied into a knot at one end, and then placed in a bag. When the dust bag is full, all the debris and dust will be collected on this piece of nylon fabric, which as a result can be very easily and simply removed from the bag without unpleasant shaking of the dust.
Thus, making a vacuum cleaner bag with your own hands is not difficult. The main thing is to decide which material is best suited for your repaired vacuum cleaner, acquire the necessary set of tools, choose a manufacturing technology and boldly begin to implement your plan. You can also try making a filter for a vacuum cleaner.
Cleaning devices
The fact is that a wet, sodden leaf sharply reduces the traction of wheels and shoes with the surface of the earth.
Therefore, it is necessary to collect fallen leaves before they turn into a soggy mass .
Leaf litter consists of individual leaves, usually small in size, but the total volume of this material is enormous, because from one medium-sized tree at least a cubic meter of foliage falls to the ground.
It is very important to use the correct equipment , which is optimally suited for this particular material. Otherwise, either the equipment will not have enough capacity and some leaves will not be removed, or too much money will be spent on devices with excess power/performance.
In the article about leaf collection, we talked about various methods of collecting and delivering leaf litter to the disposal site. Here we will talk about the types of equipment that are used for such work.
According to the method of use, as well as the level of mechanization, it can be divided into:
If you are interested in loading equipment and vehicles that can be used to remove leaves and other debris, we recommend that you pay attention to these articles:
Installation instructions yourself
Having all the necessary materials and tools at hand, anyone can independently make an awning or canopy with eyelets at home, which can be used on the farm. This product can be used in various areas, from a tarpaulin curtain at the entrance to a garage to covering an outdoor pool from foreign objects and dirt.
Eyelets are great for securing canvas curtains to gates
Regardless of the area where you plan to use an awning with grommets, first of all, you should acquire high-quality blocks and rings; the overall strength of the grommets will depend on them. Experts recommend purchasing ready-made kits in specialized stores.
Typical eyelet sizes
As for tarpaulin, its choice should be made based on its intended purpose, based on the characteristics of strength, moisture resistance, frost resistance and the like. The shape and size are selected individually.
Preparing the tarpaulin for installation of eyelets
Having prepared all the necessary components and selected a tarpaulin for installing eyelets, you can move on to the next stage - punching holes in the tarpaulin, for which you will need the following tools:
- Ruler.
- Pencil, marker.
- Punch.
- Hammer.
Using a pencil and ruler, you need to find and mark the areas on the tarp where the eyelets will be placed. The mark should be made according to the diameter of the ring, evenly, at the same distance from each other. After this, using a punch and a hammer, holes are made in the tarpaulin in accordance with the marks.
It is necessary to accurately determine the location of the eyelets so as not to make unnecessary holes
If the tarp is thin, you can use a piece of durable fabric or use plastic or brass washers
Before punching holes, a wooden board is placed under the tarp to serve as a shock absorber when the hammer and punch collide.
Installing eyelets on the awning yourself
Having completed all of the above manipulations, all that remains is to secure the grommet in the tarpaulin awning, which, if all conditions are met, will not be difficult.
To do this you will need the following tools:
- Flaring.
- Hammer.
A block and a ring are placed in the previously prepared holes on the tarpaulin on both sides, opposite to each other, after which they are securely fixed to the material using a flaring tool and a hammer.
A furniture bolt with a wide head is suitable as a flaring tool.
This method allows you to quickly and efficiently install eyelets on the awning for further use for their intended purpose.
As you can see in the photo, flaring can be done quite efficiently even without a special tool
In addition, there are special manual presses for installing eyelets, which allow you to install eyelets on any type of material as quickly and easily as possible. This method is more suitable for installing grommets for commercial purposes.
Hand tools
Manual equipment includes all tools, the impact of which is based on the muscular strength of the worker .
The most popular tool is a regular garden rake, which can be purchased at any garden or hardware store.
Despite the extremely low productivity, this tool is the most versatile and is suitable for cleaning not only fresh, just fallen leaves, but also caked masses of leaves.
In addition to rakes, other devices are used to collect leaves, for example, a broom, a net or a transport cloth. These tools are designed to handle small volumes of collected leaves.
First, the leaves are moved by a rake or blower to any of these devices, then the net is tightened, and the canvas is folded so that the edges are easy to carry, and pulled along the ground or above the ground (depending on the degree of loading) to the storage location. More detailed information on these and other homemade devices can be found here.
How to sew curtains
This type of window design is considered the most popular today. In addition to the previously listed basic materials for sewing curtains, you will need grommet tape, the adhesive base of which will help to properly attach the product. The tape can be purchased at a specialty store, where it is offered in widths from 5 to 12 cm.
In order for the curtains to have an aesthetic appearance, you need to correctly calculate the number of fastening elements. How to make eyelets on curtains? If an even number of eyelets is installed on the curtain, the edges of the product will be directed in one direction. The standard distance between them can range from 15 to 20 cm. If the distance is greater, then the folds will be larger.
The first and last fastening element is installed 5–7 cm from the edge. If the distance is greater, the curtains will puff up; and if it is less, then the part may get caught on the hem and not be fixed.
Once all the instructions have been carefully read, you can begin sewing. DIY curtains with eyelets step by step instructions.
Master Class.
- The top edge of the curtain is folded inside out 2 cm and ironed.
- The size of the next hem will depend on the width of the eyelet tape. It is wrapped and ironed.
- The eyelet tape is placed between the fabric, under the large hem. It should be shorter than the width of the curtain by the amount of the side hems.
- Having straightened everything out carefully, we proceed to ironing. To avoid damaging the fabric of the curtains with the hot temperature of the iron, you need to place the cotton fabric on top of the curtains and only then iron them.
- To prevent the tape from falling off over time, it must be sewn with a machine stitch along the upper edge of the hem.
- The next step is processing the bottom of the product and the side edge.
- We install the eyelets according to the markings made in advance. To do this, you need to attach a ring and draw its inner circumference on the fabric. When all the elements are outlined, you can cut out the holes with sharp scissors, you will get some kind of loops. In order for the eyelets to be neatly attached to the fabric, you need to cut a slightly larger diameter than the one drawn. Two parts of the eyelet are applied to the resulting hole and compressed until a characteristic click is heard.
Advantages of curtains:
- Many people enjoy the sound of their window curtains sliding and closing. But this only happens when metal is used as the material for making eyelets.
- When the curtains are closed, the wave is uniform - it will not be disturbed after washing.
- Thanks to the eyelets, the fabric wears out more slowly, regardless of how often the curtain is closed.
- The design is very simple: even a child can open and close the curtains.
- If you accidentally pull the curtain, it will not break. The mount is quite strong, the main thing is to install it correctly.
Manual mechanized devices
Manual mechanized equipment includes all garden vacuum cleaners and blowers that the worker puts on himself or moves along the ground using his physical strength. The basis of all devices of this type is a centrifugal fan that creates a powerful air flow .
To switch to vacuum cleaner mode, a suction pipe is connected to its input, and a filter bag that catches collected garden debris is connected to the output. To switch to blower mode, the fan inlet is covered with a protective mesh, and a blower pipe is connected to the outlet.
More detailed information about the operating principles and configuration of these devices can be found here.
All manual mechanized devices are divided according to the type of mechanization or type of engines into:
Electrical devices
Electric vacuum cleaners and blowers operate on 220 V AC power and their power ranges from 0.6 to 3 kW.
This variation in power is caused by different purposes, because even a low-power blower can create sufficient air pressure to move a small volume of fresh leaves.
That is, with its help it will be possible to collect foliage in heaps or drive it onto a previously laid net or canvas. Powerful leaf blowers are great for cleaning gardens and vegetable gardens, because they can even blow away leaves that are stuck between the bushes.
At the same time, the weight of even the most powerful electrical devices does not exceed 6 kg, and their cost is 2–12 thousand rubles . The main disadvantage of electrical appliances is their dependence on an outlet , so they can only be used near electrified houses.
It is equally important to select the device itself correctly, focusing not only on power and weight, but also on the brand, which this article will help you with.
Rechargeable
These devices can work even far from a power outlet , but the battery charge rarely lasts more than 10 minutes in maximum power mode . This is due to the insufficient capacity of modern batteries, as well as their high price and heavy weight.
Therefore,
the total purchase costs:
are many times higher than the cost of most electric or gasoline models .
Because of this, battery devices are purchased only for home use, because it is impossible to clean a street or large area with them.
And the purchase of several additional power sources will raise the cost so much that it will be cheaper to buy a self-propelled gasoline device. You can find more information on this type of garden vacuum cleaners and leaf blowers here.
Gasoline devices
The main difference between gasoline devices is their complete autonomy , because they receive energy for operation from the combustion of gasoline and are in no way tied to network electricity. Therefore, they are used where it is necessary to work for a long time in autonomous conditions, that is, without connecting to an outlet.
However, these devices have a significant drawback - it is impossible to install motors with a power exceeding 1.5 kW on them. This is due to the large mass of internal combustion engines and the ratio between:
Hand-held gasoline blowers are not subject to power restrictions for vacuum cleaners, because the motor can be carried behind the operator’s back, which is exactly how backpack devices are designed.
Therefore, they create a very strong air flow, because their power often exceeds 5 hp. With. However, it is impossible to use a backpack configuration for a vacuum cleaner due to the difficulties associated with emptying a filled filter bag.
This dependence also does not apply to wheeled non-self-propelled and self-propelled vehicles. After all, in them the entire load falls not on the operator, but on the wheeled chassis.
Therefore, even in non-self-propelled cars, motors with a power of 3.7 kW (5 hp) are often installed, and their weight reaches 40–50 kg. Self-propelled devices with 15–20 horsepower engines are even heavier. With. — their weight often exceeds 100 kg.
All wheeled devices are more efficient than hand-held ones , however they cannot be used in blower mode. Instead of a suction pipe, they have a suction bell, the width of which depends on the engine power and is 50–100 cm.
A flexible hose is designed for cleaning leaves where it is impossible to reach with a spout. It is connected to a special connector on the socket or housing of the centrifugal fan, after which it is used as a regular garden vacuum cleaner.
Self-propelled and non-self-propelled models are equipped with large garbage collection bags (volume 200–250 l), which are installed immediately behind the engine, between the vacuum cleaner body and the operator. You will find more detailed information about all types of gasoline vacuum cleaners and leaf blowers here.
Punch for eyelets: description, scope of application
To install eyelets, round holes of a certain diameter are required, which are very difficult to make at home with improvised tools. Experience from industries where accessories are used in the production of footwear, printing, textile products and leather goods came to the rescue.
The main purpose of the grommet is to protect the edges of the hole from destruction.
Large companies use the grommet stapler as a tool for filing documents, and the rivets are often decorated with corporate symbols. Industrial enterprises use punches for grommets. Today, many companies offer for sale variants of punches for home use. This hole punch allows you to solve several problems at once: it perforates the material, bends its edges, so no additional processing of the edges is required.
Compatibility with instruments is checked individually each time.
There are the following types of punches for eyelets:
- manual;
- semi-automatic;
- automatic.
The choice of tool for installing grommets depends on what products you want to install.
Let's try to figure out which option you should choose.
It is important to understand the material, how strong the work will be, what the grommet itself will be made of, its shape and range of sizes. The choice of ring size will depend on the functional load of the product
Products come in different colors, shapes and materials.
The variability of the grommet itself will also affect the choice; you can use a metal version made of brass or steel, wood, plastic, coated or uncoated, of various shapes and sizes. Regardless of the type and shape, the fittings consist of two components: a bushing and a washer, so the principle of operation of the punch is approximately the same everywhere.
A hole is made with a punch, a sleeve and washer are applied and secured with a tool.
At the same time, the manual version of the hole punch is in great demand due to its low cost and ease of use in the original version. Usually it includes a punch, with the help of which the hole itself is made directly, a matrix into which the sleeve and washer are inserted, and embossing, by pressing which they are fixed components of the eyelet on the material.
Experts recommend purchasing devices in whole sets, but using universal, multifunctional ones is no less convenient.
Disadvantages of the manual option:
- for different grommet options you will need appropriate attachments for the embossing;
- with a high density of the material used, the process of piercing the material is labor-intensive;
- Not suitable for leather goods.
For “small things”, a hand tool with capabilities limited in terms of the size of the installed products is suitable.
Pros:
- availability;
- use at home.
In order for any eyelet installer to last as long as possible, it must be kept clean, visually inspected periodically, and lubricated with machine oil.
A semi-automatic hole punch is suitable for working with materials of increased strength, since the hole itself is punched automatically by the sharp edge of the sleeve itself
If we choose this option, then the choice of the eyelets themselves is especially important.
Hole punch eyelets must have a sharp edge.
Minuses:
Purchasing specialized eyelets.
Pros:
- versatility (suitable even for working with tarpaulins);
- availability;
- minimum effort;
- performance.
Installation pliers are not universal - the clamp for eyelets and blocks of different sizes is selected individually.
In industrial production, automatic punches are used.
Pros:
versatility in materials and eyelet sizes.
High performance.
- minuses:
- high price;
- weight and dimensions of the punch.
For large eyelets you will need more serious equipment.
Fully mechanical technology
Such devices include attachments designed for installation on various equipment, such as:
They
also consist of a centrifugal fan and additional accessories, that is:
Most mounted devices are equipped only with a flexible hose , the length of which is 3–15 m. The exception is models designed for front installation on mini tractors.
Such devices are also equipped with a suction bell , due to which the collection of fallen leaves becomes completely mechanical - the operator can collect most of the leaves without leaving the seat.
If the foliage is located where it is impossible to reach with a socket, then the operator uses a flexible hose. After the centrifugal fan, the air and collected debris enter a chute, which determines the direction of their movement .
Due to their enormous productivity, they are not equipped with bags for collecting garbage, but rather they place containers nearby, into which they pour out everything that they managed to suck from the surface of the earth.
Another difference between mounted devices is that they are often supplied without a motor , because the engine for them will be the power unit of the vehicle on which they will be installed. They are connected to the vehicle engine via a power take-off shaft (PTO) or hydraulic drive.
You will find more detailed information about fully mechanized attachments for removing leaves from lawns in the article Municipal vacuum cleaners for removing leaves from streets.
Why do you need a cyclone filter?
Construction dust, metal or wood dust very quickly clog the filter and bags of the vacuum cleaner. Not only do you have to constantly buy new bags, but also the vacuum cleaner motors burn out from the dust. Besides:
- Dust can clog the special ventilation holes designed to cool the instrument. As a result, it overheats and fails again.
- If your device has moving parts, dust can interfere with their operation and even cause damage in the future.
- Dust gets inside the tool and lubricant. As a result, it overheats and fails.
The cyclone filter will ensure the collection of any industrial debris without damaging the vacuum cleaner.
Content
Gardens and lawns look great both in the city and on a personal plot. But in order for the “green corner” to please the eye, it requires careful care: the lawns must be mowed, aerated, reseeded, and combed. Bushes and trees need to be trimmed, and fallen leaves from trees need to be collected and processed or burned.
Of course, you can do all this with hand tools, but it is time-consuming and difficult. It is much easier to use a lawn mower to cut the lawn, a scarifier to comb out and aerate, and a leaf blower to sweep and collect grass clippings and leaves.
How to sew curtains and tulle on eyelets yourself - step-by-step instructions
Sewing curtains yourself using eyelets will take some time. However, unlike products purchased or ordered from an atelier, making them yourself will cost much less. Costs will be associated only with the acquisition of the necessary material.
Fabric calculation
Having determined the total amount of material, calculations are made taking into account hems, where the allowance is:
- lower edge – 8–10 cm;
- the upper part can be up to 25 cm. Such a margin is required, since the eyelets must be attached to several layers of fabric;
- lateral edges – 3–4 cm.
In the case of sewing a curtain consisting of two parts, in order to fit the pattern, the material is taken with a reserve.
Tools and materials
To attach grommets to curtains you will need:
- grommet tape;
- scissors;
- ruler;
- pins for marks;
- chalk with a pointed end;
- pliers.
To install metal rings, you also need a hammer drill, a hammer, and a rubber gasket. The latter is necessary to soften the blows of the hammer on the fittings during fastening.
Initial material processing
Before securing the rings, the fabric is pre-compacted. After all, even dense material is not able to withstand the loads from the fittings installed on it for a long time. This applies to both plastic and metal products.
Therefore, to reduce the load on the curtain, a grommet tape is pre-attached. However, if it is not possible to use such a tape, then dublerin can be an alternative sealant. Although this material is inferior in its characteristics, it is still quite suitable as a reinforcing element. In any case, the tape is selected so that its width is greater than the outer diameter of the rings.
The upper part of the fabric is folded twice to the width of the installed tape, and the fold is ironed. In turn, on the sides, the seal is cut off with a margin equal to the width of the hem. After the manipulations, the canvas unfolds, and the tape is adjusted along the intended upper fold and secured with an iron. To ensure that no traces of a hot electrical appliance remain on the canvas, the work is carried out through a sheet of paper. To more securely fasten the eyelet tape, a seam is made along the very edge of the hem.
Markings for eyelets
After the grommet tape is secured, dots are applied to the curtains indicating the centers of the fittings. The marked places are marked with pins. Then the contours of the holes along the inner diameter of the eyelets are marked on the fabric, and the intended part is cut out along them with a margin of 2 mm. After that, rings are installed on both sides and snapped or pressed with a press.
Tip: To speed up and make work easier, use a flaring tool and a punch.
At this stage, the main task is to apply the central points evenly. To ensure that the edges of the curtain are in the same position, there should be an odd number of spaces between the eyelets.
Do you need a garden vacuum cleaner?
Some property owners are skeptical about leaf blowers: they say, in nature, no one collects leaves with a garden vacuum cleaner - and nothing: the grass grows, the trees don’t fall. This is all true, but it should be understood that a lawn with garden trees cannot be compared with a natural biocenosis, just as cultivated plants and weeds cannot be compared. Lawn and garden crops are more capricious than wild ones, so without proper care they can quickly lose their attractive appearance. Uncollected grass clippings and fallen leaves create favorable conditions for the proliferation of pests, the development of diseases, and simply look unsightly. Therefore they need to be removed. And heaps of leaves do not add beauty to city surfaces - sidewalks and asphalt.
In addition, small models can be helpful in blowing out difficult-to-clean objects.
And in some countries (alas, not in Russia), a blower is used when laying asphalt to remove small debris from the surface.
How to install grommets without tools
It is quite possible to rivet the grommet so that it closes the hole without special units; in some cases the result will be better, especially when compared with cheap, low-quality pliers.
Ways to install eyelets using improvised means:
- A bolt with a round head slightly larger in diameter than the grommet. Instead, a bearing, steel ball, etc. are also used. The striker is placed on the walls of the grommet and hit once or twice with a cloth, then the “petals” are bent with the same hammer, striking from the center to the edge of the grommet.
- Phillips screwdriver (or screwdriver bit). The sting is placed in the center of the grommet, on the wrong side, and the handle is lightly struck with a hammer, as if it were a hand punch. It turns out to be a quadrangle - the part is rotated 90 degrees and the blow is repeated. The walls move apart and are tapped with a hammer to make the edging flatter.
- A blade from a stationery knife. It is placed across the block and hit from above with a hammer so as to cut the walls almost to the fabric (or other material). Rotate 90 degrees and repeat the operation. You will need 3-4 such cuts. Then the “petals” are bent and flattened with a hammer.
Characteristics of garden vacuum cleaners.
The wattage of a leaf blower (as with most power tools) largely determines its performance. There is even the possibility of a rough estimate of power output: one square meter per minute for every 100–150 watts of power. So, a 600 W blower will clean up to 4 m 2 per minute. However, when choosing a blower, you should not rely on power alone. First of all, this is a very rough estimate. Secondly, for a garden vacuum cleaner, not only performance is important, but also jet speed. And thirdly, excess power is not always beneficial - the higher it is, the more expensive and heavier the tool. The last parameter is especially important if the blower is supposed to be carried by hand.
Therefore, it is better to select a blower based on several parameters, and focus on power at the last stage - with all other characteristics being equal, a model with more power will be preferable.
The performance of a blower is determined by the volume of air driven through the fan per unit time. The higher the productivity, the less time you will spend cleaning the area:
The speed of the air stream affects what kind of debris the blower can handle: models with a flow speed of 120–200 km/h will only sweep away dry leaves and grass. If you want the vacuum cleaner to sweep away wet leaves, it should have a flow speed of about 300 km/h. And at 350 km/h the air flow is already capable of sweeping away large branches, pebbles and small construction debris.
As you can see, a high air flow speed increases the functionality of the blower, but sometimes 350 km/h will be too much - ornamental plants and shrubs can already be damaged by such a flow. Therefore, many blowers are equipped with an air flow speed regulator. And if for a blower with a maximum flow speed of 120 km/h such a regulator is not particularly needed, then for a powerful vacuum cleaner the presence of a flow speed regulator is much more important.
Type of food. The most common electric blowers are powered by 220V. Despite some inconvenience in the form of a long “tail,” such models provide acceptable performance at a minimal price - this is the best option for models with a capacity of up to 900 m 3 /h.
If the area is small but has a lot of trees, decorations, and other obstructions that the wire will snag on, a battery-powered leaf blower may be your best choice. In terms of performance, they do not lag behind network ones, but they are much more expensive and weigh more. Keep in mind that most models do not come with a battery.
Gasoline blowers have high power - a productivity of 1000 m 3 / h and above is achieved only on models with an internal combustion engine. Unfortunately, their price and weight are also higher than other models.
The suction mode is not present in all models - pay attention to this if you want to be able to not only sweep away debris, but also collect it in a bag. But keep in mind that dry leaves and grass are very bulky garbage; even the largest bag will fill up very quickly. A shredder can help in this situation - vacuum cleaners equipped with this option are able to shred the collected garbage, compacting it more tightly into a bag. In addition, grass and leaves “crushed” in this way can already be used as mulch.
Please also pay attention to the blower design and equipment :
The noise level of garden vacuum cleaners can vary greatly - from the unobtrusive buzz of light electric leaf blowers to the loud “motorcycle” crack of powerful gasoline models. Be sure to pay attention to this parameter when choosing a tool - after all, some models require the use of protective headphones during operation to prevent hearing damage.
Technology for making curtains with eyelets ↑
Curtains with rings are valued for their beautiful, uniform waves of drapery, to obtain which you need a lot of fabric - usually 2.5-3 widths are taken, you should not save and take less than 2.5, this will noticeably affect the appearance.
To decorate such large windows you will need a large amount of fabric.
A span of more than 4 may also not give the expected decorative result, because they can turn out to be bulky and heavy, more like shields. The choice of length is individual - in the kitchen the length varies more freely - from the floor to the windowsill or to the middle of the window.
We must not forget that the edges of the fabric will have to be folded and stitched, add another 3-4 cm on the sides and bottom and a little more on top - it will not be possible to install the rings well on one layer of fabric. To calculate the amount for the top hem, you need to take into account the density of the material - the denser it is, the more you can fold (professionals recommend leaving 13 cm on thick fabric). It is imperative to take into account the diameter, because it is directly connected to the cornice; for unhindered movement of the curtains it must be 1.5 cm larger. Otherwise, the eyelets will cling to the cornice and get stuck on it.
In order to sew, you need: fabric, eyelets, scissors, a pencil, eyelet tape (it can be replaced by interlining or dublerin), an iron for gluing it and skills in working with a sewing machine (entry level is quite enough).
Determine the distance between them in advance, based on the desired depth of the folds - if you need deep relief folds, then install the rings at a distance of 22 cm from each other, if the folds need to be softer, then 15 cm is enough. Large intervals between the rings can lead to sagging fabrics, especially dense ones, and small ones will not give the expected aesthetic effect. The optimal distance is 18 cm.
The deep relief wave allows you to take a fresh look at their design
It is important to determine the distance from the top edge; here it is better to focus on the density of the material. Soft fabric holds its shape worse; the bend at the top edge is about 5-6 cm for organza or tulle, if the fastening rings installed on them have an outer diameter of 3.5-4 cm
You can install eyelets on loose fabrics, but place them closer to the top edge
Feel free to cast aside all doubts - organza, mesh, voile, tulle can adequately compete with other types of fabrics for curtains and will harmoniously fit into the interior of the room.
On such fabric, the main condition is the location closer to the upper edge of the product.
If the combination of lightweight fabrics and fastening rings does not inspire confidence, you can make an original trim from a denser fabric, and at the same time show off your design abilities.
Such a bright trim will emphasize the elegance and sophistication of organza
Before installing them, you need to make sure that the curtain is completely ready - the edges are processed and the top of the product is reinforced with grommet tape or its equivalent. Now you can begin the most important part of the work - marking the fabric. Marks are made where the rings will be installed, and holes are carefully cut out.
When marking fabric, you need to take into account the possibility of its displacement.
Eyelets are installed on both sides and snapped into place, or pressed through with a press, if ordinary.
After the markings have been made and the holes cut, you can safely install the mounting rings themselves.
If professional manufacturing is not part of your immediate plans, then you will not need a special tool for installation. But a punch and flaring tool will greatly facilitate and speed up installation.
Options for choosing garden vacuum cleaners and leaf blowers
For a small suburban area, a light model powered by a 220V network will be sufficient.
If your site has a complex shape or you simply don’t want to carry a long wire around, choose among battery-powered models.
Gasoline leaf blowers do not require a nearby outlet and offer impressive performance.
If you want to be able to not only sweep away debris from paths and lawns, but also collect it in bags, choose among models with a suction mode.
If you need a universal blower that can sweep away not only leaves and grass of any moisture content, but also pebbles, branches and other heavy debris, choose among models with a flow speed of 350 km/h and variable speed control.
Source
What to do if the dust container lock does not hold the mount
If the plastic fastening is loose, then you can use office clips of the right size. One or two clips are enough, which are attached on top of the plastic one.
How to replace a rubber seal
If the rubber seal for attaching the dust collector, which serves to seal the connection, has worn out, then you can also easily update it yourself. A wide medical rubber band or a tube from an old soccer ball is suitable for this.
To replace the seal, you need to disassemble the mount by unscrewing the nuts. If the fastening was held on by rivets, you need to select four screws with nuts of suitable size in order to easily assemble the fastening after repair.
After the fastening is disassembled, one half is applied to the prepared surface, the contours of the fastening and the holes in it are traced using a template using a marker, then cut out. The hole must be cut at a distance of 5 mm from the contour.
Then the seal is glued to the plastic fastener with rubber glue and the bag is connected to the finished parts.
Do-it-yourself grass cutter driven by an angle grinder
I have birch trees growing in my dacha. Leaves are falling from the trees. We have to clean it up, burn it, and fill up the compost pit. The foliage takes a long time to rot. I decided to chop it up. For this you need a grass cutter. I looked at what they were making on the Internet. I turned on my brain and this is what I came up with.
Do you like an inexpensive option for a garden shredder? Read the article further and find out how to make a homemade product from an angle grinder and a metal tank. Tok2Z acted like this:
The turnover is crazy. I threw a shovelful of leaves into the tank, and they blew away! I checked where the flow was going. Air goes up from the edge of the tank and is sucked in in the middle. I cut out a galvanized ring and installed it in the center of the tank. Threw the leaves. The knives crushed it just right, and it flew into the lower pipe.
To grind the grass into a very fine fraction, the user installed a corner in front of the “exhaust” pipe.
Pipe diameter 10 cm.
The grass cutter shreds the leaves directly into the compost bin.
Compare: a pile of leaves.
The grass cutter threshes everything - grass, leaves. Sometimes, along with the foliage, a wire comes across. Pebbles. Pieces of metal. The crusher crushes the stones. No iron. You have to turn it off, look for trash and throw it away. The noise is terrible. One of the disadvantages is the thin walls of the tank. It breaks through. I will redo it. I will make a tank from a sheet of iron 1-2 mm thick.
Preliminary work
Preliminary preparation is important in any business to obtain a quality result. Before you think about how to make eyelets for curtains, you should:
- Make the necessary calculations.
- Buy material of the desired color for curtains and lining.
- Buy dublerin or grommet tape, eyelets. The width of the tape should be 2 centimeters larger than the outer diameter of the fastener.
- Find a flat surface to work on: you can work on the floor or use an ironing board.
Fabric yardage calculation
To calculate the required amount of fabric, you should find out the length of the cornice and determine the height of the finished product. The length of the cornice should be multiplied by a factor to give the product beautiful folds. The coefficient will be equal to:
- For light fabrics - 1.5.
- For dense materials - 2 or 2.5.
The calculation also includes material for side allowances (up to 15 cm), top and bottom allowances (at least 25 cm). The calculation looks something like this for a cornice length of 1.5 meters: 1.5 2 + 0.15 = 3.15 meters or 315 centimeters.
Counting the number of fasteners
To purchase the required number of fasteners, a preliminary calculation of materials should be carried out. To calculate the required number of eyelets, you need to measure the internal and external diameters of the fasteners, taking into account the standard properties:
- It is necessary to purchase an even number of eyelets.
- The rings should be attached at a distance of about 18 centimeters. The optimal distance for attaching them ranges from 15 to 20 centimeters. When using a double curtain rod, consider the distance between the rods so that the curtains do not touch.
- The distance between the side edge and the center of the first eyelet should be at least 7 centimeters. This parameter depends on the width of the hem and the outer diameter of the fastening. To securely fasten the fittings, you should place them so that the fasteners do not touch the seam.
Preparing fabric for cutting and finishing seams
The curtain is prepared in advance for installation of eyelets. Before installing the rings, you should:
- Decorate curtain fabric. This procedure is carried out by wetting, drying until damp, and ironing the fabric. After this treatment, the fabric does not shrink after washing.
- Sew on the lining and finish the seams.
The seams are processed in strict sequence. The top seam is treated first. The material is processed in compliance with the technology:
- The material is laid out on a flat surface.
- The wrong side is folded and ironed 2 cm.
- Another fold is made to fit the width of the grommet tape.
- Having released the width of the hem from the edges, lay the tape between the layers of fabric.
- The strip with tape is glued using an iron. Iron small sections of the tape until the sides are completely glued. Only after obtaining a high-quality result do they move on to the next section.
- The fabric is sewn along the edge of the lapel, departing 2 centimeters from the edge.
You can sew the side seams using a hem stitch. It is not necessary to use grommet tape - you can use regular curtain tape, after removing the tension cords from it. You can hem the bottom of the product after installing the eyelets at home in order to measure the desired length of the curtain to the floor. In order not to spoil the fabric due to lack of experience, you can carry out all the necessary work on a small piece of fabric.
Universal grass cutter and corn sheller
Alex Nk FORUMHOUSE
I also made a grass cutter. I mainly use it to chop grass for poultry. The basis of the homemade product is a kilowatt motor made in the USSR. I bought it for 1400 rubles. Works great. The engine is three-phase, but converted to operate from a 220 Volt network.
Making a homemade grass cutter step by step:
I bent the strip with a hammer, striking the metal on the jaws of a vice. The radius was controlled in a circle by drawing it on the bed.
At the finish, the user welded the legs to the base. Fixed the electric motor. I made a large tank with a lid so that debris would not fly out of the grass cutter while the engine was running.
Homemade mobile grass cutter on wheels.
The tank is removable for ease of use of the grass chopper.
The engine produces 1500 rpm. The grass cutter operates almost silently.
Features of homemade dust collectors
Poorly made homemade bags do more harm to the vacuum cleaner than good. Each manufacturer produces a dust collector designed for the parameters of a specific model. A special form is developed and the material is selected. A homemade product may turn out to be too dense. The motor will work under load, start to heat up and the suction power will decrease.
A material that is too porous will allow a lot of dust into the room and into the engine compartment. Additionally, the strength of the fabric is taken into account. A powerful vacuum cleaner will tear apart a weak bag and then you will no longer be able to do without completely disassembling the engine.
If you decide to make a bag yourself, try to choose the most suitable fabric for the structure. The pattern is made as close as possible to the original product.
Corn husker from grass cutter
Alex Nk decided, based on a grass cutter, to make a mechanism for shelling corn. The result is a two-in-one unit. To make a homemade product you need:
Tests have shown that the height of the hex head of conventional bolts is sufficient for shelling corn. The disc was raised from the base by 4 cm.
The slope of the output tray has become steeper, almost vertical. This way the grass mass did not clog the hole.
The tank has been redone. A “reflector” was attached to it to throw the corn “cobs” into the bucket.
Grass cutter-corn sheller assembled.
Places for storing fasteners.
To prevent the grass from wrapping around the motor shaft, the user installed a protection ring.
I found experimentally that the optimal option for chopping grass is two knives. Four knives turn the grass into mush. I also threshed apples for the poultry. One bucket of apples is crushed in 4-5 minutes. The result is a grass cutter-vegetable cutter-fruit cutter.
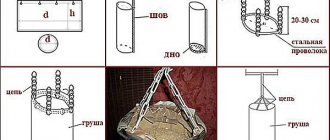
Dust bag pattern
We will cut the bag for the vacuum cleaner from spunbond material folded in half or three times (it all depends on the density of the fabric), according to the dimensions of the old original bag, or the dimensions can be removed by opening the lid of the vacuum cleaner itself: you need to measure the length and width, in our case the dimensions of the bag turned out to be with sides 30 cm + for hem – 1 cm. That is, our pattern is a rectangle with side dimensions of 62 cm x 32 cm.