This holiday happens only once a year, so I want to create a unique atmosphere in the house. A decorated Christmas tree, tinsel and bright garlands on the walls are all indispensable attributes of the New Year. However, don’t forget about the festive table: a bottle of champagne in an interesting package will effectively complement the dishes. This can be a cover made of paper or fabric, tied with satin ribbons, or a neat bag, beautifully decorated with a bow. There are a lot of ideas on how to decorate a bottle of champagne for the New Year 2022. Let's look at the most interesting of them.
Ways of original New Year's decoration of champagne
You can also decorate a bottle of wine festively. In the photo: a cap, put on the neck, and a beautiful suit with a deer.
You can decorate not only the drinks that will be displayed on the New Year's table. A cover or original packaging, made by yourself, can be put on a bottle intended for a loved one or colleague.
It is advisable to complement such a gift with a set of chocolates or even flowers (an option for the woman you love). In any case, a gift designed independently and with all your heart will definitely not go unnoticed.
A removable knitted cover is a romantic decoration for such a gift. It can be complemented with something sweet (chocolate, candies), a jewelry pendant (for a woman) or a tie (for a man).
Classic and simple champagne decoration
There are a couple more options on how you can decorate a bottle of champagne for the New Year 2022 with your own hands for those who want to give the drink in the glass a festive look, but do not want to spend a lot of time with handicrafts.
Decorate with balls . Take small Christmas tree branches (you can use natural ones, but it’s more convenient to work with soft artificial ones) and fasten them into a wreath. Attach small New Year's toys, rain or a garland to the branch. If you have one, spray the branch with a special spray that imitates snow. Place the resulting wreath on the neck of the container to be decorated. Keep in mind that it is more convenient to create such decoration separately, and then adapt it to a bottle of champagne.
Place it in a bag. You've probably seen beautiful New Year's gift bags. They can be depicting holiday attributes, Santa Claus, or in the shape of a Christmas stocking for a gift. This decoration option will not require any effort or time from you at all - just buy a bag and place a container with a sparkling drink in it. This decoration option for 2022 is a great gift idea, so take note!
Master class on decoupage with champagne
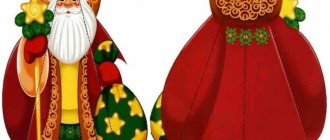
Felt case in the form of Father Frost and Snow Maiden
Decorating items in the shape of the main characters of the New Year is always a good idea. Bottles in felt “clothes” will create a homely holiday atmosphere. To make Santa Claus you will need:
- white and red felt;
- ruler, scissors, pencil;
- red bias tape;
- egg from Kinder Surprise;
- wide red ribbon;
- elements for decoration (beads, sequins, lace ribbons, bows);
- glue
Step-by-step instruction:
- First you need to make the base for the bottle. To do this, take a piece of fabric measuring 20x30 cm and try it on champagne. The ends of the rectangle need to be glued together so that the resulting pipe can be easily put on and removed from the bottle. The joint on the cylinder is carefully sealed with satin ribbon.
- The felt tube should be cut 8 times vertically, the length of the cuts should be about 4-5 cm from the neck. The resulting strips must be glued together overlapping so that the cover tapers upward. On the inside, the joints are sealed with satin ribbons.
- The resulting workpiece must be braided completely from top to bottom with bias tape. This must be done carefully so as not to overtighten the felt.
Bottle decoration process
- Then you need to cut 3 strips of equal width (25 mm), 3.5, 7 and 9 cm long from the white fabric. Lace strips are cut out along them.
- White felt is used to decorate the neck, the smell of the “fur coat” and the bottom of the cover. Lace is carefully glued underneath it.
- Then you need to take the egg from the Kinder Surprise and separate the larger half. It is also covered with tape, and the bottom is covered with white fabric. You can decorate the hat with beads or lace.
Future Santa Claus
The final stage will be decorating the “fur coat” with beads and decorative sequins. Your DIY champagne bottle cover for the New Year is ready! And so that Grandfather Frost does not get bored without the Snow Maiden, you can decorate the second bottle in a similar way, but using blue materials or tapestry fabric.
If you attach such decorations to bottles, you can give them to friends or put them under the Christmas tree
Progress
Choose your fabric thoughtfully.
You will need very little of it, but the external attractiveness of the entire work will depend on it. As the front fabric, you can use cotton with a bright pattern, velvet, or even denim if you want to give the case a more brutal appearance. The main thing is that the fabric is nice and does not stretch too much, maintaining its shape (therefore, it is better not to use knitwear, it will stretch and simply slide off the cup or bottle). For lining, it is better to take a soft and dense fabric that will help maintain the original temperature of the drink. Personally, for these purposes I used a baize with a dim pattern that matched the tone of the front fabric. However, you can, on the contrary, choose a contrasting option or even make a double-sided case, decorating both sides.
We select the appropriate decor for the selected fabrics (buttons, ribbons, braid, etc.) and cut out two rectangles according to the pattern. The pattern is given based on the calculations of a standard wine bottle, since their sizes are quite universal, unlike, for example, tea cups. If you are going to decorate a vessel of an unusual shape, the pattern should be adjusted to its actual dimensions. This is easy to do with the help of a tailor's meter, not forgetting to add allowances for processing.
Tip: if you are making a cover for a container for hot drinks, you can insert a padding made of batting or padding polyester inside the cover so that it better maintains the temperature.
Before sewing the details of the cover, you should design its front side. This is the moment in which you can show maximum imagination and use all the little things at hand: scraps of fabric, ribbons, stripes, buttons, beads, etc. I suggest making a small felt pocket on the front side, into which you can insert, for example, a card with the name of the donor or a banknote, and use it in a tea cup to store a tea bag or candy. You can give it the most bizarre shape, the main thing is that it does not turn out to be too big.
I suggest sewing it on with decorative stitches using thick, bright threads such as iris or floss. The rule is simple: we do everything that you want to sew or embroider at the very beginning; we leave small parts that we plan to simply glue to the case until the product is almost completely ready.
We also sew buttons on the front side, with the help of which our cover will be held. 4-5 pieces, located at an equal distance from each other, will be enough. When sewing on buttons, be sure to leave about 2 cm between them and the edge of the fabric - this is the seam allowance.
Tip: you can replace buttons with a zipper. It will look especially impressive in combination with denim. And if you want to make a more feminine and romantic version of the packaging, the buttons on both sides can be replaced with ribbons that are tied with cute bows.
Popular articles Congratulations on March 8th. Original congratulations on March 8
If the decor has already taken its place, it’s time to sew together the parts of our cover, folding them with their right sides inward. The most convenient way to do this is with a sewing machine, but if you don’t have one at hand, you can do it manually. For this, I recommend using a frequent running stitch or a forward stitch with a needle, then the parts of the fabric will be connected quite firmly.
We sew the side opposite to the one on which the buttons are sewn only along the edges, leaving an open area for the loops. Through the same hole we turn the product right side out.
For the loops, we make blanks from braid, twine or ribbon by eye. The main thing is that the case fits the bottle or cup tightly enough. Using pins or a pencil, mark the location of the loops exactly opposite the buttons. They can be sewn by hand with a blind stitch, topstitched on a sewing machine, or simply glued in place using a hot glue gun or special fabric glue that can be found at any craft store. The hinges must be securely fastened and the opening in the case must be completely closed.
Our gift case is almost ready. All that remains is to glue buttons and bows to it, to your liking, insert a greeting card and solemnly hand it to the recipient. The beauty of such packaging is that it will make even a simple gift very personal and can be used, reminding you of you, for a long time.
Candy pineapple
This is a great way to decorate a bottle of champagne with sweets in a beautiful and interesting way. To make fruit from sweets, you will need:
- round candies in gold wrapper (for example, Ferrero Rocher or “Golden Lily”) 65 pieces;
- double-sided tape;
- hot glue gun;
- half a meter of organza;
- half a meter of sisal;
- aspidistra ribbon;
- leg-split;
- satin ribbon.
Production in stages:
- You need to start by gluing the organza to the surface of the bottle with double-sided tape. The material must be glued carefully so that wrinkles do not form.
- If the candies have tails, they should be folded inward so that only the round base remains. It is better to attach them with tape.
- Next, you need to glue the sweets one by one onto the bottle. This must be done from the bottom up, forming circles surrounding the vessel. The candies are attached using a glue gun.
- Then you need to divide the sisal into small pieces. With its help, the empty space between candies is decorated.
- From a ribbon resembling a living aspidistra, it is recommended to cut leaves so that they look like pineapple greens.
- They need to be glued one after another on top, overlapping (to make it look like the sheets of a real fruit).
- The joint between the leaves and the candies should be tied with twine or a beautiful ribbon. Tie a bow on top.
This pineapple can be made quite quickly: the design process is easy and will take no more than 1-1.5 hours.
Any drinks can be packaged this way. It doesn't have to be sparkling wine from the Champagne region. You can dress up a bottle of good whiskey as a pineapple, adjusting the amount of sweets to its height.
Christmas bottle decorated with sparkles
A simple and profitable solution for decorating champagne for 2022.
For this work you need:
- A bottle of champagne;
- Spray glitter;
- Glue;
- Fixative;
- Scissors.
Manufacturing process:
- We clear the bottle from the label.
- Cover the entire surface of the container with glitter from a can. Don't forget to cover your work table with old newspaper beforehand.
- We wait until it dries completely.
- We cover the bottle with a fixative for a more lasting result.
- We decorate the neck with a beautiful ribbon or stick a ribbon with a suitable inscription on the bottle (in this case, we initially protect a certain area of the bottle with tape).
- The decorated bottle is ready!
Decor of a champagne bottle for the New Year: decoration with satin ribbons
To decorate a drink in this way, you will need medium-width ribbons. It's good if they are blue, red or green. On the first one you can glue Christmas tree decorations (thin snowflakes), after cutting off the loops from them. It is advisable to attach a small decorative Santa Claus bag made of felt or a Christmas wreath to the red background.
One of the most interesting ways is to make a New Year tree out of a vessel covered with green satin ribbons. It can be decorated with small elegant candies, hooks, a bunch of balls, and a shining star can be placed on the cork.
Quite a complex way of design. It is better to learn the process step by step through video tutorials.
Not only a master, but also a beginner can handle easier design
Champagne in the shape of a Christmas tree
To create a Christmas tree you will need tinsel, various decorations, foil, candies, wire and bows.
Step-by-step instruction:
- Wrap the champagne bottle with foil in 2-3 layers;
- carefully wrap with wire;
- wrap tinsel on top;
- Attach Christmas tree decorations, decorations, and candies on top.
Here is a Christmas tree with a secret!
Paper decor
A far from new way is to design a bottle using paper. You can corrugate it yourself or purchase the material at the store. Two pieces are cut out of the canvas: small and large. The neck is wrapped first, and the bottom of the vessel is wrapped second. Paper elements are secured with tape or twine (for more secure fastening, you can use double-sided tape). Decorative elements are randomly glued onto the corrugation on top. These can be beads, packaging tapes, lace, cardboard figures and much more.
Champagne with sweets
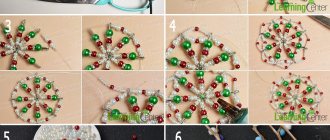
Sweets and champagne are a traditional New Year's gift. You can combine sweets and drinks by creating a composition in the form of a bunch of grapes. For this you need:
- small round candies;
- green or yellow foil;
- thick green paper;
- marker;
- glue or double-sided tape.
Unwrap the candies and make a new foil package for each one. Using a marker, draw the outline of a bunch of grapes on the bottle, fill it with candies - they can be glued with tape or glue. When the silhouette is filled in, begin to create volume by adding candy in the second and third layers. Cut out leaves from paper and add them to the composition. Tie a voluminous bow at the base of the bunch.
Decoupage
To decorate a bottle using this technique, you need to prepare beautiful napkins. It is better to use two-layer or three-layer. If the champagne is to be given as a gift, for decoration you will need not decoupage napkins, but photographs printed on a printer (this requires special thick paper). Transferring a photo from paper to a surface will be similar to the standard decoupage process.
Decorating gift bottles in this way is easy and interesting. And most importantly, there are no restrictions in choosing pictures, because you can print the templates yourself.
Premium modifications
A brief overview of some models will allow you to decide on the choice and functionality of ovens:
- Asko OCS-8656 S – volume 75 l, five-layer glass (triplex) on the door, has a thermal probe that allows you to bake any meat without difficulty with an accurate determination of the degree of its readiness. There is a steam cooking mode, a digital display, and a strict design design. Ease of operation and excellent technical performance ensure that the manufacturer remains among the leaders.
- The power of the Hansa BOEI69311055 electric oven allows you to easily prepare many dishes. It provides more than 35 programs, and using the USB connector you can update the recipe. Working chamber volume – 66 l. A special coating protects the surface from burning, is easy to clean, and the doors do not heat up.
Decor with toys and tinsel
You can prepare and sew toys in advance. To do this, you will need to make patterns and then sew them together according to the instructions. It is recommended to look at options for New Year's toys on the Internet (or purchase ready-made patterns). The only condition that must always be observed is that the pieces must be cut out carefully, exactly according to the parameters specified in the instructions.
The finished toy can be attached to the bottle, additionally decorating it with tinsel.
Cute toy “hats” that can be sewn or knitted. They will cheer up the owner not only on New Year's Eve, but also in the following days.
Decorative bags
The bags transform the bottle and protect against droplets. Once the drink is finished, you don’t have to remove it from the table.
You will need the following material:
- fabric - can be linen, felt, silk;
- threads - simple or thick with sparkles;
- decor - beads, sequins, rhinestones, ribbons, stickers and much more.
Make a pattern, cut out the desired piece of fabric. Sew and decorate as you see fit. Dress up in shamanic attire and you can enjoy the festive atmosphere.
Sequin decor
Perhaps one of the simplest and most affordable ways to decorate. To decorate a bottle in this way, all you need is to purchase glue and a variety of glitter. The vessel should be evenly lubricated with the composition and sprinkled with glitter. It is recommended to complement the product with beads, rhinestones and tinsel.
Decoration with twine
You will need:
- glue;
- alcohol or acetone;
- twine;
- white lace ribbon 3-5 cm wide;
- decorative decorations.
To ensure that the twine holds tightly, you must first degrease the surface of the bottle by wiping it with alcohol. Decoration should start from the bottom. Apply a few drops of glue and glue one end of the twine. Wrap the bottle up to the neck so that the layers lay one on top of the other, like a snail’s house. There is no need to apply glue to the entire surface at once: it will be inconvenient to work with. Add it gradually, after each revolution.
Once the entire area is wrapped, glue white lace tape to the bottom of the bottle. Add pine cones, branches or other decorations.
Knitted cover
This is a great option for those who love knitting. This is quite a time-consuming method (however, needlewomen can do it in 1 day). You don’t have to link New Year’s attributes; you can just make a small sweater for the bottle. Such vessels are usually placed on the fireplace: they successfully complement the interior of the room and make it more cozy.
Decorating with ribbons
You can decorate the container as a New Year's toy using satin multi-colored ribbons that will be wound around the bottle from the neck with foil to the base. With this method of decoration, it is important to choose the right shades.
Deep blue or rich red colors with golden or silver tones look beautiful.
To work you need to take:
- a bottle of champagne;
- blue satin ribbon – 4 m;
- brocade ribbon – 2 m;
- glue gun or glue;
- scissors.
- First you need to measure out the satin ribbon for the first layer, applying it to the neck and wrapping it around the entire surface of the bottle. After this, cut off the desired length. Use it to measure the tape for other layers and cut it. After this, glue is applied to a piece of satin ribbon along its entire length, and it is glued over the entire surface of the glass so that the foil and label are not visible from under the ribbon.
- One layer of brocade ribbon is glued on top of the blue ribbon. Then another layer of silk ribbon is glued between the turns of golden material so that the brocade ribbon is visible. A golden brocade ribbon is glued to the bottom at the base of the bottle. The top of the container is decorated with a decorative bow made of silk and brocade ribbons.
Painting on the bottle
To implement this idea, it is best to use acrylic paints, because they are the most durable, do not stain and are available in a wide range of colors. The surface is decorated with patterns, images of New Year's attributes or beautiful snowflakes. Artists can recreate thematic scenes, and amateurs can recreate simpler pictures: a cheerful snowman, a decorated Christmas tree, a snowy landscape.
The second option for decorating using napkins
You don't have to buy expensive materials to decorate a champagne bottle for New Year's. Even with the help of ordinary napkins you can come up with a beautiful decoration.
Materials:
- napkin with a pattern;
- white napkins;
- acrylic paints;
- acrylic lacquer;
- PVA glue;
- glitter;
- acrylic outline;
- Christmas decorations.
Master Class:
- We remove all labels from the bottle and use a solvent to clean the surface of any glue residue.
- We paint the container for decoupage with white acrylic paint. Apply two layers of paint and leave until completely dry.
- Then coat the painted surface with glue, apply a napkin with a pattern and carefully smooth it out. After applying glue, we go over all the corners again and thereby remove excess air and glue from under the napkin.
- Apply PVA glue to the surface of the bottle. We take an ordinary white napkin, tear off a piece, crumple it, apply it to the bottle, assemble it and apply glue diluted with water on top. In this way, decorate the entire bottle with napkins and leave overnight until completely dry.
Then we select the appropriate colors and paint the resulting base.
- Decorate the bottle with sparkles. To do this we use glue or acrylic varnish.
- We highlight some elements in the picture with a white outline.
Finally, we completely cover the bottle with acrylic varnish, and glue spruce branches and Christmas tree balls to the neck.
If you don’t have a napkin with a beautiful New Year’s design, you can print it on plain paper. But before gluing the design to the bottle, it is better to sprinkle the paper with water and leave it to soak for a few seconds.
More ideas
There are also many different techniques for decorating a bottle of sparkling wine. The easiest way is to paint the container with the children. For a New Year's theme, it is better to use a blue and white background with bright splashes. You can decorate the bottle with cotton wool and “rain”.
There are a great many options for designing champagne bottles. They are decorated with shiny rhinestones, dressed in Santa Claus suits, covered with decorative plaster and even made into a three-dimensional Christmas tree. If you turn on your imagination and use your imagination, you can get an extraordinary result. Learn new techniques, watch video tutorials and what others are doing, and then try to create something of your own. All in your hands!
To decorate champagne, we will need:
- champagne;
- red and white felt;
- pencil and ruler, lighter, scissors;
- red bias tape 10 m;
- red ribbon wide 2.5 cm – 2 m;
- lace, sequins, half beads;
- Kinder egg for Santa's hat;
- glue Moment (gel) I only use it. You can take any other one that you are used to.
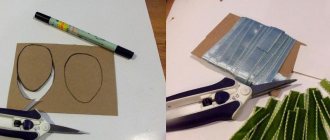
To begin with, we make a base cylinder for champagne. We take felt 20x30cm, this piece of felt is just right for champagne. We try the rectangle on the bottle and glue it, but so that the cylinder can easily be put on and removed from the bottle. I glued it end to end with satin ribbon.
Now we make the shoulders: cut the felt vertically to the point where the bottle becomes straight. These strips were cut off on both sides (shown by the black line in the photo) to make the case shaped like a bottle.
Next we glue the strips. I glued it end to end on the inside with satin ribbon. I didn’t photograph this moment right away, I’ll show it at a later stage of the work.
This is the preparation I got
The most important thing is to make a beautiful shape for the decoration, so that it is even and easy to put on and take off. At first I made it from paper, but there are bumps on the workpiece and they are very clearly visible. Then it is very difficult to hide. I decided to try it with felt and was right. Of course it's a little more work, but it's worth it. The base turned out smooth. Another advantage of felt is that it stretches; if you pull the binding a little during the process of braiding the bottle, then together with the felt you can slightly adjust the size.
Let's start creating the design. We begin to braid our workpiece with bias tape. Try not to pull the binding too much so that the uniform can be easily removed.
After you have glued several strips, you can cut out the neck, then we will process it.
I apply glue to the middle of the bias tape so that it sticks to the felt and not to the tape. And so it is unlikely that the glue will “crawl” out.
Do everything carefully, take your time, make sure that your binding is glued just above the middle of the previous strip. If you want the strips to be wider, then you need to glue them in the middle.
We glue the binding to the place where the bottle becomes straight
Why do I like using bias tape? Because it fits well and doesn’t stick out, but it’s much more difficult to work with tapes.
I glue it using Moment Gel glue, applying it over the entire strip. Many people use Titan glue or its analogues. You decide for yourself which glue is more convenient for you to work with or which glue you are used to.
Next we will braid the bottle in a straight line, to the bottom of the bottle. There is no need to cut off individual strips; we glue them with one tape until the end.
We will process the collar with the same bias tape.
And now the most interesting and enjoyable part - creating the image of Santa Claus.
We cut strips of white felt 2.5 cm wide. There should be three of them: for the neck, for the bottom and for the front (where the buttons will be).
We cut strips of lace equal in length to the pieces of felt; for the front you need two strips of lace, because the frill will be on both sides. In general, there should be 4 stripes
I first glued the lace to the felt. And then I glued the felt onto the bottle.
First of all, we glue the bottom, then the vertical strip, and then the collar.
This is how Santa Claus' clothes look from the back.
We make a hat from a kinder egg. We cover the larger half with tape, decorate it with a strip of white felt and a half bead. You can also make a felt hat. It's easy to do. We take a piece of red felt 12x5 cm, sides 5 cm. We sew it vertically, overlapping or gluing it together. We collect the upper cut with a thread and sew on a pompom made of yarn, you can do it without it. We decorate the bottom cut with white felt.
Now we make buttons: glue sequins in the shape of snowflakes, and half beads on them. The buttons are ready.
New Year's decoration for Santa Claus champagne is ready.
How to decorate champagne for the New Year
It’s good if Santa Claus has a Snow Maiden. Just decorate the second bottle of champagne in blue. Let these favorite characters decorate your New Year's table!
And in the end I got these Santa Claus and Snow Maiden.
How to decorate champagne for the New Year
By the way! The Snow Maiden has a hat made of a kinder egg, and Santa Claus has a hat made of felt.
PS If you are looking for how to decorate champagne for a wedding, watch the master class here.
And also, you can beautifully decorate not only champagne with ribbons, but also a bottle of wine. For example, you can make something like this “Lady in Red”.
DIY gift for a friend
Agree, such a bottle of wine would be an excellent gift for a friend or good acquaintance.
Click on the social media buttons!
Dressing up a bottle of sparkling wine in different clothes
You can make a funny New Year's character out of a container with a drink. Make a hat from an old sock, cut an even strip from an unnecessary T-shirt with a suitable print, attach a fringe - the scarf is ready.
A great way to add a new flavor to the holiday is to decorate bottles in the shape of Santa Claus' reindeer. Make horns from fluffy pipe cleaners for children's crafts. Eyes can also be purchased ready-made, or drawn on paper and cut out. A red nose for a deer can be made from a pompom or a large button.