Cute Teddy bears have long become the most favorite children's toy. Since they appeared on store shelves at the beginning of the twentieth century, their appearance has undergone changes. But nowadays, needlewomen are happy to study old sketches and make vintage teddy bears based on them. In the photographs you can see the final result. How to make a bear? All you need to do is choose a life-size Teddy bear pattern and follow the step-by-step master class.
Necessary materials
To create a children's toy, you must use only safe materials. For children under 5 years old, it is better to choose whole natural fabrics, without lint or added synthetics. It is also recommended to do without accessories in the form of buttons, glitter, etc. If a toy is being made for an older child, then the imagination is limitless, as is the choice of material.
Fabrics for soft toys
Knitwear is ideal for sewing toys for little ones. This is an elastic and practical material, from which it is very easy to make a toy, and it is safe. It is easy to wash and does not lose its shape, does not require additional processing, and thanks to the variety of colors, the toy will turn out to be very impressive.
Another fabric that is often used for tailoring is silk . This is a capricious material; working with it will require patience and accuracy. But products made from silk are very beautiful and durable. It is also used for decoration, but can also be used as a whole fabric. Requires delicate washing and gentle drying.
And the most popular material for sewing soft toys for little ones is cotton fabric.
It is very diverse, inexpensive and used everywhere. It is very easy to work with, has increased durability and strength, moreover, it is safe, and stains and dirt are removed quickly.
For older children, you can use other fabrics, such as faux fur or wool; this is an ideal option for sewing bears; it will give the toy a realistic look, and if handled with care, it will last a long time. Other fabrics are also suitable, for example, velvet, velor, felt.
Other materials
To make a soft toy with your own hands, you will need not only fabric, you must have other materials, such as:
- Pattern and template from which the toy parts will be created;
- Soft filler, you can use cotton wool, but it is recommended to take pieces of foam rubber, it will help maintain its shape longer;
- Threads and needle, scissors;
- Thick paper;
- If decor is planned (when making toys for children over 5 years old), then you can use buttons, sparkles, and ribbons.
Preparation for the process
Even a beginner can sew a toy.
But before you make a Teddy bear, you need to prepare all the necessary tools and work out the details. It is best to make a pattern from cardboard or other thick paper, so it will be easier to transfer it to the fabric. When performing this process, you must not confuse the back and front sides. Transfer the template to the wrong side using a blue ballpoint pen or a simple pencil. You should not use chalk; it distorts the shape of future workpieces.
It will be very easy to sew a thing from ordinary thick cotton. Absolutely any base can be suitable, but the toy will look best made from the following materials:
- artificial fur;
- velvet;
- suede leather;
- velours;
- felt;
- fleece
Loose fabrics - fur, suede and velor - are difficult to cut. It is necessary to take into account the direction of the pile, so it is more difficult to work with them. But felt and thick cotton are just perfect for beginners. In other cases, you can choose a fabric similar to fur. The main condition is that it should not crumble or stretch too much, otherwise the parts will be deformed.
Beginners should not choose toy patterns that are too large. But miniature bears are the most difficult to sew. The optimal size is 20–25 cm.
Sintepon is the best filler for a toy. You can safely wash it without worrying that the item will wrinkle or lose its shape. You can also use holofiber. If you don’t have them on hand, you can take scraps of fabric or cotton wool. Specialized fillers (granulate or sawdust) are available in specialized stores.
Important nuances
To sew a soft toy, you need to accurately make a fabric pattern using a template. This is an exact copy of the details of the future product, depicted on paper, which is then transferred to the material. Each toy has its own set of templates, but you can also draw it yourself. Then you should cut them out and attach them to the fabric using tailor's needles.
Before making a toy, you should wet the selected fabric and dry it. This will help check whether it will shrink during the first wash and whether the toy will lose its shape. If this happens, it is recommended to wash the material before sewing, dry it and only then start working.
We sew a small teddy bear without a sewing machine
Plush toys are very soft and cuddly. You can make them yourself using a regular needle. You don't need a lot of fabric for a little bear, but it will turn out very cute.
Necessary materials
To sew a teddy bear, you need the following materials:
- Fabric in two colors.
- Synthetic fluff or holofiber.
- Strong threads.
- Black buttons or beads.
- Threads for mouth embroidery.
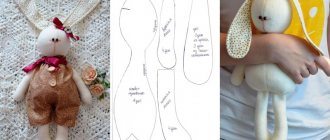
Pattern according to sample
Download the pattern from the Internet and print out the details on paper, namely:
- torso>;
- head>;
- upper foot>;
- lower foot>;
- ear>;
- sole>;
- spout
Cut out all the templates with scissors.
Transfer to fabric and cutting parts
Place the paper elements on the side of the material where there is no lint. Trace with a pencil, taking into account seam allowances. Mark darts and places for stuffing. Draw a mirror image of the head, upper and lower legs, and torso. Two parts of the ears are made from the main color of the plush, two more from a different color. Also prepare 2 patterns for the sole and nose from contrasting plush.
Stitching the main elements
Sew all the darts on the head and body of the bear using a “back needle” stitch. Attach the head by connecting the two parts and leaving a hole for stuffing. Turn it inside out and place the filling in the muzzle, sew up the hole with hidden stitches.
Connect the two parts of the body and stuff. Sew the upper legs, turn them inside out, fill them with stuffing, and close the place of stuffing.
Connect the blanks of the lower paws with a strong stitch, then attach a plush sole of a different color in a circle.
Unscrew the legs and fill using a wooden stick. Lightly pull the spout part with threads in a circle and fill it in a little.
Reference! Plush pile hides uneven seams when creating a toy.
Ear sewing and stuffing
Connect two pieces of ears of different colors, fasten them with a “back needle” seam, leaving a hole for filling. Turn out and fill with a small amount of stuffing. Do the same with the second ear.
Connecting all the parts together
Attach the head with a hidden seam to the body. Using a strong thread, connect the legs to the body, making several through stitches through the body. This will help the paws be mobile. Then attach the ears to the bear's head with a hidden seam.
How to sew on eyes, design a nose and mouth
Mark with pins the places where the eyes should be. Attach beads or buttons with strong threads. Sew the plush nose with a hidden stitch, connecting it to the muzzle. Mark the mouth with threads.
Photo 2. Ready-made teddy bear with eyes, nose, mouth and a bow for decoration.
Bear toy pattern
Making a soft teddy bear toy is quite simple and easy to do yourself. For
it is enough to use any popular pattern.
Some tips on how to choose it:
- All patterns can be divided into simple (with a minimum number of details) and complex (where additional design is required in the form of accessories and decor, such as dresses, ribbons, seam processing).
- Beginners should start with easier ones, these include: a Barney bear (or a simple bear made of fabric), a sock bear, a Tilda-style bear.
- Other popular but difficult patterns for sewing are: Teddy bear, ballerina bear, polar bear, mother bear with babies.
Fastening moving parts
Typically, special fasteners are used to assemble Teddy bears. They consist of wooden disks, pins and metal washers. The pins are looped and T-shaped. Factory fasteners can be replaced with homemade ones if the design requirements are met.
Mounting parameters:
- The base disk must be made of durable solid material, usually wood or hardboard.
- The diameter of the metal washer is selected so as to prevent the edges of the pin from coming into contact with the wooden base.
- The pins should hold their shape well.
In order for the toy's limbs to hold tightly, the characteristics of the fasteners must correspond to the size of the parts for which they are intended. The larger the bear, the larger the discs should be, and the longer and thicker the pins. Typically, the size of the disk is determined by fitting it to the part; it should be located in the center of the upper part of the element, at a distance of 56 mm from the contour.
Master classes on making soft toys
Teddy bear made of fabric
One of the simplest patterns is a Barney bear, transferred directly onto the fabric, without using templates.
How to make a soft toy with your own hands without a template:
- Take a small piece of fabric and fold it in half exactly in the middle with the right side facing inward;
- Using a pencil, draw several rounded lines;
- You should start with the head - describe a small semicircle, then the ear, a rounded cheek, a slightly elongated paw, a slightly rounded belly and one elongated leg;
- Cut strictly along the contour;
- Expand the material - the bear pattern without using a template is ready;
- Repeat all the manipulations exactly, thus preparing its back part;
- Sew the two halves together from the wrong side;
- Leave a small gap, turn the product inside out and fill it with filler.
There are other interesting patterns for a soft bear toy.
Felt bear
To make a felt toy you will need:
- multi-colored felt;
- floss threads;
- pattern paper;
- tracing paper;
- scissors and needles.
Performance:
- Select and transfer onto tracing paper a template for the parts of a felt bear; the scale must be respected and be 1:1. Also, everyone can show their imagination and draw parts of the bear’s body themselves.
- After the drawing has been transferred to tracing paper, it is transferred to thick paper, strictly observing the scale and every detail. Thus, the template is ready.
- Then all the component parts are cut out from a thick sheet and fixed to the fabric using tailor’s pins. Carefully trace with a simple pencil or chalk, remove the template and cut out - the pattern is ready. Advice! Perform all manipulations on the wrong side.
- Next, 2 identical parts are placed on top of each other and sewn together, leaving a small gap for the filler. They are turned right side out, the toy is evenly filled with foam rubber, cotton wool, synthetic padding (optional) and sewn up to the end with neat stitches.
- After all parts of the bear’s body are made, they are sewn together, and depending on the imagination, eyes, nose, and mouth are made.
One option for creating a face is to use buttons or sew on store-bought glitter. Many craftswomen embroider them from multi-colored floss threads using satin stitches. You can also cut out a nose, eyes and mouth from felt of a different color and sew them on with threads; for this, a chain stitch is most often used.
The final touch in making a felt bear is decorating the product. You can sew on several multi-colored ribbons, bows, sparkles and a very bright and beautiful toy is ready.
Teddy bear made from a sock
Making a soft bear from a sock is very simple.
You don’t need a pattern for this, just have the materials:
- new sock;
- filler;
- needle, thread;
- scissors;
- marker.
Work algorithm:
- turn the sock inside out, place the heel up;
- the head is the nose part, draw them with a marker;
- cut along the contour and sew;
- leave a small hole, fill the product with filler;
- shape the nose of the sock into a ball;
- distribute evenly and sew up to the end, tightening the edges with threads;
- a rounded head is obtained;
- then the heel and part of the toe to the elastic band are the torso and paws;
- the heel is the future hind legs, it must be cut strictly in half and formed into two limbs, sewn together, stuffed with filler;
- The front legs are made from elastic, simply cut out, stitched together and sewn to the body.
- then the ears are created, they can be made from the rest of the sock or take a new one.
- They can be made from elastic - just draw two semicircles and cut them out, stuff them with filler and simply sew them to the head.
- For decoration, you can use ribbons, buttons, sparkles, thus creating eyes, a mouth, and a nose.
- From another sock you can make a color for a bear; for this you need to cut out small round fragments and sew them on the paws, muzzle and even the stomach - thus getting an unusual color.
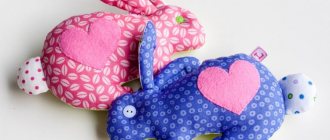
Teddy bear pillow
To create such a bear you will need cotton fabric, soft filling, a sewing machine, and scissors. To get a more realistic product, it is recommended to take weave of different colors.
The first step is to create a pattern; it should be large enough and round in shape. The head and ears are depicted, then they are cut out, the seam is sewn by machine, the product is turned inside out and stuffed with soft filling, and sewn up to the end. The material acts as decor; it will be comfortable to sleep on and so
This will create the effect of a bear's face.
Two round appliques are cut out of a dark color - these are the eyes. They are sewn to the pillow with hidden seams or sewn on by machine.
It is better to make the muzzle bright, any color of your choice, in the form of a large oval-shaped piece of fabric. A small round mouth is sewn to it.
For realism, you can sew on small front legs. They are made from the same color of fabric as the pillow itself and are attached to its lower part, having previously been stuffed with filler.
Bear in Tilda style
This bear cub is distinguished by its elongated body proportions and legs; it has recently gained a lot of fans. To make a bear in the Tilda style, you need to take fabric from bright cotton sprint, a template from which a pattern, scissors, threads, a needle will be created; ribbons and bows often act as decoration.
Transfer the template to the double folded fabric, leaving a small seam allowance. Sew together and turn right side out, then sew with a blind stitch.
The peculiarity of this soft toy is that the legs are attached to the body with buttons, this allows them to move, creating different positions of the bear’s body. The ears are sewn to the head, and the nose, eyes and mouth are created from threads, without using any decor. A mandatory decoration for a Tilda-style bear is ribbons or bows; you can also do original embroidery by hand.
Teddy bear
Making a soft Teddy bear toy with your own hands is a difficult task, so before starting work you should carefully study the algorithm.
How and where to start:
- Choice of material – this teddy bear is made of faux fur, the material should be short-pile. Also, to create this model, you need to stock up on thick cotton fabric for making the inside of the paws, the inside of the ears and the muzzle.
- The details of the pattern should be made in a mirror image in relation to each other, this will help to create the artificial pile to lie in one direction, which will create a realistic toy.
- The bear's limbs must have holes to create fastenings for their mobility.
Work algorithm:
- Transfer the patterns of parts onto pile fabric; they should be a mirror image;
- Cut them out, leave punctures for the paws to create fastenings;
- The ears and paws are made from two different materials, the outer side is made of pile, the inner side is made of cotton;
- Sew them together;
- Turn inside out and then stuff with filling;
- The next step is fastening;
- They are inserted into the space left in advance, these are cardboard disks with a hole with a mounted bolt (the body of the bear cub);
- A nut is also sewn into the limb and then stuffed with foam rubber;
- The fastenings in the limbs and torso are carefully sutured, making them invisible;
- Next, you should screw the limb to the body, this fastening gives the soft toy mobility;
- By analogy, perform this manipulation on all paws;
- After the body of the bear cub is ready, you should embroider the eyes, mouth, and nose with threads;
- Tie a bow or ribbon around your neck;
- Teddy bear is ready.
Teddy bear ballerina
To sew a ballerina bear, you need to take dense material, preferably short pile. For the heels, palms and inside of the ears, you need to choose a soft fabric, for example, silk, cotton.
Patterns need to be made according to templates; there will be a lot of details here, because... legs, palms, knees and shoulders are movable, they are sewn separately. In order for the pile to lie in one direction, all fragments of the bear are made in a mirror image and then sewn together. They are turned right side out, stuffed with foam rubber and sewn up with a hidden seam.
The ankles, legs, shoulders and palms of the toy are movable, this is achieved with the help of a button fastening. There are 2 design options: hidden (when stitches and buttons are sewn into the details from the wrong side) and external (they are sewn on the front side and look quite nice, only the color of the fabric and the color of the buttons must match).
The loop is made on the body, and the button is sewn on the paws. Next, the loop is made on the arm or leg, and the fastening is sewn on the palm or ankle. To decorate the face of a bear, ballerinas most often use beads or multi-colored sparkles. A ribbon is tied around the neck, and the same is attached to one ear.
A mandatory accessory for this toy is a ball tutu; it is created by hand and made of transparent bright fabric, for example, chiffon, veil, cambric.
The cut should be short, it should be tied onto a thread and distributed evenly to create beautiful voluminous waves. Pull the skirt at the bear's waist, sew it up with a hidden seam, you can also insert a narrow elastic band, this will make it possible to change the clothes of the ballerina bear.
Polar bear
In order to understand how to make a soft toy with your own hands, you will definitely need a bear pattern with the number of necessary parts.
This soft toy differs from all previous ones not only in color, but also in the fact that the bear stands on four legs. Therefore, tailoring a polar bear is different from the rest. The fabric should be chosen dense with a long, hard pile, the pattern should be made strictly according to the template, executing in a mirror image. Sew the fragments together and fill them with filler through a small hole.
In order for the toy to be stable, the paws must be filled very tightly.
In one version, the polar bear is performed in a stationary state, the limbs are sewn to the body, and in another, a hidden button fastening can be made.
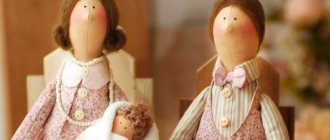
Bear with babies
To make a soft toy of this type, there are many options for patterns; it could be a bear in a lying position, and several of her cubs around her. And also sitting with the offspring on your lap, or even standing. The difficulty of this composition is that you have to work with small details. The fabric can be varied, ranging from faux fur or regular cotton.
For sewing the family, movable fastenings are not used; all limbs are sewn tightly to the body. To create faces, buttons are selected from the mother; for babies, most often the mouth, nose and eyes are decorated with floss threads or glued with small sequins.
Teddy bear
The pattern of this bear is perhaps the most difficult, since it requires fabric that imitates fur and special fastenings for the paws. So, in this case, the pattern is not transferred to the material folded in half, but two drawings of the parts of the body, head, ears and paws are made. Moreover, one part of the pattern is located next to the other, but in a mirror manner. This is necessary so that the fabric pile of the finished toy is directed in one direction. Cut parts only with very sharp scissors so as not to damage the pile. In the parts of the paws and body, where they will be fastened to each other, make punctures for future hinges.
Also often Teddy's feet, palms and the inside of the ear are made of another material, such as leather, so they are cut out separately.
Next, we do everything as usual - the fabric bear pattern must be cut out, stitched, turned inside out and stuffed. Now is the time to insert the fasteners. These are cardboard disks with a hole into which a bolt, nut and 2 washers are inserted. A disc with a bolt is inserted into the paw through the unsewn hole, and the fabric is sutured around the bolt coming out. A disk is also placed in the body at the place where this paw is attached, and its hole must be aligned with the hole previously made in the fabric. Next, apply the paw to the body so that the bolt from the paw fits into the hole in the body and secure the structure from the inside with a nut. Do the same with all the paws and head, and you can sew up all the remaining holes and form the muzzle.
Popular articles Acrylic nail extension procedure
To do this, using a needle and thread and a knot tied at its end, pull the muzzle from the inside in the area of the eyes (to give volume to the eye sockets) and mouth (to form a smile for the bear). You can remove the thread behind the ears. The drawstring makes it possible to create exactly the facial expression that you want to give to your toy.
What stitches should I use when sewing a soft toy?
Threads for sewing toys must be strong and must match the color of the product. The only exception is when a decorative loop stitch is made; it is used as a finishing stitch and not only sews the parts together, but also processes the edges of the fabric.
To create a soft toy with my own hands, I usually use the following types of seams:
- External - the internal fragments are sewn together with it, it should go in small stitches and look neat, there should be no gaps between them.
- Looped seam - the thread is passed through a loop over the edge of the fabric and tightened, thus processing loose fabrics and sewing together the pattern pieces.
- Blind - the thread with a needle should be inserted into the fabric from the inside, having previously folded the edges of the material together. The stitches are made small, neat, you need to make sure that the needle and thread go exactly along the line, without going to the front side.
- Joining seam - this method is used to sew a button and some other accessories to a soft toy, as well as fragments, such as limbs, head, tail, etc. They are sewn with small stitches on the front side, threading the needle through the fabric.
Simple crafts
To sew a teddy bear with your own hands for the first time, the patterns should be simple, consisting of a small number of parts. Beginning craftsmen will benefit from simple master classes on how to make a regular bear and a gentleman bear.
Children's creativity
Even children can sew a bear from fabric with their own hands. For a simple bear measuring 20-25 cm, you should prepare a piece of cotton fabric 50*50 cm, cotton wool, threads and needles, pins, buttons and a thin satin ribbon.
Print or draw a bear pattern. The template is cut out and transferred to fabric folded in half. The fabric is secured with pins and cut out. Parts can be sewn in two ways:
Without removing the pins, the parts are connected with the seam facing forward
Important! When sewing, you must leave a hole for turning and stuffing the toy. The workpiece is turned out and filled with cotton wool. It is necessary to distribute the filler evenly over the figure so that there are no compactions or unfilled spaces.
The stuffing hole is sutured. The eyes are sewn to the head in the form of small buttons and the nose is a large oval part. The mouth is embroidered with red thread. Fingers are embroidered on the upper and lower limbs. A satin ribbon bow is tied around the neck of the finished toy.
Charming gentleman
A more complex toy, available for children to make, consists of several parts. The pattern from it must be printed on an A4 sheet and cut out the part templates. It should be noted that their sizes can be changed. Thus, based on one pattern, you can create several completely different toys.
Fleece should be used as the main material. It is soft and pleasant to the touch, unpretentious in processing and operation. Toys made from fleece fabric will last your baby for many years. The beautiful plush fabric may fray during cutting and stitching. Therefore, it is better to use it with some experience in needlework.
The choice of filler depends on the method of stitching the parts. If you plan to work on a sewing machine, you can fill the toy with special granules. The machine seam will not allow loose material to enter the child’s respiratory tract. When sewing parts by hand, the bear is stuffed with padding polyester, cotton wool or holofiber.
A rectangular piece of material is folded in half with the front side inward. Lay out the templates on the fabric and trace them twice with a marker. The second line is drawn at a distance of 5 mm from the template. This will be the seam allowance
It is important to trace the mirror parts correctly so that you don’t end up with two identical elements. Two pieces of ears, a pug and feet are cut out of fleece in a contrasting color.
Popular articles Lampshade made of threads
Paired parts are sewn together. Colored feet are sewn to the lower paws. All elements are turned inside out and filled evenly with filler. A pug is sewn to the head using overlock stitches, and then small black beads are sewn on and the mouth is embroidered.
All parts are connected with hidden stitches. Ears are sewn to the head. Then it is connected to the body and legs. At the end of the work, a silk scarf or scarf is tied around the neck.
What is the best material to make the eyes and nose of a bear from?
Most often, buttons are used or sequins are glued, but sometimes floss threads can be used to decorate the face. To do this, you should master the embroidery method. The most common of them is satin stitch, the stitches are made even, tightly adjacent to each other. Cross stitch is also used, this is the easiest way.
For some toys, the appliqué method is used.
Here you need to cut out a small piece from a fabric of a different color and use a buttonhole stitch to sew on the pattern.
DIY teddy bear
Method 3
This method of sewing a bear toy with your own hands may seem complicated at first glance. But this is only at first glance. Following the instructions, you can sew such a soft bear in one evening.
So let's get started!
Materials
- Fleece or plush fabric, light brown, 50 cm.
- Brown fleece 2x2 cm for spout
- Pink chintz 10x10 cm for the inner ears and soles of the legs.
- Brown floss threads
- Threads to match the fabric
- Sintepon
- Chalk
- Scissors
- Big needle
Stages of work
- Print and cut out the pattern.
- Place the pattern on the wrong side of the fabric and trace it with chalk.
- Make seam allowances of 0.5 cm.
- Transfer all the marks from the pattern, including the point numbers, onto the fabric.
- Cut out two parts of the ears and soles for the bear's legs on pink fabric.
- The spout detail is cut from brown fleece.
- Fold the body parts right sides inward and sew, leaving the top edge unsewn.
- Fill the body with padding polyester and sew up the hole with a hidden seam.
- Place the head pieces right sides together.
- Sew from point 1 to point 2.
- Align the parts of the head and forehead with the right sides at points 2 and baste the parts of the forehead on both sides.
- Sew according to the basting.
- Turn your head out.
- Fill with padding polyester and sew up the hole with a hidden seam.
- Sew the nose with threads to match the fabric using a seam “over the edge”.
- Using a “back needle” stitch, make the bear’s mouth.
- Embroider the eyes with a French knot. Insert the needle through the place where the head attaches to the body.
- Place the parts of the ears with the right sides in pairs pink with the main color of the toy.
- Sew the ear pieces along the bend line.
- Turn out the ears.
- Sew the bottom edge of the ears with a hidden stitch.
- Sew the ears to the bear's head according to the marks.
- Place the handle parts right sides inward and stitch to the turning marks.
- Fold the leg pieces and stitch to the turning marks. Do not sew up the bottom of the parts!
- Baste the soles to the bottom of the leg pieces.
- Sew the soles to the legs.
Turn out the parts of the bear's arms and legs. Fill with padding polyester and sew with a hidden seam. Sew the head to the body with threads matching the fabric using an over-the-edge seam. Mark symmetrically the places for sewing on the arms and legs. Make points on the arms and legs in the middle of the upper part - this will be the attachment point. If we want the arms and legs of our bear toy to be movable, then we take a large needle and insert it into the marking point for attaching the handle. Next, you need to pierce through the body and bring the needle to the point of the second handle - symmetrically on the other side of the body, grabbing the handle at the marked point. Withdraw the needle and reinsert it into the same place in the handle part, bringing the needle through the body to a point on the other side, while grabbing the second handle. This must be done three times. It is recommended not to pull the thread too much so as not to tighten the body of the toy. But it shouldn’t be too loose, then the paws will hang
It is important to insert the needle exactly into the same place where it came out. Only in this case will the bear's paws move. In the same way, sew the legs to the body of the toy.
Photo instructions for the master class
What to fill a sewn toy with
Foam rubber is most often used as a filler; this material is dense, it does not fall off and holds any shape perfectly. It's also easy to remove if the toy needs to be washed. You can use ordinary cotton wool, but it quickly clumps and the product may lose its original appearance.
Synthetic padding is also used - it is easy to purchase and a pleasure to work with. With it, the toy will keep its shape for a long time, it is easy to dry and does not get lost. An alternative option is holofiber - this material is durable and easy to use.
Natural fillers are used as a filler, this is wool. It is environmentally friendly, will allow the product to keep its shape and even generate heat; it will be very pleasant for the child to sleep with such a toy.
How to insert a wire frame
The wire frame is used quite often in soft toys; it allows it to hold its shape and gives it flexibility. To create it you will need a little wire; for safety, its ends should be bent using round teeth. The wire should be copper or floral, along the entire length of the toy.
Then, when the desired blank is made, it is lightly coated with glue and wrapped with the selected filler. This will prevent it from getting out while using the toy. Next, the filler is evenly distributed around it and a frame is obtained, which is then placed in a fabric pattern. The fragment is sewn together.
Thus, the wire frame is inserted both into the body and into the limbs or even into the ears and tail of the toy.
How to sew a head and limbs to the body of a toy
Tilda is an interior souvenir toy that will help decorate your home and create warmth and comfort in it. A hand-sewn tilde toy can be the most wonderful and heartfelt gift.
Each figure has its own – and quite capricious – character and prefers to be called by name.
What do we need to sew Tilda Bear?
The master class presents examples of making Tilda Bears - a boy and a girl.
For work we will need:
- Natural fabrics for making Bear's body and clothing.
- Braid for finishing the edges of bears' clothing.
- Sintepon filler.
- Copper wire with a diameter of 1.5 - 2 mm.
- Floss threads for eyes.
- Buttons.
How to decorate a soft toy
There is a huge selection of accessories for decorating toys. The most commonly used are beads, buttons, sequins, ribbons and bows. They are sewn to the product using a hidden seam or special glue. You can also take small pieces of fabric, for example, velvet, cambric, silk, chiffon, they are overlapped and then sewn on using a buttonhole stitch.
Sometimes original embroidery appears as decoration, as this helps make the soft toy unusual. This option has increasingly become used when the product is created by hand.
Another option for creating a unique look can be specially tailored clothing, such as a dress, skirt or jumpsuit. It is made from beautiful lightweight fabric.
Author: Elena Petrova
DIY felt Christmas bear
A New Year's bear will help create a festive atmosphere, and making it can be an interesting activity to do together with your child. To sew such a bear you will need:
- soft felt of different colors: for example, brown/sand/beige – for the body and head, red/green/blue/silver/gold – for decoration, dark brown/black/gray – for the design of the muzzle;
- threads: brown - for sewing the bear, black - for embroidering the face, red - for sewing on decorative elements;
- needle;
- filler;
- scissors;
- ruler;
- erasable marker;
- glue;
- red and white yarn, knitting needles/hook - for knitting accessories (hat and scarf).
Having prepared all the materials and elements, you can begin to work.
Patterns for a felt bear
To sew a felt bear with your own hands, you need patterns, the templates of which need to be printed or drawn on paper/cardboard, cut out, and then transferred to the working material.
To sew a bear, you need to cut out 2 such parts, which you then need to connect together
The more details in the pattern, the more difficult the sewing process
You can complement the teddy bear with bright New Year's accessories, decorate the belly of the toy, or make individual elements to create a composition.
To make the bear convey the New Year's atmosphere, you can complement it with a knitted hat and scarf, a candy cane or a small bag of gifts.
How to sew a bear from felt
Having prepared all the necessary tools and materials, cut out a template of the future felt bear from cardboard, you can start working, following the following algorithm:
- Transfer all the details of the template onto canvases of the corresponding colors using a disappearing marker/bar of soap/chalk. There should be 2 pieces of each pattern piece. – the front side of the toy and the back.
- Cut out the parts using sharp scissors.
- The first step is to attach the stripes to the main details of the pattern - to design the paws, nose, belly, eyes - to work out all the non-voluminous elements. When sewing, you need to use a back stitch and make sure that the stitches are the same length and located at an equal distance from the edge. The color of the thread should match the shade of the part being sewn.
- If the design involves embroidering any elements with satin stitch, then it must be done at this stage.
- Next you need to sew three-dimensional parts - muzzle, head, torso. To do this, use an overlock stitch. The elements must first be sewn not completely, leaving a small hole. Place the selected filler in it - padding polyester/holofiber, and only after part of the toy is stuffed, the hole must also be closed with an overcast stitch. When sewing the head, sew in the ears immediately so that you don’t have to glue them on.
- The parts of the bear are assembled by gluing them together. To do this, you can use special fabric glue or a glue gun. To glue the eyes, you can use Moment Crystal glue.
- The last stage is decorating the product. A knitted hat can be fixed on the bear’s head with a drop of glue, and a scarf can simply be tied around the neck. A candy cane or bell can also be attached to the paws using glue.