We must pay tribute to fur products, because they do not lose their relevance from year to year. This is not surprising, because fur can not only look stylish, but also retains heat well. And preserving heat in our latitudes is especially important.
Fur products can be found in the wardrobe of almost every woman. Perhaps the love for fur products dates back to ancient times.
Since ancient times, male hunters went hunting and brought animal skins to their women. Nowadays, a mink hat and other animal products are a luxury item due to its high price.
But don’t despair, because it’s possible to sew a fur hat with your own hands. All that is required is your desire.
If you learn how to sew fur products, you will not only be able to save your savings, but also replenish them by selling your products to your friends.
In the article below we will tell you in detail how to work with fur.
Stylish fur hat in the shape of a papakha or a pill with your own hands
To sew a hat in the form of a papakha you will need:
- Fur;
- Fabric for lining;
- Pattern paper or tracing paper;
- Tape measure;
- Needles, scissors, knife, marker and sewing machine.
Instructions:
- Measure the circumference of your head. The height of the pattern will be the height of the hat itself. For a circle pattern, you can also use the length of a rectangular piece;
- Create a pattern. Transfer the obtained parameters onto tracing paper or paper. Cut out the sample along the lines. The result should be a circle and a rectangle;
- Place a rectangular shape and a circle on the back of a piece of fur and trace it with a marker. Using a knife or scalpel, cut out these parts.
Important ! In order not to damage the fur, you need to cut not the pile, but the fur fabric itself. Be careful.
- Cut out the same details from fabric as from fur;
- Turn the fabric and fur inside out. Connect the sides of both pieces and secure them with pins. Then use a sewing machine to make stitches – a centimeter from the edge;
- Carefully examine the fur and the direction of the pile. This is necessary to determine the place where the connection to the circle will occur;
Note : the fibers on such hats are usually directed towards the face.
- Turn both pieces over again - the circle and the rectangle to the wrong side and pin them together;
- Sew 1 cm from the edge of the circle, so that both parts are fastened together;
- Turn the hat right side out and release any lint caught in the stitched line;
- In the same way, sew the blanks from the lining fabric, but leave a small hole on it;
- Place the fabric in the fur blank so that the edges meet. Secure everything with pins and make stitches on the machine again;
- Turn out the resulting cap using the gap that was left in step 10.;
- Use hand stitches to close the hole;
- Align and straighten everything, then comb and shake the fur.
An unusual and very stylish headdress is ready. This style will look great together with a warm coat made of drape, wool, etc. As you can see, sewing a fur hat with your own hands is not so difficult. The main thing is the tool.
Two-tone fur hat
To make it, prepare the following materials and tools:
- Natural fur of two contrasting colors and not very thick;
- An old knitted hat or sweater (if you don’t find it at home, you can buy it or knit it yourself);
- A sharp blade, scalpel or stationery knife;
- Threads, needle;
- A small piece of leather;
- Sintepon and fleece (felt)
The operating principle is as follows:
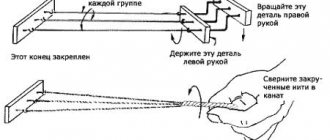
- On the fur, make markings for 7 mm stripes;
- Using a utility knife, blade, or scalpel, cut the marked strips. Be careful;
- Take a hat or sweater as a base. If the latter, then take the bottom of the sweater and apply the resulting strip to your forehead. The crown of the head should not be connected together;
- On the sweater strip, gather the stitches into a knitting needle and cast off. If you don’t know how to knit, then assemble them with an elastic band or thread;
- Start sewing fur strips to the convex part of the workpiece, alternating light and dark colors;
- It is advisable to make stripes of dark fur shorter than light ones, but here everything comes from your imagination and the available material;
- Connect the dovyaz with fur into a ring. Use a hook or thread with a needle;
- Seal the top hole with leather approximately 12 cm in diameter (you don’t need to sew it directly on top, but by pressing it down a little). Place some synthetic padding in the middle, and cover the hole with fleece or felt on top;
- Turn the hat inside out. To straighten the fur, comb it well, straighten it and shake it a little. All is ready!
A little effort and you will get an interesting and fluffy two-color hat.
This is interesting: Pattern Women's T-shirt SML-XL
Peculiarities
The boyarka has quite a long history, because it is a traditional Russian headdress. Previously, this hat was an item of men's wardrobe, but, as is the case with many other things, it eventually migrated into women's fashion.
Boyarka hat is a headdress made of two parts, one of which covers the top of the head (crown), and the second is wrapped in a single strip around the forehead (band). The shape of the crown can be flat or convex, and the band is at least ten centimeters wide.
This hat has no gender, that is, both men and women can wear it, however, the model range for both differs slightly in popular colors and decorative elements. Most often, the band and crown differ from each other in material, but some hats are made entirely of fur.
Since the boyarka is a winter item of clothing, there is insulation on the inside, as well as a size adjuster so that it fits better on the head and does not allow cold air to pass through.
The traditional model of the boyarka hat is a leather crown with a band made of solid fur. The streamlined cap can be sewn from several wedges, and the fur is chosen to be fluffy and voluminous to give the headdress a distinctive shape.
The most common model looks like a wide fur rim sewn around the leather crown, but there is another technology. It involves the presence of a base made of a knitted blank, through the loops of which thin strips of fur are passed.
There are not so many models of the Boyarka hat, since it has a certain classic style. However, some designers bring something new to it, for example, ears on the sides or a pom-pom.
Another atypical model is a knitted boyarka hat, on which a double volumetric lapel acts as a band. Unusual ones include the “orbit” style, in which under the band there is a continuation of the crown, that is, an additional lower part that fits the forehead. Externally, the orbital hat is a bit reminiscent of a kind of beret.
There are models of hats, the band of which is made not of fur, but of suede, velvet and sometimes leather.
As for decorative elements, the main decoration on fur boyars is, of course, fur. However, on some models, for example, the so-called “Snow Maiden”, on the back of the head there are leather laces with bells, metal tips, bells, or a long fur tail.
The crown can be decorated with embroidery made of gold thread, bugles, beads, stones, pearls, and also covered with a print in the style of Gorodets or Khokhloma painting, Pavlovsk scarf.
The Boyarka hat looks expensive and impressive, because expensive thick furs are used to sew it. The most popular are arctic fox, mink, silver fox, but besides them there are squirrel, beaver, sable, raccoon and fox. The band of more affordable models is sewn from sheepskin.
The crown of all-fur hats is made of fur, both the same and a different type. The fur crown must be cut and plucked so that there is a difference in texture between the two parts of the headdress, since the color is within the range of shades of the same color.
Most often you can find and purchase combined models, the cap of which is made of genuine leather or leatherette, suede, velvet, jacquard, less often knitwear or knitted from wool yarn. Twill or jersey is used as lining.
Winter hat with wide fur trim: choice of material
We sewed caps from soft corduroy with a pattern. To make the hat warm, we additionally laid a layer of synthetic padding in each wedge of the crown.
You will need a piece 20 cm long with a fabric width of 150 cm. For insulation we used synthetic padding, and the inside of the crown is made of silky viscose lining. You will need pieces of these materials approximately 10 cm long; you can calculate the exact quantity after printing the pattern. For the trim in our model, faux fur with a fairly long pile is used. You can also sew a hat from natural fur, but first make sure that your machine can handle this task or sew by hand.
Both natural and faux fur require special cutting, and we will show you how to do it correctly. Before purchasing fur, decide on the width of the trim. In our photos, the width of the trim on the hat is 8 cm when finished, plus 2 cm for seam allowances. Sometimes the trim is double sewn and folded in half, but in our case, the inside of the hat is made entirely of fabric.
If you buy real fur, draw in advance a rectangle pattern with a width equal to the desired trim width plus allowances and a length equal to the head circumference plus 5 cm. For faux fur with a width of about 140 cm, you only need to know the width of the trim.
So, let's sew a winter hat with fur trim!
Uncover
Print the pattern, making sure your printer is set to “actual size”, “100%”, and not “scale to fit”. In the Russian-language program, the option “real size” is possible. Cut out the pattern.
Also measure the length of the bottom edge of the resulting model and cut out the fur trim, focusing on this size and adding a spare 2 centimeters.
Cut out:
- 6 wedges from the main fabric and 6 wedges from the lining fabric with 1 cm allowances on all sides.
- 6 synthetic synthetic wedges without allowances
- A strip of fur trim with a length equal to the circumference of the head plus 5 cm and the desired width plus 2 cm for allowances.
- The same strip of lining under the trim from the main or lining fabric
To cut natural or faux fur, use a knife or razor. Using a sharp blade, carefully cut along the intended contour from the wrong side of the material. Cut the base material of the fur, but do not touch the pile.
Slowly move the edges of the cut out part, straightening the fur pile.
Progress
- Wedges made of main and lining fabrics, insulation
- Strip of fur and main fabric
- Threads and scissors
Sew three wedges at a time from the main fabric, folding them right sides together. Press the allowances to the sides, cutting them diagonally at the top.
Place insulation inside the wedge, cover with seam allowances and pin. Stitch along the front side, grabbing the insulation, retreating 3-4 mm from the seam.
Fold the two halves of the crown (each of 3 wedges) with the right sides inward and stitch, aligning in the center. Topstitch the seam allowances, straightening them onto the insulation.
Sew the details of the crown lining. Iron the allowances together, straightening them at the top.
Place the lining in the crown with the wrong side inward and pin, starting from the middle. Baste along the edge. Check the length of the bottom edge and compare it with the length of the trim and its lining, if necessary, trim the trim parts.
Sew the hem and hem lining along the long edge, with right sides facing in. Tuck the fur pile inside the seam.
Sew the hem and lining into a ring along the side edges, folding it in half with right sides facing inward.
Pin together the crown and trim, placing them right sides together. Tuck the fur pile inside the seam. Stitch.
Turn the seam allowance to the hem side. Turn 1cm of the lining edge over to the wrong side and baste or iron.
Hand stitch the folded edge to the topstitch seam allowance using a blind stitch. Pull out the basting.
The winter hat with fur trim is ready!
Cute hat with bunny ears
The pattern of the hat will be exactly the same as in the previous work. For this hat you need to make an applique - carrots and bunny ears. Sew the finished ears to the hat so that they fall under the seam.
To make the carrot look even more realistic, you can stitch it with a zigzag stitch. Then stitch the finished part to the hat. You can glue interlining to the back of the hat so that the fabric of the hat does not stretch. That's it, the product is ready!
Using the same pattern, you can make a hat with cat ears, or search on the Internet for many patterns of original children's hats for the street or for any holiday, such as patterns for Santa Claus hats and others.
Before altering an old mink hat, check the inside: tips
Important: Be sure to inspect the interior and the fur itself before starting work! The pile should not crumble, and the core should be dense and moderately hard, but not over-dried by time! If the product is already crumbling at the disassembly stage, then during sewing the core may even crack.
- To remake an old mink hat, you need to completely or partially disassemble it. In any case, even if the changes are minor, we will definitely change the lining! To do this, carefully evaporate the old base and peel it off from the fur.
- If you used a lot of gelatin when gluing, then wet the inside of the cap well. Don't get the fur wet! And lightly tear the flesh from the base.
- When you have taken the hat apart, be sure to inspect the leather part! Old flesh can deteriorate, especially if it was poorly repaired. In this case, acid begins to accumulate, which literally eats away the flesh.
- To do this, wet the flesh and pull it a little. It should become plastic and not tear.
- If you are working with pieces, then trim off all the irregularities. You can just test them for strength - lower the fur trimmings into water for 10-15 minutes. Bad fur will literally begin to fall apart in your hands. You can't work with such fur! If the product is not sewn, then it will fall apart when worn.
- Ideally, strengthen any punctured or worn areas. You can use special glue and thin fabric. Moment glue and spunbond (used in furniture production) proved to be the most durable We cut strips 1 cm wide, grease them with glue, and apply glue to the leather base.
Strengthen the fur around the perimeter and in weak spots!
How to change a hard mink hat into a soft one?
We will start with this master class on how to alter a mink hat. After all, before, hats were hard and kept their shape well. Because we tried to gelatinize the base as best as possible. Today, not only has fashion changed, but such accessories have also turned out to be not very comfortable, since they often press. Therefore, we will begin our analysis with how to disassemble the hat and make it more convenient, without greatly modifying the appearance.
- First of all, we tear off the lining.
We work carefully so as not to damage the interior
- Now a little advice - if you see hand stitches inside, then this is a good sign. This means that the felt cap was dry when the skin was pulled on. This means that it will be easier to remove. If the felt had been wet, the bonding with the flesh would have been stronger.
Cutting the seam
Taking out the felt
- But in order for the headdress to keep its shape, it is worth leaving the upper part of the cap. To do this, we cut it out along the most protruding points.
Cut it out
- We insert it into our cap, secure it with pins in the center, and turn the product inside out. Now we sew the firth itself to the flesh and along the protrusion using normal hand stitches in a circle. Make sure that the stitches on the fur side are small and do not touch the pile itself.
Leave the top part hard to keep its shape.
- We outline the line of the future new hem. In this case, the fastening tape is light. Therefore, so that it is not visible and a new one is not sewn on, we simply change the hem line.
Celebrating
- To insulate and add some volume, we will insert batting. We take measurements on the hat for the desired size. Ours is asymmetrical, so we measure from all sides.
Measurements
- Cut out the batting to the desired size. To make the bottom of the cap a little thicker, insert a strip of drape - 4 cm to the circumference of your head. Sew directly to the fur part. On the pile side the stitches are small.
Sew on the drape
- We attach the batting. To do this, we lower it a little behind the strip of drape. We sew our batting to it.
Sew on
- Now we make a fur fold. For this we use thin felt. We cut it out in a semicircle and simply fold it into the widow and sew it to the desired place.
Making a fold
- Now we completely sew on the batting and secure it to the top of the felt cap. Sew the securing tape to the felt. You can optionally insert an elastic band or ribbon so that you can adjust the volume.
Closing
- We cut out the new lining on the bias. Never use old lining material! We also cut out a round base approximately 18 cm in diameter.
Cutting out the material
- We sew it, bend it at the top and also go through it with a stitch. Now we need to tighten the upper part. To do this, we pierce the fabric and now throw the material in a spiral. It’s like winding the fabric around a needle.
Then we pull the base together using the threads
- Distribute the folds evenly. We take an ordinary jar as a basis. First we place the round part, then the rectangular base. We secure everything with an elastic band or rope to prevent fidgeting. And sew it on by hand using a regular seam.
Sew on
- We insert our lining into the fur base and secure the bottom with pins. We place it evenly - the lining should be completely flush. We secure it with pins, and then sew it with a regular seam directly to the fur, capturing a millimeter of the mesh and about 0.5 cm of the lining.
Stitching
Eventually
Reviews of women's fur hats
Fashion trends do not stand still. Every year new models of women's hats appear. There are options that do not lose their relevance. These primarily include voluminous ear flaps and beret hats. They, in turn, have many modifications depending on the design and type of fur. Faux fur hats are also popular. They are distinguished by a variety of colors and affordable prices.
This is interesting: Pattern for women's mini skirt made of stretch fabric (size XS-XXL)
How to turn an old mink hat into a fashionable beret?
The beret is a symbol of femininity that can decorate almost any outfit. By the way, you might be interested in the article “Which hat to choose depending on the type and style of jacket or coat?” But back to our topic - it’s very easy to turn an old mink hat into a beret!
Restoration
In this example, two hats will be used, since the beret will be voluminous. Based on the pattern, you can roughly guess how much fur is needed. If you initially have a large hat, but want to make a small beret, then one headdress will be enough. Also, at your discretion, you can make the wedges narrower, but in larger quantities.
Pattern
Important: Takes a head volume of 56-57 cm. If you need a smaller volume, for example 52 cm, then take 9.5 cm at the widest part (indicated in green).
Cutting wedges
- We sew all the wedges together. In the example, the fur is from different hats, so the shade is slightly different. To beat this, we will alternate them with each other.
Sew along the entire length
As a result, we have two such semicircles
- We connect them in the center. Then we sew along the sides and form the base of the beret.
We fix it in the center
- Now we cut out the lower base of the beret. In our case, there is little fur, so the strip turned out thin. The bottom of a beret about 5 cm wide, folded in half, will look very nice. We sew all the pieces into one strip, focusing on the volume of the head + seam allowance + 2 cm for padding polyester, so that the headdress fits better and more comfortably on the head.
Cut out the rim
Important: Since it comes from wedges, the rim must be made from the same number of parts. At the same time, to add volume to the beret, we will gather the fur a little, sewing it to the bottom strip. This will also help you understand how much of our wedge you need to collect.
Part of the base is slightly narrower than the beret wedges
- We sew bias tape to the headband. Can be sewn on a simple sewing machine. But in this case, we place the trim at the bottom, and put newspaper on top of the core. If the flesh is hard enough, then the machine can handle it.
The flesh should be on top!
- Then we turn the binding inside out and literally sew a line half a millimeter from the edge.
Carefully sew the line
- Sew the fur rim to the beret. In this rim, between the bias tape and the base, we insert thin padding polyester, batting, or simply soft fleece-type fabric. To make the hat fit better, we sew on a thinner elastic band.
Rubber
- We sew behind the shirt at the bottom of the beret (at the junction with the headband) and behind the bias tape.
Sew on
- Now we cut out the lining; it’s better to use padding polyester. We also cut out 8 wedges + 1 cm along the edges for the seam + 3 cm down.
Cutting out the lining
- We sew it on a machine, turn it right side out, and take it back out. We put on a hat with a lining. We fasten with pins and sew well with hand stitches.
Stitching
How to choose according to face shape?
Mink always suits you. But do not forget about the rules for selecting a headdress based on your face shape . A slim figure, an oval face and regular facial features allow you to choose hats of any style. Curvy fashionistas should choose their accessory more carefully. For example, such a lady is unlikely to suit a voluminous headdress or a hat that is too fluffy. Such models are more suitable for fragile and sophisticated women.
- Girls with a pointed face shape (triangular type) should pay attention to models of fur hats with earflaps. The “ears” of the hat should hang freely at the sides. If, in addition, the girl lets down her long hair, then she can choose a hat that is more rounded, but quite voluminous.
- Designers recommend that chubby fashionistas turn their attention to models of earflaps with “ears” tied back. Also suitable for them are hats and fur berets, slightly shifted to the side. A rounded face type allows you to wear voluminous hats, for example, large knitted ones using mink.
- A square face type needs to be visually “stretched out”. Therefore, girls with this type of face can be advised to choose a hat with ear flaps, but not with a deep fit along the forehead, and other models of hats, except for a papakha.
- For an elongated face shape (rectangular face), a low mink hat is suitable. This could be, for example, a boyar hat, or a model of a hat with earflaps, in which the “ears” are neatly tied back. A fur beret will look good.
There are practically no restrictions on the choice of accessories for women with an oval face type and regular features. In this case, you can choose any hat style you like.
Fluffy keychain
You can use pieces of an old collar to make fluffy key rings. Any fur is suitable; colored faux fur with long pile looks especially colorful.
How to make a fluffy hedgehog keychain, master class:
- We will need dark fur, a key ring with a base, a piece of white flannel or plush, stuffing, satin ribbon, and beads.
- On paper we draw the body of a hedgehog. You need two such parts, and one will consist entirely of white fabric, and the second will be sewn from black fur (thorn) and a corner of the fabric (muzzle).
- We attach the templates to the fabrics and trace them with a margin of 1 cm.
- Sew the muzzle and back.
- Sew both pieces together, leaving a hole to turn inside out.
- We fill the keychain with padding polyester or other filler.
- We insert a satin ribbon inside so that a small loop is formed. The ring for the keychain will be attached to it. Now we sew the hole with a hidden seam.
- All that remains is to sew on the beady eyes, nose and put the ring on the loop.
LiveInternetLiveInternet
—Categories
- (0)
- DIY (DO IT YOURSELF) (1270)
- Handicraft videos (262)
- handicraft master classes (812)
- FASHION (FASHION) (577)
- the art of dressing (188)
- model shows. video (106)
- embroidery (111)
- knitting (2694)
- A CENTURY OF KNITTING - A CENTURY OF LEARNING! (458)
- KNITTING VIDEO (581)
- KNITTING FOR “LUXURY” LADIES (543)
- knitting magazines (173)
- KNITTING IDEAS (no description) (220)
- knitting master classes (873)
- CORDS ARE MY WEAKNESS! (90)
- Japanese symbols (17)
- knitting, crochet (3847)
- CROCHET ACCESSORIES (691)
- crochet tank tops, vests and tops (381)
- crochet blouses and pullovers (275)
- children's crochet patterns (170)
- crochet jackets and cardigans (312)
- Irish and Bruges lace (294)
- hook+fabric (68)
- ribbon lace (42)
- crochet dresses, skirts, tunics (613)
- crochet patterns (807)
- fillet knitting (78)
- freeform (36)
- crochet flowers (196)
- knitting, knitting needles (3724)
- KNITTING ACCESSORIES (419)
- sleeveless vests, vests and knitted tops (417)
- knitted blouses and pullovers (619)
- children's knitting patterns (175)
- knitted jackets and cardigans (140)
- knitted jackets and cardigans (422)
- knitted dresses, skirts and tunics (423)
- knitting patterns (364)
- Decor (481)
- DESIGN (174)
- interior (83)
- DIARY (818)
- PROPERTY LiRu (2)
- FOOD (631)
- main course (169)
- cooking video (88)
- cooking master classes (100)
- drinks (16)
- salads (85)
- sweet (171)
- soups (16)
- HEALTH (131)
- toys, dolls (137)
- IDEAS (190)
- sewing ideas (without patterns) (7)
- INTERNET (137)
- ART (401)
- still life (20)
- COMPUTER (37)
- Literature (25)
- WORLD (278)
- MY TRANSLATIONS (93)
- MY WORKS (3)
- WISDOM (114)
- phrases (11)
- MUSIC (120)
- REmodel (267)
- AT READER REQUESTS (31)
- UTILITIES (639)
- POETRY (9)
- DICTIONARIES (16)
- JEWELRY (517)
- sewing (1725)
- sewing videos (284)
- sewing ideas (without patterns) (81)
- patchwork (80)
- sewing master classes (595)
- models with patterns (501)
- pattern making (190)
- sewing techniques (155)
- HUMOR (98)
-Music
-Always at hand
—
—Search by diary
—Subscription by e-mail
—Interests
— Regular readers
—Communities
—Broadcasts
-Statistics
How to transform an old mink hat into a fashionable and modern headdress: complete restoration of earflaps
Now we offer you a master class on how to alter an old mink hat, which at first glance cannot be restored at all. But we assure you that the result will give you the opportunity to believe that nothing is impossible! Especially in the fur business.
Initial view
- Let's start cutting out the lining. At the same time, we do not rip, but rather cut off the fur, since the appearance at the seams can no longer be restored.
We cut off everything unnecessary without regret
Rip out all the seams
Cutting the insulation from the ears
- Now we need to check each skin! To do this, simply sprinkle it with water in some places.
Checking
- We wait 10-15 minutes. Gently stretch the flesh.
As you can see, the result is not always positive
- Now we need to refresh the color. To do this, take regular hair dye. Ideally, take chocolate and mix it with 1 part dark brown or half black.
Dye
- Carefully dye the pile and comb it with a pet comb in different directions.
We paint
- Rinse well until the water becomes clear. It doesn't hurt to use the balm that comes with the paint. We also rinse well. Dip with a towel to remove excess moisture.
Let's dry
- Now we will stretch the skins. To do this, we nail it onto a wooden surface with small nails or staples from a furniture stapler along the perimeter. If we talk about the right side - do as you feel comfortable. If you place the fur on top, you can brush it periodically, which will speed up drying.
Stretch
What do we have after painting?
- We trim off any uneven edges or damaged fur.
Trimming
- We cut strips of approximately 0.8-1 cm. Please note that this must be done by weight. And for convenience, so as not to get confused in the stripes, do not literally cut 0.5-1 cm to the edge.
Making stripes
Front and back view
- You can use another model at your discretion. We begin to wrap the front lines on the hat. Please note that we trim off bald patches or damaged fur. We don’t sew it yet, but we hide the ends inside, on the wrong side. We will sew them together at the end, not only with each other, but also sew them directly to the base of the hat.
We wrap around the entire perimeter. A detailed master class on creating a hat from strips of fur is in our article “How to make a fur hat from stripes?”
- We will make the top of the head from another fur. We also cut it into strips. In this example, a silver fox will be used. If you have beautiful whole fur, you can simply sew on a piece of the desired size. You need to insert a hat elastic at the bottom. Just pull it through the knitted base, and not just through the fur.
Result
What kind of fur is best to make a hat from?
The choice of fur is determined by a person’s personal preferences and financial capabilities. It is also worth considering the outerwear with which the headdress will be worn. The hat should match or emphasize the chosen image. So, a product made from fox skin will be very impressive and bright. Therefore, you need to understand in advance what it looks harmonious with.
On a note! The most in demand when sewing women's hats are mink, arctic fox and leopard. Products made from rabbit are considered budget products, while more elite products are made from lynx fur and other valuable animals.
Color
Many fashionistas are sure that mink products should only be in natural shades. It is worth considering that the headdress is matched to the outerwear in the appropriate color scheme and according to the color type of the face and hair. A wide range of shades of natural fur allows every fashionista to make the right choice. It’s also worth giving up your prejudices and taking a closer look at models with dyed fur. Only the model must belong to a well-known brand to avoid fakes. In this case, modern fashionistas have a truly huge scope for choosing accessories.
And yet, when choosing a mink hat by color, you should adhere to the basic recommendations of designers.
- Brown-haired women look great in products of deeper dark colors - all shades of black and brown. Walnut, mahogany and scanglow models are also suitable here. You can also choose colored versions of the hats, then you should take a closer look at the deep blue models.
- Blondes, of course, can afford contrasting colors - black and white. Also, girls with a northern type appearance should take a closer look at models in purple, blue and pink shades.
- For redheads, hats in warm brown shades are suitable, as well as models with golden fur, and accessories in yellow or green colors.
- Mink hats in mahogany or walnut colors look impressive on brunettes. Or it could be pastel-colored models. From headdress models, you should choose tinted items in burgundy, blue, red, and turquoise colors.
Whatever the hair color, it is important to note that their shade and fur color should not be identical. For example, a white mink hat looks great against the background of golden hair. Blondes should choose accessories in light gray tones.