A small hatchet will come in handy around the house. They take it with them on vacation, fishing or hunting. He is an indispensable assistant in household chores. The article describes how to make an ax from a saw blade for concrete - useful information for those who like to work with their hands.
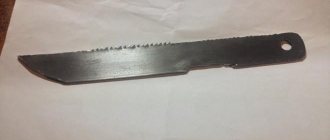
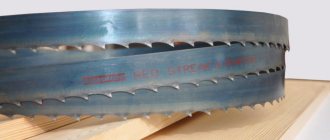
A small ax made from a saw blade.
What materials and tools are needed to make a saw?
The set of tools and consumables for creating a band saw with your own hands at home may vary depending on the features of the chosen design. But, as a rule, the construction of a machine requires the following:
- boards or sheets of plywood for the frame;
- bearings;
- motor - electric or gasoline;
- metal corners;
- metal cutting blade - homemade or purchased;
- self-tapping screws and bolts with nuts;
- rubber from a bicycle inner tube;
- wooden blocks and slats, they are needed for the supporting frame of the structure;
- bushings;
- belt for transmitting torque;
- a steel rod that will serve as a shaft for the pulleys;
- steel sheet or piece of PCB;
- varnish or paint, they are needed at the final stage of creating the machine.
Also, when making a band saw with your own hands, you will need to use the following tools:
- grinder;
- screwdriver;
- pliers;
- wrenches - sizes are selected in accordance with the bolts;
- jigsaw;
- screwdrivers;
- hammer.
Advice! When choosing boards for the table and band saw frame, it is better to choose hardwood blanks with a thickness of at least 2 cm.
Selection of tape material
If you wish, you can make a saw blade for a band saw with your own hands from U8 or U10 tool steel. The material should be strong but flexible, with a thickness of 0.4-0.8 mm for cutting hardwood. When creating a blade yourself, you will need to use a grinder to cut out the teeth in the metal, spread them apart and sharpen them, and then solder the tape into a solid ring with a gas torch and sand the seam.
Small hatchet made from a saw blade
Hello crafts lovers, today we will look at how to make a small convenient hatchet from a saw blade. You can take such an ax with you outdoors, hunting, fishing, hiking, and so on. A distinctive feature of the ax is the handle; it is combined, made of wood and epoxy resin, and looks quite interesting. The handle pads are held on with screws, so they can be easily replaced if necessary. The ax has been hardened, it is sharpened to the point of a razor, and the author uses it to cut paper. If the homemade product interests you, I suggest you study the project in more detail!
List of materials:
- saw blade or other source of carbon steel; - wood for the covers; - epoxy resin and blue dye; - thin G10 or other similar material; - decorative screws with nuts for attaching the covers; - polishing paste; - leather for the cover; - oil for wood.
The process of making a hatchet:
Step one. Main profile of the hatchet
Draw the main profile of the hatchet on the saw blade with a marker. It is better to use an old disk; the metal in modern disks may be bad. If you want to make a high-quality axe, it is better to try cutting a piece of metal from the disk and try to harden it. Now the profile can be cut, arm yourself with a grinder and get to work. We cut out bends and other problem areas with a grinder in pieces.
Step three. Hole
The ax has an oblong hole, it serves as decoration, and thanks to it you can open beer and other drinks. The hatchet can be hung from the same hole.
Our hole is oblong and has a fairly large diameter; to solve this problem, we will need a drilling machine with crowns. You will need crowns with carbide tips, since steel cannot be drilled with a regular drill. We mark everything and drill holes along the edges of the future window.
Next, we combine these holes by cutting out a piece of metal with a grinder. That's all, now you need to finish the hole with a metal file. Don't forget to also drill holes in the handle for the pins before hardening.
Step four. Bevels
We make bevels on the hatchet; they can also be done by eye, since our blade is small. We carry out the work using a belt sander; we need to ensure that the bevels are symmetrical.
Step five. Hardening
If the saw blade is made of steel rather than iron, it can be hardened. Heat the hatchet until it glows red; at the right temperature, the magnet should stop reacting to the steel. Next, immerse the ax in oil and check whether the steel has been hardened. The metal should start to ring and should not be taken with a file.
After hardening, the steel must be released, otherwise it will become brittle. This is usually done in the oven, the temperature should be about 200 degrees Celsius. We heat the ax for about an hour or two, the metal should become straw-colored. If everything is done correctly, the ax handle should begin to spring back when you hold the ax in a vice and pull the handle to the side.
Step seven. Pen
We make linings for the handle; we have them combined, made of wood and epoxy. We trace the outline of the handle on the tree and cut out the future handle. The thickness of the workpiece should be such that it can then be cut lengthwise into two halves and get two workpieces.
We cut out the workpiece on a band cutting machine; this task can be handled with any other specialized tool, including a hand jigsaw.
You need to cut channels in the workpiece for pouring epoxy resin. We glue the resulting handle parts with tape and place them in the formwork for pouring. Acrylic, plywood and other materials are suitable as formwork. Make sure that the resin does not leak anywhere, it is much more fluid than water. Mix the resin, add blue dye and pour it in, wait until it hardens completely.
Next, we disassemble the formwork and cut the workpiece; we also need to cut the handle lengthwise into two halves. Between the overlays and the metal part of the handle there are also inserts from G10, we cut out the necessary parts.
Then we place the blanks on the knife and form the desired profile with files and sandpaper. To make the resin transparent, the handle must be polished with polishing paste.
Step nine. Case and tests
We are assembling a case for the axe, with it the ax will be comfortable to carry, and it will look better. The case is made of leather and closes with a button.
Receive a selection of new homemade products by email. No spam, only useful ideas!
Please note: Electric grass trimmers: model ratings and selection
*By filling out the form you agree to the processing of personal data
DIY making
You can make any type of ax on your own. It can be simple, hunting, Scandinavian, hiking, intended for throwing (throwing) or simply decorative - there are a great many options. It is also possible to update the tool and build a completely new and convenient tool from an old axe. In order to carry out such work yourself at home, you will first need to make an accurate drawing with all the indicators of the planned tool. It is important to indicate the dimensions of all parts, as they can vary greatly. For example, the handle of an ax is not only quite large, but also medium or small, as is the blade.
From a spring
A small hatchet can be made from an old spring. This can be not only a working tool, but also an original decorative tool, similar to a Viking axe. You need to do this thing as follows.
- You need to take an old spring from a car with a width of 10 cm and a length of about 40 cm. Using a previously prepared template, draw the contours of the planned device on the springs using a marker.
- Draw the contours of the ax using a grinder with cutting wheels. Then carefully sand the cut piece, giving it the desired shape.
- For particularly complex metal work, it is permissible to use a drill.
- You can use an old chair leg as a handle. Drill 3 holes in the spring for fastening to the handle.
- Cut a piece of the desired length from the leg. Saw this part into two halves. Drill 3 holes in each of them. After this, you need to assemble the handle, fixing it with bolts and screws. Draw the shape of the part on a grinding machine.
- Finally, sharpen the blade. The result will be a beautiful mini hatchet. It is suitable for outdoor recreation or in a summer cottage.
Rules for working with metal
In order for the blade to be strong and elastic, during its manufacture it is necessary to follow the rules of working with metal. They are as follows:
- The workpieces must not have visible or hidden damage. Before making a knife, the workpieces must be inspected and tapped. A solid part sounds loud, but a defective part sounds dull.
- When designing the shape of the blade, angles must be avoided. In such places the steel can break. All transitions must be smooth, without kinks. The cuts of the butt, handle and fuse must be ground at right angles.
- When sawing and sharpening, do not overheat the steel. This leads to a decrease in its strength. An overheated blade becomes brittle or soft. During processing, the workpiece must be constantly cooled by completely immersing it in a bucket of cold water.
- When making a knife from a saw blade, you need to remember that this product has already gone through a hardening cycle. Factory saws are designed to work with the hardest alloys. If you do not overheat the canvas during the turning and finishing process, then you will not have to harden it.
The blade shank should not be made too thin. It is this part of the product that will bear the heaviest load.
Do-it-yourself knife from a circular saw - step-by-step instructions
To obtain the desired product, you must follow the technological process. A homemade knife made from a saw blade, a hacksaw for wood, or a saw for metal will last for many years, regardless of the conditions of storage and use. Let's look at how to make a knife from factory-made metal parts, what you need for this and what you should pay attention to.
Creating a Layout
At this stage of work, you can decide on the shape of the blade of the future blade and the shape of the handle. The layout is best made from thick cardboard or thin plywood. You can also use thick plastic. A rigid pattern will allow you to understand how a knife from a circular saw will lie in your hand and how convenient it will be to use. Try to avoid right angles, as they concentrate more load on themselves during impacts. Try not to use complex forms if you are new to this matter. Today it is easy to find a suitable drawing using the Internet and then cut it out without bothering with drawing.
If you or a friend has a knife of the desired shape and design, you can simply transfer it to cardboard.
Cutting and primary processing of the workpiece
Using a marker, draw a sketch on a steel circle. If your future knife is not very large, you can make several blades from one circle. For cutting, you can use either a grinder or a hacksaw. It all depends on your skills and means. We clamp the steel profile in a vice and slowly cut it, stepping back a few millimeters from the drawing line to prevent mistakes.
The resulting workpiece will bear little resemblance to the desired knife: the lines will be crooked and rough. Therefore, primary processing will be required, which will include aligning the sketch along the desired line, sawing out small additional elements and giving it a smooth shape. This can be done using a grinding machine or a regular file, securing the workpiece in a vice. You can set the future sharpening angle of the blade using the same file or another convenient method.
Giving the workpiece its final shape
Gradually grinding the workpiece to the line marked with a marker makes it more similar to a normal knife, allows you to see small flaws and inaccuracies, and also get as close as possible to the final shape. It is necessary to use different sizes, grits and types of files to achieve the result. In order not to erase too much, you can also attach a cardboard sketch and circle it again. There is no need to move further than the intended line.
Blank for making a knife.
And also this stage involves fine-tuning the blade, not sharpening, not polishing, but fine-tuning. We do this using sandpaper, which should remove rough marks from the file. This manipulation must be carried out with the entire body, removing burrs and irregularities.
Shank drilling
When drilling, you need to take into account the future size of the handle and the diameter of the rivets. The distance between them must be measured according to the drawing. We select the necessary drills (it will be easier to work with a diamond drill), place the workpiece on a wooden block and make holes. It can be seen that small protrusions have appeared on the blade; we carefully smooth them out with sandpaper.
Forming the cutting edge
Draw a line along the future cutting edge of the blade with a marker. Then, using a drill bit the same thickness as the blade, make a mark exactly in the middle of the blade line. This mark will be convenient when filing the cutting edge, so as not to make it with an uneven slope.
To form the cutting edge, we use a file with a large notch, moving from the edge to the butt. After the cutting edge is properly ground, we pass sandpaper over the entire area of the blade.
Finished blade
We receive a finished blade, only it does not yet have sufficient sharpness, since it will be determined after hardening, before polishing.
Hardening and tempering
Hardening will give the metal additional hardness, and tempering will give it flexibility; such a blade will be no worse than a factory one.
Hardening the cutting edge of a knife.
Turn the largest burner on the gas stove to maximum. This is not enough to heat the blade to 800 degrees Celsius, so use a blowtorch in addition. Such heating will demagnetize the part. Keep in mind that hardening temperatures vary for different types of steel.
After the part has warmed up to such an extent that the magnet stops sticking to it, keep it on the fire for another minute to make sure that it has warmed up evenly. Dip the part in sunflower oil, heated to 55⁰C, for 60 seconds.
Wipe the oil off the blade and place it in an oven preheated to 275⁰C for one hour. The part will become dark during the process, but 120 grit sandpaper will easily handle this.
Use all safety precautions: thick gloves, long holder, glasses and keep your distance.
Sawing out the handle blank and preparing for gluing
Using the blade as a reference, we trace the outline of the handle onto a block of wood. Make the handle from any available wood, but alder is denser and practically does not absorb moisture and odors. We cut out 2 symmetrical parts about 0.6 cm thick.
Now we put them on the ponytail for fitting. To ensure that the workpieces adhere well to the shank, after gluing with epoxy resin using a flat surface and sandpaper, we make one side of each part as flat as possible. This way there will definitely be no gaps after gluing.
At this point we determine the shape of the handle and draw its approximate outline. Then we again transfer the outline of the shank to the wooden part of the handle. We cut out the shape on one of the parts with a jigsaw and then, attaching it to the other, transfer the outline to the second. This will allow you to get identical parts.
Forming the upper part of the handle
You will have to work hard with sandpaper and a file to give a more precise shape to the handle. It is advisable to completely complete the top contour, because after gluing it will be difficult to work with and can also scratch the blade. Therefore, we achieve the final shape, polish it and only then move on to the next step.
We drill one hole in the workpieces for the rivets, taking into account their diameter in advance, and insert a drill of the appropriate diameter into it to avoid mistakes when making the second hole.
Manufacturing of rivets
You can buy rivets so as not to bother. But we decided to make the knife with our own hands, and this is its integral part, and we will also make it ourselves. There is nothing complicated here. We cut out a steel rod of the required diameter, leaving 5 millimeters more than the width of the handle. You need two of these rivets, preferably stainless steel.
Giving the handle the desired shape
Now we glue our halves together, having previously treated the surfaces with acetone. Cover the blade with a rag or paper so as not to smear it. We insert the rods so that all the holes coincide, align the two halves and clamp them with special clamps or a vice, leave to dry according to the instructions.
The handle of the knife is made of wood.
After they are glued together, all that remains is to give the handle the required shape. First we grind the rivets down to the level of the handle, then we work with a file and sandpaper.
Sanding and varnishing a knife handle
After the handle has received the outline of the future product, we move on to its final polishing. Starting with coarse grit and ending with very fine grit, sand until the product is smooth and shiny.
We wipe the finished handle with acetone and varnish it. After the first layer has dried, apply the second. Number of layers – 3-5. We also polish the varnish with fine-grain sandpaper.
Making a knife from canvas
If the blade is large and does not have much wear, then several blades for different purposes can be made from it. The effort and time spent are worth it.
A knife is made from a circular saw with your own hands in the following sequence:
- A pattern is applied to the canvas, and the contours of the blade are outlined. Scratches or dotted lines are applied over the marker with a core. This way, the design will not be erased when cutting out the workpiece and adjusting it to the desired shape.
- Workpieces are cut from a circular saw blade. To do this, it is better to use a grinder with a metal disc. You should leave a margin of 2 mm from the contour. This is necessary in order to remove the material burned by the grinder. If you don’t have a grinder at hand, you can sharpen the workpiece using a vice, a hammer and a chisel or a hacksaw.
- Any excess is ground off on the grinding machine. You will have to spend a lot of time on this process so as not to overheat the steel. To prevent this, the workpiece must be regularly immersed in water until it cools completely.
- The blade is outlined. Here you need to be careful to maintain the contour of the knife, not burn it and maintain an angle of 20º.
- All straight sections are leveled. This is conveniently done by placing the workpiece on the side of the grinding wheel. The transitions are given a rounded shape.
- The part is cleared of burrs. The blade is ground and polished. To do this, several interchangeable wheels are used on a grinding machine.
Separately, we should dwell on how the handle is made. If wood is used, then a monolithic fragment is taken, in which a longitudinal cut and through holes are made. After this, the blank is placed on the blade, and holes for fastening are marked in it. The handle is fixed to the blade using rivets or bolts with nuts. In the case of a bolted connection, the heads of the hardware are recessed into the wood and filled with epoxy glue.
When the handle is assembled from plastic, 2 overlays are used, which must be symmetrical. To give the knife originality, the plastic linings are painted on the inside. You can make cavities in the overlays that can be filled with jewelry, items made of non-ferrous and precious metals, small compasses and photographs.
After fastening to the blade, the handles are ground until they acquire the required shape and smoothness.
Main components, materials, tools
The algorithm for creating a circular saw with your own hands is quite simple. First you need to determine for what purposes the circular will be used. If this is a small portable machine for working with laminate and plywood, then it is worth considering a device made from a hand-held circular saw, and if there are more ambitious tasks, then it is better to think about a more reliable engine and the impressive size of the machine.
In any case, you will have to make drawings of the device in order to calculate how and where the equipment will be installed, how the main parts will be attached, and at the same time think about what tools will be needed for the work.
Required materials and tools
First of all, you will need to get the canvas itself to make the blade.
Old circular saw blades are made of high quality steel. You can find them in abundance at swap meets and garage sales. The big advantage of using an old saw is the lack of complex metallurgical work. If you make a blade from a disc on concrete, it will immediately have the necessary hardness to maintain an edge and other characteristics of a high-quality knife.
To create a bladed weapon, you will need the following list of tools (we will use improvised means available in any garage, if you have an alternative to some items, use it):
- marker;
- scissors;
- Bulgarian;
- hacksaw for metal;
- protective equipment (glasses, gloves);
- Grinder;
- vice;
- clamps;
- wood hacksaw;
- files;
- sandpaper;
- pliers;
- drill and bit;
- gas oven and blowtorch;
- lighter.
Materials:
- saw blade;
- paper or cardboard for a sketch;
- towels (rags);
- stewing oil;
- wooden blanks for making a handle;
- rivets;
- epoxy resin;
- abrasives for sharpening.
Main stages of work
At the next stage, it will be necessary to drill two holes with a metal crown, and cut off the partition between them with a grinder. The inner edges must be processed with a file.
Next, the author lowers the blade and sharpens it on a grinder. After this, the metal hardening procedure follows - the workpiece must be heated red-hot in a forge, and then cooled in used machine oil.
After tempering the metal in a gas or electric oven, final grinding and sharpening of the blade is performed.
At the last stage all that remains is to make the handle. In this case, the author makes a handle from pieces of wood and epoxy resin, but you can simply make a classic version of the handle.
For details on how to make a kitchen ax from a saw blade, we recommend watching the video on our website.
Read also: Make your own hdmi to tulip adapter
How does a band saw work?
Band saws may vary in design depending on the model. However, for a home workshop, a machine with a vertical blade is usually chosen, which consists of the following main parts:
- frame, or frame;
- sawing table;
- drive, or electric motor;
- pulleys;
- saw blade.
The design is activated when the electric motor is turned on, and the cutting belt begins to move along a closed circular path at high speed.
Important! People most often assemble wood saws for the home with their own hands. Theoretically, the machines can work with metal, but it is difficult to build a structure with the appropriate characteristics from scrap materials
Ax design
The design of this ax consists of three parts.
Ax blade
The shape of the blade was borrowed from the tomahawk, an ax used by Native Americans and European colonists. But you can change its shape by adding some spikes or a hammer on the butt. The ax blade will be glued to the handle and secured with rivets.
Opener
First, as an opener, I wanted to make a suitable hole in the blade. As a result of test drilling, it was discovered that it was impossible to make a hole with a conventional drill, so I changed the type of opener. Both options can be seen in the image. The new type will be made in the form of a specially shaped hook.
Please note: Homemade mini snowcat (mountain snowmobile)
Saw
I wanted the ax to come with a saw and thought it would be nice if it could be hidden like a jackknife. From the handle and it can be unfolded using the finger groove. The saw will be hidden between two pads. The shape of the metal part of the handle will allow the saw to be locked in both open and folded positions. Once the design was chosen, I tried it on a circular saw blade to get the dimensions to fit.
How to make a good ax handle for an ax - step-by-step instructions and drawings
The result of an activity - economic or industrial - depends not only on the perfection and quality of the tool used, but not least on how convenient it is for a particular person. As for the handle of a purchased ax, it is often this that becomes the source of a number of problems - intense dulling of the cutting edge, the piercing part regularly flying off, rapid fatigue, and so on.
Experienced craftsmen recommend making an ax handle with your own hands, preferably for certain technological operations. The main thing is to know how to make it correctly, “for yourself”, so that it is suitable for any household work.
Wood selection
It is clear that not every breed is suitable for making an ax handle. It is advisable to focus on ash, oak, maple, hornbeam, acacia, rowan (necessarily old), beech and even apple trees.
But the best option is still considered to be birch, namely, the root part of the tree or growths on its trunk. This wood is characterized by maximum density.
Consequently, the durability of the ax is guaranteed.
It is better to harvest lumber in late autumn. At this time, the movement of juices practically stops, which means that the wood is relatively “dehydrated.”
Sample exposure
Even an experienced craftsman may not be able to make a quality ax the first time. Therefore, it is necessary to stock up on several blanks for the ax handle.
Opinions vary on the length of their storage before processing, but everyone agrees on one thing - drying should be done for at least 3 - 4 years. Moreover, it cannot be accelerated artificially.
The process should proceed naturally, and it is advisable to choose a dark and dry place for storing raw materials.
It makes no sense to use “fresh” wood on the ax handle. As a result of the material shrinking, it will become deformed, which means that the handle will have to be constantly wedged, otherwise the metal will fly off. Undried wood is used only as a last resort, as an exception to the rule, when there is an urgent need to make an ax handle, at least for a while.
Preparing the template
A good ax handle must have a strictly defined shape. Trying to withstand it “by eye” is a futile task. The same applies to linear dimensions - they should be as close as possible to the recommended values.
Axes have different purposes. As a rule, a good owner has at least two of them. Cleaver and carpenter are a must. The dimensions and shape of the ax for each are clearly visible in the figure.
What to consider:
- The “tail” is made somewhat larger in cross-section than the gripping part. This ensures that during the work the ax handle will not break out of the master’s hands.
- Since we all have different heights and arm lengths, the linear parameters of the ax are not standard. They vary within certain limits. First of all, this refers to its length (in cm). For a cleaver - from 750 to 950, for a carpenter's tool - about 500 (±50). But it is necessary to leave a so-called allowance, first of all, on the side of the butt fastening (8 - 10 cm is enough). Once it is firmly seated on the ax handle, without splitting the wood, it is easy to cut off the excess.
If you have an ax on the farm, which is convenient in all respects, then it is enough to transfer the contours of its handle onto a sheet of cardboard and cut out a template using them.
Making an ax
Having a sample, this is easy to do. The main stages of work are as follows:
- workpiece marking;
- sampling of excess wood (electric jigsaw, carpenter's knife, etc.);
- finishing, grinding the ax handle.
Adviсe:
- You should not rush to fine-tune the fastening part “to size”. During the process of processing the ax, you need to constantly monitor how tightly it fits to the eye of the butt. Even a small “shaft” is undesirable, since such a handle will have to be wedged out immediately. Taking into account the specific use of the tool, it will not last long. Therefore, grinding the ax should alternate with its regular fitting in place and adjustment within the required limits, with a small margin (about 2 mm). The work is painstaking, requiring time and accuracy, but the result is worth it.
- When processing a workpiece for an ax handle, it is not advisable to use files. Such a tool loosens the wood, so it is unlikely that you will be able to accurately maintain the dimensions - you will have to constantly remove burrs, which means choosing wood. For finishing, it is more correct to use a sharp knife, glass fragments, or sandpaper with different grain sizes. The recommended direction for stripping and sanding is along the grain.
- It is also necessary to choose the correct angle of the butt attachment. For a universal tool used for economic purposes, 75º is sufficient, a cleaver – about 85±50. This is also taken into account when finalizing the securing part of the axe.
Protecting the wood of the ax
Any tree is susceptible to rot to some extent. For ax handles, the best impregnations are linseed oil and drying oil. Varnishes and paints cannot be used to protect the material from moisture. Otherwise, it is not a fact that the handle will not systematically slip out of your hands. The consequences are known.
The composition is applied to the ax handle in several stages, and each layer must dry well.
Experienced craftsmen mix brightly colored dyes into drying oil or oil. It is very useful if you have to work with an ax in dense bushes or in areas with tall grass. A tool with a handle that is clearly visible will definitely not get lost.
Practical recommendation
Ready-made ax handles are available for sale. If you decide to purchase a handle rather than waste time on preparing wood and making it yourself, then it is advisable to have its approximate dimensions with you (indicated in the figure above). And choose a workpiece based on them. At home, all that remains is to slightly adjust the ax handle “to suit you.”
Source: //WoodGuide.ru/diy/kak-pravilno-sdelat-toporishhe/
Types of axes
Humanity has been using axes of various shapes and sizes for several tens of thousands of years. Today, store shelves are filled with hundreds of types of beautiful axes for repairs, industrial wood harvesting, and participation in medieval reconstructions.
If desired, you can chop wood and cut down trees with any ax. But only a specialized tool will help you complete the task quickly, using a minimum amount of energy. Before starting work, determine the type of ax you have.
Felling ax
A huge felling ax is the first item that comes to mind when thinking about lumberjacks. The length of its ax reaches 1 meter. The massive butt and wide blade increase the impact force. This tool will be useful for owners who prepare firewood with their own hands.
Cleaver
The cleaver is a classic ax for chopping wood. Without it, this activity turns into a long, exhausting routine. The heavy blade with a dull sharpening is ideal for cutting firewood for future use.
Army hatchet
An army hatchet is a small, versatile, easy to transport and maintain, a tool that is familiar to any military personnel. It can be used both for preparing branches for lighting a fire, and as a hammer for driving in pegs or bladed weapons during battle.
Carpenter's ax
A carpenter's ax is a universal tool for working with wood. Its lightness and sharpness make it an indispensable assistant in the countryside and garden. The weight of such an ax can vary from 0.8 to 1.2 kg, depending on the materials and dimensions. It should fit easily in the hand. The notch (notch above the blade) serves to lighten the blade and improve its cutting properties. Our step-by-step guide will show you how to make this type of ax at home.
Features of a homemade ax
An ax is a simple and common tool that is difficult to surprise anyone with. However, thanks to it you can cope with many complex jobs and ultimately get an excellent result. On sale you can find both simple versions of axes, as well as more interesting and original ones, for example, with decorative inclusions. If you don’t want to spend money on a ready-made option or you couldn’t find a suitable one among those, you can make it yourself.
Many home craftsmen, not finding the right tool on sale, decide to make it themselves. Such work cannot be called impossible or extremely difficult, but even here it is very important to act according to all the rules in order to get a good result. It should be borne in mind that there are several types of axes that you can build on your own.
For example, there are special cleavers that are very popular today:
- mechanical;
- with electric drive.
Of course, the mechanical option is the simplest and easiest to implement. It is equipped with a manual drive. Making such a model with your own hands is not difficult. The drawings of mechanical tools are quite simple and understandable, and the principle of their operation lies in simple mechanical manipulations. This device consists of the following basic elements:
- metal wedge;
- spring mechanism.
When working with such a tool, the master spends a minimum of effort and time, especially if you compare this cleaver with a standard simple ax. As for the even more advanced electric cleaver, it contains one main part, which, after activating the engine, begins its movement - constantly rotating. The master only needs to add a new batch of firewood for splitting.
You should also know about other options for axes, which many craftsmen can make on their own.
- Carpentry. This tool is light in weight and size, and has a sharp blade. It is used in cases where the most precise and accurate work with wood is needed.
- Taiga. This ax can also be made with your own hands. It is perfect for cutting down trees, removing knots and bark.
- Tsalda. This tool is made to clear an area of bushes.
- Kitchen. Such tools are made exclusively for chopping bones. A kitchen ax is a small device with a short handle and a large blade.
- Lumberjack. Suitable for cutting down trees only. Made from a long ax and a sharpened wide blade. It also has other names, for example, felling.
The taiga types of axes are recognized as the most popular and practical. They are distinguished by the following features:
- little weight;
- small area of the stabbing area;
- unusual sharpening of the blade (the edge at the back is several times smaller and thinner than the front).
Certain tree species are ideal for making a home ax. It must be taken into account that materials suitable for such purposes can easily withstand significant vibration loads that occur at the moment of impact of the tool.
Any homemade ax is distinguished by the fact that it is ideal for the master who works with it. By making this instrument with your own hands, you have the opportunity to adjust it to suit yourself, to suit your hand. The result is the most convenient, practical and easy-to-use devices.
DIY: Custom Sawing Table for Circular Saw
If you study the section on FORUMHOUSE “Homemade machines, tools and mechanisms”, you can find “1000 and 1 option” of devices for the self-builder that you cannot buy in the store. This could be a stand for a grinder, for precise and quick cutting of a metal profile, a mini-lathe, as well as all kinds of reinforcement and pipe benders and planes for aerated concrete. An interesting multifunctional and inexpensive sawing table was created by a portal member with the nickname id215711128.
I am building a house from “cylinders”. Because When building a log house, I want to save money and get a high-quality result, I try to do most of the work myself, without hiring hired workers. Somehow I started making casings for windows and doors and realized that an ordinary wood circular saw couldn’t do the job. We need something more accurate and convenient. So I made a circular saw table and would like to share its design with FORUMHOUSE users.
- How to make a saw table for a circular saw.
- What materials and parts are needed for this.
Review of homemade ax models
In addition to restoring old axes, blades are made from other available materials. The type and purpose of such a tool is limited only by your imagination and skills. Springs, reinforcement, a circular saw blade, and stones can be used. A homemade ax may turn out to be better and more beautiful than one bought in a store.
Spring ax
The spring of a regular car is made from light, elastic, durable alloys. One 100x400 mm plate made from a spring is enough for a small decorative or throwing hatchet. To create a full-size blade, several springs must be welded into a small sheet of metal.
Draw the blade of your future ax and cut it out with a grinder. Keep in mind that the handle will wrap around it on both sides, much like a knife design. To make it, you can use a shovel handle or parts of old wooden furniture. Legs and slats will do.
Reinforcement cleaver
Unnecessary pieces of construction reinforcement can be turned into a convenient splitter for firewood. To begin, weld two identical squares from the reinforcement so that they are diagonally sized so that the logs can pass through them freely.
Then weld the letter “H” from the same reinforcement, and weld a blade with an obtuse sharpening angle onto the jumper. Connect the ends of the resulting structure with squares. The cleaver is ready.
Circular saw ax
A circular saw is an excellent material for a beautiful kitchen hatchet. Simply use a grinder to cut out a blade along with a handle from a circular saw blade, drill a couple of holes, and screw on the wooden trims.
Don't be afraid to experiment in your workshop. Skillful hands can breathe life into seemingly unnecessary, rusty garbage.
Ax from a circular saw blade drawings
An article for those who want to make a hatchet with their own hands at home.
I used a video I found on the Internet as a basis, the idea is pretty good and the work will only take one day. You can also watch the video.
In the video, you can see a step-by-step process of making an ax made by yourself at home. Starting from marking the circular saw, the craftsman uses a grinder to cut the outline of the future axe. Then it is polished, a characteristic blade is made, and hardening is carried out. Next, the shape of the blade is formed, handles are made, and holes are drilled for attaching the handles. Epoxy resin and pins provide a strong attachment, the craftsman makes them perfect. While sharpening the blade, he checks how sharp it is. As they say, it is better to see once than to hear a hundred times.
Let me get ahead of myself, the result turned out wonderful, my wife still does not praise the kitchen hatchet.