Using a calendar in the interior is not only a functional, but also an attractive solution. They can be used in different rooms, from offices to an ordinary living room.
You can make an interesting wall calendar with your own hands at home, although similar items are also sold in stores. Such calendars are perfect for decorating spacious rooms, making them both practical and beautiful.
Operating Instructions for Wall Calendars
“If nothing else helps: finally read the instructions...” © /author unknown/
“There was a tear-out calendar hanging on the wall. » © /from school essays/
You, of course, also read the brilliant instructions written by hardworking and talented (but simply undereducated or misunderstood something) Chinese developers. This is a masterpiece. Like the inscription in a Beijing pharmacy (in the Russian section and in Russian): “My butt hurts - hemorrhoids.” It's like an advertisement for hemorrhoidal suppositories...
However, if you believe that there are no instructions worse than those that are written illiterately, you are seriously mistaken.
The worst of all, the most harmful of all and the most useless of all are recommendations for the use of anything given by an intellectual, an intellectual and a graphomaniac all rolled into one! This is truly evil!
After reading the Chinese gobbledygook instructions, you will swear, strain your gyri (or the bone at their potential location), scratch the top of your head (or what you usually scratch in such cases) ... and still figure out how to translate this fucking goblin-Russian into simple Russian. And you will go to put the result of the translation into practice.
Having familiarized yourself with a literary, correct and highly artistic text, compiled by a person who has received (judging by the height of the syllable) at least two higher educations, you... will think for a long time...... ... firstly, about the meaning of life in general... ... secondly, about its absence specifically in your life... ...and, thirdly, of course, about the complete meaninglessness and absolute inexpediency of using the subject you read about...
Do you have any doubts? Right. I will argue! To do this, I will provide here the full (not edited) version of the Instructions for Use of the Wall Calendar.
This Wall Calendar is an incredibly difficult item to use, right? Such, you know, a cardboard consisting of sections on a spring with tear-off sheets and a red rectangle that needs to be moved by date... Almost nanotechnology! I can’t imagine how to approach this miracle of modern industry!
But now I’ll introduce it. Here it is - the saving Instructions! Where are all the answers to all the questions... which I don’t have... ... but in vain! It's not that simple, gentlemen!
“BEFORE USING THE CALENDAR FOR ITS INTENDED INTENTION, PLEASE READ THESE INSTRUCTIONS.”
/Yes. But! If you are very lucky and did not notice this instruction, proceed as usual. And, if not... Welcome to our Community of Initiates in the Mysteries of the Correct Use of the Wall Calendar! I must immediately warn you that members of the Community do not use Wall Calendars. Because they don’t dare.../
“VIRTUALLY ALL OF THE MAIN COMPONENTS OF THE CALENDAR CONSISTE OF PAPER AND ITS DERIVATIVES.”
/What did you think, this is polypropylene polyester? Titanium alloy? And water and week! Although it’s not clear about derivatives... As far as I know, notebooks, books... calendars... A calendar from a calendar are made from paper? There is something philosophically metaphysical in this.../
Further, the intellectual author took pity and explained his previous maxim for those in the tank:
“THUS YOU SHOULD CAREFULLY SELECT WHERE YOU PLACE IT.”
/As they say: you need to know the places! Previously, I posted such an undoubtedly wonderful and very valuable thing as a Wall Calendar, as long as it was somewhere. But now I realized the depth of my wrongness... You will say that the Calendar is a Wall Calendar, to hang it on the wall? Wow, how primitive this is. Of course, on the wall, but where exactly? Where will you go? Ah, no. No, no, what are you talking about! It’s immediately clear that in the matter of hanging Calendars you are as inexperienced a person as I once was.../
And now - attention! Here's some basic information for you:
“IT IS NOT RECOMMENDED TO INSTALL THE CALENDAR IN PLACES WITH HIGH MOISTURE CONTENT, NEAR STRONG SOURCES OF HEAT, COLD, LIGHT, IN PLACES OF UPSCENDING AND DOWNSTANDING AIR FLOW, DRAFTS:...”
/Well, and for those who have a slow gas, condescendingly, through a colon.../
“... LAMPS OF ALL TYPES, HEATERS, FANS, AIR CONDITIONERS, NEAR WINDOWS AND DOOR OPENINGS, VENTILATION HOLES.”
Not giving a damn (in my favorite manner) about warnings will not work. Why? Here's why:
“ALL THIS CAN RESULT IN THE LOSS OF THE CALENDAR’S PARTICULAR APPEARANCE, AND IN ITS VARIOUS DEFORMATIONS: BLOWS AND BENDS OF THE EDGES.”
/Who wants a bloated and bent calendar that simply screams that its owner is an irresponsible (and illiterate) person? Nobody? That's it/
However, the author of this informative (even too much) opus does not lose hope that all the obstacles on the path to achieving Zen (and the Calendar) will be overcome by us, and continues to give practical, but unnecessary advice:
“WHEN TEARING OUT THE CALENDAR SHEET, WHEN POSSIBLE, HOLD THE UPPER COLOR SEGMENT WITH YOUR HAND TO PREVENT IT FROM TEARING.”
/The best thing to prevent the “cliff” will be the simple but fateful fact that I will never hang the damn Calendar anywhere! And, accordingly, I will not be able to interrupt its “segments”. “If possible”... Look, this “adviser” fully admits the possibility that after reading his instructions, we will not have the opportunity! Smart guy. Or was he just already experimenting on someone? Then why is he still alive? And he spoils people’s nerves with IMPUNITY. /
Well, well... It's time for the finishing touch. You have already thought about the meaning of life (or rather, about the purposelessness of existence), and about your own calendar inconsistency... (I don’t know about you, but I was thinking about it)... But that’s not all. The sadistic author, with an unwavering hand, reduces your self-confidence to absolute zero (according to Kelvin):
“FOLLOWING ALL THESE CONDITIONS WILL ALLOW THE CALENDAR TO BE BENEFITABLE AND PLEASANT TO YOUR EYES THROUGHOUT THE WHOLE YEAR.”
/Where. In a room without heat (cold), light, air... and without you, preferably. Well, just in case. Perhaps you - oh, horror! – an unaccounted danger factor for the Wall Calendar? So, there is no point in placing this complex paper product anywhere! You bought it, unfolded it, pleased the “eye” (it’s strange that the pedantic author does not specify which eye should be pleased) and that’s enough for you! Look! If you want more, choose the conditions! Prepare a tinted vacuum chamber with temperature control... and a spacesuit in which you will go there in order to... (drum roll!)... move the slider on the Calendar! Without damaging (God forbid!) any of its particularly important “segments” /
These are the things, dear ones. This, of course, is a trifle (just think, instructions!). But the picture of happiness is often made up of little things. It must be a funny picture in the head of the compiler of such messages for future Calendar users! Psychedelic cyberpunk, no less...
Yes, and by the way, this extremely useful Instruction has been translated (no more - no less) into 3 languages! So, even if you are not fluent in Russian, knowledge of the rules for proper use of the Wall Calendar will not pass you by……… Be prepared!
/Illustration borrowed from the Internet/
Source
Perpetual calendar
Such a calendar provides for a constant change of numbers and inscriptions indicating the week, month and year.
- Based on this, the calendar should be made “movable,” that is, with the ability to shift or rotate elements.
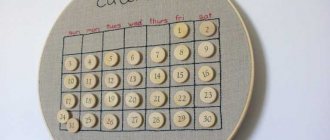
- You can make special windows or pockets on the general canvas in which the data will change.
- Or they can be written on separate pieces of paper and attached with decorative clothespins to the canvas (board).
- Such calendars can be made of cardboard, wood or fabric.
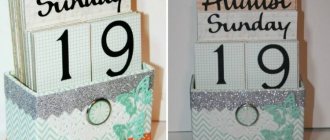
Perpetual calendars in the form of cubes with numbers and inscriptions printed on them are very convenient.
Whatever calendar you make with your own hands, it will always play the role of not just a calendar, but a wonderful decorative element that adorns your home.
How to attach a wall tear-off calendar?
The tear-off calendar is attached with special tendrils to a small cardboard picture, which in turn is hung from a nail on the wall.
As life shows, all these dates, from 01/01/01 to 11/11/11 were ordinary days, nothing unusual happened and even many of them, if not all, went unnoticed. It didn’t even occur to me that this was some kind of special date.
According to this source, this is a bachelorette party the day before or on Valentine's Day.
It says here that this is Women's Friendship Day.
Google found this name in the English Wikipedia:
The names of the months of the year in Belarusian, for those who are not familiar with Belarusian.
It turned out to be quite difficult to find a calendar in Belarusian so that all the months of the year would be in the Belarusian language.
I managed to find only one version of the calendar for 2022, this
The opening ceremony of this sports festival will begin on January 25 at 20:00, although women's single skating already starts seven hours earlier.
I suggest you familiarize yourself with the competition schedule (Moscow time):
Source
Requirements for the design of three-block quarterly calendars
The calendar block occupies the main part of the three-block calendar. A well-made calendar grid should be:
- readable;
- visible from a sufficiently large distance;
- typed in large font (bold).
We recommend
“Calendar production: types, stages” Read more
Calendar blocks and top should be carefully matched to each other and matched in style and colors.
The calendar grid is very informative: it contains the names of the days of the week, months, week numbering, holidays and weekends. The information can also be duplicated in English. All this data, included in the calendar grid, should look organic.
A gift calendar is a functional thing, and its primary purpose is to be a calendar and help with work, and only then is it a place for advertising and a reminder of you. Don't forget about the cursor window - this is a very convenient detail in the calendar.
Converting a wall tear-off calendar into a desk calendar
A simple conversion of a wall tear-off calendar into a flip calendar for greater ease of use.
In our daily life it is impossible to do without a calendar. At the same time, there are different calendars: large wall calendars for the whole year, flip calendars by month or day, tear-off ones, etc. Of course, everyone chooses the type of calendar that they like best.
But it should be noted that today, as in former times, ordinary wall tear-off calendars are very popular. Many people hang these calendars in their homes and tear off a piece of paper every day.
And I must say that these calendars are really very convenient. On each leaf of such a calendar, the day of the month and day of the week are printed in large and clear font. In addition, there is a lot of additional, often very useful information (date of sunrise and sunset, length of daylight hours, lunar phases, etc.).
In addition, the reverse side of each page of such a calendar contains various information of a certain thematic focus, for example, culinary recipes, useful housekeeping tips, traditional medicine recipes, etc.
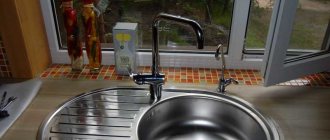
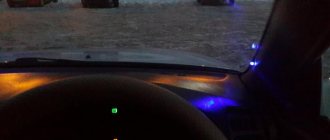
Our family also likes to use similar calendars. However, I have long noticed that all such calendars have one significant drawback. It consists in the fact that the pages of the calendar are torn off very unevenly, pieces remain behind them, which then, as the pages are further torn off, accumulate, and the pages begin to come off lower and lower. Here is just a striking example of such a shortcoming (for clarity, I bent the corners of the tin lid on top of the calendar).
To combat this drawback, you have to regularly, once every two to three months, remove the calendar from the wall and cut off the accumulated fringe from pieces of pages with a knife. Naturally, this is quite inconvenient. Moreover, I don’t understand why manufacturers of such calendars cannot solve this problem. After all, theoretically, it is quite simple to solve it, for example, by making perforation on the top of each page of the calendar, that is, a line of frequent holes of small diameter (much like on toilet paper). However, there is still no progress on the part of manufacturers in this regard.
Therefore, several years ago, I myself began to solve this problem by slightly modifying each newly purchased tear-off calendar. This modification is very simple and requires a few simple tools.
The process of finalizing the tear-off calendar.
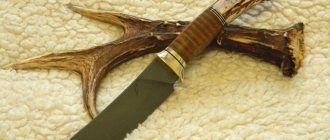
Step 1. Remove the cover from the calendar. In order to remove the tin cover from the top of the calendar, first use an awl to remove the staples from the front and back of the calendar.
Step 2: Drilling holes. First, we mark with a pencil the centers of future holes for hanging our calendar and prick them with an awl.
Then we clamp the calendar with a clamp, although in principle this is not necessary, since you can simply put a board on top of the calendar and press it with your hand. But when using a clamp, finishing the calendar is still more accurate and easier.
It must be said that in tightly pressed layers of paper, holes are drilled quite easily and evenly.
Step 3. Cut off the adhesive layer from the top of the calendar. In order for the calendar pages to separate freely, you need to cut off the adhesive layer from the upper end of the calendar.
After this, our modified calendar is ready for use.
By the way, it should be noted here that the drilled holes do not look very smooth and neat from the front of the calendar.
Therefore, as we remove and transfer pages from the front of the calendar, the holes on subsequent pages will become smoother. In principle, you can ensure that the holes are perfectly even and neat if you drill holes in the calendar through a tightly pressed board or plywood. But, in my opinion, this is not particularly necessary.
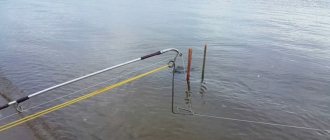
To hang such a modified calendar, I once made a simple canopy from wire.
However, this year, I decided to make not a tear-off calendar, but a completely reversible calendar. And this was influenced, in particular, by numerous requests from family members to ensure that the calendar, after use, remained intact and organized by pages, which in turn would make it possible to save it and read the recommendations and useful tips printed on the back of the calendar pages.
Therefore, in order to turn such a wall calendar into a desk calendar, I decided to make a new canopy for it, for which I needed the following accessories:
Materials:
• A piece of steel wire with a diameter of 3 mm, and a length of 30-40 cm. • A piece of steel wire with a diameter of 1 mm, and a length of 50-70 cm. • A used can of universal lubricant.
• Aerosol paint. Tools:
• Hammer with anvil. • Pliers.
The procedure for making a canopy for a calendar.
Stage 1. Making rings for hanging the calendar.
Step 1. Winding the wire onto the mandrel. We wind thin steel wire around the mandrel. As a mandrel, you can use a steel pipe of a suitable diameter, but I didn’t have such a pipe on hand, so I took a used can of universal lubricant as a mandrel.
Stage 2. Making the base of the calendar canopy.
Step 1: Straightening the wire. We straighten the thick steel wire on the anvil with gentle blows of the hammer.
If necessary, slightly bend the upper part of the canopy to the left or right to achieve its balance.
Step 4. Processing sharp edges. Using a file, we dull and round the sharp edges on the tips of the canopy, as well as on the tips of the rings, for safety.
We thread the tip of each ring into the hole of the calendar, and then screw the rings themselves in completely, much like we put keys on a keychain.
Having placed the sheet in this position, it is very convenient to read the information on the back side of the sheet without removing the calendar from the wall. As a result, I haven't redesigned the rings yet.
Well, in conclusion, I want to say that such a simple canopy turned out to be very convenient. Now, when changing the date on the calendar, you no longer need to tear off the leaves from the calendar and worry about where to put them in order to save them.
To change the date, now you just need to flip the next sheet of the calendar back, which is much more convenient. In addition, at the end of the year, this calendar will be completely organized by page, so that it can be removed and stored, and it will also be very convenient to read or look up the information you need on the back of the pages.
Source
Many will agree that even the most modern and expensive interior can look a little boring and inexpressive without small decorative elements. Little things like wall paintings, frames with family photos or decorative plates brought from various exotic places make the home more comfortable, homely, filled with a characteristic mood and soulful atmosphere. However, considering how much effort and money was spent on this very repair, many still refuse to place such items on their walls, for fear of damaging the wallpaper or other finishing materials.
Revision process
First you need to use pliers to pull out the two steel brackets that secure the tin cover at the top of the calendar.
And then remove the cover itself.
Now you need to mark the holes in the upper part of the calendar. The centers of the holes can be placed at 15 mm. top and side of each side.
We prick the hole marks with an awl for more precise installation of the drill and drill holes in the calendar. In this case, it is advisable to place a thick board on top of the calendar while drilling and press it harder. This is necessary so that the calendar pages are tightly compressed and drilled better and cleaner.
Now you can remove the top and bottom unnecessary pages (covers, supporting information) from the calendar.
After this, cut off the top part of the calendar with a knife, approximately 2 mm wide. The fact is that the upper end of the calendar is coated with glue, and if this strip is not cut off, the pages of the calendar will not be easily removed.
And now our calendar consists practically of separate pages that are easy to separate.
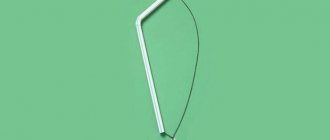
Now we need to make a wire holder on which we will hang our calendar. To do this, if necessary, straighten the wire with a hammer and bend it with pliers.
We consistently bend the wire with pliers.
And we get a holder of the required shape.
Now all we have to do is put the calendar on the holder. At the same time, since our calendar is quite thick, it is best to divide it into two thinner parts and put them on the holder in turn.
And now our modified calendar is mounted on a holder and ready for use.
At your discretion, you can either throw away the removed pages or save them if there is any useful information there.
Of course, the only drawback here is that every year when you buy a new tear-off calendar, you will need to re-do the modification operations (drilling holes and trimming the top edge). But you won’t need to make a wire holder anymore, because once it’s made, it will serve you for many years.
That's all, happy New Year to everyone!
Source
Many will agree that even the most modern and expensive interior can look a little boring and inexpressive without small decorative elements. Little things like wall paintings, frames with family photos or decorative plates brought from various exotic places make the home more comfortable, homely, filled with a characteristic mood and soulful atmosphere. However, considering how much effort and money was spent on this very repair, many still refuse to place such items on their walls, for fear of damaging the wallpaper or other finishing materials.
Criteria influencing the choice of fastening method
Before we begin to consider the fastening methods themselves without the use of nails or screws, it is necessary to understand what parameters affect the possibility of their use. The most important indicators are:
If you do not take into account such an obvious fact as the weight of a painting or plate, then all your efforts may not be crowned with success. Some fastening methods can securely hold objects weighing up to 9 kg. But most are still intended for small-sized elements weighing up to 1.5-2 kg. It is clear that a heavy clay plate cannot be held using double-sided tape.
The next important factor is the base material on which the fastener will be held. For example, the same double-sided tape will not stick well to textured wallpaper. However, it will feel quite reliable on smooth wallpaper or on a plasterboard surface. Brickwork or surfaces made of natural or artificial stone interact well with various adhesives.
Do not forget that it is not enough to securely fix the picture on the wall - it must be done relatively evenly. Only correctly located objects will create a harmonious environment. To do this, do not neglect the building level or marking immediately before starting work.
Material for making a calendar
What can you make a calendar from? Different materials can be used:
- Cardboard
- Thick paper
- Textile
- Tree
- Plastic
In addition, you can use a variety of decor to decorate the calendar. These can be pictures, flowers, twigs, leaves, ribbons, twine, buttons and generally any available materials.
It is enough to look at photos of handmade calendars on the Internet to understand that imagination in their design has no limits. Each master class on making calendars with your own hands is unique in its own way.
Methods for fastening light objects without nails
Weightless items such as banners or posters, calendars or daily schedules, photographs without frames and other thin elements can be mounted on the wall most quickly and reliably using the following methods.
No. 1. Double sided tape
Double-sided tape will be optimal solution for placing objects on plasterboard walls . This can be explained very simply - such fasteners do not violate the integrity of the gypsum board, which has a positive effect on its strength indicators. By the way, this figure decreases with each new hole that you make in such a surface.
The most aesthetically pleasing item will look if it is glued along all four edges , which will prevent them from bending. To fix a small strips no more than 1 cm wide along the edges . The larger the format, the longer the pieces of tape should be. Mark the location of the poster on the wall in advance and check its evenness. Neglecting this point and relying “by eye”, you may need to tear off the glued element in order to correct its position. In this case, you can tear both the object itself and tear off a piece of wallpaper or paintwork from the wall.
The protective layer on the second sticky side must be removed immediately before gluing . This way you won’t leave fingerprints on the sticky layer and dust won’t have time to settle on it while you “try on” the photo on the wall. The wall surface must be dry, smooth, clean, free of dust and other particles. If after some time you need to remove a strip of tape from a decent-sized wall without damaging its cladding, you need to carefully peel off a small section , starting from the corner, and slowly pull the rest of the strip down at a 90-degree angle to its orientation.
You can immediately use fabric-based double-sided tape, which can be removed without leaving a trace at any angle and from any surface. There is such a variety as foam tape, which can withstand much greater loads. It can be used to mount small paintings or photographs in plastic frames.
No. 2. Push pins
Push pins are also great for securely attaching lightweight items. There are many types of buttons, the heads of which are decorated. Thus, this visible fastener will not only not spoil the appearance of the poster or photo, but will also help decorate and even complement it. Push pins will adhere well to plastered walls, as well as walls covered with wallpaper, paint or decorative plaster. They are easy to stick into such a surface.
But in the case of concrete walls, difficulties may arise . If the layer of plaster under the wallpaper is already old and begins to crumble, the puncture sites may become too loose, and the buttons will periodically fall out. Take this into account when choosing this method of mounting in the children's room . You may not immediately notice the missing button, but your child can easily prick himself with it.
After dismantling such a fastening, barely noticeable traces will remain in the form of small holes . To remove them, just run your finger over the wallpaper and smooth it out at the puncture site. Thus, buttons are good if a private change of scenery is required.
Now let's get back to the concrete walls. possible to attach the same photo to them using the buttons . You just have to spoil the wallpaper a little. To do this, you need to choose buttons with a flat, thin cap .
Using a stationery knife, you need to make a horizontal cut in the wallpaper , the length of which is equal to the diameter of the cap with a small margin. Now make the same transverse cut . You will get a small cross . Using a knife, carefully separate the wallpaper from the wall and bend the corners. In the resulting free space, lean the button with its cap against the wall, after dropping a drop of superglue on it so that the tip is facing you. Now put a small drop of glue on each corner of the folded wallpaper and fold it back. When the glue dries, you will get a fairly strong fastening in the form of a small point protruding from the plane of the wall. All that remains is to pin the desired element on it. This method is good if you are not afraid of damaging the surface. After installation, you can hide the tip with a ball of foam or a piece of wine cork.
No. 3. Paper clip
A paper clip can also easily and quickly turn into a fastening element for light pictures or frames . To do this, it needs to be slightly altered. We will paste a paper clip under the wallpaper, as in the previous version. Only the cut will look a little different. The horizontal line should be slightly longer than the length of the paper clip, and the perpendicular line should be slightly larger than its width. A transverse cut is necessary to freely insert the paper clip into the wallpaper. You need to bend the edges and peel off the wallpaper from the wall along the entire length of the cut. The paper clip itself must be bent so that it resembles the letter “L”. It's like you used it to fasten a large stack of papers together and then took it off.
Place
one of the edges behind the wallpaper and see if it fits completely into the cut. If everything is fine, take out the paper clip, add a drop of glue , position the paper clip completely and press the wallpaper firmly into place. The glue should fill the entire void and be sure to get onto the paper clip. Leave the improvised fastener to dry for a day , and then feel free to hang the picture on it.
The edges of the wallpaper will stick well and traces of the cut will be almost invisible, especially if the wallpaper has a texture. At first it may seem that such fasteners are not particularly reliable , but in practice you will be pleasantly surprised . If you still have doubts, you can make several of these hooks. If the moment comes when you have to remove the paper clip, you don’t need to pull it out along with the wallpaper. Just bite it off at the very base with sharp nippers. Using the same principle, you can use a fishing or clothing hook . All stages of work will be similar.
No. 4. Sewing pins
Sewing pins are one of the neatest methods of fastening, which causes the least damage to the surface of the walls. Lean the photo against the wall and pierce it with a pin at a slight angle to the plane of the wall. Her leg should go behind the wallpaper, but not stick into the wall. Instead of pins, you can use a regular sewing needle. It will be less noticeable. Such fasteners can withstand weight up to 500 grams .
No. 5. Decorative tape
Decorative tape or decorative cord can also be used as a fastening element. With its help, you can arrange small paintings or photos in a more original way. In the desired place you need to make one of the above hooks .
Take a ribbon with finished edges, fold it in half and tie it on a hook . You will have two ends hanging freely. We will place the paintings on them. If you don’t really like the knot in the middle of the wall from an aesthetic point of view, you can tie a neat bow and another knot so that the bow does not come undone under the weight of objects. You can fasten the bow separately and then simply glue it onto the knot.
options for decorating the place where the ribbon is attached, ranging from artificial flowers to beautiful beads. Start from the general interior.
To secure the paintings to the ends of the tape , you need to apply a little glue to their reverse side . And for reliability, you can cut strips of thick paper and additionally glue them over the tape. By alternating the height of the decorative elements, you can create a very unusual collage.
In these simple ways you can attach small plates made of lightweight materials, photo cards or small paintings in plastic frames. If you make several fasteners of the same type on one line, and on the back side of the picture stretch a fishing line or nylon thread into the ears along the edges , then by hanging it in this way on all fastenings at the same time, you can significantly increase the strength of the fastening , and the permissible weight will increase several times.
Methods for installing medium-heavy objects
The same, beloved by many, modular paintings or photo frames made of wood with glass protective sheets weigh much more. And if the format exceeds A4 size, then they can even reach a weight of 1-1.5 kg or more. But this is not a reason to grab a hammer drill and remind your neighbors about yourself. If there are several painless fastening methods that can easily support large objects and heavy plates.
No. 6. Spider hook
A spider hook is a small, cunning item that, despite its simplicity and modest size, is highly reliable. It is a plastic product with a flat back side. On the front side there is a hook at the bottom, reminiscent of a hook on a clothes hanger. And on the upper edge there are four sharp spikes . They are the ones who provide reliable fixation.
The spider is attached to the wall as follows : a mark is made in the selected location, against which the fastener is placed with the flat side. The thorns will be looking at you. Now , using a small plumber's hammer you need to hammer these spikes into the wall . Do not hit with all your might so as not to damage the plastic surface or break it. As soon as the spikes enter the wall flush with the plastic, the hook will be securely fixed. Please note that the hook is located at the bottom. Therefore, the loop on the back of the picture or plate must be made at such a height that its surface completely hides the fastening element.
The spider hook can support objects weighing up to 2 kg . This is his average. The smallest model is designed for a weight of 1-1.5 kg , and the largest can withstand loads of up to 9 kg .
Removing such a hook is very simple. Grab hook with pliers at the level where the tenons enter the wall and simply pull it out. There will be a mark left in the form of four small holes, which can be easily smoothed out. This is definitely better than a dowel sticking out of the wall.
No. 7. Miracle Velcro
Miracle Velcro, or the “Command” system, has proven itself to be a great way to attach objects to flat, smooth walls. These Velcro are made of plastic . They have a small hook at the ends. This system consists of two parts that have a sticky layer . One part is glued to the wall, the other to the back of the desired item, and then they are connected to each other.
The beauty of these Velcro tapes is that they can be easily removed without harming the surface of the walls and reused, unlike double-sided tape.
There are several types of equipment , which are distinguished depending on the permissible weight. The minimum configuration is 4 sets of 8 small strips. The average one includes 3 sets of 6 strips. In the first case, one Velcro can withstand 100 g , and the entire set - 450 g . In the second case, the Velcro can withstand 400 g , and the entire set can withstand a load of up to 1 kg . To dismantle or rehang the painting, you simply need to remove the white stripe from the system.
No. 8. Kreps fastening system
Kreps fastening system is another modern system designed for fastening various elements to the wall without the use of nails and without harm to the surface. “Creps” is intended for objects that are attached to ropes or cables . Therefore, if you like this method, you will also need to take care of attaching the ropes to the back of the decorative items.
No. 9. Cornice rail
A curtain rail is another reliable way to hold weighty objects. And if you have an old cornice, you can borrow it from there. We also need strong fishing line or nylon thread .
We will make a hanging system that will allow you to place several objects at once and will not be conspicuous. Inside the rails there will be small plastic hooks to which you need to attach a fishing line or thread, taking into account the desired length and distance between objects. Now you need to glue the rail to the wall and secure the picture threads to the ends. The improvised installation is ready. The advantage of this design is that at any time you can add or, conversely, remove several items.
No. 10. Wine cork
This should be done with a sharp stationery knife . Glue the resulting circle with reliable glue. After complete drying, take a short self-tapping screw and simply screw it into the cork . The threaded elements will hold tightly in such a structure. You just need to choose very tight plugs. Wine silicone ones are also suitable. Reliability will depend on the adhesive chosen.
Master class on decoupage on wood: Hanging for the calendar “Happy people don’t watch the clock”
Time does not stand still, its gears do not rest, the pages of the calendar change from one to another... But you need to be able to enjoy what you have now, like these snails in love, for whom time has stopped... look how their hearts burn... Today we will do something unusual , a bright and textured pendant for a calendar!
Author: Ridzel Svetlana
Plywood blank measuring 21 cm (width) x 29 cm (height) x 0.6 cm (thickness).
We cut the varnished printout to the size of the image (printout on glossy photo paper, inkjet printer).
Place the printout in water for a few minutes (until the paper layer is completely wet).
Separate the varnish film with the image.
We transfer the film to the surface covered with decoupage glue and carefully smooth it with wet fingers, expelling excess glue and air bubbles.
I really love this polish. It dries quickly, is easy to apply, safe and wear-resistant. Yes, what am I telling you, you know it perfectly well even without me - the most favorite varnish among decoupage artists.
Tip #1: Never work with a whole large can of varnish, pour some into a sealable container!
Firstly, with frequent opening and closing, the varnish dries, and growths of dried varnish appear on the lid, which interfere with the tight closure and this makes the varnish dry even faster. Secondly, by dipping your brush into a large jar, you unwittingly transfer imperceptible dust particles into the entire volume of varnish, i.e. dirt, which will definitely come back to haunt you in the future.
Fastening in “serious” ways
In this paragraph we will look at ways to fasten objects or a series of objects that have significant weight, without using nails. It is worth noting that dismantling some elements will be difficult and will leave behind characteristic marks . In this regard, it will be necessary to update the wall covering.
No. 11. Picture board
This method is used when you don’t mind the floor and ceiling , but you do mind the walls. Please note right away that if you have a suspended or suspended ceiling, then this method is not for you . Unless, of course, this was foreseen in advance. It is worth noting that using an entire separate wall to place objects will help achieve unique interior solutions.
Such a board can become the center of the room and set the rest of its furnishings. Compositions that are designed to tell about something look more harmonious and thoughtful. For example, a series of landscape photographs taken at different times of the year, which convey the brightest moments of each month and tell the story of the decline and rebirth of nature. Or a series of black and white portrait photos of a married couple, which depict the story of their acquaintance and the most significant moments. Or the story of a person dear to you growing up. to highlight such an element using spot lighting . And it’s even easier to build such a structure. You can use real wooden boards, knocked together into a single sheet of the required size. More affordable options involve the use of laminated or sanded chipboard or MDF.
You can paint the surface yourself in a suitable color. For fastening, you need special brackets , which are sold at any hardware store.
It is best to place 5-10 cm from the wall in order to emphasize the individuality of this object and direct maximum attention to it. If you have already decided on the order in which objects will be placed on the board, then it is better and more convenient to make fastenings for them before installation. If not, you will have to use the stairs.
No. 12. Adhesives
Adhesives will help secure heavy objects without much effort. “Liquid nails” , “cold welding” and polymer glue have proven themselves well . The reverse side of the frame, plate or other object must first be degreased. The wall on which the item will be glued must be dry and clean.
Apply any of the products to the back of the painting and simply lean it against the wall, following the markings. Heavy objects must be coated with glue along the entire perimeter ; for lighter objects glue can be applied only to the top part . Hold the painting for a while until the glue sets. You can lean something on it for greater effect.
Polymer adhesive has a slight advantage - after dismantling it does not leave greasy marks on the wall surface. Some experts claim that the shelf life of such fasteners is about 1 year . Therefore, be prepared to periodically renew the adhesive layer.
Source
Where to begin
If you have never done anything like this before, you should definitely start by looking for detailed instructions on how to make calendars correctly. To do this, you first need to decide what kind of calendar you want to make.
Then stock up on the necessary tools and materials.
The set of tools for any type of calendar is approximately the same:
- Pencil
- Ruler
- Scissors
- Glue, glue gun or double-sided tape
For the kitchen calendar you will also need magnetic tape. And for the reversible one - springs or rings.
- And, of course, you need to prepare a calendar grid: monthly or for the entire year.
- It can be drawn by hand or printed on a computer.
- After this, all that remains is to make the calendar step by step with your own hands.