If you are a keen hiker, then you know how important it is to be able to provide yourself with an effective and reliable source of fire on the road. Without it, you will not be able to cook food, boil water for drinking, or keep warm in bad weather.
Since ancient times, people have solved this problem by making a fire. However, this method requires quite a large amount of firewood, some skills, and is not very good from an environmental and safety point of view. Therefore, they have been replaced by modern gas and gasoline burners, which make it possible to solve all problems with cooking as comfortably as possible. However, this solution also has its drawbacks. For example, if you are going on a multi-day hike, then the weight of gas cylinders or gasoline containers can be quite significant, and no one wants to carry the extra weight. Or, for example, you are about to fly on an airplane, where, as you know, it is impossible to transport such things, so there is a need to purchase gas and gasoline on the spot, which is not always possible.
Therefore, more and more tourists are turning to wood stoves.
They combine all the advantages of a fire with the utmost simplicity and comfort of a burner. To use such a stove, you will need a minimum amount of fuel of almost any type: firewood, branches, pine cones, leaves and even dry grass. Therefore, you can use a wood stove in any area, with the possible exception of the desert and ice ridges. And most importantly, it has excellent efficiency, which allows you to boil a liter of water using just a few dry wood chips. This is explained by the special design of such a stove, which uses the phenomenon of wood pyrolysis.
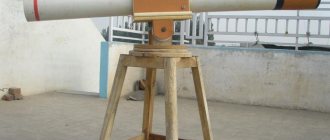
If you are interested in such a device, then you can buy one of the ready-made products, for example this one. Or you can spend one hour and make a wood-burning camp stove yourself, because you only need three tin cans of different sizes and our instructions.
So, first of all, you will have to get three tin cans of different sizes. The first, largest, will serve as a shell. The second jar is smaller because it must fit freely in the first. And the last, smallest one, is useful as a burner. In addition, we will need a marker, a drill, metal scissors and a small wooden block.
Making an auxiliary device
This wooden block is not part of the stove, but serves to make it. With its help, it will be more convenient for you to drill holes and perform other operations. Insert the block into the jar and draw two lines with a marker approximately at the level of the lid.
The distance between the lines should be approximately 7–8 millimeters.
Carefully cut out a rectangular notch. The top edge of the can should fit freely into this recess.
Let's position the wooden block in such a way that it provides reliable support for the can. The upper edge should fit comfortably into the notch we made.
Making a drip heater
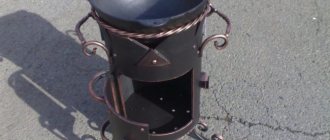
Most often, craftsmen use old oxygen and propane cylinders with a diameter of 220 and 300 mm, respectively, to assemble droppers. The former are preferable because of their powerful thick walls that can last a long time and not burn out. A pipe made of low-carbon steel (St 3-10) with a wall thickness of 5 mm or more is also suitable.
Advice. The ideal option for a durable housing is a pipe made of heat-resistant stainless steel alloyed with chromium, molybdenum or nickel (for example, 15X1MF or 12X18H12T) with a wall no more than 3 mm. Perhaps you or a neighbor has one in your garage. There is no need to buy it specially - it will be too expensive.
Select rolled metal for other parts according to the drawing of the furnace with top feed of waste into the combustion zone. The blower fan is a “snail” from a VAZ 2108 cabin heater or its Chinese equivalent, the fuel line is a stainless tube with a diameter of 8-10 mm.
The manufacturing technology is as follows:
- Make a fire bowl from a piece of pipe or take a ready-made steel container. It must be removed through the inspection hatch, so do not make the tray too large.
- Cut openings in the body for the chimney pipe and cleanout hatch. In the latter, make a frame and install the door (possibly bolted).
- Make an afterburner. Take your time to drill all the holes indicated on the drawing; do the bottom 2 rows first. You will complete the rest while setting up the oven.
- Weld a cover and an air duct with a flange for mounting the fan to the afterburner. Attach the fuel supply device as shown in the photo.
- Assemble the heating unit and connect it to the chimney.
Advice. For greater stability to the body, it would not hurt to weld a frame from a steel profile or angle according to the example shown in the photo.
The afterburner in the photo is a close-up - side and end views
. To regulate the heating power, you need to provide a fan speed control and a device for dosing the fuel supply (as a rule, an auto-drinker with a jet break is used). According to reviews from craftsmen on a popular forum where heat extraction issues are discussed, fuel consumption in the furnace can be monitored visually. The trend is this: if the oil flows in drops at the break in the stream, then less than 1 liter per hour burns, and when a thin stream flows, more than 1 liter per hour.
Recommendation. Control the fan performance using a cheap Chinese PWM controller (price is about 8 USD).
Different designs of drip bowls
After igniting and warming up the heater, it is necessary to set the optimal operating mode. The procedure is carried out according to the same scheme as with the miracle stove: you need to achieve the most transparent smoke from the chimney by drilling additional holes in the afterburner. The ideal flame color is blue, normal is yellow, and reddish is unsatisfactory. In the latter case, low heat transfer, high consumption and soot formation are observed. For details about the design and assembly of the furnace, see the video:
Making holes in the bottom of a large jar
First, draw a line along the bottom edge of the can. This line is needed to mark the points for the ventilation holes. In this case, a special dye is used for marking, but nothing will happen if you do it with a simple marker.
We drill holes along the line we marked. Their number and size are of great importance for the operation of the stove. If there are too few of them, there will be no traction, if there are too many, then the wood will burn out very quickly. Therefore, it is better not to overdo it here in order to be able to drill more holes after testing.
Advantages and disadvantages
Long combustion rocket stoves have the following advantages:
- high efficiency - at least 85%;
- high speed of heating the room - 50 m² will become warm in less than 1 hour;
- absence of soot - the exhaust during fuel combustion does not form soot, but is formed in the form of steam and carbon;
- the ability to operate on solid fuel of any type;
- low consumption - the fuel consumption of a rocket stove is 4 - 5 times less than a conventional stove under equal conditions: combustion time and heating temperature;
- the possibility of installing a warm bed;
- the duration of heat retention in a well-heated structure without adding fuel is up to 12 hours.
This stove has many advantages, but there are also disadvantages
Disadvantages include:
- manual method of controlling a heating device - fuel burns out quickly and requires regular reporting;
- the high heating temperature of some structural elements threatens owners with burns in case of accidental contact;
- the heating speed does not allow the use of a rocket stove for baths;
- the aesthetic component of such a device is not for everyone and is not suitable for every interior;
- danger of carbon monoxide entering living rooms.
Drilling the bottom of the middle jar
We make many holes in the bottom of the jar. Their size and quantity should be such that firewood cannot fall out through them.
The result should be something like this.
Assembling the structure
We insert the middle jar into the large one.
As a result, our stove consists of two cans, rigidly inserted into one another. At the same time, a small gap remains between their walls, necessary for air movement.
What are camping stoves for?
A camp stove is an effective “substitute” for a fire. But, unlike the same fire, it requires very little fuel. It can be:
- dry branches;
- tree bark, chips, cones;
- reed;
- coals left over from an old fire.
Note! The ratio of heat generated to fuel loaded in a camp stove is several times higher than in a campfire. In other words, with the same volume of fuel, the amount of heat is not the same.
It turns out that, having the same amount of firewood, you can cook dinner on the stove, but, alas, you won’t be able to do this on a fire. Thanks to domestic craftsmen, today there are many different modifications of camping structures. Conventionally, they are all divided into single- and double-walled. You can them:
- build at a resting place, using available materials;
- make ahead using an old pan, tin cans, sheet metal, etc.
At the same time, the camp stove itself should consume minimal amounts of fuel, be small-sized, light, convenient, and also heat the dishes, not the surrounding air.
Video - Camping stove. Detailed review
Making a burner
The type of burner in different designs may vary slightly. In this case, the option with round holes in the side wall is used. You have already learned how to do them well from previous operations.
We cut out the bottom of a small jar with metal scissors.
The edges can be smoothed with a hammer and filed.
Homemade pyrolysis oven from a gas cylinder
Design and operating principle of a gas cylinder stove.
You can make a pyrolysis oven with your own hands according to the drawing from an ordinary gas cylinder; it is also called the Bubafonya oven. Pyrolysis is the separation of organics from inorganics in the absence or deficiency of oxygen. During pyrolysis combustion, temperatures up to 500 degrees are reached. This is a necessary condition for the released pyrolysis gases from wood to burn out.
A pyrolysis furnace from a gas cylinder can operate on any solid fuel, and the fuel moisture level can reach 70%. The cylinders are made of ferrous metal, 3–4 mm thick. The upper part is made in the form of a dome and welded to a cylindrical base. Let's consider what manipulations need to be carried out to make a pyrolysis oven from a gas cylinder:
- cut off the upper convex part;
- in its central part we make a hole for the air duct;
- in the upper part of the conical body we make a hole for the smoke exhaust;
- we manufacture a gas divider with a pipe for supplying oxygen;
- We weld the chimney.
In principle, a homemade pyrolysis oven from a cylinder has a fairly simple design. In your work you may encounter various nuances.
When you cut off the top of the cylinder, the cut should be made 3 cm below the seam, since the joint is additionally reinforced from the inside with a metal plate 3 mm thick.
Gas diffuser at the end of the air supply pipe.
The hole in the lid should almost coincide with the diameter of the air supply pipe, and the latter should move easily. The diameter of the gas divider must also be matched to the size of the tank. At the bottom of the gas divider, ribs are welded to direct gas flows. It is better to make them curved so that the flow swirls. Remember, the fewer extra gaps, the higher the efficiency of the unit.
To protect yourself, before starting cutting, you need to fill the cylinder to the top with water, in case gas vapor remains inside. Even if there was liquid in the cylinder before, and there are definitely no gas vapors, a characteristic smell of propane may appear during cutting. Don't worry, it's the additives that are added to the gas that smell. They tend to settle on the inner walls. Additives are a necessary warning measure, since the gas itself has no odor.
The operating principle of a homemade pyrolysis oven from a cylinder:
- Fuel is placed in a cylindrical tank and ignited;
- a pipe with a gas divider at the end is installed on top (the latter should press the fuel);
- the lid is put on top;
- combustion occurs from top to bottom; as the fuel burns out, the pipe with the gas divider lowers.
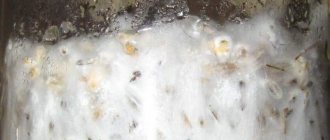
A feature of this fuel combustion method is the minimum amount of smoke and soot. There is really very little ash. After the first burning, a sharp smell will appear - this is the burning paint that covers the cylinder. There is no point in removing it mechanically, as it is ineffective. It’s easier to burn out everything unnecessary by testing kindling.
To make long-burning pyrolysis stoves with your own hands, you will need the following equipment:
- Bulgarian;
- hammer;
- pliers or pliers;
- welding machine.
To carefully cut a round hole with a grinder in a blank for a pyrolysis oven from a gas cylinder with your own hands, you need to take a small, already erased circle and make a 1 mm indentation along the cutting line. Then, using a large, new circle, cut a square in the center of the marked hole and make slits from it to the edges with an indentation of 1–2 cm, like the petals of a flower. Then the petals are bent inward with a hammer. The bend line will run exactly along the intended perimeter with a depth of 1 mm. The petals can then be broken off with pliers.
As a result, we get a neat hole. If you immediately use a large circle, then the cuts will inevitably go beyond the boundaries of the markings. After this they will need to be brewed. As you know, no welding seam can compare in strength to solid metal.
Incorrect connection of heating radiators to pipes can result in the radiators not heating.
You can read about how to lay heating pipes in the floor here.
We carry out tests
The main part of the wood stove consists of two tin cans inserted into one another. We load the middle jar with flammable material, which can be wood chips, branches, or cones. It is best to use dry branches on trees, because branches lying on the ground may be damp to one degree or another.
Set it on fire and wait for it to burn. At first, this may cause some difficulties, but after several training sessions it will be possible with one match.
When a confident, intense burning has begun, we place a burner on top, which we made from a small jar.
And then we place a kettle or pan on top.
If you watched the manufacturing process to the end and did not understand anything or it seemed too complicated to you, then check out another option. The video below demonstrates how to make such a stove without any tools other than a regular knife. It turns out, maybe not so neatly, but no less practical.
And we invite all our readers who have already used similar stoves in the field to share their impressions and advice with us.
Brick pyrolysis oven
Even if you have a diagram, you won’t be able to make such a stove yourself.
Brick kilns today are no longer as relevant as they were quite recently. However, a DIY brick pyrolysis oven can cope with heating a large house. We hasten to warn you that the work is complex and requires knowledge in this narrow industry. After all, from time immemorial, a good stove maker was worth his weight in gold and for good reason. The masters passed on the secrets to their followers like some kind of treasure. There are a lot of nuances and schemes, which are not so easy to understand.
If you still decide to make a pyrolysis oven out of brick with your own hands, despite the fact that it is practically impossible, the first thing you need to do is the foundation. The structure is quite heavy, so it requires a separate, powerful strip foundation. The entire structure made of refractory bricks is already placed on it. Fireclay bricks are laid inside.
Regarding the installation scheme, we repeat - it will not be possible to build such a complex structure on your own, even if you have a drawing. Stop futile attempts, waste your time, money and nerves in vain.
You need to hire a knowledgeable person, preferably on the recommendation of reliable people. All you have to do is watch the process and accept the work. Pay attention to what the chimney will look like. It is better to avoid a completely brick chimney. A metal insert must be installed in it or a ceramic chimney must be built into it.
Also note that a heat exchanger for a water heating system can be installed in the oven. By and large, this can be done according to the principle of installing a water circuit in a fireplace. We have already written about this earlier. DIY pyrolysis oven video: