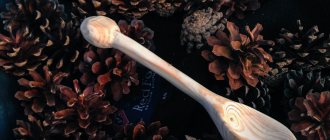
You can refresh the visual appeal of many items using the decoupage technique, which is very popular among creativity lovers. In this way, it is easy to make a new one out of an old cutting board and give it a second life, but in the form of a decorative element.
In addition, handmade products are in demand and original. However, not everyone is familiar with this technique and does not know how to decoupage boards with their own hands.
Information for Beginners
Mastering the technology of creating decoupage is not at all difficult, especially in our age of the Internet. You can use the advice and recommendations of professionals, or get many ideas posted on websites. At the same time, it’s worth trying once, and you will be able to decorate various household items with decorative works or give gifts to loved ones and friends.
Before you start doing creative work, study our master class and photos of decoupage boards.A little history
Decoupage literally means “to cut out.” It is one of the original decorative techniques. The meaning of decoration is that all sorts of images are cut out from various materials, after which they are pasted onto the surface to be decorated. After which the finish is opened with several layers of varnish.
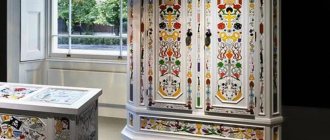
The history of this art direction began in the Middle Ages. The Germans were the first to try and recognize it, which happened in the 15th century. Then the carved images began to be used as decorative decoration. This technique gained particular popularity a little later in Venice. During the 17th century, pieces of furniture decorated with patterns of stones and natural materials (marble, wood, metal) were only gaining popularity. These were Japanese and Chinese style trends. Craftsmen skillfully carved out entire paintings, giving the pieces of furniture a luxurious oriental look.
In our country, interest in this type of technology appeared only at the beginning of the 21st century. Today, there are many techniques and materials for realizing incredible ideas. Computer technology played an important role in the development of this area.
Basic Steps
Decoupage technology is not complicated and consists of several basic steps:
- sanding the surface of the product;
- primer;
- painting with white acrylic paint;
- drawing an image;
- varnish coating;
- sanding layers of varnish after it has dried.
Note! Beautiful decoupage of a cardboard box - a master class on making stylish and gift boxes with your own hands (180 photo ideas and video instructions)
Drawing a picture
Let's start decoupage
Please note that our drawing is in a mirror image, on a white background. We will glue the printout with its face in the varnish
We apply varnish to our picture, as well as to the place where we will glue it. Without waiting for it to dry, use a file to apply the image to the surface. Now use a napkin, or better yet, a roller to remove the air along with excess varnish. If varnish has dripped onto the back side of our printout, remove it with a damp cloth. Put everything aside, drying will take approximately 2-3 hours.
After waiting for it to dry completely, soak the printout with a damp sponge and gently roll the paper with your fingers. During the rolling process, our pattern will gradually appear.
After removing the paper and developing the picture, we cover the entire board in 3-4 layers with acrylic varnish. Sand after each application.
Necessary materials
When working you will need:
- PVA glue or special for decoupage;
- acrylic: varnish, white paint and paints for artistic works;
- napkins with a pattern for decoupage;
- sandpaper of different fractions.
This set of materials is considered basic for decoupage.
Subtleties
Decoupage cutting board - despite the simplicity of the material, it requires attention for beginners. To avoid defects, do not forget:
- Remove excess glue; when it dries, it will leave marks and definitely ruin the drawing.
- Each layer of work, no matter what it is, paint, acrylic contours or another layer of design glued on top requires fixing with varnish.
Instructions for decoupage boards
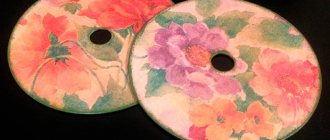
The ornament of the future masterpiece is chosen independently or selected from examples or photos. Mostly they prefer flowers, geometry, world map, chess pieces, icons, etc.Beautiful decoupage of boards is done both on used and new surfaces. Wooden products are best suited for this.
First you need to master skills such as sanding, sanding and painting. To fully use the board, you need to coat the surface with a varnish of increased strength and moisture resistance. Yacht varnish or parquet varnish is suitable for this, as it has suitable properties. For decorative items, light varnishing is sufficient.
Benefits for children
It is difficult to overestimate the positive effect that decoupage has on children. Fine motor skills are developed, because in the process of making products, children have to work with small parts, glue and cut them. Decoupage also helps children understand taste values and guidelines, what they like to work with most, and what colors to use. Another positive effect is that the child will engage in self-development instead of wasting time. Decoupage, as a means of developing creative abilities in children, is very often used in kindergartens, rehabilitation centers and in private practice.
Sequence of work
The decoupage technique is carried out in the following sequence:
- Prepare the surface by sanding it with sandpaper and sanding it.
- choose a thin napkin with the desired pattern. Cut it out using nail scissors.
- prime the area prepared for the drawing. Let the primer dry slightly.
- separate the layer with the pattern from the rest, since the work requires the thinnest piece of napkin. – stick the design onto the surface using an adhesive composition, which is applied gradually with a brush. The napkin is applied from top to bottom and covered with glue. Avoid bubbles and creases.
- secure the drawing with acrylic varnish using foam rubber and let it dry.
- decorate the edges of the board with a corresponding ornament, using paints with mother-of-pearl of a suitable color.
- Apply another layer of varnish and leave to dry.Choice of decoupage theme.
Selecting the right topic is quite simple. For this purpose, newspaper clippings, magazine pages, book illustrations, gift paper wrapping, lace and fabrics are used. It is better to cut out designs using sharp nail scissors or razor blades.
An ideal theme for decorating kitchen boards is the image of vegetables, fruits or kitchen appliances.
You can make the image even and smooth with a mini roller, spoon or rolling pin. Be sure to remove excess glue using a brush, sponge or paper.
Making a blank
There is always a favorite board in the kitchen that you hate to part with, so let’s decoupage the old board. Select the side on which the drawing will be located. Sand the surface with sandpaper and remove dust with a napkin. Using a brush, apply the primer evenly over the entire surface of the board and let it dry thoroughly.
Each stage of decoupage boards with napkins ends with thorough drying - this is the main guarantee of an excellent result of the finished work. Sand the board again, remove dirt with a napkin and apply a second layer of primer, dry. Make sure your brush is always clean and dry.
To finish the workpiece, use a sponge to paint it with white acrylic paint. Apply the paint with jerky movements, pressing and lifting the sponge from the surface.
Try not to smear the paint on the board. After the workpiece has dried, lightly sand it and wipe with a napkin. The workpiece is ready.
Craquelure technique
One of the ways to perform decoupage of wooden products is the craquelure technology. The method involves applying a special coating that creates the effect of a cracked surface. The result is original decorative items that look like antique items.
Craquelure compositions can be purchased at art workshops.
They come in different types depending on the application technique.
Single-phase compositions are applied in several stages, forming a thick layer. As it dries, it cracks.
The two-phase method involves applying a base in the form of a special paint. Often, silver or gold paint is used for the base. Then a special varnish is applied on top, which, reacting with the base, creates the effect of an aged, cracked surface.
Interesting ideas
The decoupage technique allows you to decorate objects in any style. For this reason, it is in great demand when decorating rooms.
At the planning stage, it is necessary to carefully consider the appearance of the item and select suitable elements for decoupage.
Delicate floral patterns will look harmonious on a white or very light background.
Artificially aged items will fit well into a classic design.
Bright compositions are perfectly emphasized by a dark background.
Black and white illustrations or old newspapers are perfect for modern interiors.
A creative approach to work will allow you to create bright and unusual interior items.
Useful tips
Wooden surfaces decorated with decoupage fit harmoniously into any interior. Using different design methods, it’s easy to create unique interior items with your own hands.
A few useful tips will help you achieve better results:
- It is recommended to apply the glue with a soft brush to create an even layer,
- Gilding looks impressive to create “antique” products.
For uniform painting, work should be done on horizontal surfaces. For this reason, it is recommended that furniture pieces be dismantled and then reassembled.