The stores have a huge assortment of beautiful Christmas tree decorations, stars, cones, bows and many other New Year's accessories. Factory production produces beauty in large quantities and it can be found on the Christmas tree in different families - and that’s good! However, you want to do something special and unique, and your skillful hands will help you with this. In this article we will look at how to make bows for a Christmas tree from ribbons with your own hands.
Chic bow made of satin ribbons
You will need: red ribbon 5 cm wide, white ribbon 2.5 cm wide, white ribbon 0.5 cm wide, needle, thread, lighter, scissors.
Master Class
- Prepare 4 pieces of 15 cm long each from red 5 cm ribbon.
- Prepare 5 pieces of 15 cm long each from 2.5 cm wide white tape.
- Select 4 pieces of each width and place a narrow ribbon in the center over a wide one.
- Melt the ends of the strips using a lighter.
- Bend the pieces in half.
- Assemble a bow from the blanks using a thread and a needle. Carefully do this work using a basting stitch.
- Pull and secure the thread.
- Sew the remaining white linen into the center of the bow.
- Prepare a piece of the thinnest white ribbon and sew it as a pendant of the length you need.
A chic bow made of satin ribbons is ready! I recommend watching this video!
DIY crafts – How to Make Bow / Simple Way to Make ribbon bow / diy decorative bow / Julia DIY
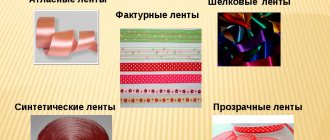
Standard forms
There are not so few of them:
In addition, they can be simple and composite, multi-layered and of different textures. Fastening - on a knot, clip or elastic band. Choose what you like, combine and share ideas.
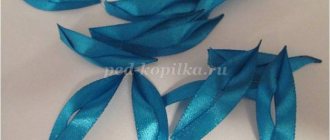
Floral ribbon bow
You will need: textured ribbons of the same width, scissors, thread and needle, lighter, rhinestone.
Master Class
- Prepare 7 pieces of the same size.
- Fold the piece in half and cut the ends diagonally. Repeat this process with all the pieces.
- Melt the ends of the strips using a lighter.
- Thread the pieces onto a thread and a needle as shown in the image.
- Tighten and secure the bow.
- Prepare a thin ribbon and secure it in the center.
- Attach a rhinestone to the center of the bow.
- Prepare a piece of ribbon and sew it as a pendant of the length you need.
The floral ribbon bow is ready!
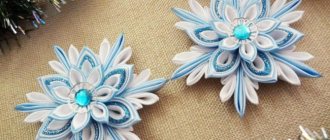
What other bows for the Christmas tree can you make with your own hands, photo
Ribbon bows can be used to decorate not only the Christmas tree, but also greeting cards and a box with a New Year's gift. You can choose ribbons of various color combinations and arrange a real New Year's “Scottish fireworks display”.
The photo shows a variety of bow options made in a similar style.
Original ribbon bow
You will need: textured ribbons of two colors of the same size, scissors, lighter, thread, needle.
Master Class
- Prepare 2 pieces of the same size in each color.
- Fold in half and cut ends diagonally.
- Melt the ends of the strips using a lighter.
- Fold the ribbons in a cross and sew them in the center.
- Tighten the thread, wrap it around the center and secure.
- Prepare a thin piece of ribbon and decorate the center.
- Prepare a piece of ribbon and sew it as a pendant of the length you need.
The original ribbon bow is ready! I recommend watching this video!
How to make a RIBBON BOW of any size / Satin ribbon Bow / ✿ NataliDoma
Velvet charm
He is always in fashion. More often it is combined with beads or ornamental stones. Velvet on a flexible base will suit every coniferous fashionista. So, bend the ribbon in half and cut the ends diagonally. (Repeat this twice). Fasten the resulting elements in the middle, sew them together using a buttonhole stitch, and pass a wire between them. Form a classic butterfly from 10-12 cm and plant it at the bend. Place rhinestones or beads across the canvas.
It's a fact: a Christmas tree decorated with velor bows does not tolerate many toys. In this case, European minimalism will save you.
Christmas ribbon bow
You will need: textured ribbons of different widths, scissors, lighter, thread, needle.
Master Class
- Prepare a piece of the widest tape. It will be the base and should be larger than the other two parts.
- Fold it 3 times.
- Gather in the center and tighten with thread.
- Wrap the thread around the center, then secure it.
- In the same way, form the middle bow, it should be smaller than the previous one.
- Sew bows in the center.
- Form a small third bow and sew it to the two bows in the center.
- Prepare a thin piece of ribbon and decorate it class=”aligncenter” width=”812″ height=”578″[/img]
- Make 10 small identical pieces and twist them using scissors.
- Sew the sections together to form a curly flower, then sew into the center of the bow.
The Christmas ribbon bow is ready!
Tips from needlewomen
Experienced craftswomen know that any creative work requires compliance with certain rules. This helps simplify the process and avoids having to redo the same thing several times.
Some recommendations:
- Before work, sharpen the scissors, since the tape needs to be cut in one motion.
- Do not forget to handle the ends of the material with a lighter so that the threads do not spill out.
- To cut small parts, you need to make a template and fix it to the fabric with a paper clip.
- You can use a sticky roller to collect small debris at the end.
- You need to start with easy jewelry options, and having already gained some experience, take on complex ones.
Classic satin ribbon bow
You will need: a satin white ribbon 5.5 cm wide, a golden lace or other pendant, 3 gold sequins and 3 beads, a needle, thread, scissors, a lighter.
Master Class
- Prepare a ribbon 55 cm long.
- Fold in half and cut ends diagonally.
- Melt the ends of the strips using a lighter.
- Fold the ribbon into a bow shape as shown in the image.
- Sew the center of the bow with thread, then pull it off.
- Prepare a 5x5 cm square of white tape.
- Melt the sections with a lighter.
- Fold the square in half, sew along the edge and turn it inside out.
- Wrap this strip around the center of the bow and sew at the back.
- Sew sequins and beads.
- Prepare a lace 14 cm long, form and sew a loop.
The classic bow made of satin ribbons is ready! I recommend watching this video!
Satin ribbon bow