The use of a compressor in an aquarium is explained by the need to supply air to the water and saturate it with oxygen. In most cases, a deficiency in the gas mixture is caused by excessively high liquid temperatures due to the action of room heaters. If you do not use a device for additional air supply, the likelihood of fish death under such conditions increases significantly. According to natural science laws, as water cools, the limit of oxygen saturation increases, therefore, its best supply will occur in reservoirs with cooled liquid.
- 1 Why do you need a compressor in an aquarium?
- 2 Mr. Tail recommends: the main types of professional compressors 2.1 Pump for an aquarium
- 2.2 Mini compressors
Why do you need a compressor in an aquarium?
Installing a compressor is one of the procedures aimed at maintaining a stable state of the biological system formed within the aquarium. It is necessary to solve both vital and aesthetic problems:
- Constant aeration. When the device operates, oxygen bubbles rise, which makes it possible to increase the proportion of the chemical element.
- Mixing layers of water. The compressor provides temperature control throughout the tank, acting like a fan, which minimizes the negative effect of heaters. Fluid stagnation is excluded due to its circulation.
- Improving the appearance of the fish house. Rising to the surface, air bubbles add aesthetics and attractiveness to the tank.
- Elimination of film on the top layer. If a compressor is not installed in the system, dust and bacteria form a layer that requires prompt removal.
- Creating conditions close to natural. Many types of fish need to imitate the flow in order to adapt to a new environment and be comfortable in it. When using the device, a fluid movement occurs, similar to the flow in reservoirs.
Materials and tools
To make an aquarium compressor with your own hands, you will need available tools. The principle of operation of a compressor in an aquarium is simple: it accumulates air in itself and then supplies it to the reservoir. Based on this, it is very easy to figure out what materials and tools you may need for DIY production.
Materials for creating an air compressor:
- air container (balloon or chamber from a ball, bicycle wheel);
- small electric motor;
- any pump, bulb;
- IV tube;
- eccentric;
- IV clip;
- tee for connecting tubes;
- clamps.
Tools for creating a device:
These are not all possible items that may be needed for a homemade device. Please note that the amount of materials required often depends on the type of product. So first, read the different instructions.
Mr. Tail recommends: the main types of professional compressors
According to the principle of operation, the compressor can be membrane or piston. In the first version, air comes from a chamber connected to a membrane. The reason for the movement is the pressure difference provoked by vibrations of the magnet (not the solenoid) acting on the membrane. This design does not require large amounts of energy during operation, rarely fails and is easily repaired. Diaphragm compressors (vibration) are cheap, but they are not recommended for use in aquariums larger than 150 liters.
In piston engines, air flows are pushed out due to the work of the piston - the rotational movements of the shaft are converted into vibrations. This device is designed for tanks with a volume of about 200 liters. It has greater productivity than the previously mentioned type, and durability is approximately at the same level. Even powerful piston compressors can be chosen for use in rest rooms, as they are almost silent. The disadvantages include increased electricity consumption and high cost.
Aquarium pump
Separately, it is worth highlighting the pump - a type of circulation pump that also performs the functions of a filter. It is capable of working both to purify liquid (air filter) and as a means of saturating it with oxygen. The design includes:
- filter compartment;
- motor (rotor with impeller and stator);
- aerator.
Dirt removal is carried out thanks to a multi-layer flow filter. The pump equally successfully creates air flows in aquariums of different sizes.
There is almost no noise during operation, glass damage is excluded due to the immersion of the structure in the tank.
Mini compressors
Separately, you can provide a description of water mini-compressors. They are designed for small aquariums in situations of temporary power outage. Using batteries, stand-alone devices operate loudly enough for no more than six hours, after which they need to be turned off.
Content recommendations
Aquariums are often installed in places where large numbers of people gather. In order for the microclimate to remain optimal, the compressor must be constantly running. If an electromagnet was provided during the manufacture of the device, then the compressor should be hidden so that noise does not interfere. You can hide it in a pipe that will run under the aquarium. You'll have to buy an air duct. It is needed to transfer air to the aquarium. This will allow the system to function optimally.
To avoid a strong shock wave from the engine, you need to create a protective level. And the noise of the device itself is perfectly compensated by the wooden box.
The compressor power must correspond to the displacement of the aquarium. It is necessary that the air flow is soft and moderate. For this purpose, the displacement is calculated. Even for large engine volumes, 12 W will be enough.
If the air cooler is too powerful, it can cause aquarium inhabitants to become ill or die. A high power motor will create strong water circulation. This will disrupt all the natural and life processes of the fish. If there is a lot of algae in the aquarium, then the compressor should be turned off during the day. Otherwise, you can create excess oxygen.
How to make a compressor yourself
The task when creating a device is to implement air intake with its subsequent controlled flow into the aquarium. For assembly you need available parts and tools:
- a rubber chamber that acts as a container;
- hand pump;
- tee;
- tube (material – plastic) from a dropper with clamps;
- clamps;
- electric motor (compact, low power).
It is possible to create a stationary compressor or one that runs on batteries. To start working on the first one, you need to take a tee, a chamber, a pump and a tube with clamps. Procedure:
- Cut the plastic tube into 3 parts. One should be longer than the others.
- At the end of a long piece, leave a lot of holes with a needle and process it with a lighter, attach a clip.
- Use a tee to fasten all 3 parts, securely connecting them with clamps.
- Attach one of the two small pieces to the pump and secure it with a clamp from the tube, attach the other to the chamber.
- Pump air into the chamber as much as possible. Lower the long part with the needle marks into the tank and open the outlet flow by activating the clamp that regulates the air flow.
A compact homemade battery-powered compressor for an aquarium is useful on the road and during a power outage. To create it you need to follow the instructions:
- Cut a plastic bottle or canister into 2 parts.
- Solder several wires to the motor and attach the cooler.
- Secure the device to the bottom of the bottle with glue.
- Attach a tube to the neck, having first soldered its end, and leave many holes on the other part of the tube with a needle.
- Attach a button and a hole for batteries to the wires, close the bottle.
Instructions for making an aquarium compressor
A compressor is a necessary thing in an aquarium. It saturates the water with oxygen, without which neither fish, nor plants, nor other aquatic organisms can exist. This device is not that expensive, but you can easily make it yourself. How to make a compressor for an aquarium quickly with your own hands?
Video “Compressor for an aquarium”
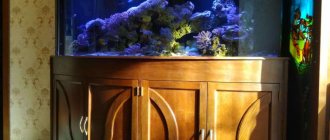
How to install
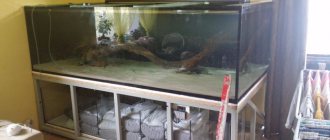
In order to reduce energy consumption and noise, it is recommended to install equipment above the water level. External placement directly on the lid is dangerous due to the vibration generated during operation of the device. It is best to place it on a table or shelf; you can fix it with a nail on the wall (mounted option). Be sure to maintain a distance between the compressor and other electrical appliances, especially a computer and other expensive equipment.
If such an installation is not possible, a non-return valve will be required, with which the device will be placed in the aquarium cabinet.
Sprayers and hoses are placed on the bottom, which can cause them to float to the surface and greatly reduce the efficiency of the compressor. The problem can be easily solved on your own with the help of objects that perform decorative functions in the aquarium (driftwood, stones and other weights).
If the device is located below the water level, you need to include a check valve in the circuit. Its membrane regulates the movement of liquid so that it flows only into the aquarium.
At the first stage, the hose is cut crosswise, leaving a section protruding no more than 4 cm above the wall. Then each side must be attached to the check valve nozzles. After connecting the hose to the compressor, you should check whether aeration is effective.
Device placement
Making the mechanism is quite simple. First you need to choose a location. You can place it inside the container, above the surface, or outside. Hoses with a sprayer are placed at the bottom. It is not necessary to provide fastening; you can press down the hose with a heavy stone or shell.
For the tube, it is better to choose silicone or any other elastic rubber. It needs to be able to easily withstand deformation and not crack. The service life of the device depends on this element.
The tube must be inert and not release any harmful substances when exposed to water. If you don’t have silicone, it’s better to buy it separately at a pet store. You can also use a hose from a drip.
Repair
A malfunction of the compressor mechanism is indicated by excessively loud noise during operation. If a membrane aerator is installed, the reason in most cases is that the valves are too dirty. To solve the problem you need to do the following:
- Turn off the device.
- Remove the cover and use tweezers to pull out the valves. When held with glue they come off.
- Clean the surface with a cotton swab dipped in alcohol.
- Remove dirt from air ducts and valve seats.
- Let dry and assemble.
During prolonged use (more than 12 months), the compressor membrane may rupture. Failure can be determined by power loss and loud noise. Replacement is not difficult - just unscrew the cover, find the damaged elements, pull them out and install new ones.
Piston compressors often have to be turned off because the armature winding of the motor has burned out. This is due to natural wear and tear or voltage surges, or water getting inside the device. To solve the problem, you should contact service centers.
Tools and materials
At home, you can build an air blower for an aquarium yourself using available materials. To create a conventional mechanical air compressor you will need:
- a car pump (a hand pump from a bicycle will do);
- silicone tube (an excellent solution is an IV tube);
- 3-way valve;
- a mechanism for squeezing the tube (you can use a clamp from a dropper);
- clamps;
- car camera (for a small tank up to 80 liters, a soccer ball is enough).
For a battery-powered device with a cooler you will need:
- not very large PET bottle;
- a small electric motor (a cooler from a computer fan is perfect);
- IV tube;
- glue (it is advisable to use instant action);
- wiring;
- batteries;
- battery pack (a box for storing batteries with an on/off button).
To make a 4-chamber mini air compressor, you will need the following tools and materials:
- PET bottle with a large neck – 4 pieces;
- round balloon – 4 pieces;
- elastic bands - 4 pieces;
- 5 microgram syringe – 4 pieces;
- plastic measuring 10x15 centimeters - 1 piece;
- PET bottle cap – 1 piece;
- a piece of plastic measuring 5x5 centimeters - 1 piece;
- paper clips – 5 pieces;
- dropper – 1 piece;
- gearbox with motor – 1 piece;
- switch – 1 piece;
- battery – 1 piece;
- wires – 2 pieces;
- electric soldering iron;
- knife;
- Super glue;
- hot melt adhesive.
DIY aquarium sprayer
An alternative to a submersible aerator is considered to be a homemade water sprayer, which can be easily made at home without any special knowledge. It can be collected in one of two ways:
- Take a short rubber tube and put it on the outlet hose. Using a needle, make small holes on each side and plug the free part. There is an option to do without a nozzle, but it is better not to spoil the design.
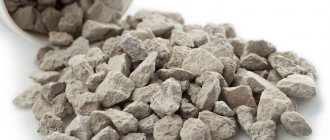
- You can add aesthetics to your aquarium by making bubbles rise from natural rocks. In this case, you will need a breed that does not affect the quality of water (an indicator of acid and alkali), as well as a mount that securely fixes the hose, the length of which should be comparable to the length of the aquarium. The holes are created in groups at the same distance from each other for uniform aeration. The tube is placed on the bottom, after which the diffuser is masked with plants.
If there is a low, elongated “can,” air should come from several groups of points. Otherwise, aquarium animals will be localized in one part of the tank, which will negatively affect the appearance.
Water pump for aquarium
Features of an aquarium water pump
It must be said that the functions of this pump are not limited to mechanical distillation of water. In particular, its work helps maintain uniform temperature throughout the entire water column. By supplying water to the filtration system, it is also useful in cleaning the aquarium. Finally, a water pump can also have decorative functions: it depends on the imagination of the aquarist whether it will be a decoration of the aquarium design, whether the bubbles it erupts will form a fountain or a waterfall.
From the point of view of its location relative to the aquarium, the water pump can be submersible (deep) and external (external); For a modest-sized aquarium, the second option is better. It is clear that each option will have its own fastening, but the way it is fastened does not affect the power of the water pump at all.
You can make a water pump for an aquarium yourself. For example, to make a simple external pump, you will need a plastic box as a base: on its lower surface you need to make two holes for the hose, and on the lid - a larger hole into which a thin rubber membrane will fit.
By gluing silicone petals into the holes made at the bottom of the box, you can use a crank to connect the membrane to a small motor (for example, from a toy car), which will then be connected to a power source. Once all this is completed, a hose is connected to the assembled structure. The water pump for the aquarium is ready.
WomanAdvice.ru>
Advantages and disadvantages
The main disadvantage of a homemade mechanical compressor is that for it to work you need to pump up the chamber every day (sometimes several times a day). Another disadvantage is the impossibility of using such a device in large containers. It’s also not possible to leave the device for a couple of days without supervision.
The advantages are:
- Quiet operation. Compared to piston and membrane units, it does not make any noise, so the aquarium can be installed in the bedroom.
- Autonomous from the electrical network. Even in the event of a power outage, this will not affect the life of the fish at all.
- Long service life. Due to the absence of electromechanized units, the use time of this device is almost unlimited.
Battery operated with cooler
When long-term transportation of an aquarium with its inhabitants is necessary, the question may arise of how to provide the fish with oxygen along the way. It will not work to take a stationary device with you that operates from the mains. A homemade mechanical air blower is also not suitable because it is too bulky. In this case, you can make a compressor for an aquarium that runs on batteries.
Along with mobility, the big advantage of this unit is that it is almost silent.
The compressor manufacturing procedure is as follows:
- cut the plastic bottle into 2 halves;
- solder or screw 2-phase wiring to the cooler motor;
- secure the engine inside the bottle with superglue;
- insert a pipe into the neck of the bottle (the free end must be soldered in advance and pierced at several points with a thin needle - it will act as a sprayer in the aquarium);
- connect the wires to the battery pack;
- combine the halves of the bottle together, wrapping the joint with tape.
It must be remembered that a powerful motor can significantly harm the inhabitants of the aquarium. The movement of liquid at high speed will disrupt all the life processes of the fish, as a result of which they may die.
4 chamber compressor for aquarium
The manufacturing procedure is as follows.
- Cut off the lid of the plastic bottle with the neck. We remove the bumps and the plastic strip. Unscrew the cap from part of the bottle.
- Cut out the round part of the balloon and divide it into 2 parts. We fix one part of the ball with rubber bands on the neck of the bottle.
- Carefully stretch the ball and cut off the excess that sticks out more than 2 millimeters from the elastic.
- On the covers we mark 2 socket-type points and use a soldering iron to make holes. We remove irregularities.
- From the rest of the balls we cut out strips measuring 0.5x1 cm. We glue them to the lids on one side of the hole. In this case, we glue one strip on the outside of the lid next to one hole (this will be the exhaust valve), and the second on the inside of the lid near the second hole.
- We cut off the area of the syringe where the needle is fixed and glue it onto the outlet valve using hot glue.
- We combine the necks and lids with each other - these will be mini-compressor chambers.
- Glue mini cameras to the base, 2 on each edge. In the center of the base we glue the bottle cap with the hole down.
- We cut out 2 circles with a diameter of 2 cm from plastic. We make a hole on one side and thread the aligned paper clip through halfway. We fix the remaining part with glue to the circle.
- We take the engine with the gearbox and glue the mugs with paper clips onto the side protrusions. We apply a large amount of glue in order to secure the circles to the maximum.
- We combine the gearbox with the cover, which was fixed in the center of the base.
- Cut the cotton swab into 4 parts. Straighten the paperclip and make a loop at one end.
- Insert part of a cotton swab into the loop. Then we wind a thread around it and soak it with superglue.
- We put the loop on the gearbox and measure the distance to the free cover. Before removing the excess, we wrap the edge and glue it to a small piece of plastic. After a while, when everything has frozen, we connect it to a mini-supercharger.
- After connecting all the paper clips to the gearbox, bend the tip onto the drive to secure it. Solder the wires to the motor. We glue the battery, the switch and solder the wires.
- From a section of a dropper we construct a connection for 4 pipes, which we cut in advance. To do this, create holes in the container using a soldering iron.
- We connect one end of the pipe to the edge of the syringe, and insert the second into the dropper. We fix them with hot glue and glue the dropper to the base next to the battery. The mini supercharger is ready.