Graduation day, the first of September or the birthday of your favorite teacher - many holidays require gifts for school. What to give to the school as a souvenir, for the benefit, so that the gift remains for many years and brings joy to everyone? And is it possible to make a worthy gift to the school yourself, with your own hands? Undoubtedly, it is possible, how! Handmade gifts always bring delight and joy, because they have so much soul!
It is important, when choosing what to give to the school, and what gift you can make with your own hands, not to rush into making a choice. Because this is a responsible matter! You want the gift to evoke the most pleasant emotions, keep the memory for a long time and not remain gathering dust in the far corner, right? Choose the best and keep in mind that manual work will take some time, but it will be worth it. Because only such gifts, made with your own hands, bring maximum pleasure and real joy!
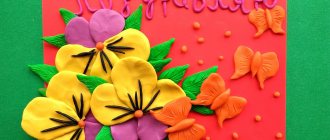
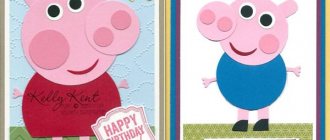
Happy Birthday card, school
Happy Birthday card, school - do it yourself
Happy birthday school! We congratulate you! And we give you a piece of our heart from ourselves.
How to make a “Happy Birthday School!” greeting card We offer a simple and quick option with our own hands.
First, select the text of the congratulations (see below). There are quite a few pictures for this request. Most beautiful backgrounds can be found in school presentation templates or school presentation templates. Download the picture in full scale.
Let’s take, for example, this picture as a basis. In Word, enter the text of the congratulations in a beautiful font in the right place on the page. We print it on a white sheet and fill in the remaining elements and color them with pencils. This is roughly what happens. The background of the board is green (badly scanned).
To complete the drawing, you can choose the simplest school-related objects that are easy for children and adults to draw: a bell, a globe, books, flowers, etc.
Congratulation texts "Happy Birthday, school!"
The glare of the sun in the windows, The desks are strictly in a row. Happy Birthday, school, - Joy for the children! You teach a lot, You give a lot, So that we become better, You bring light to the masses! We sincerely wish you Happiness on this bright day! Congratulations! Let laziness disappear, Troubles and worries go away forever! And don’t be strict with us, Because we love work
***
It's a nice day at our school. We're not too lazy to study there. Congratulations to our school. We're happy about it every day. We go to study with all our hearts. We'll gain a lot of knowledge. We'll always be proud of it, And when we leave.
***
We congratulate the school on its birthday! We send her our warm greetings! We wish the school hundreds of more years to lead children to the teaching of the light. We wish the director, teachers and head teachers joy, patience, good luck! May a hot geyser of knowledge always flow within the kind walls of our native school!
Collection by Elena
Ferrero Rocher Chocolate Reindeer Treats
Make some adorable little ferrero rocher chocolate reindeer treats for your friends and family! They are so easy and they will LOVE them! Christmas treat gift idea. Cute reindeer craft art project for kids.
Paper Heart Flower Craft with Template
We have another wonderful heart and flower craft to share with you! This paper heart flower craft is perfect both for Mother's day (a great alternative to your regular Mother's day card) or for V-day.
Gift Horse Party Favors | Handmade Charlotte
These painted cardboard and popsicle stick horses are a great way to gift wrap a small treat, like a handful of candies or any other tiny treasure!
Little Easter Lollipop Bunnies
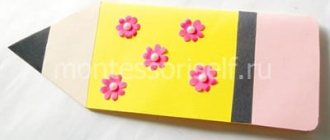
PENCIL CRAFT
children activities, more than 2000 coloring pages
Sunfrog / children's furniture and accessories
Furniture and accessories for children's rooms are made only from environmentally friendly materials!
Creative workshop DECORETTO
Author's toys, decorative and interior items, photography, interesting ideas and new trends, Perm
. – ) – Galina2405
Pet Paw Print Heart Openwork Photo Charm
DIY your Christmas gifts this year with 925 sterling silver photo charms from GLAMULET. they are 100% compatible with Pandora bracelets. DIY: christmas tea trees
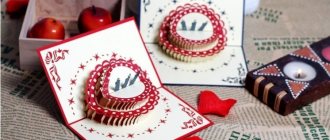
Graduation Card
I saw this Graduation Card on Pinterest, but was unable to find any instructions on how it was made. After an evening of “playing” I final…
Wall newspaper for Victory Day
Victory Day is just around the corner, I hope that the idea of such a wall newspaper will be useful.
Crafter Blog
Easy DIY Felt Crafts, Felt Crafts Patterns and Lincolnshire Felt Crafts. Pics 80996451 #feltcrafts #craft
Stage decoration for the holidays
I want to share with you my design for the stage backdrop...I use fabric - voile, lining fabric, drawings, balls, etc.
Оформленме музыкального зала в лОУ к праздникам
R'арианты оформления музыкального зала РІ детском саРґСѓ Автор: Якушева Светлана Сергеевна, музыкальный руководитель МлОУ С†РµРЅС ‚СЂ развития ребенка – детский сад в„– 34 «Жвездочка» Рі. Серпухов, РњРѕСЃРєРѕРІСЃРєРѕР№ области Оформление музык
Stylish DIY birthday card for your aunt
A handmade greeting card for your aunt’s birthday, given from the heart, will not only be remembered for a long time, but may well become the highlight of the holiday day . It is quite simple to do, and it does not require large material investments or great physical effort. The result will be interesting, original in its own way and, of course, memorable.
Simple paper card
To make a paper card for your aunt’s birthday with your own hands, you will need the following tools and materials:
First of all, several circles of different diameters are marked and cut out on colored paper with a compass. Then, using scissors, moving them from the edge of the paper circle to its center, a spiral is cut out - the basis of future flowers. For greater beauty, you can use scissors with curly blades.
Using a wooden stick, which can be an ordinary pencil, the spirals made are twisted from the edge to the central part - you get a kind of flower. To prevent it from unwinding, the center of the twisted spiral is fixed with a small drop of glue. It should be taken into account that the splendor of the finished “bud” depends on the density of the twist.
Gifts for the teaching staff
The central figure in every school is the director. This person cannot be ignored. An organizer is considered a classic gift option for a school leader.
,
wall clock
,
notebook
or
diary
.
An interesting gift for the director could be a gift set of encyclopedias
on the subject he reads. A good option is a school bell system, which will allow better control of the educational process.
For the head teacher, you can purchase a large board for posting various announcements
. There are options for self-adhesive or magnetic boards. An option with an organizer or stationery set is also suitable.
Handmade fountain pen - a gift that exceeds expectations
Volumetric postcards using scrapbooking technique
Scrapbooking is the art of decorating photo albums, but its techniques are also very popular when creating cards.
Using Kirigami elements, using the Scrapbooking technique, you can also make a three-dimensional postcard with your own hands. We cut out and fold “steps” from scrap paper for the “pop-up” candles on the second half of the card. Glue the candles and glue the resulting blank onto the base of the card.
You can make a simple but original greeting card from scrap or colored paper. We cut out the candle flame and decorate it with sparkles, then glue it to 2-sided tape. We glue the second part of the candle with glue. The congratulation itself can be tied or glued to an elegant satin ribbon. Simple and original!
A postcard made from paper of a different texture will look completely different)
By placing each element of the card on top of each other, again using double-sided tape, you can create such a voluminous, bright cake!
Let's take a look at Tatyana Sadomskaya's master class on how to easily make a voluminous, delicate postcard using the Scrapbooking technique using ready-made pictures.
To create such a postcard, Tatyana used:
- scrap set ScrapBerry's “Favorite Pet”
- scissors
- thick cardboard
- glue
It is better to use scrap paper with a large number of miniatures that can be cut from a single sheet, as well as colored stamp prints and chipboards.
Before creating a postcard, you need to decide on its plot in order to choose the color of the base of the postcard and its “characters”. In this case, the basis is paper with a calm beige print, and the components of the plot are cut out of it: kittens, a puppy, flowers, a crown on a pillow.
Next we work with the base. It is necessary to make markings for cuts on the front side.
Don’t forget to decide before starting this work what will be in the foreground and what will be behind it!
In our case, we put the larger kitten in the foreground, this will enhance the feeling that it is closer than kittens with a dog.
We make the necessary cuts. The result is a design with “steps”. We glue leaves of arbitrary size onto the resulting “steps”. These leaves imitate a wooden fence.
Next, we gradually glue our elements, starting from near to far. We start from the foreground and glue the kitten. We glue it onto beer cardboard, because it gives additional volume and casts a shadow. Using the same principle, you can glue several other elements, for example, balls and flowers. When the inside is ready, glue it to the base of the card.
We also decorate the outside of the card with an elegant floral print.
For greater elegance, decorate the elements of the card with sparkles (use glitter).
For inspiration, check out this masterpiece 3D cake card:
Accordion postcard (diagrams and templates)
Another type of voluminous postcard is the accordion postcard.
To create such a postcard you will need: thick scrap paper for the base frame, a die-cut scrap knife or stationery knife, transparent plastic for the internal parts, stamens, semi-pearls and other materials for decoration.
We take the template and make blanks for the postcard. We cut out 8 blanks for the base frame from thick scrap paper and 4 from transparent plastic.
Thick paper blank...
...and transparent plastic
We glue the plastic blanks to a paper base. To make the card fold, we make a double crease of about 2 mm on the outer folds. We connect the resulting 4 parts - glue them with glue or use 2-sided tape. Glue the remaining 4 frames on the opposite side.
Next, we connect the internal plastic parts. The easiest way to do this is to use transparent tape. We get this basis for an accordion postcard.
We connect the parts with tape
Basis for an accordion card
Now you can begin the most creative part of creating a card - decorating it! Glue fluttering butterflies and twisted greenery to the plastic. The postcard is ready!
Let's start decorating
Ready!
See below for various templates for making the bases of such postcards:
Using your imagination, you can create all sorts of variants of such folding postcards. For example, with a predominance of children's themes. The number of components may vary.
Clock for the night owl
Asterisks for the astrologer
Birds, flowers, butterflies always look very light and airy on postcards!
Ah, France, Provence!
The Bird of Happiness
For the most beloved!
How do you like this original clock mechanism?!
What kind of birthday cards can you make yourself?
Homemade cards, which evoke not only tenderness, but also genuine joy, can be made using a variety of decorative little things that come to hand - paper, thread, textile scraps, paints. If they are available, postcard “semi-finished products” – blanks – can be used.
Handmade birthday cards can be divided into several large types:
DIY Happy Birthday Card
New Year's decorations on the Christmas tree
Every educational institution holds matinees on New Year's Eve, where the main decoration of the holiday is a green tree.
Students are entrusted with decorating it with their own homemade toys, and each child wants to contribute by hanging a homemade craft on the Christmas tree.
Complex components that add chic and shine
When making your own “Happy Birthday!” You can use unusual design details that will decorate it with their surprise.
For example, attach a small envelope inside the postcard or on the back so that you can insert a bill there. Or glue another card of a smaller format on the inside, which also includes congratulatory inscriptions.
You can place flowers made of corrugated paper inside the card, so that when you open it you get a 3D card: the flowers will “bloom”! This option is possible for making any other three-dimensional postcards with your own hands.
There is inexhaustible scope for imagination about what kind of paper figure to place inside - a boat or an anchor, a cake with candles or a kitten, the Eiffel Tower or an Egyptian pyramid.
Gift to graduates from the class teacher
This present is more symbolic and carries a great emotional load.
A collage is considered ideal
or
a clip from photographs
documenting school life.
In order to prepare such a gift, you need to prepare for more than one year, but the result is worth it. It would be appropriate to make an album “Class History in Photographs”
.
You can also print photos without forgetting about the design. You can make a photo book
,
parchment scrolls
with words of congratulations and wishes. To prepare this surprise you need to put in a lot of time and work, but the result is worth it. This gift will cause a storm of emotions, and will be stored not only on the shelf, but also in the children’s memory.
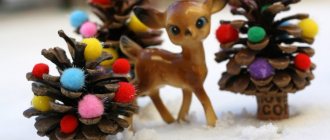
Small cones with the inscription “School Air” will forever preserve tender memories of school days
Note!
Choosing memorable and unusual gifts for teachers for 11th grade graduation
Envelopes or postcards with messages to the future
. You can collect school essays on the topic “Who do I dream of becoming in the future” and invitations to an alumni meeting. All this must be put in envelopes and sealed with the note “to be opened in exactly 5 years.” Such a gift will give hope for a joint meeting and will not leave anyone indifferent.
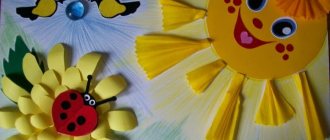
Card for mom
Mom is the main person in everyone's life. And on her birthday I want to congratulate her by giving her something beautiful, unique and from the bottom of my heart.
How to make a card for mom's birthday? We invite you to consider one of the gift options.
A postcard made using the quilling technique looks very interesting. For this craft you will need colored contrasting paper, ribbons and standard tools.
Next, let's get to work:
First, you need to cut out small circles of different sizes from colored paper. After this, each part must be cut from the outer edge to the middle. It is best to do this with curly scissors, then the resulting flowers will look more sophisticated.
Next, you need to form the flowers by twisting the blanks with a special stick in a spiral. Each resulting flower must be secured with glue.
You need to prepare the base of the postcard. To do this, you should bend a sheet of cardboard in the middle, placing the resulting flower heads and determine where they will be located.
Form a phase for flowers by cutting out its configuration from dark-colored paper. Attach the blank to the future postcard with double-sided tape.
From cardboard of any color you need to cut out a rectangle slightly smaller than the card itself. Next, you need to make a bouquet from the flowers you made earlier. It is necessary to glue the flowers closer to each other to create the effect of splendor.
The last stage is decorating the vase. Using a satin ribbon, you need to tie the card with a bow, and glue a strip of paper with words of congratulations in the desired place. The postcard is ready!
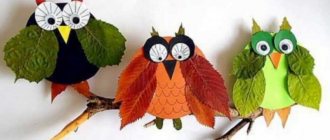
Figure of a crow made of plasticine
The process of creating a crow figurine from plasticine will appeal to both the child and his parent. Plasticine is a material that helps develop the dexterity of a child’s fingers, and a crow can symbolize a character from a popular fable. To do this, mold a piece of cheese from yellow plasticine and hand it into the crow’s beak. So, to create a figurine you will need:
Let's start the creative process:
- Roll a small smooth ball from black or dark blue plasticine.
- Make a smaller gray ball.
- Make cutouts in a circle on the gray ball. Parts of gray plasticine need to be cut to form a star.
- Stick the black ball to the gray “star”.
- Make two dimples on the ball using a spatula.
- Make an oval out of dark plasticine and stick it to the star so that the oval forms the body of the bird.
- From dark plasticine, make two elements resembling a drop in shape. Flatten it and cut out feathers on it. Stick it to the body: you get wings.
- Make paws from gray plasticine and stick them to the bottom of the oval. Make a beak and stick it to the bird's head.
- Make several thin “sausages” from dark plasticine and stick them to the bird’s head. They will form a raven hairstyle.
- Using black and white plasticine, make eyes for the crow and place them in the prepared holes.
- Using a spatula, draw hairs on the gray part of the raven.
- Attach a small tail made of black plasticine to the crow.
How to make beautiful birthday cards with your own hands
The best gift is one that is made with your own hands, especially if it is a real work of art. Ideas for such crafts are simply in the air. The main thing is to catch the idea in time of what kind of card to make with your own hands for your birthday!
After all, a man-made exclusive is expensive not only in the spiritual sense, but over the years it becomes expensive in a real material sense. One of the easiest gifts to make is a homemade greeting card.
Gifts for girls and women
The weak half of humanity loves to decorate their home and create comfort in it. Decorative elements that will help make your home more original and interesting will be a good gift for women. Coffee lovers will appreciate a cup decorated with coffee beans. A coffee heart in a jar looks great (it will also need to be decorated with decorative materials).
Indoor clocks look beautiful, which you can make yourself or decorate purchased ones. Older women will gladly accept a wallet as a gift (especially if you cover it with photographs of people dear to the recipient), a case for glasses, or an original bag. Keychain with family photo.
It's easy to please little birthday girls - you can sew or knit a soft toy, create a wardrobe for it so that the girl can change her clothes. You can make furniture for a doll and a house from cardboard.
Beautiful DIY birthday cards for a woman teacher
What is necessary:
- White cardboard
- White (brown) corrugated cardboard
- Leaflets
- Flowers
- "Berries in Sugar"
- Twigs
- Red ribbon with polka dots (can be replaced with any other)
- Cesal
- Glue gun (they are the most convenient for gluing)
How to do:
1. Fold the A4 sheet in half.
2. Hot glue a piece of corrugated cardboard 13 by 16 cm.
3. The stripes on the cardboard are not horizontal, but vertical, in both the first and second versions.
4. I glue a ribbon to the top edge of the card.
5. I glue it not just with a strip, but by tucking it. We cut off the excess tape, fold it over and glue it to the card.
6. Along the upper right edge I place cuttings, flowers and berries.
7. I glue twigs, berries, roses and leaves using hot glue.
8. You can go over the edges of the roses and leaves with white acrylic paint.
9. The postcard is ready.
I made 2 postcards using this principle. All that’s left to do is stick on the “Happy Birthday” inscription!
The second postcard looks like this. There are a lot of little things in here that I buy at the scrapbooking supply store. Gold ribbon with glue, berries in sugar, twigs, sesal, small white roses made of foamiran.
Why do I like DIY paper birthday cards? The fact is that the paper, even after 2-3 years, “will not deteriorate”, will not become lighter, darker, or fade. In any case, teachers are happy with such gifts. Beautiful, original, unusual.
CRAFTS FOR SCHOOL
CRAFTS FOR SCHOOL post pinned
- Community Posts
- Search
CRAFTS FOR SCHOOL post pinned
CRAFTS FOR SCHOOL post pinned
CHILDREN'S CRAFTS
CRAFTS FOR SCHOOL post pinned
CRAFTS FOR SCHOOL post pinned
CRAFTS FOR SCHOOL post pinned
CRAFTS FOR SCHOOL post pinned
CRAFTS FOR SCHOOL post pinned
CRAFTS FOR SCHOOL post pinned
CRAFTS FOR SCHOOL post pinned
PAPIER-MACHE CRAFTS They are not difficult to make, but the process takes a long time.
Today we soaked the trays (2 minutes), tomorrow we kneaded the dough (say 15 minutes), then molded them, and we can decorate them slowly in the evenings - for some reason, preparing for the holidays is much more interesting than celebrating. Getting ready for the New Year Show in full... You need paper trays for eggs, paste, PVA glue. For decoration - corrugated paper, gouache, PVA, starch, semolina, wire. You need to buy a large container of PVA at a hardware or construction store - it takes a lot. In order for everything to work out well, I recommend using loose trays; they begin to unravel on their own as soon as you pour hot water over them. Fill the trays with hot water. When softened, tear into pieces and leave in water.
When the pieces have swollen properly, grind them using a mixer or food processor.
Squeeze out the water through a rag.
Mix the squeezes with paste and a small amount of PVA glue, or just with paste. The result is modeling dough. But you can’t sculpt anything out of it, so you need to choose a simpler form. I’ll show you how I sculpted it using the example of a mushroom. Let's roll a ball in our hands.
Place it in a small round container. Roll the ball into the container. It will turn out even and smooth. It is then convenient to sculpt simple shapes from it.
We plop the ball onto a flat surface and get a mushroom cap.
Punch out the hole for the leg.
The hat can be made in another way. This makes it smoother. It must be dried directly in the mold.
Roll a leg from the same ball.
We dry the workpieces. You can do this on a battery.
The dry workpiece can be immediately covered with crepe paper. If it is very uneven, you can first stick on several layers of toilet paper.
The lower part of the cap is covered with crepe paper, and the upper part is painted with matte.
Semolina crumbs. Semolina can be glued on and then painted. Or prepare in advance as follows. Pour a few tablespoons of semolina into the frying pan and stir-fry. When the color changes, put some in a separate container. This is how we get different shades of brown.
Now about the stalemate. Pat is a mixture of starch, PVA glue and gouache. It is used to make the stamens of the flower artist. Pat will replace you with chocolate glaze, mushroom or apple peel. You can also use it to make cherries. You need to wrap cotton wool with PVA around a wire, form a berry, dry it and cover it with a mat. Can be done in two layers. If you need shine, then coat the top with more varnish.
How to cook. Pour starch into a small(!) container and add PVA. Mix and achieve the desired consistency by adding PVA - if you need it thinner, or starch - if you need it thicker. We tint with gouache. It’s better to take the container with a lid so that you don’t have to use the whole mixture at once. This is how the workpiece turns into an apple. Let's paint it with a stalemate. The tail is made of wire wrapped in crepe paper (we coat everything well with PVA). And here I want to show how the apple preparation turns into an apple. To make it smoother, I covered the blank with several layers of toilet paper.
Rules for making your own birthday cards
“When making beautiful birthday cards with your own hands, a lot depends on the selection of colors”
There are quite a lot of techniques to give a homemade postcard an original and memorable appearance. The easiest way is to use an unusual, non-traditional base for manufacturing. A non-standard move, for example, would be to use watercolor paper as a background; A drawing stamped on tracing paper with a backing made of bright, “acid” colored decorative paper will look original.
When making beautiful birthday cards with your own hands, a lot depends on the selection of colors. With the right approach, the simplest composition can very well become a highly artistic product!
For greeting cards, it is important to choose the right color scheme
The main rule in this case is not to overdo it: it is quite enough to use three colors in one card, two bright, contrasting to each other, and one neutral. An unusual, asymmetrical way of folding it will add originality to the craft.
It is preferable to make the inscriptions on the postcard in a beautiful calligraphic font, but always easy to read. When using computer fonts, do not forget that the letters “l” and “p” in many of them are extremely similar and that this can lead to unexpected incidents. The best, festive-looking color for letters is silver or gold.
The gold font looks festive
To make your own birthday card, you can use the scrapbooking technique. In this technique, several background layers are glued layer by layer onto a base made of colored cardboard, each of which contains the necessary decorative elements. Well, very great opportunities, despite its apparent simplicity, are provided by the paper decoupage technique, in which the top layer of ordinary, for example, napkins is used as an image (drawing). This layer is carefully removed from the “source” and carefully glued onto the postcard base with PVA glue diluted with water.
Happy birthday card using scrapbooking technique
How to choose the right gift idea
In order for the recipient to like the surprise, it is necessary to take into account the details. You need to know what the hero of the occasion is interested in, his hobbies, wishes. Based on this, you can make a gift with your own hand, which will definitely please him and leave a lot of positive emotions from the surprise. Do not forget about the age category of the birthday person and gender.
Older people are not always suitable for gifts that their peers will appreciate. Also, surprises for women can be more gentle and elegant than for men. Gifts given to relatives and loved ones will be different from those given to friends. Children will be happy with sweets or favorite toys.
The simplest version of a paper card for a teacher
What is necessary:
- Designer cardboard
- Rectangle of colored paper
- The inscription “Happy Birthday” (I printed it from the Internet)
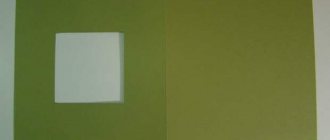
How to make a postcard:
1. I have a designer cardboard with a cake, balls, stars, in a word, festive. A4 format. I bent it in half.
2. Cut out a rectangle from yellow paper.
3. I printed out the inscription “Happy Birthday.” I glued it onto yellow paper.
4. I glued all this onto the card, and voila, the simplest paper happy birthday card is ready!
The card is beautiful, very simple. It couldn’t be simpler, one might even say so. Even a child can cope. You can make it together with your baby and give it to a teacher or kindergarten teacher.
Here is another version of the postcard, in my opinion, it is simple and original. Delicate card with butterflies. This is a version of a simple postcard. I’ll say right away that this idea is not mine, it’s from the Internet, but I really liked it.
Edible bouquets
For those with a sweet tooth, sweet bouquets are a good option for congratulations. They can be done in the form:
- traditional bouquet in transparent paper;
- bouquet in a pot or tea cup;
- cars, dolls with full skirts, other toys.
For dads, grandfathers, brothers, sweets can be replaced with more harmful, but very tasty smoked sausages, croutons, chips, salty crackers and other goodies. A can of beer or a bottle of wine will complement such a surprise.
For mothers or grandmothers, high-quality alcohol can be supplemented with expensive chocolate and made into an elegant box made of thick cardboard.
The top of the box is decorated with flowers, ribbons, and embroidery. Using cellophane paper, you can make a transparent window through which the contents of the gift will be visible.
DIY card for mom: voluminous heart
A DIY card for mom with a bright, voluminous heart can be dedicated to Mother’s Day, Valentine’s Day or mom’s birthday. The card itself is not at all complicated, the only painstaking part was the letters, but if you have a special stencil with letters, this will make the task much easier. In any case, you can write nice words with a felt-tip pen.
Craft from recycled materials
Recyclable materials include newspaper, paper or plastic utensils, beverage cans, egg trays, plastic yogurt cups, and cardboard food packaging.
What kind of craft can be made from recycled materials for school? Plastic or paper cups make a great snowman. The cups must be connected to each other to assemble the ball. For a snowman you will need 2 balls. Then the balls are fastened together, a nose, eyes, a headdress, a scarf and other accessories are added as desired.
You can make tubes out of newspapers. And then use it to weave baskets, like from a willow vine. Following your imagination, you can weave not only a basket, but also a cup and saucer, an owl, and a vase.
The finished creation can be painted and varnished. Another way to decorate wickerwork is to make decoupage using paper napkins with a beautiful pattern.
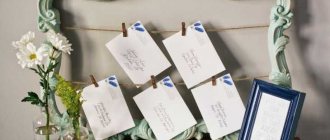
School Birthday Card
We bring to your attention bright, beautiful, festive and very interesting cards for the school’s birthday with congratulations in poetry and prose.
Using Photoshop and thematic backgrounds, you can create similar greeting cards with your own hands, change the text and font, color and style.
Poster and wall newspaper for the school anniversary
Anniversary gift
Memorable dates require special attention when choosing gifts. This is not just an ordinary case when you can present a simple item. When choosing a gift for your school's anniversary, it is worth focusing on items that carry a special emotional load.
Gift Rewards
.
There are many options for such gifts. These can be cups
,
medals
,
orders
,
figurines
. All these items are made to order; you can add an engraving or dedicatory inscription to the gift. This type of gift will be unique and will not leave the walls of the educational institution.
A gift edition of a famous newspaper or magazine can be classified as something useful to give to a school for its anniversary. Such a gift can be made to order, and interesting notes or stories from the life of the school can be placed there.
A medal for every teacher is a pleasant reminder of his need and importance for the children