A homemade trailer-trolley for transporting a car on a rigid coupling was assembled by Wild Tatar. A photo and video review of the design is presented below. It is better and more reliable to transport a broken car to a repair site using a rigid hitch, and a rolling trailer was invented specifically for this purpose.
The principle of rolling is that the transported vehicle runs over it, and the wheels are fixed in special openings welded from a square pipe and additionally tightened with a stripper.
The wheels of a dolly trailer steer and follow the path of the tractor, this is done thanks to steering rods installed and connected into a single structure with the trailer drawbar.
The maximum width along the outer rim of the wheels is 1840 mm. Weight 96 kg, disassembled into parts 1300 mm long, R-13 tires, bolt pattern 4x98. Hitch head for 50 mm ball. Hand winch and two ladders.
Materials
- steering knuckles VAZ classic
- hubs with bearings VAZ-2108
- profile pipe 100x100 mm
- drawbar 60x60 mm
- steering rods
- tips and ball VAZ
And so, let's carefully look at the material provided.
The dolly trailer is designed for towing passenger cars using the partial loading method. The dolly trailer must be transported disassembled, otherwise at the first traffic police post you will be issued a fine, because... A trailer without a car will be considered a trailer. with all that it implies. During the design, emphasis was placed on turning the wheels, because Without swivel wheels, there is a skid when towing a car. There are photos of tests and the product itself. PS Special THANKS to users: sanfox for the 3D model “VAZ wheel hub. " and Dimka_88 for "Winch Q=0.5t". And also to the user of a BMW 8 series from an automobile site from Chelyabyansk. Basically it was his idea. I just tried to turn simple sketches into drawings, and them into a product with testing and subsequent operation.
Composition: 3D parts and assemblies. Details, specifications, assemblies. STEP file, Info files (images)
Software: KOMPAS-3D 16.1
Date of: 2018-09-17
Views: 1 145
10 Add to favorites
A trailer is a vehicle that does not have an engine installed. It is designed to travel in conjunction with a car. Despite the apparent complexity of such a device for transporting goods, it is not difficult to make a trailer with your own hands. For successful work, you need to choose the right parts and materials, make sketches or drawings.
Roll-up trailer
Good day to all. There was a need to transport buggies off public roads. As an option, they offer a similar weight. But I’m not even in the know: should it be registered or not. There are options with PTS (self-assembled), without PTS. Please tell me if it’s worth the bother. Or is it easier to carry it in a truck?
Special greetings to Defavod! You'll love it!!
Hello! Thank you. If you don’t register? If you cook it yourself or are ready to buy it, then what sanctions await you? A fine or parking?
And another question: I roll one axle into the truck, fix it tightly so that it does not dangle with slings, the second axle rides on asphalt. This, as I understand it, is according to traffic rules? Or am I completely misunderstood and it’s time to throw my rights into the river?
Well, one more thing: If you screw a channel to the frame and make a platform under it to fix the axle (similar to how bicycles are attached to the back of a car)... is this a change in the design of the vehicle or not? Well, the principle is the same as in the photo, only attached to the frame and without wheels.
Or is it even possible to register a buggy with Technical Supervision? It’s completely self-assembled on a frame welded from pipes. There are only docks for the engine and nothing else.
Last edited by ant222; 08/13/2016 at 20:06.
Denis, well, hello to you, of course, as well as to Gray 777. Please tell me, in simple language, not legal (I’m starting to get confused in the letters in legal), what’s the easiest way to deal with this bullshit?? In terms of the road to the forest and back.. When in the forest I am less interested. Thank you in advance
Well, one more thing: If you screw a channel to the frame and make a platform under it to fix the axle (similar to how bicycles are attached to the back of a car)... is this a change in the design of the vehicle or not? Well, the principle is the same as in the photo, only attached to the frame and without wheels.
Or is it even possible to register a buggy with Technical Supervision? It’s completely self-assembled on a frame welded from pipes. There are only docks for the engine and nothing else.
You can get PSM for a buggy if you certify it for compliance with the Technical Regulations on the safety of self-propelled vehicles.
Thank you! I’ll go to Technical Supervision and find out what they need for registration. For now I will carry it in the Bong. One thing is not convenient - it doesn’t fit 5 cm in width to close the sides. I have to unscrew the wheels. Or can it be transported with open sides? With a protrusion of 3 cm on each side. Drives in and out of it even without boards. AT YOUR OWN MOVE, the body is 60 cm from the ground!! You just have to put 2 pallets under the side so that it doesn’t break off when entering/exiting
Last edited by ant222; 08/14/2016 at 22:24 .
I can’t tell you by law, but as a person who often carries all sorts of rubbish on trailers, I’ll share my experience: when you’re dragging something, it’s a rigid hitch and no questions arise, but when it’s hanging alone from behind, it’s like a trailer that needs to be registered, that’s how the guys explained it.
Thanks for the answer! I myself have carried everything and in every way. And in every way I haven’t carried. that it doesn’t matter (rigid coupling), and the fifth (with whom they were going to drive it to the village) replied that he himself didn’t know whether it was possible or not. If there had been a passage via VAT, I wouldn’t have bothered. But it is necessary to drive through 2 regions. And even here, dragging around, who knows, you’ll run into someone. Something like this)))
Ps. I understand perfectly well that practice in all regions is different in our great and vast one.
Last edited by ant222; 08/14/2016 at 22:45.
And again.. Well, they stopped me, well, I’m on my way to register this trailer (unused, self-assembled, I’ve had the transmission for less than 10 days, no title, no license plates, well, I lost it, let’s say, well, I’m going to register, it doesn’t happen to anyone) ..what are the sanctions??if by law.
After all, in fact, the fact that they won’t register it for me is a different story. I’ve owned it for less than 10 days, I’m trying to register it.. How do I know that I was misled by the sellers of this miracle of technology? And it cannot be registered. ))
Last edited by ant222; 08/14/2016 at 22:56 .
I just really don’t see the legal application of sanctions against me in this case. Please enlighten me if I'm wrong.
And by the way, if we’re going to develop it... well, I have a Niva, I slightly re-equipped it, well, just a little) I have a certificate of registration, I have a certificate for the engine, I have 10 days for registration (sales insurance, in theory, I don’t need it). I lost my license plate, the license plates hooligans took it off..well, why can’t I drive it according to the additional traffic regulations??registration deadlines haven’t passed yet..well, and then history repeats itself in 10 days..well, that’s just me, for the sake of fantasy.
Even if I probably asked questions to which there is no clear answer in the legal field... if you put everything together. Well, at the same time I opened a loophole with a converted car. I didn’t want to, I thought about doing everything according to the traffic rules with it. Well, what is there, use whoever understands and who needs it. I do not mind. Ps. If you don’t understand, please don’t ask me questions in a private message. I won’t answer.
23. Transportation of goods
23.1. The weight of the transported cargo and the load distribution along the axles must not exceed the values established by the manufacturer for this vehicle.
23.2. Before starting and while driving, the driver is obliged to control the placement, fastening and condition of the load in order to avoid it falling and creating obstacles to movement.
23.3. Transportation of cargo is permitted provided that it:
does not limit the driver's visibility; does not complicate control and does not affect the stability of the vehicle; does not cover external lighting devices and reflectors, registration and identification marks, and does not interfere with the perception of hand signals
; does not create noise, does not create dust, does not pollute the road or the environment. If the condition and placement of the cargo do not meet the specified requirements, the driver is obliged to take measures to eliminate violations of the listed transportation rules or stop further movement.
23.4. A load protruding beyond the dimensions of the vehicle in front and behind by more than 1 m or from the side by more than 0.4 m from the outer edge of the side light must be marked with the “Large Load” identification signs.
, and in the dark and in conditions of insufficient visibility, in addition, in front - with a white flashlight or reflector, and at the rear - with a red flashlight or reflector.
23.5. Transportation of heavy and dangerous goods, vehicle movement
, the overall parameters of which, with or without cargo,
exceed 2.55 m in width
(2.6 m for refrigerators and insulated bodies), 4 m in height from the roadway surface, 20 m in length (including one trailer), or movement a vehicle with a load protruding beyond the rear point of the vehicle's overall dimensions by more than 2 m, as well as the movement of road trains with two or more trailers
is carried out in accordance with special rules
.
International road transport is carried out in accordance with the requirements for vehicles and transportation rules established by international treaties of the Russian Federation.
Do-it-yourself collapsible partial loading trolley
Good afternoon In this article I will tell you how I made a COLLAPSIBLE partial loading roll. This is not my first tackle, the fact is that I very successfully sold the first tackle complete with wheels and belts for 25 thousand rubles, and it left St. Petersburg all the way to the Republic of Mari El.
the sold truck left my garage
My idea was that I needed to make the same design of the tackle, reducing its cost if possible, and also try to make it collapsible. I wanted to make it collapsible so that, firstly, it would be more convenient to store it in the garage, and secondly, to put it on Avito and see the demand for such a design. Thirdly, I wanted to understand how much more difficult it is to manufacture than a regular tackle, which is not dismountable.
First of all, because I wanted to reduce its cost, but at the same time make it from those components that I could buy, and not those that were in the garage or from a friend, I went to an auto parts store to buy axles and hubs with bearings from a VAZ 2108, but Having been overwhelmed by the cost (5,500 for a set of 2 hub axles, the hubs themselves and their bearings), and yet I still need to buy hardware, bolts, a coupling head and consumables, I realized that the cost of manufacturing a rolling tackle would exceed well over 10,000 rubles.
In this regard, I decided to buy a used beam assembly, since there are plenty of offers in St. Petersburg on Avito, and everywhere for about the same price of 1.5 thousand rubles. At the same time, I will sell the remains from production as scrap metal, partially recouping the cost of the beam itself.
bought a used beam
I cut off the part that I need, the rest went to scrap metal
Next, hardware was purchased. Profile 50x50x2 15 m.p. at a price of 300 r/m Reinforcement 14 mm 6 m.p. at a price of 125 r/m Pipe 40x20x1.5 3 m.p. at a price of 150 r/m
I brought six-meter long whips in a trailer without cutting them, fortunately the trailer allows this)))
Next, the rectangle of the frame was welded and the pipes for the drawbar were cut. I took the size from my previous hitch, but here I slightly reduced the length of the drawbar. If I cook more, I’ll make the width smaller.
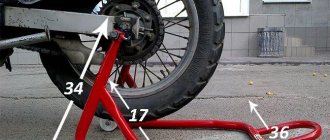
The width of the rectangle along the outer edges of the pipe is 195 cm, and the length of the triangle is 55 cm. The height of the triangle (drawbar) to the junction with the rectangular frame is 180 cm
The next step I cut from 4 mm. iron scarves, with the help of which this structure will become collapsible. To connect the structure, bolts from the Zhiguli suspension M12x1.25x75 were used. The frame is already with gussets. I grabbed the gussets at the points and assembled the entire structure.
attaching the drawbar to the frame
Connection of side braces and drawbar
Naturally, all the pipes are drilled on a machine, and after that - the fillers.
Zavtulina professional pipe, so that it does not deform during assembly
Next came the stage of assembling the wheels. I attached it using the same technology as on my last tackle.
Cut off part from the rear beam. that's all we need
I removed the hub assembly from the same beam. We will need them too
The cut-off part is welded through a piece of corrugated pipe to a rectangular frame. Naturally, all this was previously leveled so that there would be normal alignment of the wheels. Well, the collapse too.
Then it’s all scalded, 4 plates of 4 mm iron are cut out, reinforced with scarves and scalded again. In my opinion, this is the most successful solution in terms of reliability. After all, the heavy Chrysler Voyager withstood the previous tackle and didn’t even bend! gussets are already welded
this is what it looks like
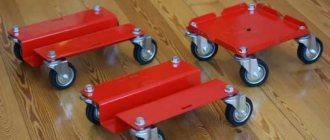
Roll on wheels
The disassembled tackle will look like this
Close-up of drawbar design
The drains are welded from professional pipe 40x20 and connected with fittings
The tackle is assembled and hooked. Now there will be a test drive)
Got caught on the tow bar. In fact, this photo does not carry any semantic meaning)
We loaded up the Mazda 3 and drove it around the garages without even tying it up. All OK
.
Finally, before giving an estimate for materials, I would like to talk about mistakes or miscalculations: 1) The 40x20 corrugated pipe on the ramps for the entry must be placed on its edge; after one exit or entry they bent a little.
2) It is not very convenient to assemble and disassemble this structure alone. 3) After tightening the bolts, the plates are compressed; therefore, after unscrewing the bolts, the pipes remain clamped between the plates, which complicates disassembly. 4) The roll turned out to be the same in width, but it had to be made narrower, about 10 cm. Firstly, there are very few cars so wide that you can carry them constantly. My Captur fits on this hitch with plenty of room, the same Mazda also left a lot of space around the edges. The Voyager, which had to be transported on the previous hitch, fit right in, but such cars have to be transported very, very rarely. And secondly, the narrower it is (within reason), the less load on the frame will be.
5) This frame design, I mean a rectangle without supports for wheels, is very good in terms of securely fastening the car to the frame. That is, when loading the car, its wheels fall into the niches and remain there; if the wheel is large, then it can be further lowered so that the car sits more tightly in the frame. But this is also a huge disadvantage when lowering the car from the roll, because the car gets stuck with its wheels in the niches of the frame, especially if the wheels are less than 15 radius. Now the estimate for materials: 1) Rear beam - 1500 rubles 2) Profiled pipe 50x50 - 15 l.m. 4,500 rubles 3) Profiled pipe 40x20 - 3 l.m. 450 RUR 4) Reinforcement D14 - 6 running meters. 750 rubles 5) Coupling head for a square 50x50 - 1,600 rubles 6) Bolts M10x1.25x75 for fastening the coupling head 2 pcs - 80 rubles 7) Nuts M10x1.25 2 pcs - 30 rubles Bolts for assembling the frame M12x1.25x75 - 10 pcs - 430 RUR 9) M12 nuts - 10 pcs. 200 RUR 10) Bolts for attaching the hub axles (trunnion) to the frame 8 pcs. 200 rub. 11) An iron sheet 1500x550x4 mm was bought for 2,500 rubles, but 1/3 was spent, a total of 830 rubles 12) Cutting all this took 3 cutting circles for a large grinder and about 10 circles for a small one - 700 rubles 13) Steel pipe VGP 15x2 ,8mm for tightening the frame, at a price of 140 rubles/m. Spent 0.5 m. total 70 rubles. TOTAL expenses: 11,340.
These are just wasted materials without painting. I haven't painted the hitch yet. The time spent took 14 hours (I worked for 2 days entirely). I probably won’t make a collapsible hitch again if I ever have to. It’s too steamy, cutting and drilling everything, etc., it’s much easier and faster to just weld the whole thing. And personally, I still have a place to store it, albeit a little cramped. Now all that remains is to paint. I posted this design on Avito for 20 rubles, sooner or later, I think I’ll sell it for that money. Until I sell it, I’ll use it myself) Maybe I’ll try the rental option)
How to make a rolling jack for a car: 4 interesting ideas
An ordinary person thinks like this: if he doesn’t have something, he can buy it. A simple and straightforward approach that can only be accomplished if you have enough money in your pocket.
The DIY master has a slightly different opinion: if something doesn’t exist, it can be done.
And really, why spend money on something if you can do it yourself?
Very often this concerns tools and devices for car repair and maintenance.
Let's take, for example, a rolling jack. Yes, you can always buy the first mechanism you come across on the market, paying 1500-2000 rubles for it. But will you be sure of its reliability?
Practice shows that there are things on which it is better not to skimp. And a rolling jack is just that case.
If you buy a good jack from a reliable manufacturer - the toad is pressing, then if you have scraps of metal, you can make it yourself.
Moreover, you can immediately kill two birds with one stone. A homemade rolling jack will be much cheaper than branded models, but at the same time, more reliable than cheap Chinese analogues.
In this article, we will take a closer look at 4 interesting ideas from home craftsmen on how to make a rolling jack for a car with your own hands. If you like any of the designs, take note!
Popular models
If you are looking for a good tow trailer for a passenger car, you should focus on trusted manufacturers. Try to carefully study the technical characteristics of a passenger tow truck, compare it with the planned tasks and look for the optimal price-quality ratio.
Among the most popular and widespread brands under which the trailers we are considering today are produced are the following:
- Pragmatec;
- Bren;
- Rydwan;
- NPP Palych;
- Verda, etc.
I won’t go into the details of the manufacturers. Still, the assortment is very large, it is problematic to dwell on something specific. Much depends on what and for what purposes you are looking.
Homemade rolling jack from a bottle
The most popular designs are based on a hydraulic drive, which is a bottle jack. Its carrying capacity must be at least 3-5 tons. Preferably more.
The idea of making a rolling jack belongs to the author of the YouTube channel Mr Novruz.
The jack structure consists of:
- support frame (bed);
- lever;
- hydraulic drive;
- stop
racks;
To make the main structural elements (support frame, vertical post and lifting arm) you will need thick metal.
In this case, the master uses a channel. We mark and cut the pieces to the required size. We weld a vertical stand to the supporting frame (we install the workpieces perpendicular to each other).
We cut four pieces of square rod and weld them to the base - this will be the “seat” for the bottle jack. We weld a handle-bracket made from a square rod to the outside of the rack.
The author welds a mount with a roller to the front of the frame so that the structure can be conveniently moved in the garage and on the street.
Instead of a roller, you can install a pair of wheels. Some craftsmen install two pairs of wheels, but one will be enough. By the way, you can make the wheels yourself.
Rack and pinion rolling jack
Despite the fact that the most common do-it-yourself lifting mechanisms are hydraulically driven, some car owners prefer to use completely mechanical designs driven by a low-lift rack-and-pinion car jack.
And such devices also have a right to exist - a budget option for the garage.
Required parts and materials:
- rack and pinion mechanical jack;
- profile pipe;
- wheels (metal or plastic).
First of all, we determine the dimensions of the future structure. Then we cut the blanks from the profile pipe and weld them into a rectangular base.
A rail with a lifting mechanism will need to be welded to the base. These parts can be removed from an old car jack.
To make the structure mobile, we weld wheels to the base. In this case, the author welded two pairs of wheels. But, as we said earlier, you can get by with just one pair of wheels.
The next step is to make a hinge assembly with a lifting arm.
Next, install the handle from the car jack, and our homemade product is ready. We clean the welds and metal and start painting.
The operating principle of the device is very simple. Using the handle, moving the lifting element along the rail, we thus raise the lever, which rests on the bottom of the car and lifts it.
Details on how to make a rolling jack with your own hands are shown in the video below. This idea belongs to the author of the YouTube channel Ze Pro.
Please note: No matter whether you use a hydraulic or mechanical jack, always use vehicle safety stands. Don't put yourself in danger and don't risk your life!
Required tools and materials
So, before you start assembling the desired structure, it is worth preparing a number of tools and materials that will be required at various stages of assembly.
- Steel channel for the frame. The optimal channel size for assembling a car trailer frame is 25x40 mm. It is also possible to use a square pipe with dimensions 40x40 mm. The length of the material is selected individually based on the design features.
- Sheet steel for body sides. The thickness of the sheet steel from which the body sides will be made should be about 1 mm. The dimensions of the required sheets should also be calculated based on the dimensions of the finished structure.
- Thick plywood. The bottom is made from it, therefore, the thickness should be chosen with a margin for sufficient strength.
- Chassis. Everything here relies only on the imagination of enthusiasts. For example, the use of suspension elements for Moskvich, Volga, ZAZ, etc. cars is quite popular. Attempts are often made to build a trailer on the classic “Zhiguli” bridge.
- Elements of electrical equipment. Wiring, brake lights, direction indicators, dimensions. Nowadays there are often ready-made solutions specifically for car trailers on the market. In this case, rear lights from onboard UAZs and Gazelles are often used.
- Fastening elements. It all depends on the design features. It is worth noting that in order to increase strength, you should not skimp on bolted connections.
- Hand tool. The minimum set of hand tools includes the following. Hammer, pliers, wrenches, drill, jigsaw and grinder. Depending on the design features of the trailer, the tool can either be replenished or reduced.
- Welding machine. Actually, the element, without which assembling the trailer will simply be impossible, you will also need to find either an experienced welder or have the necessary skills yourself.
Manual lift for lifting a car
This device is not a jack in the truest sense of the word. However, this is one of the types of mechanical lift.
The idea of making this device belongs to the author of the YouTube channel “BOBKA TV”.
First of all, we prepare the necessary parts. To do this, we use the following materials: profile pipes, strips of metal and a piece of round pipe (we cut the round pipe blank lengthwise and use one of the resulting halves).
Next, we proceed to the manufacture of a homemade device. We weld a piece of round pipe to a section of professional pipe, as shown in the photo below.
We weld another piece of corrugated pipe to the opposite end of the profile. We weld a stand from a long section of profile pipe to it - it will act as a lever. A handle must be welded to the top of the rack.
Next, install the wheel axle from a threaded rod and weld it. We weld a piece of profile with furniture wheels to the stand.
We clean the welds and start painting. After this we install the support wheels.
The principle of operation of a homemade device is very simple. We rest the trolley against the bottom of the car. Then we press on the lever with our own weight and lift the car. In this case, you no longer need to press the lever.
The step-by-step process of making a homemade rolling jack is shown in the author's video.
If you liked this homemade product, you can repeat it. But be sure to use car safety stands.
Car jack with homemade hydraulic system
Some home craftsmen come up with completely homemade designs - that is, without the use of hydraulic or mechanical jacks. However, in most cases, such homemade devices do not justify themselves.
One of these devices for lifting a car was made by the author of the YouTube channel K i.
To make the frame of the structure, the author used metal profile pipes. A wheel axle is welded to the bottom of the frame, onto which two wheels are placed. Furniture wheels are attached to the opposite end of the base.
The author made the hydraulic system from plastic sewer pipes, a silicone hose, fittings and a piston. All elements of the system are interconnected. Attached to the frame.
From a piece of round steel pipe, the author made a handle that connects to the piston.
The frame and handle will need to be painted (all welds must first be cleaned), after which you can begin the final assembly of the lifting device.
The assembled structure should not be taken seriously, since it is not able to fully compete with mechanical and hydraulic rolling jacks.
And most importantly, there is no safety when using this device. In general, a rather dubious design.
The step-by-step process of making a jack with a homemade hydraulic system, as well as the principle of its operation, is shown in the author’s video.
Design features
Light carriages or trawl trailers are an alternative to car recovery services. With the help of such a trailer, you can get your own tow truck with similar capabilities and efficiency for little money.
They all have design differences, due to which they are divided into two large categories:
- partially loaded trawls (also known as rolling trawls);
- passenger tow trucks with a full load.
In the first case, we are dealing with a trailed single-axle vehicle, onto which only the front axle of the vehicle is loaded. The rear wheels remain on the road surface and rotate, covering the required distance.
Do-it-yourself car tackle (drive2 drawings)
We welcome everyone who is interested in motorsport.
Today we would like to talk about a rigid hitch with partial loading of a car. In common parlance - “tackle”. Two manufacturers are widely known in our village. Both make turntable carts. About the first one, we heard not the most flattering reviews from friends: the carts fall apart, after each race they have to be patched and strengthened. The second one is in perfect order with the reliability of the carts, but due to the high metal consumption, the “rolls” are very heavy. And everything would be fine, but recently nothing has been heard about the second manufacturer. Therefore, we decided to weld the cart ourselves.
We started with analyzing and designing a tackle to suit our needs.
We decided to make a rigid cart for several reasons:
1.
To transport a car, we need a minimum loading height, because...
The “Tuper Killer”
will drive on asphalt in the summer, which means installing a suspension with minimal ground clearance. It is easier to achieve the minimum loading height on a rigid cart, because There is no rotary superstructure.
2.
For further maintenance of the hitch, we need to drive it into our boxes, and our gate is 2.5 m. There are again problems with the rotary one, because it is wider than the hard one. Having experience owning a rotary trolley, we can say that this is a serious storage problem: there are few garage boxes where you can drive the cart.
3.
The metal consumption of the structure and, accordingly, the cost are lower. Fewer nodes means greater reliability. And it’s easier to make a rigid one than a rotary one.
The only disadvantage of a hard tackle is the effect of pushing the tractor in a turn. Precisely because of the lack of ability to turn. This feature is felt on light tractors, but in the case of our
- it will be little noticeable. And there haven’t been many maneuvers in narrow places in our entire travel history. Having assessed all the pros and cons, we settled on a hard tackle.
And then the story in photographs:
A motorcycle is a whole philosophy and lifestyle for a large number of people. It represents to its owners freedom, the romance of the road, exciting and unforgettable travel. But for a bike to last for many years, it requires proper care and maintenance. First, you need to figure out what types they come in and how to make a motorcycle mount with your own hands.
Just something complicated
If we talk about passenger cars, there are, as it seems at first glance, many different types of trailers used for transporting cars.
What can you usually encounter? These are vehicles such as:
- car transporter;
- towing trailer;
- trawl;
- carriage.
So many names. We know how to make something complex out of a simple thing. So it is in our situation. For one category of trailers they came up with such a scattering of names.
I'll tell you right away. Behind all these designations lies the same type of vehicle trailer, aimed at passenger cars.
After all, ordinary tow trucks have a special loading area, additional equipment, lifting mechanisms, cranes, etc. But since we are talking about the transportation of passenger vehicles by passenger cars, you can use all these names equally correctly.
Types of motorcycle stands
Today, tackles have proven themselves to be very convenient devices for repairing and servicing a bike. Every motorcycle owner who has had to repair their equipment has thought about purchasing such a device. The tackle allows the owner of the iron horse to install it very steadily for repairs. The roller is very convenient when changing a wheel - it allows you to hang the motorcycle and thereby easily remove the wheel.
We can say that a homemade stand is a do-it-yourself motorcycle stand, only without a table. If there are wheels, the lift can easily be moved to a given location for repairs. The small dimensions of the device allow it to be used in places with limited space.
- rear - for servicing the rear of the motorcycle;
- front - for servicing the front of the motorcycle.
The front type lift comes with an adapter that allows you to hang the wheel for repairs. The adapter is selected for a specific bike model. This tool is suitable for repairing the front fork. A do-it-yourself car tray is ideal for storing cars in the winter. It has a simple design and does not require special knowledge to operate it.
The rear type tackle is a little more structurally complex. It features an L-shaped device with a handle. It is equipped with clamps whose task is to securely hold the wheel. The width of the clamps is selected for a specific wheel. Such tackles are mainly used by repair services, as they allow lifting weights of up to 300 kg. With the help of such a tackle, you can hang the motorcycle in such a way that the suspension is maximally unloaded. Thanks to this feature, it is quite easy to replace the chain.
Using a motorcycle stand
Currently, rolling under a motorcycle is a very important attribute in the life of every motorcyclist. Such a solution should be present in every workshop, both at home and in a specialized one, where complex work is carried out. With the help of a tackle, you can carry out comprehensive maintenance and repair of your bike. In addition, such a device can become indispensable when repairing a car. As for two-wheeled vehicles, it is used when it is necessary to lift the rear part to replace disks or tires, or when repairing the cooling radiator. If you intend to repair the motorcycle yourself, be careful when choosing the appropriate model of stand.
Given the presence of movable wheels, such structures can be freely moved around the workshop, placing them in a specific place. As for the invention itself, it is a special type of motorcycle lift, but unlike classic models, there is no work table. Due to its compact dimensions, the roller is suitable for small chambers where a motorcycle is placed for painting or drying. The service life is practically unlimited, and no special maintenance is required.
Motorcycle lifts come in two main types, depending on the part of the vehicle that will be repaired. Based on this, a tackle occurs:
- rear;
- in front of him.
In most cases, representatives of the second category are supplied with a unique stand and a special adapter that allows you to hang the wheel and carry out a number of repair work.
Selecting a Factory Lift
The first thing you should pay attention to when choosing a stand in a store is the manufacturer of the device. The manufacturer must certify its product and provide all quality guarantees for the device. Factory lifts undergo a series of safety and operational tests. Branded products must comply with GOST standards. Good expensive lifts are made from quality materials using modern technologies. Therefore, it is very important to choose the right model.
The motorcycle lift industry is evolving along with technological progress. New production technologies are emerging, new materials for manufacturing are being developed. Competition among manufacturers leads to the emergence of more functional and easier-to-use devices.
Branded tires are increasingly being used by professional riders around the world. The presence of a large number of additional accessories can significantly expand the capabilities of these devices and simplify their work. A modern lift can be operated by one person and allows you to lift a heavy rear end, securing it securely.
Transport trailers
The widespread use of semi-trailers and trailers is due to the additional convenience when transporting heavy loads. The vehicle bears only part of the load, which extends its service life. When unloading, you can save valuable time by unhooking the cart and leaving it in place, and unloading it at a convenient time. This option is convenient and is used for delivering goods between workshops of the same enterprise located at a certain distance.
All towed devices are divided into two groups:
- Special-purpose trailers allow you to take into account the needs of working with various loads, but there are quite a few universal vehicles for such work. Common types include heavy-duty semi-trailers, log trucks, panel trucks, cement trucks and other types of trailed equipment.
- General transport equipment includes flatbed, tilt and other trailers of various sizes designed for transporting heavy loads of any kind.
Types of devices
The most popular type is the platform lift. It is quite mobile and versatile - it allows you to service different types of motorcycles. Hydraulic ones are used mainly for servicing heavy touring motorcycles and massive choppers. This type of lift is installed under the motorcycle frame and lifts it using hydraulics. Thus, the motorcycle is left in a suspended state, which allows for comprehensive maintenance and repair of equipment. Tools of this type have many adjustments and settings, which allows them to be used for repairing motorcycles of any type.
Factory or homemade
When repairing and servicing a bike, it is advisable to use both types of tackles - front and rear types. Factory solutions will meet all safety requirements, will be more functional and will have additional accessories, but all this will be quite expensive. On the other hand, homemade options will be several times cheaper, but the safety and functionality of such products will be much lower.
Advantages of factory devices:
- factory tackles are used by professionals;
- they have ideal proportions and geometry;
- can be operated by one person;
- can be installed under the pendulum and slider;
- have many adjustments and settings.
DIY making
A branded factory tool is a good and convenient tool for motorcycle repair. But the prices for such devices are quite high. It will also be quite difficult to choose a stand for a specific motorcycle model. Many companies offer universal stools. But, as practice shows, a universal tackle does not always have functions for a specific motorcycle.
In this case, you can make a motorized scooter with your own hands using drawings found on the Internet. A homemade lift can be perfectly adjusted to the size of your bike. It is quite simple to make, but it requires a lot of time and great care, since it must have ideal geometry. Otherwise, working with it will be quite problematic.
There are two ways to lift a motorcycle by the rear wheel. In the first case, lifting is carried out using a bushing installed in the wheel axle. In this position it is convenient to work with the chain.
In the second option, threads are made on the bushings and they are attached to the pendulum. In this position it is convenient to change wheels. When making the central frame of the tackle, you will need the help of a welder. All corners must be perfectly measured and welded securely. After all, safety and convenience during work depend on the accuracy of measurements and the quality of welding.
In conclusion, I would like to say that if possible, it is better to purchase a good branded option. If you are limited on money, then it is quite easy to make a motorcycle lift with your own hands. Drawings can be easily found on the Internet. A high-quality tackle will be an indispensable assistant in the repair and maintenance of your favorite bike.
The dolly trailer is designed for towing passenger cars using the partial loading method. The dolly trailer must be transported disassembled, otherwise at the first traffic police post you will be issued a fine, because... A trailer without a car will be considered a trailer. with all that it implies. During the design, emphasis was placed on turning the wheels, because Without swivel wheels, there is a skid when towing a car. There are photos of tests and the product itself. PS Special THANKS to users: sanfox for the 3D model “VAZ wheel hub. " and Dimka_88 for "Winch Q=0.5t". And also to the user of a BMW 8 series from an automobile site from Chelyabyansk. Basically it was his idea. I just tried to turn simple sketches into drawings, and them into a product with testing and subsequent operation.
Composition: 3D parts and assemblies. Details, specifications, assemblies. STEP file, Info files (images)
Software: KOMPAS-3D 16.1
Date of: 2018-09-17
Views: 1 145
10 Add to favorites
Honda CBR Owners Forum: Trolley drawings – Honda CBR Owners Forum
- Discussions
- Calendar
Users
- Honda CBR Owners Forum
- >Forum for Fireblade users and owners
- >Technical issues and repairs.
- View new posts
- 2 Pages
- 1
- 2
- →
- You cannot create a new topic
- You can't reply to the topic
drawer drawings how to raise the engine?
#1 Snake
- Group: Members
- Posts: 6
- Registration: 05 November 10
- Up of the page up there ^
#2 maloy-serp
- Group: Members
- Posts: 69
- Registration: 23 October 10
Serpent (5.11.2010, 14:35) wrote:
- Up of the page up there ^
#3 Garik
- Burn everything.
- Group: FB Veterans
- Posts: 4,097
- Registration: 26 May 07
Serpent (5.11.2010, 14:35) wrote:
- Up of the page up there ^
#4 Shell-68
- Group: FB Veterans
- Posts: 4,864
- Registration: 08 April 08
- Up of the page up there ^
#5 Snake
- Group: Members
- Posts: 6
- Registration: 05 November 10
Garik (5.11.2010, 14:40) wrote:
- Up of the page up there ^
#6 Garik
- Burn everything.
- Group: FB Veterans
- Posts: 4,097
- Registration: 26 May 07
Serpent (5.11.2010, 15:35) wrote:
- Up of the page up there ^
#7 ANDREY CH
- Group: Members
- Posts: 143
- Registration: 23 November 08
Garik (5.11.2010, 15:47) wrote:
I made myself such a universal thing, and you can lift the front and back.
ANDREY CH (11/10/2010, 1:27 am) wrote:
Attached images
- Up of the page up there ^
#8 Manul
- Group: Members
- Posts: 66
- Registration: 24 May 10
- Up of the page up there ^
#9 ANDREY CH
- Group: Members
- Posts: 143
- Registration: 23 November 08
- Up of the page up there ^
#10 Reptily
- Group: Members
- Posts: 23
- Registration: 16 November 09
Snake (11/5/2010, 5:35 pm) wrote:
Hello! I made this one for myself https://www.youtube.c. h?v=gzplUCtAkFs nothing complicated
- Up of the page up there ^
#11 CyBeR
- Group: Members
- Posts: 42
- Registration: 29 January 09
I liked the idea. I looked at videos where everyone implemented the device differently, but then I came across a much more lethal version. I immediately realized that I needed to implement just such a device! This is no longer a lift, but just a bike lift!
Maybe someone has some experience.
- Up of the page up there ^
#12 Danny
- Group: Inquisition
- Posts: 6,136
- Registration: 19 January 07
- Up of the page up there ^
#13 joni
- Group: FB Veterans
- Posts: 2,120
- Registration: 20 July 07
CyBeR (11.11.2010, 15:24) wrote:
I liked the idea. I looked at videos where everyone implemented the device differently, but then I came across a much more lethal version. I immediately realized that I needed to implement just such a device! This is no longer a lift, but just a bike lift!
Maybe someone has some experience.
- Up of the page up there ^
#14 sz83
- Group: Members
- Posts: 243
- Registration: 19 August 09
- Up of the page up there ^
#15 Alexander S
- Group: Members
- Posts: 133
- Registration: 18 December 09
Danny (11.11.2010, 15:28) wrote:
- Up of the page up there ^
#16 ANDREY CH
- Group: Members
- Posts: 143
- Registration: 23 November 08
CyBeR (11.11.2010, 15:24) wrote:
I liked the idea. I looked at videos where everyone implemented the device differently, but then I came across a much more lethal version. I immediately realized that I needed to implement just such a device! This is no longer a lift, but just a bike lift!
Maybe someone has some experience.
- Up of the page up there ^
#17 joni
- Group: FB Veterans
- Posts: 2,120
- Registration: 20 July 07
sz83 (11.11.2010, 16:15) wrote:
- Up of the page up there ^
#18 Urqua
- Group: FB Veterans
- Messages: 1,487
- Registration: 21 May 08
- Up of the page up there ^
#19 sz83
- Group: Members
- Posts: 243
- Registration: 19 August 09
urqua (12.11.2010, 16:30) wrote:
+1 Or maybe lift the bike under the fork, and then screw something like stands under the sliders? They must endure. (this is specifically for removing traverses)