Set of socks, Omsa socks
349 ₽ More details
Set of socks, Omsa socks
349 ₽ More details
Water heated towel rails
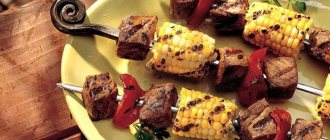
It’s hard to imagine outdoor recreation without aromatic barbecue cooked over an open fire. Contrary to popular belief, you can cook meat over coals not only on skewers. A DIY barbecue spit will be an excellent alternative to traditional skewers.
Stages of creating a spit at home
Many people are interested in how to make a spit with their own hands.
First you need to decide on the length of the skewer, as well as its diameter. An ordinary kebab requires a regular rod with a diameter of less than 1 cm, but to fry a pig you will already need a rod with a diameter of 1 to 1.6 cm. After welding the rods in a cross-shaped position, you need to create a handle, which can be made either stationary or stationary if desired. or removable. You can even take a regular door handle.
The rods can be round, square or flat - it all depends on the preferences of the master. The round view is not ideal, as there is a risk that the carcass will slide and turning it to the other side will become a difficult process, but from the physical side it is much easier.
Although the square shape of the spit guarantees uniform roasting of the meat, it is physically difficult to turn.
Each form has its own advantages and disadvantages, so everyone chooses what they can do.
The final stage is attaching the teeth to the spit with the blunt side or the handle side, which can also be removable. But this is not a required element.
After completing this stage, we can say that the spit is completely ready for use; all that remains is to purchase your favorite type of meat and cook it.
To create the perfect skewer for the grill, you need to adhere to the following some nuances:
- To place the supports evenly, they should be installed on a flat surface, as this helps to achieve a horizontal position of the spit while frying meat.
- It is better to make the skewer as short as possible to minimize additional effort during its movement, and the handle should, on the contrary, form a large lever. This way you can make turning the product as comfortable and easy as possible.
Safety Tips
What kind of skewer do you use?
ManualElectro
The convenience of using an electric spit comes with certain risks that the cook should be aware of.
To avoid accidents, it is important to follow safety precautions, which include the following recommendations:
- Monitor the voltage in the electrical network (if it surges, you must immediately turn off the device).
- Electric spits can only be used if the winding is intact.
- Worn parts should be replaced promptly - using a faulty electrical appliance is life-threatening.
- Consider the storage rules that the manufacturer applies to their products. Different electric spits may have their own characteristics that need to be taken into account.
An electric barbecue spit is a useful device that can significantly simplify the cooking process. With proper setup and careful use of this mechanism, the cook will be able to prepare juicy and tasty meat that does not have overcooked or raw areas. If you follow safety precautions when using an electric spit, it will last for many years.
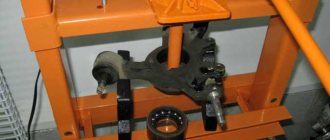
Making an Electrical Device
Creating an electric spit requires a little more effort and some knowledge. Creation stages:
- For the drive, 2 small pieces of plastic should be cut from a metal sheet.
- Then a hole should be cut on the resulting plates.
- For the gearbox, you need to attach the sprocket from the bicycle to the motor shaft, and then the gear. This structure should be secured to the plate and then mounted on the shaft.
- On the opposite edge, a second gear is installed through a bearing.
- After this, you need to attach the gears to the skewer a little further than the handle.
- Now you can install the motor on one of the legs of the grill and pull the chain to the body.
- The final step is to weld the support on the other side of the grill.
As you can see, creating a spit is a fairly simple process, the main thing is desire. If you follow all the steps, you can get a device that will become an indispensable assistant in creating barbecue. And the additional bonus in the form of money saved on the purchase will not leave anyone indifferent.
A reliable option that will serve for many years is a spit made of steel rods. Its production will require more effort, but will pay off with interest
It is important to choose the right metal - it should be high-density stainless steel. You should not use rods made of light alloy materials that contain lead, zinc, tin, or bismuth.
For greater strength, it is better to use not one, but several rods, welding or twisting them together. In this case, at least one of them must be long enough to lie on the racks of the fryer supports. The overall thickness of the metal may vary depending on the weight of the meat. For ordinary kebabs of 100-200 g, a skewer 0.7 cm thick is suitable, a rabbit or chicken carcass can withstand a rod 0.9-1.7 cm thick, cooking lamb or pig requires a more durable structure - at least 1.2-1.5 cm.
It is important to choose the right trochanter section. If it is round, frying boneless meat may be a problem, even with the extra teeth.
A flat skewer will most likely not be strong enough and will bend under the weight of the carcass. The ideal option is a triangular or square cross-section; the meat will not turn or slide off.
Be sure to weld onto the spit at least one pair of prongs to hold the meat and a long, curved handle to rotate it. It is convenient if any position of rotation on the fryer can be fixed.
Mechanical spit with manual drive
This design for frying meat consists of a number of required elements:
- support part with fastening elements;
- rod with handle;
- base for attaching meat.
The basis of this design are the support posts. As a rule, they are placed on the ground and attached to the grill itself. In addition, they can be separate or attached to the structure. Some designs come complete with racks for attaching the ram.
When choosing, it is worth considering that unstable racks will not support a large lamb or pig carcass. But you can easily cook smaller meats with them: chicken, rabbit, partridge, portioned pieces.
The main feature is that collapsible structures, despite their dimensions, can be easily transported. If you decided to fry on skewers, then the racks can be removed.
The process of making a barbecue spit with your own hands
So, first you need to determine the length of the skewer and its diameter. For a simple barbecue, a rod with a diameter of less than 1 cm is suitable, but if you plan to cook a small pig, you will have to take a thicker rod.
Its diameter, depending on its length, can vary from 1.2 cm to 1.6 cm.
If you plan to cook a very large animal, then you cannot do without complex mathematical calculations. The length of the spit is determined either by the dimensions of the grill, or by what will be used instead.
So, the rods are welded crosswise, and the rod is selected. What to do next?
The handle for the spit can be made from improvised means, for example, a piece of pipe.
It is necessary to build a handle. It can be either stationary or removable. It all depends on the desire of the master who builds the spit for the barbecue. It can be made from a simple door handle or a bicycle handle. You can also simply take a small piece of pipe and give it any shape convenient for further work.
You can take an even simpler route: do not make a handle, but leave about 1 m of rod protruding beyond the stops. This way you can also protect your hands from touching hot metal.
You can make a barbecue skewer in all possible shapes with your own hands.
You can use not only round rods, but also square or flat ones, but they must be thick enough to hold the carcass.
For the spit, you can use rods of various shapes: round, square and flat.
By the way, round rods are not very suitable for spits, since the carcass can slide on them and is difficult to turn from side to side. However, such a rod is easier to turn over.
If you make a spit with a square cross-section, then, on the contrary, it will be difficult to turn it over, but the meat will be fried evenly. In general, each option has its own pros and cons, and the choice depends on the specific desires and capabilities of the person.
There is very little left, and the spit for the barbecue will be completely ready. The final step is to attach the teeth to the spit either from the blunt end or from the handle side
It's not that important. By the way, they may not be removable.
After the last stage is completed, we can state the fact that the barbecue spit, created with your own hands, is absolutely ready for use. Now all that remains is to buy a young pig and try to roast it over the grill or fire.
Recently, people often spend time outdoors, taking a break from the bustle of big cities. In addition to admiring nature, every self-respecting person cannot do without kebabs on skewers, for the preparation of which it is recommended to use a grill with a spit for comfortable cooking and uniform heating of the meat.
There are many types of such devices on the market, among which the most popular is the electric spit, which allows you to rotate the skewers automatically. But the simplest option is to create a product with your own hands, which gives you confidence in the quality of the selected materials, and if you follow all the rules and recommendations, it will delight you with its functionality for several decades.
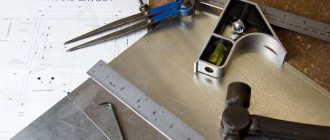
A mechanical barbecue spit requires the following materials:
- Metal rods;
- Actually a barbecue for carrying out basic measurements;
- Handle for rotating the spit;
- Metal bayonet;
- Welding machine;
- Pliers;
- Meter or tape measure;
- Bulgarian.
Making a spit with your own hands is quite simple and the process does not require special knowledge in this area.
The main condition when choosing a bayonet is to take into account the material from which it is made. It must be a difficult-to-melt product, since otherwise there is a risk that it will melt, thereby ruining the quality of the meat carcass
It is also important to choose stainless steel
To conveniently attach meat to a barbecue spit, you need 4 rods that are welded crosswise, and each of them must be the same size, otherwise it is impossible to achieve a uniform load.
Methods for making and attaching a handle
Any heat-insulating material is suitable for the handle. Many people use ready-made door handles or even a piece of pipe. It is attached to the main rod, forming a kind of lever for easy rotation.
If there is no suitable material for the handle, you can simply bend the spit itself and wrap the bent edge with any suitable material so as not to get burned during cooking.
Be sure to try cooking meat on a spit at least once, and you will definitely want to have such a design at your disposal so that you can regularly pamper your loved ones with juicy and aromatic dishes from the fire.
Start of creating a barbecue
To mount the electric skewers drive with your own hands, you need to prepare a drawing and the following types of tools:
- Bulgarian;
- electric drill.
The materials you will need are a set for rotating skewers, which includes:
- pulley;
- gears;
- belt;
- motor.
The belt can be easily replaced with the chain that was put on the bike. A car drive with a power of 12 V is installed as a motor on the grill with rotating skewers. You can use a motor from an existing toy. The standard number of gears is usually 8 pieces, which is determined by the number of skewers used.
You should make gears yourself using stainless steel. It is also used to make the parts that make up the engine of the device. To make an electric grill, you need to perform a number of basic steps:
- Clamp the plates in a vice.
- Use a grinder to drill several holes at the bottom of the wall to supply air flow.
- Make holes in the bottom of the body in the smallest increments.
- Weld the body of the structure from the plates.
- Strengthen the legs from the corner by welding.
Having equipped your country house with a barbecue, grill or barbecue, you can comfortably spend your leisure time on the site.
Equipment
Electrically driven skewers can differ significantly from each other both in their structure and in the choice of materials.
On store shelves today you can find the following products for electric grills:
- Rolling skewer (a set of interconnected skewers varying in width).
- Automatic spit with motor.
- Universal device for rotating skewers (installed on the grill).
- Rotating grill grate.
Expert opinion
Levin Dmitry Konstantinovich
The devices are also offered with parts in the form of gear motors, pass-through units and skewer clamps, which allow you to fix large pieces of meat in the desired position.
The materials from which electric skewers are made include the following options:
- Stainless steel.
- Wood (usually combined with stainless steel elements).
- Galvanized steel.
Light alloys or parts made from scrap metal are completely unacceptable for both manual and electric rotisseries, since they become toxic when heated.
Manufacturing process
The first thing you need to do is determine the length of the spit on the grill. If you only need to cook shish kebab, then take a rod of small diameter. But if you need a spit to cook, for example, a whole carcass, then it is better to choose a larger diameter.
In order to prevent the meat from falling off the rod, you need to take smaller rods, weld them crosswise and weld them to the future skewer. Next, let's start building the handle. It is best to use a wooden block because if you use metal the handle may get hot.
How to make an electric spit for a barbecue
In order to create an electric grill with your own hands, you will have to work hard. Additionally, this process will require you to have some knowledge and understanding of what needs to be done. We hope our article will help you. She will tell you how to make your own automatic drive for the grill, which will rotate the spit or skewers.
So, here is a rough work plan:
- To make the drive housing, you need to cut 2 small plates from a sheet of metal.
- If we are talking about an electric rotisserie, then I need to remove the plates and make a hole for it.
- To assemble the gearbox, attach a sprocket from a bicycle, for example, or a pulley with a small diameter, to the motor shaft. Afterwards, you need to weld the gear to the larger one. Attach the shaft with the bearing to the plate, after which you place the entire structure on the same shaft. From the axis to the bottom of the cut on the body there should be a distance equal to the diameter of the gear. But the size of a large “star”, as a rule, is chosen so that the spit can make approximately 1-2 revolutions around its axis in 60 seconds. It is this approach that will allow the meat to be thoroughly fried, but not burn.
- On the other edge of the housing on the shaft through the bearing, install the second gear.
- Now you need to secure the gears on the skewer near the handle. The diameter of this gear must match the gear that is welded to the sprocket.
- Now we install the engine somewhere on the scabbard of the grill. Pull a chain (a bicycle chain will do) from a small “sprocket” to a large one, which is located on the drive housing. And the second chain must be pulled horizontally between the large “sprocket” and the gears on the drive housing.
- The last step is to weld some kind of support for the spit on the opposite side of the grill.
Now your electric spit is ready! By analogy, you can also assemble an electric drive for skewers.
As you can see, there are a lot of interesting ideas for barbecue. And sometimes it’s not just about the marinade or the process of preparing barbecue, sometimes it’s about building a barbecue grill with your own hands, a spit, an electric drive and all that stuff. After all, it is precisely the fact that you had a hand in this that will give the divine taste to your dishes.
What it is?
The electric barbecue was invented several years ago. At the moment, there are several main types of electric grill designs, each of which is unique in its own way. If you prefer a ready-made model, which can be purchased in a store, then your assistant will be able to cook several dishes simultaneously on the grill and even on the grill using a special grill.
The ease of use of such equipment will instantly make you a fan of modern barbecue preparation, because you just need to place the sharp end of the skewer in a special hole, and send the handles onto the teeth into the grill drive housing. When the electric drive is turned on, the mechanism comes into action with the help of an electric motor, the sprockets begin to move, the gears pick it up, thus the chain begins to rotate, carrying skewers with meat, commonly called a spit.
It is not necessary to buy a ready-made electric grill in a store. You can build it yourself, because the design is not as complicated as it seems at first glance. It will take you a little time to make a barbecue, but the improved barbecue will bring you joy from use for many years. You can also always remove the structure from the grill and continue to fry the shashlik the old way, by hand.
If you decide to create an electric grill yourself, first of all, you need to familiarize yourself with the types of equipment and diagrams in order to choose the model that you like best.
If your plans include remodeling a simple grill and upgrading it with an electric drive, then you should have the following tools in your arsenal:
- Electrical engine;
- Bulgarian;
- the drive belt can be replaced with a bicycle chain, but then the pulleys will be in the form of sprockets;
- door, preferably electric;
- pulley;
- gears in the same quantity as the number of skewers your grill will be designed for.
Tips and tricks
When the grill is ready, you can start preparing the shish kebab.
In order for the device to serve for a long time and the cooked meat to be tasty, you should take into account safety rules, as well as some rules
- The device must be installed on a level place.
- Do not install the device too close to trees, bushes or buildings. Do not place flammable objects nearby.
- It is worth thoroughly cleaning the skewers and the grill itself after use, and promptly removing accumulated ash.
- It is necessary to lubricate metal structures with oil to avoid rust.
- Do not leave the operating device unattended.
- To avoid burns during cooking, it is correct to use oven mitts or special devices.
- To prepare high-quality barbecue, the coals must be properly prepared - they should be red and have a slight ash coating on them.
- The shish kebab will turn out more delicious if you use the coals of fruit trees. You can also use birch or oak options, but the coals of coniferous trees will be absolutely unsuitable - the aroma of the meat will be lost.
- If you have no experience in preparing coals, then you can simply buy them at the store.
- You need to prepare the “right” side dishes and drinks: vegetables, herbs, fresh bread, dry wine (beer and barbecue do not harmonize).
Dispute about section
Choosing the cross-section of the rod for the spit is the first thing that comes to mind. There is no universal solution and much depends on the type of spit.
What are they:
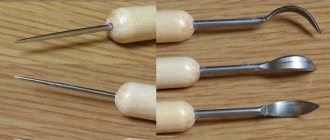
- Trident skewer.
- Rotisserie with forks or clamps. Suitable for roasting carcasses.
- Rotate the rod. For the lightest and least crumbly pieces. Good in hiking conditions.
We discard the flat section immediately: when rotating, the piece of meat will periodically sag significantly. This is inconvenient for a manual spit and an extra load on the mechanism for an electric one. The idea that on a square rod, compared to a round one, the meat does not turn, discard forever. It turns and even starts to wobble.
For a simple rod skewer, both round and square rods will work.
For the trident skewer, this issue is also not fundamental.
In the version with clamps or forks, it is better to choose a square section of the rod. This makes it easier to secure the clamps against rotation and will allow you to confidently rotate large asymmetrical pieces.
1 - fork; 2 - handle; 3 — handle fastening; 4 — disk for fixing the trochanter; 5 - skewer spindle.
What is it needed for
A carcass on a spit over a fire is something out of a children's fairy tale. Very appetizing, brutal and with deep historical roots. After all, what is a spit? This is a horizontal rod of meat, often with the carcass or part thereof rotating over a fire or coals. Clamps are provided to prevent the meat from scrolling.
During regular frying over a fire, for example, on skewers, juices and fat flow down and are lost for the future dish. The spit rotates, and the rotation speed is such that most of the juices fall onto the piece, as if wound up, forming a tasty crust.
Rotation makes it easy to coat the meat with sauce. This way you can achieve a fairly thick crust with lots of flavor from the marinade, spices and smoke. And the meat will remain juicy. This cannot be achieved without a skewer.
Types of electric drives
Another way to distinguish electric spits is the use of different drives.
Based on this feature, four categories can be distinguished:
- Unregulated – allows you to start and stop rotation. In this case, the cook does not have the opportunity to influence the rotation frequency.
- Adjustable – this option is built into professional equipment. It allows you to regulate not only the rotation speed, but also the distance to the heat. It is not used in everyday life due to the high cost of parts.
- Non-automated - does not allow the cook to set time limits during which the meat will be turned.
- Automated - using the autonomous mode, the cook determines in advance the intervals of operation and stop of the device, setting time limits.
Installing the engine on the grill
Installation of the elements of the skewers rotation system takes place in the following sequence:
- Motor.
- Gears.
- Chain.
- Power source (battery).
Next, a gearbox is mounted, which reduces the rotation speed on the skewers and transmits force from the motor to the gears. Initially, a pulley or drive sprocket is installed on the motor shaft (in the case of a chain drive). The driven gear, pulley or sprocket must be much larger in diameter to reduce the skewers' rotational speed to an acceptable level.
The entire system (engine, gearbox and gears) is mounted on a plate that already contains a shaft with bearings. The motor is mounted on the outside of the grill using a bolted connection.
The chain is tensioned only when the product is completely completed.
Purchased electric drive
For those who are not comfortable with technology, it will be easier to purchase a ready-made drive in a store. This approach eliminates difficulties; moreover, a purchased electric drive is often equipped with a proprietary battery.
Structurally, the magazine drive is an ordinary attachment that can be easily attached to any flat surface. The drive can be powered by batteries, however, the rotation speed will be minimal. Devices are available equipped with a speed controller.
There are ready-made grills with electric drive available for sale. The meat is fried from a filament on vertically positioned skewers, the juice and fat flow into the provided recesses. The taste of shish kebab fried from a heating element is really different from meat cooked over a fire, but you can use such a device even in a city apartment.
From the shop
What can you expect in the store?
There are 3 types of automatic barbecues on sale.
The cheapest solution is, one might say, a grill attachment. Only automatic drive for 4-6 skewers.
Geared motor in a single housing. There are models that run on batteries. Which is certainly more convenient than bulky wires or a heavy battery.
But still, a separate attachment will not look harmonious on the grill. And 6 skewers are not enough for everyone. For such cases, there are models on sale with an integrated skewers drive. Quite often, an automatic spit is also installed on such a grill.
A good solution for feeding a large company. The barbecues are no longer touristy at all, both in weight and size.
In addition to the classic arrangement of skewers, there are models on sale where the skewers are attached around a spit. These are very simple designs when the skewers themselves do not rotate relative to the spit. But the meat is fried on one side.
It makes sense to buy if the spit is the most important thing for you, but sometimes you want kebabs
How to assemble it yourself?
Considering that making an automatic barbecue to order is not the cheapest pleasure, a person who understands technology and has basic skills in working with metals will be able to make a device with an electric drive with his own hands. Schemes and drawings are publicly available on the Internet and specialized literature.
The drive device for skewers consists of two main elements: a rotation mechanism and a motor.
The engine can be used from old devices with low power. Any household appliance will do: microwave, stove, electric kebab maker. To equip the motor, it is good to use a gearbox - with its help it will be possible to adjust the rotation speed of the skewers in the kebab maker.
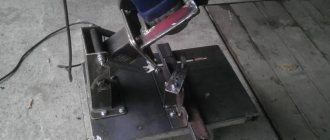
The entire system with the motor, gearbox and gears should be installed on a metal plate with a shaft and bearings - it is secured to the outside of the fryer using bolts. The motor, having started working, will set the first gear in motion, which will transmit the movement to the next part - and so on along the chain. Skewers inserted into the corresponding holes will rotate in the same mode (photo 1).
Electric spit for cooking shish kebab
The electric spit is no less popular. Its main feature is its electric drive. Thanks to a special mechanism, the engine drives the spit on which the meat is located.
Such designs can be powered by mains or battery. The principle of operation is completely identical to a conventional manual spit, although a person does not need to do anything.
How to do it yourself
If you need a stationary grill, it’s easier to make it yourself. In this case, the device can turn out to be massive. A solid foundation is provided for it.
The simplest device should include two main elements:
- Engine. Can be removed from any unnecessary electrical appliance, a microwave or an electric toy will do. It would be good if the engine is equipped with a gearbox that allows you to regulate the speed of rotation of the skewers.
- Rotation mechanism. A good solution would be to use an ordinary bicycle chain and several sprocket wheels. The gears can be turned, but it’s easier to buy them, preferably with a coating that prevents rust.
The prepared materials will need to be secured on a metal plate equipped with a shaft with bearings. The plate will be mounted outside the fryer; for this purpose, bolts are provided in it.
The principle of operation of a homemade device: the switched on motor will begin to rotate the gears, which will gradually transmit torque to all parts one by one, causing the skewers fixed in the holes to rotate.
To create such a device you will need a drill and a grinder.
Don't forget about 2 main elements
Making a box
Those who do not have a barbecue itself will have to make a brazier as well. For installation you need metal sheets approximately 3 mm thick. They are cut, then cut with a grinder to create the bottom of the roasting pan and four sides in the form of a rectangle.
Manufacturing proceeds as follows:
- Each plate is fixed in turn in a vice, then holes with a diameter of 1 cm begin to be drilled.
- In the walls they are placed at the bottom in increments of 3 cm. The heat from the coals will be drawn through them.
- Holes in the bottom are made with a smaller distance. They are needed for ash disposal.
- All parts are welded into a box - the body of the future barbecue.
- In the upper part of the long sides, recesses are drilled into which the skewers will be inserted. The distance between the notches is equal to the width of the gear with a minimum tolerance of 0.5 cm.
Now all that remains is to “plant” the roasting pan on its legs.
Engine selection
It is advisable to select a 12 W motor. You can borrow it from:
- window regulator;
- car wiper;
- microwaves;
- battery-powered screwdriver;
- replaceable timing phase;
- outdated electric stove with grill function.
Even at the initial stage, it is worth deciding whether your motor will be powered from the mains, batteries or an accumulator. However, one does not interfere with the other. By making the power supply universal, you can be powered from an outlet while staying with your family at the dacha, or from a battery when the whole group is going on a picnic.
Assembling skewers
To rotate, the ends of the skewers are inserted into the middle of rotational gears, connected together into a common system. Two types of torque transmission from electric motor shafts to gears are used:
- Serrated. The mechanism is compact. Forms an overly hard transmission and makes a lot of noise. The transmission constantly has to be lubricated during operation.
- Using flexible elements. A bicycle chain, belt, thick tape or cord are suitable for this purpose. Unfortunately, soft parts (belt, tape) can slip from time to time, and such a mechanism cannot be called durable. The device will be larger, and you will have to take into account the increased load on the shafts and supports.
You can start rotating from the central gear, which will begin to move its neighbors on both sides. Another option is to turn one of the outermost ones, which transmits the moment to the one adjacent to it, etc. This mechanism forces the skewers to rotate in one direction, so that the skewered meat will not cling. The juice is also distributed more evenly, falling on neighboring pieces, making their surface more juicy.
Experienced cooks have noticed that the meat should receive the main portion of heat in the initial 2-3 minutes of cooking. To achieve this, it is advisable to heat it manually - first on one side, then on the other. As a result, a crust is formed that will not allow the juice to flow out. Only after this the skewers are connected to the rotating mechanism of the electric grill and automatic uniform frying begins.
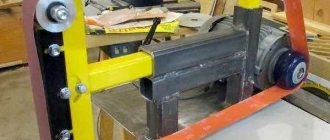
Assembling a chain of gears
Having selected a drive for automatic rotation of the skewers, you should mount the gearbox. It must transmit torque to other parts. Next you need to attach a larger diameter gear. After installing each part, you will need to tension the chain between the gears.
The structure must be mounted on a plate on which a shaft with a bearing is mounted. The finished motor is mounted to the side wall of the device from the outside. To do this, you should weld metal hooks to the body, which will allow you to hang the motor.
The scheme for composing a chain of gears requires compliance with a certain sequence. All prepared gears are mounted after strengthening the 1st gear. The next one is installed on the motor shaft through a bearing.
Next, the 3rd gear is attached to the future automatic grill with your own hands. You need to solder the 4th and then the 5th part to it. In general, their number should coincide with the number of skewers in a self-made electric grill.
The gears must be mounted so that each skewer rotates at the same speed. The movement of each rotating skewer is adjusted by the last gear. Setting the skewers rotator is necessary to control the speed at which the skewer rotates. The movement should be carried out once every 30 seconds. If the spit moves less frequently, the kebab maker will not work correctly, and the meat in it will begin to burn.
The mechanism of rotation of the skewers, provided by the fastening of the gears, depends on their movement. The starting gear must be driven by the motor shaft. The rest rotate one after another, transferring movement to each other.
Once all the gears are installed, they will need to be hidden. A metal strip can be used for this. As a result, the electric grill will operate safely.
Features: pros and cons
Cooking meat on the grill requires constant attention and the presence of a person nearby who would turn the skewers in time. The most advanced type is automatic - it will rotate the skewers itself and maintain a constant temperature that can be adjusted.
The advantages are obvious.
- This function of the device not only frees up time and eliminates the need to monitor the process, but also promotes uniform frying, without charring. The owner just has to remove the skewers with meat in due time.
- Using this device, you can cook several different dishes at once, if you use not only skewers, but also a wire rack with a spit. Products cooked on an automatic grill are always juicy, since the juice or sauce simply does not have time to drain from the products.
- It does not take much time and effort to assemble or disassemble the device. In addition, when disassembled it does not take up much space - its compactness makes it convenient for storage and transportation.
- The device is easy to clean.
However, for its operation it will require a power source - this means that it will not be possible to use it, for example, on the river bank, if there is no special battery. In addition, the cost of automatic barbecues is several times higher than conventional ones. Additionally, you need to add the cost of electricity during operation.
Features of using a spit
The product is a long rod or pin, equipped with a handle on one side and a pointed tip on the other. The product is held on this fixture using clamps. Initially, such a skewer was used for cooking whole carcasses over the fire - lamb, pig, bull or their large parts; it is also convenient for frying bacon and legs over smoke.
The thickness of the device is selected in accordance with the mass of prepared products. If small pieces of meat are a priority, a manual or automatic spit with a diameter of 10 mm is suitable for the grill. If you regularly fry whole carcasses, it is better to give preference to a product with a thickness of 12-16 mm.
Features of choosing a section:
- the square axis promotes strong fixation of the carcass, but there is also a minus - it will be difficult to string pieces and rotate the workpiece during the frying process;
- It is possible for food to slip off the round rods; meat is often undercooked here. The advantages are ease of stringing and ease of turning;
- small and medium-sized pieces can be fried on a flat spit, although its thickness should not exceed 10 mm.
What does a barbecue skewer look like?
The meat on such a skewer will be tightly seated, it will not fall or slip when turning.
Choosing the right rod is half the success
Mostly flat, square and round shapes are used. It all depends on what products we are building the grill for. Boneless meat or minced meat will be difficult to roast on a round spit because it will slip off. It is more convenient to fry shish kebab and small pieces on a flat rod. In order to cook a whole carcass without any problems, it is best to take a square shape. The meat will not slide off such a spit and will be able to cook evenly on all sides.
Scheme of a simple metal grill.
The basis of the skewer is a metal bayonet, and the correct choice of material for it is a guarantee of successful use. For a bayonet, you should not choose low-melting alloys or use an old rod from scrap metal. The best solution is stainless steel. In addition, to create a spit you will need:
- Handle for spit.
- Roulette.
- Bulgarian.
- Metal rods.
- Pliers.
- Welding machine.
Materials and tools
Before you start making the spit, you need to prepare everything in advance.
What you can't do without:
- Brazier. We will focus on it.
- Steel rod, maybe a pipe (if you fry large pieces and the whole carcass).
- Welding machine.
- Grinder with a set of wheels.
- Some iron (rods, pipes).
Of course, you should be able to cook at least at the basic level and be familiar with plumbing. The best material for a spit is stainless steel. Regular steel gives a metallic taste. Light alloys are a completely unsuitable material for a spit.
Travel version of the skewer
When you go out into nature and you have no way to use the necessary rod, you can create a disposable spit. Tree branches are suitable for this task. Just do not use branches from spruce and other coniferous trees. They are quite flexible.
The rod substitute should not bend under the weight of meat. Suitable trees in this regard: alder, walnut and maple
Before use, the bark is removed from almost the entire branch, leaving only its ends. This way the cook’s hands will not slip during rotation. The required shape of the product can be given using a regular ax.
A branch with large knots is used to secure the carcass. They are approximately one third away from the end of the branch. It will be more convenient to place the meat on such a “natural” skewer if you sharpen one end of it well.
This version of the spit was used in ancient times. Having created it, you will plunge a little into those distant eras.
Do it yourself
You can purchase a ready-made automatic grill, but they, as a rule, are either stationary and powered by a 220 V network, or have too few skewers. In order to obtain a design that meets the user’s needs, you need to make an electric grill with your own hands. The easiest way is to modify an existing grill by installing an electric motor with a drive for skewers.
You need to get the necessary materials and tools and get to work.
Required Tools
To create a barbecue with automatically rotating skewers you will need:
- Electric motor.
- Grinder with cutting and grinding wheels.
- Electric drill.
- Pulleys, sprockets or gears in the required quantity (according to the number of skewers and gears of the gearbox, if any).
- Drive belt, bicycle chain (depending on the selected drive system).
Selection of electric motor
The best option is a 12 V electric motor, which has enough power to rotate the skewers, but does not require an excessively capacious power source. It can be connected to the car’s on-board power supply, use batteries, etc. You can use a motor from various devices, such as:
- Electric grill.
- Electric spit.
- Car window regulators or wipers.
- Microwaves.
- Cordless screwdrivers, etc.
The use of motors with a 220 V power supply deprives the grill of autonomy and precludes its use when traveling outdoors, so we will not consider this option.
Drive assembly
Skewers are inserted into special slots. On one side, they are sockets into which skewers are inserted from above; on the opposite side, they are grips for skewer rings installed on the axis of gears or drive pulleys. There are many drive design options:
- A bicycle chain with a drive sprocket on the motor axle and a row of driven sprockets on the skewers axles.
- A drive belt passed in a zigzag pattern through a series of drive pulleys and a drive pulley on the motor axle.
- The drive gear transmits rotation to the chain of gears along the axes of the skewers.
The latter option is more reliable - it does not create excessive load on the pulleys, so it is used most often.
Do you need an electric drive for skewers?
There are mechanical barbecues in which the rotation of all spits at once is carried out from one axis. A handle is installed on it, with the help of which the working rods are set in motion. The design is convenient due to its independence from power supply, but it requires constant human presence. An electric drive for a barbecue frees up a person, giving him the opportunity to do other things or just relax with friends.
Electric drive installation
includes several actions
- Installing the electric motor on the product frame.
- Creation of a chain of gears (pulleys, sprockets) transmitting rotational motion to each other.
- Installing the drive belt or chain.
The use of different types of transmission somewhat changes the specifics of the actions performed, but the general order of work is not disrupted.
Instructions for making a chain of gears
The first gear is the drive gear, it is installed on the motor shaft. It connects to the 2nd gear, to which all the others are connected in series. It is not recommended to disturb the installation order and place the gears out of order; this can interfere with the ease of movement and create unnecessary load. Unlike a pulley system or sprocket from a bicycle chain, the gears are all meshed, so they require the same sequential installation.
Successful examples and options
Usually there are no special requirements for the appearance of barbecues. However, there are often people who are no less demanding when it comes to device design. An important question for them is how to make a barbecue that fully matches the design of their summer cottage or has a specific shape. The network has a large number of examples and options for the appearance of barbecues, made in different styles and forms.
You need to choose the most suitable option for yourself before you start making an electric grill, so as not to redo the finished product due to some inconsistencies.
Electric spit for barbecue
The electrical part of the grill area is manufactured identically to the previous version. The most important part is choosing the right electric drive. It should provide a rotation frequency of no more than 2-3 per minute.
Selection of motor part
In fact, various materials can be used. Some people use electric motors for windshield wipers, fans or children's toys. An electric drill or screwdriver is mounted to already manufactured structures.
Those who want to get more involved can choose a skewer, subtracting the weight of the meat being cooked. Such a system costs a lot of money, but the user can be confident in the quality of such a design and the durability of its operation.
Drive installation
In order to transmit rotating torque, various designs are used. The best option is to use a bicycle sprocket.
It is this mechanism that will help the user create a high-quality torque element that will be quite affordable. It is the design of a bicycle chain and sprocket that will last a long time and will delight users with its quality.
Reference! In addition, this is the simplest and most durable way to make an electric spit.
DIY electric spit
For those who are interested in making an electric spit with their own hands, you can familiarize yourself with the special video instructions.
Modern craftsmen offer many ideas for creating an electric drive with their own hands. In addition, a clear example will help make the work of the structure more accurate and of higher quality.
Preparing the grill
If there is no ready-made barbecue, then you can make it yourself:
- Each plate is clamped in a vice in turn. Small holes (about 10 mm) are drilled with a grinder. They should be at the bottom of the wall. The step is made at least 3 cm. This will ensure the supply of air to the fire. Holes in the bottom are made in smaller increments.
- A structure is welded from prepared plates with holes.
- A corner is welded along the perimeter (at the seams).
- A corner is used as legs. It is welded to the bottom of the structure.
Diagram of a stainless steel barbecue. If you have minimal skills in working with metal, making such a grill yourself will not be difficult.
Mounting the motor on the grill
The drive for rotating skewers or spits is a special attachment installed on any surface. This can be an electric grill, bricks or a barbecue, which allows you to conveniently fry meat. You can make a motor for a barbecue with your own hands from an electric motor from car wipers.
Having prepared a DIY set for rotating skewers, as described above, you should proceed to installing the electric motor on the grill. The part will need to be secured to the side of the device.
To make a grill with electric skewers with your own hands, it is important to know the principle of mounting a chain on a bicycle. Then you can begin to create an electric drive for the grill, which involves performing the following steps:
- Motor installation.
- Assembling a chain of gears.
- Tension of the assembled chain.
To install the electric spit, you need to make cuts in the upper part. You will need to determine the step with which the skewers themselves should be installed. To do this, you need to measure the diameters of all gears, the length of which should be 0.5 cm larger.
A home craftsman is able to install an electric drive for a spit on his own, even if he has a little experience working with metal. The main difficulty of the work is as follows:
- It is difficult to install an electric grill with your own hands;
- structural repairs may be costly;
- Finding the right part is problematic.
Manufacturing of a mechanical version
Before you build a spit, you first need to think about its length and diameter, and also prepare all the necessary materials. If the spit will be used for frying small pieces of shish kebab, then you should use a rod up to several millimeters thick. To make a carcass of a small animal, you need to select a skewer from a rod 10–12 mm thick. If you want to make large pieces of meat (for example, from lamb), then it is better to use a rod with a width of 13 to 17 mm. The length of the spit depends on the dimensions of the grill.
If suddenly there is no barbecue nearby, then you need to make a place that will hold the meat above the flame. A spit with the product is placed on top of it. The steel rods must be of the same type, due to this the load will be uniform. Several pairs of rods should be folded in twos. Thanks to the presence of gaps, the spit will stay well and securely near the fire.
The skewer differs from an ordinary swivel in the presence of a handle. With its help, you can securely hold the carcass for even frying, periodically changing its position. A barbecue fire is a real enemy that can ruin a long-awaited and delicious dinner. You can make a pen from absolutely any product you come across. A bicycle handle or a piece of pipe can be used.
The handle must be attached to the main structure. For reliability, it is better to weld it to the product. If you can’t find anything, then some kind of curved end of a rod, even the most ordinary one, will do. The main thing here is to get leverage. After this, you can make a rod of any convenient shape. This will ensure convenient cooking of meat. Hands should be far from the scorching fire, so the metal that extends beyond the limiters must be made at least one meter.
Date: March 17, 2013