DIY paper apple tree branch
Author: Chichkina Elena Vasilievna, teacher, MBDOU "Ermakovsky kindergarten No. 3", p. Ermakovskoe, Krasnoyarsk region. Description: This master class is intended for children from 7 years old, additional education teachers, parents and creative people who love to create beautiful and unique things with their own hands. Purpose: Souvenir, gift, voluminous souvenir, home decoration.
You know, if it weren’t for apples, there would be neither me nor you, either in the virtual world or in the real one. Just remember, who were the first people? Do you remember? Well, of course, Adam and Eve. But, after all, they lived in paradise, and they had everything. They only had one prohibition - not to pick an apple tree, not to eat apples.
Where are you, April breeze, charming, in love with the apple trees? They bloom and bloom, and you blow away this fragrant snowball.
In the old, blissful days, in the cold pink fog, yes, they fell sweetly, flowers of simple charms. Vladimir Nabokov
Goal: Making flowers with your own hands Objectives: - continue to get acquainted with the seasons: spring; — teach how to make souvenirs from paper and waste material; - develop interest in artistic creativity; - develop fine motor skills, eye, imagination, aesthetic taste, compositional skills; - consolidate skills in handling tools - scissors, paper; — to form a work culture: teach accuracy, the ability to use materials carefully and economically, and keep the workplace in order; - cultivate independence, patience, perseverance, a sense of satisfaction from the habit of finishing things;
Source of the article: https://kladraz.ru/blogs/elena-vasilevna-chichkina/kompozicija-iz-vetok-jablonevyi-cvet-master-klas-s-poshagovymi-foto.html
Master class “Apple tree branch”
Irina Fedoreeva
Master class “Apple tree branch”
Master class on making a branch of a blossoming apple tree.
1. For work you will need: paper napkins in 4 colors: white, pink, 2 shades of green, scissors, a stapler, a simple pencil, glue and of course a twig.
2.Fold napkins in layers: white, pink, white. Then we divide the square into 4 parts and fasten each part with a stapler.
Take scissors and cut along the drawn lines into 4 parts.
3. We got 4 squares, on each we draw a flower and cut it out.
4. Having cut out all the flowers, we begin to give them volume. We straighten each petal.
5. Having made the required number of flowers, we begin to glue them onto the branch.
6. Make small leaves from green napkins.
7. The twig is ready. We made several branches, so we decided to welcome spring.
Christmas tree from napkins Master class: Christmas tree from napkins goal: making a Christmas tree from paper napkins. The little Christmas tree is cold in winter, We took the Christmas tree from the forest. Gift for mommy! Master class “Gift for Mom” I offer a master class for those who like to make flowers for gifts for March 8 with their children. Manufacturing.
Source of the article: https://www.maam.ru/detskijsad/fedoreva-irina-nikolaevna-mbdou-detskii-sad-5-prezentacija-vetka-jabloni.html
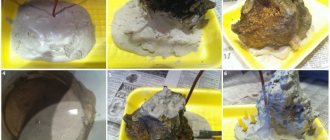
Modeling apples
Modeling papier-mâché apples is somewhat reminiscent of making cutlets. The required amount of mass is collected in the palm, and with both hands they begin to sculpt the bun. You can crumple up a model of an apple from dry newspaper, cover it with mass and lightly press it so that the bun takes the shape of an apple.
From the top in the middle, lightly press with your thumb to create a hole for the apple's tail.
You can use a real branch with leaves as a tail. The branch should be thin and not too long. Cut a long branch at an angle on one side. This will be the top. Drop some thick glue into the hole and hold the branch for a few seconds. You can also make a tail from a strip of paper, twisting it in a spiral and dipping it in glue.
The resulting buns with tails should dry thoroughly. Place them in a warm place on a clean oilcloth for at least three hours. Drying can take up to 12 hours, so be patient.
Dried apples must be primed. White paint, putty, or, in extreme cases, toothpaste, will be suitable for priming.
Prepare the primer in a separate cup and carefully coat each paper apple using a brush. Let it dry. There is no need to prime the tail of the branch. Only paper parts.
You can start painting. Choose a base color for your apples and paint. To make the apple look natural, add shimmer on the sides. To do this, you should slightly dilute the main color on a plastic board with a similar paint so that the color turns out to be a shade darker or lighter.
You can also experiment with two different colors. Try coloring something first. For example, draw an apple in a sketchbook and color it. If you are satisfied with the coloring, feel free to use it on the finished dummy.
Once the paint has dried, cover the apples with a thin layer of clear glue or clear nail polish. This will prevent cracking in the future and your apples will be as glossy as if they've been bathed in sunlight. You can decorate your kitchen with ready-made dummies in a wicker basket. Just be sure to warn guests that they are not edible.
Source
Required materials and tools
To make crafts with your own hands, you will need paper of different colors and textures, as well as additional materials and tools:
- cardboard;
- pencil;
- ruler;
- scissors;
- glue (PVA or stationery);
- glue gun with silicone rod;
- wire;
- threads;
- decor for making stamens (dyed semolina).
When working with children, it is recommended to properly organize the work and explain to them the safety rules for working with glue and scissors:
- Scissors can be passed to each other holding them by the closed blades with the rings facing forward.
- Scissors for children's creativity should have rounded blunt ends.
- The glue should be squeezed out of the tube or carefully applied with a brush.
- Do not swallow glue or touch your eyes with glue-stained fingers.
- If glue gets into your eyes or mouth, tell an adult immediately.
- Rinse eyes with running water, rinse mouth with water.
Where can you use apple blossom?
Paper flowers always remain popular. Along with the ease of their implementation, the inflorescences always look natural and allow you to decorate any space.
A branch of a blossoming apple tree made of corrugated paper or created in origami style can become a bright decoration in the following cases:
- making and decorating cards;
- interior design of a home or office;
- decoration of theme parties, banquet halls, festive tables;
- decoration of clothes and hair in the form of boutonnieres and individual flowers.
Beautiful paper crafts
There are a wide variety of techniques for making artificial flowers:
- This could be a voluminous apple tree branch made of corrugated paper that can be placed in a vase.
- A voluminous applique made of colored materials with lush inflorescences, which can serve as a decoration for a postcard or wall panel.
- Large flowers made of thick paper in origami style for decorating gift packaging.
- Delicate apple flowers made from thin napkins as interior decoration elements (mirrors, walls, windows).
- A large branch of an apple tree made of corrugated paper as a design element for spacious rooms for celebrations.
Making papier-mâché
You will need a medium-sized basin, sheets of white loose paper or a lot of old newspapers and napkins. White paper is preferable as newspapers turn a dirty gray color when wet.
The paper must be torn into small pieces (the smaller the better), placed in a basin and filled with hot water to the top. Consider whether you have enough material. Add more paper if desired. The filled paper should be allowed to sit for a day. Stir the paper from time to time and rub it with your fingers.
After the wet paper has infused, it must be boiled, allowed to cool and squeezed out, draining the excess water.
Add a little chalk powder to the loosened paper. And, stirring, pour in wood glue. You can also use wallpaper glue or PVA glue. The resulting mass should be dough-like in thickness.
Apple tree flowers made of paper master class
This master class describes step by step the sequence of assembling a flower, shows a diagram of how to make apple tree leaves, and provides tips on working with craft materials.
Crafts of individual paper flowers with a diagram
For creativity you will need:
- corrugated paper in green, white or light pink;
- wire;
- glue (PVA or silicone);
- scissors.
Apple tree flowers made of paper, manufacturing sequence:
1. Prepare materials of the required sizes according to the photo.
When cutting out elements, pay attention to the stretch line of the paper. The petals should stretch in width, and the strip for wrapping the stem should stretch in length.
2. Cut the strips for the petals in half.
Weaving techniques
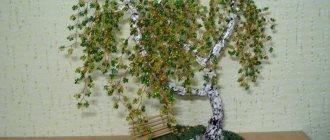
Anyone can learn to weave with beads. To do this, you will need to choose the scheme you like and study the techniques used in it. Flat, three-dimensional products are created in various ways, using large, small, elongated beads. You need to start with the simplest master classes, mastering more complex ones over time. You can create with beads using any technique. There are the following types of weaving:
- Needle-shaped. The simple version is usually used to create individual details of the composition (flower stamens, insect legs). Several beads are strung on a wire, the last one is bent around and the base is threaded through the next one and tightened.
- Flat parallel. The most popular and simple technique. It is used for weaving leaves and petals. The wire is passed through the beads according to the pattern, creating a new parallel row.
- Volume parallel. The principle of operation is identical to the parallel method, but the rows are not located in the same plane. This is how they make animal figures, flower buds, etc.
- Hand weaving. Weaving is done on one thread. The beads are connected to each other along the vertical and horizontal axis, grabbing beads from the adjacent row with a fishing line and gradually increasing them. The patterns are designed for bracelets, paintings, and decor for flower pots.
- French. Beads are strung on two ends of the fishing line and arcs are made, capturing the outer beads. The technique is suitable for making flowers and tree leaves.
- Monastyrskoe. The base is a cross of 4 beads. By increasing elements of the same type, a finished product is obtained. Suitable for flat and voluminous crafts.
- Looped. The finished elements look like loops. In this way, individual components of the composition are made or used as a basis. Several beads are strung on a wire and tightened in a loop, an indent is made and the steps are repeated.
- Mosaic. Weaving with tight fitting beads. Each piece is attached vertically, sandwiched between two beads of the adjacent row. Stringing can be circular or cylindrical.
- Mesh. In this way, various objects are braided, for example, Christmas tree decorations, flower stands, beaded trees, vases. The size of the mesh cells is determined by the number of beads.
- Brick stitch. The arrangement of beads in horizontal rows resembles brickwork. The beads in each row are located with a slight offset relative to the adjacent strip. The technique is suitable for creating flat, three-dimensional shaped products.
Ideas for beautiful flowers. Step-by-step description of work and diagrams
Paper apple tree flowers can be not only a decoration, but also the basis for children's creativity lessons. A simple craft in the form of an applique can be done independently by a child.
A corrugated paper apple tree can be created using natural ornamental material such as tree branches.
Applications for children
In order to make apple tree flowers, you will need the following materials:
- paper of light pink, brown, yellow, green colors;
- A4 cardboard sheet;
- pencil;
- scissors;
- glue.
Before starting the lesson, you need to print out the template of the applique elements, then it will be easier for the children to transfer the image onto colored paper.
- Draw the outline of a branch on a brown sheet and cut it out. Glue it in the middle of a sheet of cardboard.
- Make leaves from green paper: 3 large and 2 small.
- To make the sheet voluminous, you need to apply glue only to the center line.
- Arrange the leaves as shown in the photo.
- Cut out flower blanks. You should get 1 large flower, 1 smaller flower and a bud.
- Give the petals volume by running the tip of a pair of scissors over them. At some points, children need help when making crafts. An adult would probably be better able to create the volume of flowers using scissors.
- Glue the flowers as shown in the picture, placing the bud at the end of the branch.
- Finally, make the middle of the flower from yellow circles. First, the edges of the circle must be cut often with scissors.
To make the stamens voluminous, you need to press the center of the circle with a pencil and lift the stamens up with your fingers.
Origami flowers
Origami is the Japanese art of folding paper figures. By following a simple pattern, you can make flowers, which can then be used for various decorative purposes.
Choosing a base for weaving
Wire is not a universal base for beading. Different parts will require specific materials. It varies in thickness, ductility, degree of rigidity, and color of the coating. You can immediately purchase a set and select a suitable option from the available ones, or explore the assortment of coils and select only the products necessary for manufacturing.
0.2 mm wire is suitable for weaving small elements of decorative trees, leaves, flowers. Parallel, needle, French, and loop techniques are suitable. The base easily passes through beads No. 10 and takes any shape.
0.5 mm wire is made of steel and copper. It is soft, elastic, shiny, and does not stick to a magnet. Tree trunks, branches, and other rigid parts are made from it, onto which various elements will be attached in the future.
The base, 1 mm thick, is used to create parts of increased rigidity. The wire is intended for creativity, therefore it is no less plastic and flexible than thinner options.
Cutting templates
This section includes ideas and diagrams that can be used in creative works. Here there is a template of an apple tree flower for cutting out of paper, a stencil of leaves and branches and other photographs of finished works, which you can also make yourself.
Homemade items can become original gifts if you put in the effort. An apple tree branch made of corrugated paper in a bright frame will not leave anyone indifferent and will become a stylish interior decoration.
Source of the article: https://e-ipar.ru/cvety-iz-bumagi/yablonevye-tsvety