Drilling a well on a site is a large-scale task. Not every home owner can afford the services of a professional team, and hiring “handicraftsmen” is, in most cases, just throwing away money.
It’s easier to do all the work yourself: you work harder for yourself and have fewer expenses. In addition, if you make a drilling rig yourself, the costs will seem literally ridiculous compared to the real prices of drilling.
We will tell you how to make a machine for manually excavating a water intake on a site. The information we present is based on the practical experience of independent drillers. To complete the perception of a difficult topic, the proposed information is supplemented with useful diagrams, photo collections, and videos.
Operating mock-up of “Drilling rig BU-3000 with simulation of rotary drilling and PO”
- December 28, 2014 17:26
The mock-ups demonstrate the filling capacity of the towers and demonstrate the operation of drilling at oil production sites.
The model of the oil rig BU 3000 is made in action; it shows the work of lowering and lifting pipes, as well as the drilling process. The movement of oil after production is also shown with a neon glowing cord.
- : Scale 1:40. Dimensions: 1800x2000x350 mm Materials: PVC plastic, acrylic, vinyl film. Base: laminated chipboard (mahogany) - 100 mm. Painting: acrylic enamel Production time 25-30 days
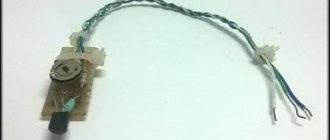
Homemade swivels
Own assembly - who needs it?
So when do you need to assemble your own swivel, if the choice of products at a seemingly affordable price is quite large? It’s worth starting with the fact that for simple gear and small loads the prices are indeed low, but for serious mining with a load closer to 100 kg the price of the product increases by an order of magnitude or more. As an additional argument, skilled people cite the ability to precisely control quality and assemble a reliable design to their liking, while people living far from company stores have their own self-evident arguments, such as the cost of travel and reliability of delivery.
Operating mock-up “Drilling rig BU-5000 with imitation of rotary drilling and rock drilling”
- December 28, 2014 17:25
The mock-ups demonstrate the filling capacity of the towers and demonstrate the operation of drilling at oil production sites.
The model of the oil rig BU 5000 is made in action; it shows the work of lowering and lifting pipes, as well as the drilling process. The movement of oil after production is also shown with a neon glowing cord.
- : Scale 1:40. Dimensions: 1800x2000x350 mm Materials: PVC plastic, acrylic, vinyl film. Base: laminated chipboard (mahogany) - 100 Production time 25-30 days
What do you need to get started?
Naturally, it’s not possible to just go and make a drilling rig. To do this, you need to prepare first. It is advisable that at the time of assembly you have minimal experience with welding. This will make your life much easier, since you will not need to involve specialists or friends. You should also have an electric drill and grinder on hand. We will look at why all this is needed a little later.
But this is not the entire list of tools. It will be difficult for you to do without a device for creating external threads, as well as an adjustable wrench and a plumbing cross. The material we need is a galvanized pipe and a ½ inch bend. In our case, a special coating is necessary, since if there is no zinc, the pipe will quickly rust. There is nothing good in this, since replacing it is a very problematic task. Well, now let's move on to the practical part of this article.
The operating model of the “SKD-8 rocking chair with a geological section of the earth”
- December 28, 2014 17:23
Made in table-wall version
The model shows the surface and underground equipment of a deep-pumping well.
The layout demonstrates: the rocking structure, the main elements, the location and interaction of the main components in the process
installation operation; operation of the deep-rod pump valves in cycles. For a better overview of the pump operation there is a backlight.
The front panel of the model is a conventional section of a well with layers. The layers are colored in different colors according to the geological pattern of the soil.
First stage of assembly work
At the very beginning, we need to prepare sections of the drilling rig pipe, which are its main part. Their connection is realized through slopes and crosses. To avoid any problems, a 2-centimeter external thread is provided at the ends of each pipe section. A metal plate is welded to two sections; it will be the tip. Such an installation will be effective only if water is constantly supplied to the drilling site. This will allow you to remove soil, and thereby gradually deepen the hole. To supply water, you can use a regular hose, which is connected to the hole in the cross blank. As a priority, the connection should be made using a suitable adapter. Well, now let's move on.
Operating mock-up "Rocking chair SKD-8"
- December 28, 2014 17:22
The model demonstrates the operation of the equipment and all its component units
- : Scale 1:10 Dimensions: 900 x 800 x 1000 mm. Materials: PVC plastic, acrylic. Base: laminated chipboard (mahogany). Painting: acrylic enamel. Production time 15 days
Types of leashes
As you will understand after seeing the photo, there are quite a lot of types of leashes. On sale you can find accessories designed for large species, small breeds, decorative or natural. They can be made of canvas or genuine leather. But the most important thing is that all dog leashes differ in purpose.
For walks
As the selection shows, traditional leashes for dogs of all breeds intended for walking are made of leather or canvas. In practice, these attributes are very durable and practical. For example, leather accessories are characterized not only by durability, but also by an interesting appearance. However, frequent walks in rain or wet weather can lead to deformation of the leather attribute and loss of elasticity, which means the accessory may crack.
Operating layout of a "Coiled Tubing Unit"
- December 28, 2014 17:20
Made on the basis of a car.
The model shows the car and all the technological equipment installed on it: operator's cab,
drum with wound pipe, hydraulic system with hydraulic lift, centralizer of wound pipe, guide gander, shoe pipe feeder
into the well, preventer.
- : Scale 1:15 Dimensions: 1230 x 500 x 770 mm. Materials: PVC plastic, acrylic, vinyl film. Base: laminated chipboard (mahogany) - 100 mm. Painting: acrylic enamel. Production time 20 days
How to make a hand pump for a well with your own hands?
Another manual well pump - a diaphragm - can be made on the basis of a brake chamber. Only one hole needs to be left in it, the rest are clogged. On the opposite side of the remaining open hole, it is necessary to make several holes in which check valves will be installed using epoxy resin.
The valves are made from thick-walled copper tube. At one end, its internal diameter is increased using a drill, after which a ball is placed here. Its diameter should be equal to the increased (reamed) diameter of the tube, as a result of which the narrow part of the tube will be clogged. Then a piece of wire is soldered to the drilled end of the tube so that it does not allow the ball to fall out - and the valve is ready.
Hand pump for raising water
Another valve is done in the same way, only a spring is soldered to the wire, which will hold the ball closed - you get a normally closed check valve.
All that remains is to install the valves in the chamber and glue to it a round rubber membrane cut from a car inner tube. A rod is secured in the center of the membrane with nuts, the free end of which is released into the hole in the brake chamber that is left open.
Operating model “Operation of an oil field with four mechanized wells”
- For: Rosneft December 28, 2014 17:19
The layout is made in a floor-standing version.
The model shows the Xmas tree used in the operation of 4 oil wells (mass flow, gas lift, rod pumps, rodless pumps).
The wells are shown in a cross-section showing the underground equipment of the well.
A well equipped with a rod pump shows a “pumping machine” installation, made in its current version.
The model of the rocking machine shows the structure and principle of operation of the units and the installation mechanism.
The model also shows the Sputnik oil metering station, an operator’s block with equipment installed in it, and a metering and switching installation with a bypass.
The front panel of the mock-up is painted in different colors – so-called layers in section.
- : Scale 1:50. Dimensions: 2.0×1.0×0.6m Materials: PVC plastic, acrylic, vinyl film. Base: laminated chipboard (mahogany) - 100 mm, Cap: Plexiglas. Painting: acrylic enamel Production time 25 days
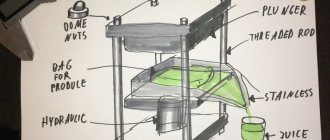
Construction of an auger drilling machine
The frame of such an installation can be made in the form of a tripod, but more often it is made of vertical guides mounted on a stand and connected at the top by a horizontal structure. The frame of the machine must reliably hold the working string of drilling equipment and extension rods when extracting them from their wells.
The diagram clearly shows the structure of a drilling rig on a metal frame with a swivel, a drill, an electric winch and a gear motor (+)
The drill is made as follows:
- A couple of turns of a metal strip are welded to a section of a narrow metal pipe about 1.5 meters long to create something like a screw thread.
- Knives are attached to the edges of the auger, the cutting edges of which should be at an angle to the horizontal.
- Knives are sharpened.
- A tee with internal thread is screwed or welded to the upper edge of the drill.
- Sections of metal pipe of the same diameter are prepared. as well as the auger pipe, in order to further increase the length of the drill string. These are barbells.
- Threads are cut on these pieces of pipe to connect them or a hole is drilled for fixation with a locking pin.
However, to increase the length of the drill rod, a coupling or locking connection is also quite successfully used. The drilling derrick can be made of metal pipes, channels or wood. The main thing is that it securely holds the drill string.
A block is installed in the upper part of the frame, which is connected to a winch to lift the pipe string with the drill bit. It is believed that a tower is only necessary when drilling wells more than eight meters deep. A small structure can be drilled without it, but the work will still be difficult.
Increasing the length of the drill rod significantly makes the string heavier, so an electric motor with a winch is used to lift it. If you plan to perform “wet” drilling, the drill is also rotated using an electric motor.
Experts consider the best option for these purposes to be a standard device with a power of 2.2 kW at 60-70 rpm, which can be powered from a regular 220 V outlet. Models such as 3MP 31.5, 3MP 40 or 3MP 50 may be suitable.
A swivel is an element with the help of which the driving moment is transmitted from the electric motor to the drill rod. Through it, drilling fluid is also supplied into the mine. Drill rods are fixed to the moving part of this device. A special sealed pipe is designed for drilling fluid.
The diagram shows the design of a swivel for a small-sized drilling rig. Through the side pipe, flushing liquid is supplied into the shaft (+)
Since the swivel is constantly moving during drilling, if performed poorly, it can break very quickly. To prevent this from happening, two rules must be followed: use only high-strength steel for its manufacture and ensure a minimum gap between the static and moving elements of the device.
As already mentioned, there are no super-strict rules when constructing self-made drilling rigs for wells. Most often, a hybrid structure is constructed, which allows the simultaneous use of both the percussion-rope method and rotary drilling.
In this design, the same frame is arranged, allowing you to switch from one method to another without making any design changes.
This is a variant of a combined type drilling rig, it can be used for both cable-percussion and auger drilling
If you want to engage in well drilling professionally, then it is better to purchase all the parts externally, rather than do it yourself, or rent it. You can order all these elements from an experienced turner. You will need to buy a reliable electric motor with a gearbox, and a motor pump, hose and hose if you plan to perform work using hydraulic pressure.
It is better to make the frame and drill after the swivel, electric motor and winch have been purchased. This will allow you to correctly and quickly fit all parts of the installation to each other. To be able to extend longer rods onto the drill, it is recommended to make a frame with a margin of about 3.3 m.
High-quality steel should be used to make the swivel and locks, since these parts of the structure bear the highest loads during the drilling process.
You can also make a swivel for a home-made drilling rig yourself, but it will be easier and more reliable to use an industrial model of such a device
Hardened steel is not very suitable for making homemade drilling rigs, since after processing it requires additional grinding, it is better to use ordinary steel. It is best to use trapezoidal rather than tapered threads on rods.
It has sufficient strength characteristics, and any turner can handle such threads. But to make a rod with a tapered thread, you will have to look for a specialist.
For drilling to a depth of more than 30 meters, it is recommended to make rods from pipes with a wall 5-6 mm thick. Ordinary pipes with a wall of 3.5 mm may not withstand such loads. To make a drill, it is better to take not alloy steel, but ordinary steel, so that there are no problems during the welding process.
For drilling hard soils, it makes sense to use a high-strength industrial drill bit. A good effect is achieved by using a projectile with three blades. During its operation, cyclic rotation is used, which allows loosening the soil as efficiently as possible.
Drilling tools for manual work come in different designs. There are spoon and coil models, as well as a drill bit. Spoon drills are effective on plastic soils: sandy loam, loam, clay. The cutter of such a drill is usually made in the form of a bucket. You can make such a drill yourself from a pipe of a suitable diameter.
On dense loams you can also use a coil drill. This device is designed like a corkscrew, and the cutting element is forked, the so-called swallow tail. An alternative to a snake auger is an ice auger, but it may not be as effective.
On hard rocks, a drill bit with a point angle of 110-130 degrees performs best. The chisel can have very different shapes, since they are designed to destroy rocks of varying degrees of hardness.
The drill bit is suitable for working on hard and soft soils. Such a drill can be made from scrap materials
To drill complex geological sections, it is sometimes better to use two stages of drilling with two different drills. First, drilling is done with a narrow drill, about 80 mm in diameter. After such exploratory drilling, work is performed with a larger diameter drill to obtain a well of the required size.
The lifting capacity of the winch must be at least one ton. In addition to the electric winch, some craftsmen immediately install another, mechanical one. It copes more effectively in some cases, for example, if the casing pipe is jammed. It is recommended to use two different control panels for the electric motor and winch.
Layout "Downhole drilling equipment"
- December 28, 2014 16:54
1. representation of the earth's surface in a section with a clearly expressed representation of the oil reservoir and various rocks, on the surface there is meadow grass and birch trees.
2. Downhole equipment is presented as a cross-section of a well (production string, tubing string, screw submersible pump (pump stator) on the tubing below, and a string of rods inside the tubing string with a rotor inserted into the pump stator). Stator in section, solid rotor with rotation of the rod string from the surface drive, with light indication of fluid flow from the formation to the surface (fluid flow from the formation along the internal part between the rods and tubing), anchor at the bottom of the pump, as a stop for the lower part of the tubing string into the production string .
Features of hydraulic drilling technology
Most drilling technologies use water as a flushing agent to remove rock and soil from the borehole cavity. In a hydraulic drilling system, water is used as one of the tools to destroy rock in the well cavity. Today, two hydraulic drilling schemes are used:
- Crushing the soil by the combined action of water pressure and the cutting bits of the drill rod. Due to the softening of the soil, cutting the bottom of a well with a cutting edge requires 10 times less force than with dry and semi-dry drilling;
- Washing scheme of hydraulic drilling. If the soil is relatively loose and contains a large amount of sand, then a well can be easily drilled by eroding the rock with high water pressure.
- Impact drilling using a bit and water pressure.
Important! Any high-pressure schemes require the use of a special gear unit mounted on the cut of the drill rod. The gearbox simultaneously ensures core rotation and water supply from the pump inside the rod
Hydrodrilling with rotary insertion
Even when clay or loam is highly saturated with water, it is very difficult to destroy the rock with water pressure alone, so for hydraulic drilling a drill bit on a rotating rod is used, as in the video:
The rod is rotated by an electric motor through a chain transmission. A lock on the top of the drill rig ensures that the new rod is installed and engaged with the main pipe without stopping.
The task of the crown is to destroy and crush the rock to a minimum size at which the flow of return water can carry the crushed mass outside the trunk. The rotary hydraulic drilling circuit exists with a direct or reverse water supply circuit. In the first case, water is pumped into the rod, cools the tool, washes the rock out from under the cutting bits and lifts the rock and soil through the annulus into the slurry pit.
In the second case, water is poured into the well through the annulus and discharged through the internal cavity of the rod. This method of hydraulic drilling is used in cases where it is necessary to obtain maximum quality of the well walls and avoid contamination of the water intake with clay solution. This, in turn, ensures maximum water yield from the well.
The combined use of water pressure and cutting tools makes it possible to drill wells in limestone, old clay, shale and formations with a high content of clastic fragments of soft sedimentary rocks. The maximum shaft depth, as a rule, does not exceed 50 m.
High pressure erosion of rock
For sand and sandy loam, hydraulic drilling of wells can be carried out according to a simplified scheme, in which the shaft of the mine is formed only by eroding the granular mass of the soil. In industrial conditions, a similar hydraulic drilling scheme with a working pressure of up to 300 atm. allows you to cut soft quartz and sedimentary deposits. At a pressure of 450 atm. Calcite, spar and granite are cut.
For home conditions, the operating pressure rarely exceeds several tens of atmospheres. It is almost impossible to carry out hydraulic drilling of a well to a depth of more than 20 m using the flushing method. The positive aspects of the flushing technology include the absence of a rotary machine and simplification of the work. Often, only a valve and a pump are used for hydraulic drilling by washout. The rod, through which water is supplied under high pressure, is installed on a three-support carriage and rotated manually using a gate.
Impact bits are also used to effectively destroy rock at the bottom of a well. In this case, sharpened chisels and bayonets made of hard alloys are mounted at the end of the drill rod. When applying gentle but frequent blows, while simultaneously rotating the rod around its axis, the sharp edge of the chisel splits small stones into small fragments, which are carried away by the flow of water. The method is quite effective for working on limestone layers, but is absolutely not suitable for viscous and mobile loams.
Layout "Oil field arrangement scheme for production, metering, transportation of oil and gas"
- December 28, 2014 16:52
Made in a wall-mounted version in semi-volume. The model shows the entire volume of technological equipment used in the development of the oil field, as well as
oil supply and gas and water discharge lines.
The layout is electrified. Gas, oil, water lines completed
using the "running lights" method.
- : Layout size 0.55x1.26x0.1m. Materials: PVC plates, plexiglass, Production time 15-20 days
Operating principle and design of the water pump
If the source of water is not a well, but a reservoir, then it is not at all necessary to spend your own energy to operate the pump. You can make a water pump - and the forces of nature will pump water.
Here's how this device is made:
- A stand with a bracket is installed on the shore so that the latter is above the water.
- Next, you need to take a piece of corrugated pipe and install a check valve at each of its ends so that they open in the same direction.
- The outlet end of the pipe is attached to a bracket, and the inlet end is tied to a log or other float floating in the pond so that it submerges under the water.
All that remains is to connect the water supply to the outlet end of the corrugation - and the pump is ready. The log will sway on the waves, causing the corrugation to stretch and contract. When stretched, water will be sucked into it from the reservoir, and when compressed, this water will be pushed out through the outlet end attached to the bracket.
If electricity is not available on the site, then water will have to be extracted from the well manually. Do-it-yourself hand pump for water - tips for making simple designs.
You can see a review of Mole septic tank models in this article.
Layout “Installation for integrated oil and gas treatment”
- December 28, 2014 16:41
The layout is made in a floor-mounted version (possibly a wall-mounted version in a semi-volume)
The layout shows the technological complex of the arrangement
We are accepting applications
Apply now
For students in grades 1-11 and preschoolers
Description of the presentation by individual slides:
Creative project Topic: souvenir “Oil Rig” Completed by a student of grade 11 “A” of MAOU “School “Native Land”, Novy Urengoy Artur Zaretdinov Head: Ametov Mavlidin Zalimkhanovich technology teacher 2016
Selection and justification of the project New Year is coming - the time when relatives give each other gifts. I wondered what I could do to surprise mom and dad? They work for me in the oil and gas sector. After some thought, I decided to make a tabletop model of an oil rig with my own hands. Problem: choosing a gift for the New Year Relevance: for a gift, decorating the interior of a room or office. Practical significance: - for people working in the oil and gas sector; — for students of the oil and gas university, in order to make their dreams come true; — for people who want to expand their collection; - for use as office interior decoration.
Goal of the project The goal of the project is to make your own souvenir “Oil Rig. Dream come true"
Historical background Oil derrick of Colonel Drake, 1859, USA, Pennsylvania The first oil well in Russia (Grandmother-derrick) – Crimean region
Study and analysis of souvenirs Option 1 Option 3 Option 2
Selection of equipment and tools 1. Hacksaw. 2. Chisel. 3. Mallet. 4. Jigsaw. 5. Planer. 6. Wood lathe. 7. Drilling machine
Winter or summer water supply
Plumbing in a dacha is not always used all year round. In some cases, it is needed only from spring to autumn, so a simplified summer version is arranged. There is no point in spending money on an expensive capital system when no one lives in the house in winter. The summer water supply will provide watering, a shower is connected to it, and it is used for other household purposes. It can be permanent or collapsible, but in both cases it is not used in winter.
The hoses used are silicone or rubber, which have thick walls reinforced with nylon. Plastic is cheap, but short-lived under the sun. Rubber is more expensive, but will last at least 15 years. At the end of the season, the hoses are disconnected, twisted, pouring out the remaining water, and sent for winter storage.
Permanent summer water supply is laid in shallow trenches so as not to interfere and so that no one is tempted to steal. Only water taps lead to the surface. The difficulty of the construction is that it requires maintaining a constant slope. It goes from the connection point to the lowest point where the drain valve is installed. Water is drained through it before frost.
Installing a winter water supply is more difficult
They take into account the slope of the relief, soil freezing and other factors that are taken into account when constructing a capital water supply system. In this regard, the dacha option is no different from what is done in private homes with permanent residence
Monofilament line
First, let's look at ways to tie a swivel to the main nylon fishing line, that is, to the most common one - monofilament. It should be noted that this type of fishing line is the most flexible in terms of choosing how to tie a knot on them.
Grinner
Although this knot is more often used on monofilament, it also works well on fishing lines made of other materials. Its strength is up to 85 percent relative to the base.
To tie a nylon leash to a swivel with a grinder, you need to do this:
- We thread the end of the fishing line into the ring, extending it about 15 centimeters.
- On the working section we make a loop, placing it along the main fishing line.
- With the end of the fishing line we make 5-6 turns along the base inside the formed loop.
- The ends of the outlets are in the direction opposite to the swivel.
- By pulling the free tip and the swivel in different directions, we tighten the knot.
Types of swivels
In addition to the fact that swivels differ in their linear dimensions and the thickness of the wire from which they are made, they can also have different design features. According to this criterion, they are divided into the following types:
Each angler chooses the model that is most suitable, in his opinion. In addition to their design features, swivels also differ in equipment. There are the following types of fittings:
- A swivel with a clasp is used for quickly changing bait or leash.
- A swivel with a carabiner performs the same function, although it is slightly inferior in mobility, but gains in connection reliability.
- A swivel mounted in a feeder or sinker allows you to minimize the number of elements for some equipment.
Special mention should be made of the triple swivel. It is mainly used for a retractable leash when fishing with a spinning rod, but many people also use it when installing feeder rigs, for example, in a paternoster.
At the end of the chapter, we will mention the fishing swivels that modern Kulibins make with their own hands. Some people are simply bored on winter evenings, others simply like to make things on their own, because this piece of equipment is cheap and does not require any special financial costs. If you are planning to make a swivel yourself, take a metal plate and strong wire, and the design can be borrowed from factory samples.
How to train a dog to a chain?
Under no circumstances should you put your dog on a chain right away. Firstly, the animal will receive severe stress due to the unexpected restriction of freedom, and secondly, the dog will try to break loose, constantly bark, whine and howl.
It is better to accustom an animal to a chain at the age of 4 to 8 months, when the pet has grown up, but has not yet fully felt freedom. An adult dog can also be put on a chain, but at any opportunity it will definitely run away and it will be very difficult to catch it.
Before restricting your puppy's freedom, put a collar on him and wait until the animal gets used to it. Then start using the leash before putting him on the chain. If possible, it is better to set up a checkpoint. To create this design you will need a metal cable and a chain 1.5-2 meters long. The cable is stretched along the perimeter of the protected area, and a chain is attached to it so that it can slide.
A checkpoint gives the dog the opportunity to guard a large area, move quickly and feel better psychologically, and a short leash will not get underfoot and interfere with the animal’s actions. If an uninvited guest enters the territory, he will not be able to determine the dog’s movement radius.
How to tie a swivel to a fishing line
The swivel does not differ in terms of tying rules from any spinning bait with an eye or ring. Use a knot that is convenient for you. The simplest one is the double clinch. Here are the correct and simple instructions so that the knot holds well both on braid and on stiffer fishing lines - monofilament and fluorocarbon.
- Pass the line inside the ring of the swivel and pull it out 7-10 cm.
- Grab the ring of the swivel so that it cannot spin freely and begin to twist the line. Or vice versa, grab both ends of the fishing line and twist the swivel ring. 8-12 revolutions are enough.
- Now thread the free end of the line through the hole between the lines that was created by twisting the two ends of the line. If you tighten it, you will get a Clinch knot. But I recommend taking it a step further and getting a Double Clinch for increased knot strength.
- Pull the line out after threading it through the first hole and thread it through the second loop that was created after threading the line through the first hole.
- Now wet the knot so that the fishing line does not burn out or become deformed while tightening the knot, this is very important.
- Gradually tighten the knot.
- Cut off the excess fishing line, but not right to the knot. Leave at least 1mm to prevent accidental unraveling.
On thick fishing line, you can get by with a single Clinch, or try an American knot.
In terms of reliability, the best knot for a swivel is: Grinner , in 2nd place is American , in 3rd place is Double Clinch .
Fluorocarbon
The rigidity of fluorocarbon fishing line forces the use of its own specific knots. The best choice from a wide variety of connections is a simple surgical loop that connects to a loop-to-loop swivel.
How to make a diverting leash for perch
Surgical loop
This simplest knot is knitted like this:
- Fold the fishing line in half.
- We wrap the resulting loop around the main fishing line.
- We pass the loop inside two more times.
- Tighten the resulting knot.
Surgical loop
We put the resulting free loop into a ring, then throw it onto the swivel on the other side and tighten it.