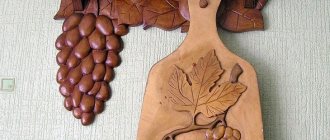
In February of this year, Nikita Zamekhovsky visited the Black Sea coast, where he not only showed what Russian surfing is on the waves of the Feodosia Gulf, but also managed to make a board in the field. Read on to learn more about the intricacies and manufacturing process.
Everyone who was interested in surfing in “field” conditions had a question: how and what are surfboards made of? Those who found the answer probably thought that it would be nice to try to create a board themselves.
This is a commendable undertaking, but in this case, “the game is worth the trouble” not always, because today it is easier, and sometimes cheaper, to purchase a ready-made and well-made projectile than to make it yourself. With my comrades in the windsurf club, we built boards back in the mid-90s using windsurf technology, inventing their shapes out of our heads.
Since then, many waves have crashed onto the shore and flowed back into the ocean, I began to ride on “branded” boards, but my guys from the club continued to storm the Crimean waves on those old ones that we once created together.
After a recent boat ride in Crimea, in February of this year, in the turbulent, cold, but such native waters of the Feodosian Gulf, the board of my friend Roma Romanov, built by us in 2000, finally took shape in three places! After a long discussion, it was decided that it was pointless to repair it and it was necessary to build a new one. Then I took the initiative into my own hands and proposed to build a “fish” - an unprecedented device on the Black Sea waves, like a shark in the Dnieper! People began to doubt: what kind of shape is this, and in general, it’s kind of short - 6.2 feet, and what kind of feet are these, and how can you even ride on it? But I didn’t give up, I turned on all my eloquence and, in the end, Roma and I licked the wonderful “old school fish” from the Internet and, literally, the next day at the “Building Materials” store we purchased polystyrene foam used for heated floors, in quantities sufficient for the construction and a cylinder of construction foam. There was a drawing, there were materials, the only thing left was to materialize the idea!
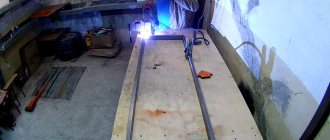
Without delay, we started marking in the club’s workshop.
We made a plywood stringer repeating the profile of the board and began to transfer the profile in parts onto sheets of foam plastic, then sawed it all out and laid it on top of each other to get the required width, glued it together with polyurethane foam.
After the bottom acquired at least some semblance of evenness, we transferred it from the drawing and cut out the approximate outline of the board, then it was the turn of the deck and our “tablet” took shape: it became almost a board, it lacked only pleasantly rounded sides.
I drew the approximate radius of the curvature of the side from the deck, i.e. from above, and then from the bottom, and while Roma was sanding, according to the lines I had drawn, I found a piece of plywood thick enough to make two fins.
First, I drew them on a paper template and Roma was indignant at the sight of them! To him, unaccustomed to the full shape of the fish, the fins seemed somehow monstrous, but the Internet again came to the rescue and Roma, after checking the pictures, calmed down.
Meanwhile, the board lay almost turned, all that was left was to sand it a little and that’s it, you can start gluing!
After begging a little, we managed to get a trainer and fiberglass from Oleg Shestakov, and Roma found epoxy resin somewhere earlier, we began to warm up the workshop room using a “potbelly stove” stove.
The stove persisted and did not want to burn, it smoked heavily, and the wind blowing from the sea blew all the smoke back into the chimney, and we wandered around in this frenzy, as if in a fog.
But be that as it may, it became a little warmer in the workshop, and after unwinding the fabric, mixing the resin with the required components, we pasted over the bottom in two layers, and the next day, when it had dried, we pasted over the deck and fins, by which time it was already turned from plywood.
According to a long-standing club tradition, Roma took the almost finished board out into the sun so that she could see the sea for the first time and the wind would breathe into her the whole wide and piercing world! The next day I left for Bali, and Roma continues to finish what he started, puttying, sanding, drawing, painting, applying designs and waiting for the yellow-green waves to come from over the horizon!
Source: https://surfdiscovery.org/russkie-sheyperi-na-chernom-more-ili-kak/
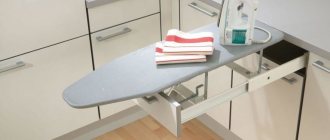
I'm developing a design
I decided to simplify the design of the board as much as possible and use only materials available at my local hardware store. The choice settled on polystyrene foam for filling and plywood for the body. The materials are very light, buoyant and cheap.
Also, in order not to come up with ways to bend the plywood to the desired shape, I decided to make the board flat.
Plywood is 6 mm thick, and polystyrene foam is 70 mm. I decided to combine everything in the form of a sandwich. In the middle of the polystyrene foam I decided to add a plywood rib to strengthen the structure and a fin at the lower end for stability on the water.
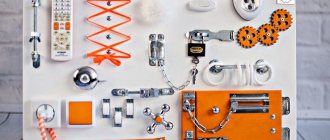
Float for fishing in currents - “Cralusso surf”
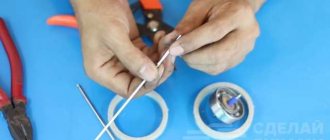
Float for fishing in the current 1. Largely thanks to the Cralusso - surf floats, the Hungarian team became the 2003 World Champion in Slovakia on the Vach River 2. Made of polypropylene foam (special plastic) 3. The manufacturer guarantees that the float will not “ drink water." 4.
Thanks to its special shape, the float does not “climb out” of the water, unlike conventional flat floats. 5. The Cralusso-surf float behaves extremely steadily in the current 6. The float has a stable weight - the spread of parameters in floats of the same size does not exceed 5%, in contrast to 100-300% in conventional balsa floats 7. The float is quite convenient to remove from the equipment and store separately.
This also prevents additional mechanical damage to the float
8. The outer layer of the float is quite durable - it is difficult to scratch or crush it.
9. The set of large floats (from 6 grams) includes 5 replaceable antennas - 2 thin - yellow and red and 3 flat - black, yellow and red - which covers almost any fishing conditions and does not require changing equipment - just change the color or thickness antennas. 10. The antenna material is light-accumulating - the antenna is perfectly visible in any lighting. Especially sunny. 11. These floats are also recommended by 4-time World Champion Alan Skothorn (Match angling plus)
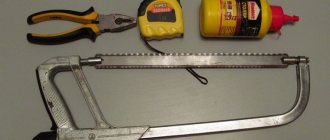
Filling voids with epoxy resin
To make the board waterproof, I decided to use epoxy resin. It is tough and durable.
Added sawdust to the mixture. They will add rigidity and increase volume to fill any voids.
After that, I poured epoxy resin into the voids. Additionally, I compressed the structure with clamps and let it dry.
Sail
The sail is the engine of your surf. Therefore, it is advisable not to save on it. Don't skimp and buy this part in the store.
However, if you decide to create this part of the projectile with your own hands, do it carefully and carefully.
Material
Choose a synthetic material with minimal ventilation. It will not gain much weight when wet and will cope well with the role of a “tractor”.
Dacron is ideal. You can also use a thin tarp.
For loyal riding conditions, you can choose jacket and raincoat fabrics, as well as cotton materials. But when using them, remember the need for additional reinforcement. False seams will help you with this.
Cut
The sail should be cut after the mast is installed on board. This way you will know the exact required dimensions and even calculate the deflection.
To cut the fabric, lay it on the floor. Determine the luff lengths, sail angles and draw on the material. Roulette will help you with this. Hammer a nail at the tops of the corners. Tie a thread to each nail. Pull it towards each corner to form a triangle.
The length of the thread on each side of the triangle should match the length of the luff.
Transfer the dimensions of the sickles from the drawing. Using a regular felt-tip pen, you can outline the maximum sail dimensions for yourself. Don't forget about hem allowances. On average, one allowance can reach half a meter.
After installing the sail, the product is considered ready.
If you know a little more about how to create a windsurf yourself, please share your experience in the comments.
Fair wind to you!
In this article we will talk about all types of surfs and how to make them yourself. In addition, we will tell experimenters and extreme sports enthusiasts about creating a board equipped with its own engine.
How to make a windsurf with your own hands?
Windsurfing is one of the most exciting and exciting water sports. Windsurfing is a hybrid of surfing and sailing. To ride the waves, athletes use a windsurf (sometimes called a windsurfer, just like the athlete himself). This is a floating board to which a mast with a sail is attached.
You can make your own windsurfing board
This board does not have a steering wheel. The athlete learns to control the projectile by adjusting the direction of the sail and the positions of his own body.
Windsurfing is no less exciting than surfing, but less expensive than sailing boats. Moreover, you can make a windsurf for this type of active sport with your own hands at home. True, for this you must be able to handle wood well and it is advisable to know at least in theory the basics of elementary shipbuilding.
Cralusso Surf floats
Articles Float fishing Cralusso Surf floats
Hungarian floats for fishing on rivers with wiring. The Hungarians have developed a flat float that holds perfectly under the surface of the water while holding the gear in the current - it does not “go out” of the stream. However, Hungarian developers went even further. We came up with a float that, when held, floats away from the shore! It is intended primarily for fishing with a Bolognese fishing rod.
"Cralusso Surf"
— surf float for the current.
You will be able to fish successfully using the revolutionary new technology of the Cralusso Surf
because:
- the float can be held, stopped, and retrieved against the current over the baited area without re-casting;
- due to the fact that the float can move in all directions, even against the current, you will be able to fish only baited areas or avoid underwater obstacles;
- When configured correctly, the pressure does not lift the float body out of the water, only the float antenna is visible;
- The float body does not get wet even if the float surface is damaged.
This float is designed for use with plug-in and telescopic fishing rods and is suitable for catching predatory fish, incl. onto twister or pieces of fish. The float body does not absorb water if damaged. Cralusso Surf floats
can be successfully used for fishing with flies and nymphs and with bait (spinners and rubber) in the current and keep them there.
Individual packaging contains:
- float body - 1 pc.
- for left current - unmarked keel and antenna - 1 pair
- for right flow - marked keel and antenna - 1 pair
- 3 interchangeable antenna attachments
- 1 waterproof silicone cambric tube (can be cut into 4 pieces of 8 mm each.
Review
Using revolutionary new technology, the Cralusso Surf
makes river fishing much easier than it was before. After all, that old lollipop float forced you to move around and you had to have an extremely rigid and balanced plug or telescopic rod to control it, with the Cralusso Surf float you can use any rod on the market and achieve the same results for bait demonstrations. This also eliminates decoys during slow swimming.
Cralusso Surf floats
can glide against the flow and can swim from the bank to the middle of the river!
The results achieved and the opinions of familiar fishing friends prove that we are on the right path, and this gives us strength to carry out more and more new improvements.
Cralusso Surf floats
Available in the following load capacities:
3 - 4 - 6 - 8 - 10 - 12 - 15 - 20 gr
.
Float assembly
For left flow
- Take the body of the float in your hand so that you see the inscription “Cralusso” upside down, and the number of grams is on your left side!
- Install the unmarked upper part - on the antenna holder (in short) from the side looking at you
- Install the unmarked lower part (longer) - the keel, which points in the opposite direction from the upper part!
- The antenna must be installed and rotated at an angle of 45 degrees (according to the picture)!
For right flow
- Take the body of the float in your hand so that you see the inscription “Cralusso” in the normal position, and the number of grams is on your right side!
- Install the marked upper part - on the antenna holder (in short) from the side looking at you
- Install the marked lower part (longer) - the keel, which points in the opposite direction from the upper part!
- The antenna must be installed and rotated at an angle of 45 degrees (according to the picture)!
Fixation on axes:
Installation on the axle: install 4 silicone tubes, putting them on the axle and fix them on the “Cralusso” so that there is one on the upper part, and three silicone tubes on the lower keel (according to the picture)!
Loading and overloading
Starting with Cralusso Surf
, used in current fishing, this concept means what is the difference between a float driven slowly or held in one place and what will be the main difference in speed between wiring and holding in place.
As a result, the current increases the weight value for river fishing, so if you put 10g of weight in, it works as if it were only 6g and gets carried away. This is why Cralusso must be overloaded, and the overload value can be from 10 to 100% (see table).
| Current speedDepthHolding | |||
| Overload g | +10-30% | +30-60% | +60-100% |
| * (dots indicate the influence of this value) |
Overload depends on speed, water depth and retention intensity.
FAQ
When did the history of surfing begin?
In Polynesia, around the four hundredth century AD. And the first fiberglass board appeared in 1946.
What is SUP in windsurfing?
Simply put, paddle surfing. SUP windsurfing boards offer just this type of sport. Inflatable SUP boards are popular; they have many advantages and can also be done independently, although in a different way. But this is not the topic of this article.
The advice given above is to buy a used board. Won't it break the next day?
No, this is prejudice. Moreover, for such things as windsurfing boards - this is still not electrical engineering, and even in a used version they will more often serve for a very long time.
What's next or the future of surf construction
Experimentation with board design, materials and manufacturing processes has led to new approaches to surfboard production. Each of them has its own pros and cons
In the field of surfboard design, the use of computers has greatly simplified the board design process. Working with special software, the designer can develop a three-dimensional model of the future surf, easily change its dimensions and contours, and then print the templates necessary for its manufacture. This is a significant time saver compared to the traditional method, but many shapers still prefer to rely on their eye and hands to judge the quality of a new board.
How to make it yourself
The most convenient ones to make yourself are fiberglass and epoxy surfboards.
To do this, you will need a polyurethane foam mold, polyurethane resin and fiberglass (first option) or EPS resin and a polystyrene foam blank (second option). In both cases, you will need a long wooden plank - the future stringer, thanks to which the surfboard gains rigidity.
We make them with our own hands like this:
- Cut the workpiece in half and insert the stringer strip.
- Give the board a shape - the shape you need, which will influence the “character” of your board. At this stage, the length, width, thickness of the board, its type, the shape of its deck and bottom, rails, tail and nose are determined. A DIY surfboard is made according to the contours of wooden patterns. It is shaped with a saw, sandpaper and a plane.
- Write the size on the already formed board and leave your signature - this is the tradition.
- Mark the spots for the fins and paint your creation.
- Place fiberglass over the design and begin the final stage - lamination. This is a uniform application of resin with a spatula over the entire surface of the board. After it dries, drill holes for the fins and fins.
- Polish the surfboard with sandpaper, removing any remaining resin, cover it with a glossy resin coating and leave it to dry for a day.
All! DIY surfboard made.
Comments
how does it behave on chop?
cool story. I read it with pleasure.
Cool! The weight is excellent for a homemade product.
I join the question of the event’s budget and wish not to dwell on what has been accomplished.
Take the next size more modern, like 250x70 for 130 liters.
Special respect to the artist!
Everything is fine, only the cutouts in the stern are at the wrong angle and slow down the board simply catastrophically. We need to redo it!
In general, cutouts on a board of such length and width are not needed.
Here is a photo of Starboard taken from the Internet. And the cutouts on her don't look right either. It's just the angle.
I AM ANSWERING THE QUESTIONS.
I started doing it in mid-January and finished in mid-April, but in February there was a break for almost a month, because... For about 3 weeks after the city froze, I had no light at home, and it took me a week to put things in order. It turns out it took two months, and it was not always possible to pay attention to this work. Mostly I worked before bed for 2-4 hours.
It behaves well in small chop, it swallows and there is practically no vibration compared to my 103 liter.
So far I have caught a large chop with white lambs once. It goes against the wave normally, bouncing. You can easily aim between the ridges. When a good gust appears, the sharp chop seems to press down and become flat - the speed increases and flies like a hydrofoil.
The direction of the wave is generally wonderful, just like on the 103 liter - it goes great along the crest and across from the crest.
It cuts well against the wind; you don’t have to fall off to gain normal speed, as was observed with my comrades.
What kind of cutouts should there be? I looked at many options. Yes, in the photo the angle of the cutout seems a little wrong, in fact it is parallel to the movement and they are not deep.
And why shouldn't there be?
I've read about these cutouts, opinions vary, but I found an article where a man described his board with cutouts and said that he noticed how he was lagging behind the others in speed. After comparing the boards, he discovered that his cutouts were very deep - 2-2.5 cm. He made foam inserts and reduced their depth - the speed increased.
I took the approximate dimensions from my friend's F2 board and he had cutouts, albeit of a different shape. You can seal them with inserts at any time and check what has changed.
As for speed, I don’t lag behind, and I can even leave my opponent behind.
The only thing I messed up in shape was going too far with the deadrise at the stern. All boards are almost flat at the stern. If you place a ruler across the aft part of the bottom, then all the boards will have either a flat surface or a small rocker of up to 1 cm. On my 103 liter, it’s about 1.5 cm. On a homemade project, the deadrise is about 2 cm. But maybe for Due to this, the cap swallows well and does not strive to fly up with its nose upward at speed, which happened more than once on my toothpick.
How surfboards are made, their structure and design
Modern boards use a rigid polyurethane or polystyrene foam core coated with fiberglass and resins. If a stringer is involved in the design, it is made of mahogany, linden or spruce. The fins are made of wood or several layers of fiberglass and resin.
Shapers (those people who make surfboards) are constantly experimenting with board designs. Most surfboards these days are handcrafted. Each design, each form is, as a rule, an individual development of a single shaper. Over the past 4 decades, boards have become shorter, then longer, and then shorter again. Two fins replaced one, and these, in turn, were replaced by three fins. And today, shapers continue to experiment with surfboard design, as they make surfboards better and better each time, trying to invent “the one.” For example, some pro surfers use five to ten boards, depending on their riding style or the type of wave at a particular spot.
Floats for fishing in currents - “Cralusso Bolo”
Floats for fishing in currents. Fishing with a Cralusso Bolo float in cramped conditions.
Everyone knows the situation when a fish, especially a large one, stands in the river at a distance from the shore, not approaching the distance of the plug and short strokes. In this case, when fishing at 16-18 meters from the shore, the angler will have constant bites of bream and roach, while when fishing at 11-13 he will catch only a few fish.
To reach the fish, you need to use long-range gear: swings of 10-11 meters or a Bolognese fishing rod. However, the swings are in an advantageous position at a depth of up to 5 meters, otherwise it is more profitable to use a lap dog. It's no secret that bream especially like it when the bait moves slower than the current, or even stays in one place.
For such animation of the bait, flat floats were invented on the plug, which allow you to hold the bait motionless and even make movements upstream. But what should you use for Bolognese fishing? Two seasons ago I came across a Cralusso Bolo float. It allows you to make a constant strong hold, so that the equipment moves at a speed 2-3 times lower than the speed of the current.
And at the same time, Bolo does not slide towards the shore, as happens with conventional barrel-shaped floats on supports. Why does this happen? This float from the Hungarian company Cralusso uses the “ship” principle, when the force of the current pushes it away from the shore. It is worth noting that this only works with constant line tension between the rod and the float.
Thus, we have the opportunity to fish at the required distance with a Bolognese fishing rod, performing the same holding actions as we could do with a plug. Why only lapdog? I tried setting the Bolo to an 11 meter swing. I caught three full-fledged fishing trips with this set. I can say with confidence - it’s not worth it.
The float behaves completely incorrectly. He loses the necessary freedom of movement. Uncertain bites begin. It is generally unrealistic to catch fish up to 300 grams; it simply cannot drown it. In addition, due to the swing casting, the float gets confused all the time and every third wiring has to be interrupted.
Floats for fishing in currents
Cralusso Bolo shows outstanding results in recreational fishing, so why not try it in competitions, I thought. The main question that tormented me was this: will I be able to keep the equipment in my sector, or will the float only work on the last meters of the wiring.
At the first competitions in which Bolo took part, I decided not to take risks and put the 11-meter swing and lap-dog under one distance. In order to successfully fish, I had to sit on the upstream edge of the sector. Then the swing worked only in the first minutes, allowing me to catch several large roach, and then I could only catch it with a lapdog with a Bolo float. The bream was biting.
Then I was not able to take a place in the top three, but I realized that with such equipment you can successfully fish in competitions. It is worth mentioning the conditions when such a method is indispensable in cramped conditions. First of all, this is a very strong current. If flat floats larger than 15 grams are used on the plug, it is better to forget about the lapdog.
The point is not even the complexity of the wiring, but the fact that large fish will inevitably fall downstream - into the neighboring sector. Secondly, the wind downstream is very disturbing. In this case, the line blows out in an arc and wiring is problematic. The same applies to strong gusty winds - the equipment will be jerked, as a result of which correct wiring will not work.
Well, the third situation when you shouldn’t use Bolo is catching small fish. This float is very susceptible to inertia, due to which weak bites are simply not visible. It is worth using it if you are targeting fish weighing more than 300 grams each. If all the conditions on your reservoir are favorable for Bolognese fishing, it’s time to talk about the little things.
Depth sounding. There was information in the fishing media that the easiest way to measure the depth with this method of fishing is to replace the Bolo float with a barrel-shaped float of the same carrying capacity. The problem is that it is very difficult to find exactly such a pair. The Cralusso Surf float is designed for fishing in currents of varying strengths, more detailed information is here.
Therefore, I measure the depth with a barrel-shaped float only if I lay out two bolos for the same distance, on one of which I put a rig with a barrel-shaped float, and on the other with a Cralusso Bolo float. Otherwise, I measure the depth directly with a Cralusso float.
Making a windsurf boom
For our board we will make a whishbon or double boom. This boom is glued together from ten by thirty millimeter slats. The slats that you will use must be carefully folded in the tsulag, precisely adjusted and the slats tightly pressed against each other. After this, sand the areas that will be glued together. Next, the slats are lubricated with glue and pressed together in the tsulag.
The final touch will be bending the front frame of the boom made of duralumin, the thickness of which will not exceed five millimeters. A regular steel strip up to three millimeters thick will also work.
Materials
Stock up on all the necessary materials and tools in advance to make the process of creating a product less fussy and more seamless. Try to be careful when purchasing material. The process of creating a surf sail is already quite labor-intensive. And buying missing products will only add to the hassle.
So, before you start making the board, buy the following consumables:
- two large sheets of plywood. It is necessary that the thickness of each of them reaches 4 millimeters;
- a sheet of plywood 1 centimeter thick;
- slats 20 by 20 millimeters. You will need about seven pieces;
- seven meters of thin slats;
- slats 2.5 meters long, 10 by 30 mm. You need to purchase six pieces;
- a small piece of plywood up to two millimeters thick;
- epoxy waterproof glue;
- nails;
- construction foam;
- fiberglass;
- waterproof dyes;
- metal strips;
- a small piece of brass;
- duralumin strip 4–5 mm thick.
After purchasing all these goods, you can begin the process of creating a sailing shell.
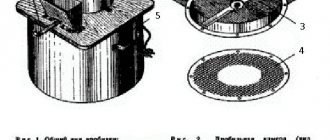
Frame
The first step is to make a board - the body of the product. You can see the dimensions of its parts and the principle of their relationship below in Figure 1.
Keelsons
When making a surf with your own hands, we take plywood and cut two keelsons. They can be made using a regular saw. For convenience, first draw the outlines of one keelson and cut it out, and make the second board in the image and likeness of the first.
The keelsons need to be connected along the contour. This is done using slats. Don't forget that the product will have a mast. Leave room for her. The future level of controllability of the surf depends on how you secure the mast and centerboard.
When creating the board, be sure to cut small holes in the keelsons. This will help the device ventilate in the future.
Most likely, the sheets of plywood you purchased will not be long enough to create a solid structure. But the board can be glued together. Use a rasp to process the parts to be glued. The gluing areas need to be processed so that they become rough (this will increase the level of adhesion). After this, grease the edges of the board with epoxy glue and connect the sheets of plywood. A rod can be inserted between them to determine the internal height of the projectile. Overlapping areas of the plywood structure must be nailed down. When the workpiece dries, the sharp tips of the nails will need to be bitten off. The lath is also removed when dry.
Deck and bottom
You can also make them yourself. This is done according to the drawings. These cut parts must first be glued to the keelson and then secured with nails. Please ensure that the fastenings are located from each other at a distance not exceeding thirty centimeters.
The sides need to be filled with construction foam. In the worst case, you can use the packaging form of this material.
Lubricate the foam with epoxy to secure it. Glue must be applied to each piece. After this, the material should “look” behind the board by half a centimeter.
When the glue dries, you will need to give the foam an oval shape. This is easy to do with sandpaper.
The resulting structure must be “packed” in fiberglass. You can use a wood stapler for this.
Holes
After upholstery, it is necessary to prepare holes in the places to which the fin, steps and centerboard will be attached.
Painting
Now you can give the device the desired appearance by painting the board with waterproof paint. If you saturate the plywood with drying oil after painting, it will last longer.
Motor surfboard
A do-it-yourself surfboard with a motor is made from simple, one might say, improvised materials:
- graphite foam;
- plywood (3-4 mm);
- polyurethane foam with adhesive effect;
- and, in fact, the engine.
Instructions for use:
- The “fish” shape is most suitable for this design. Shape the foam into the outline of a “fish”.
- Make a recess in it the size of a sealed box, where the engine and the PowerBank feeding it will be placed.
- From the box and the motor there should be a flexible shaft (from a drill, for example), to which a propeller should be attached. You can also build a steering wheel.
- We recommend using a pump motor of at least 200 watts and 2800 rpm. As already mentioned, it will be powered by a PowerBank (you can use one or a pair of batteries).
- The engine must be connected to the batteries through a waterproof switch.
This is a simple way to make a surfboard with your own hands. We hope this article gives you some inspiration to create the surf of your dreams.
Boards are different
Surfs are divided into several types according to stability, maneuverability, and functionality:
- Longboards. In appearance, they resemble a small boat and are the most stable, so they are well suited for beginners, helping to maintain balance.
- Minimalibu. They are even more suitable for developing surfer skills - on a voluminous and moderately long board it is easy to feel the wave.
- Evolutiv. Suitable for surfers making progress. They perfectly combine stability and maneuverability.
- Ghana. Their element is big waves. The most functional of the entire range.
- Shortboards. Short and narrow surf for real pros. It is distinguished by its technicality and maneuverability.
Mast
The mast created can be made from long slats. In principle, they can be replaced with a duralumin tube.
When creating a mast from slats, they need to be glued together according to the drawings presented in Figure 1 and processed.
After manufacturing, the mast must be tested for strength. If the device turns out to be too flexible, coat it with epoxy glue and cover it with one layer of fiberglass. This should increase the elasticity of the product.
The mast must be coated with water-repellent varnish.
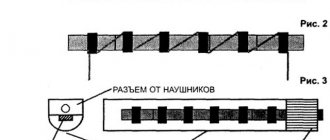
Make flats on its thick ends. Each will have a hinge attached. You can see its device in Figure 2.
The hinge cube is made of brass, and the metal parts are made of metal strips, the thickness of which is 2–4 millimeters.
Where to begin
Supboarding is also wonderful because to practice “stand-up surfing” you don’t need to rush to the Hawaiian coast and catch a big wave. A SUP boarder will be happy even with a calm sea bay, a quiet river backwater, a leisurely river flow or an absolutely smooth lake surface. You can just stand and row, contemplating the surface of the water and admiring the landscape. And most SUP boarders learned to stand on the board more or less confidently on the first day of training. That is why this discipline is so popular among ordinary water sports enthusiasts.
Ideally, it is best to learn a new sport with an instructor or friend who already has experience in SUP boarding. If there are none, then your faithful friend the Internet will come to the rescue. Go to specialized forums, thematic sites and watch videos. As a rule, this is enough to learn the basics of board control. You need to choose a calm place for your first experiment; the best option would be a quiet river or lake. You shouldn’t try to ride a big wave on the first day of training. Perhaps it won't be amiss. It's even better if you have a life jacket.
First you need to put the board on the water, lie down on it and swim a little away from the shore. After which you need to kneel. Once you feel confident and balanced, you can try to get back on your feet. The hands rest on the front of the board, then the first leg stands, followed by the second. Standing on all fours, you can try to rise to your feet. The first time you need to stand strictly in the middle of the board. Once you get used to it a little, you can try to move around the board, again maintaining balance and trying not to fall into the water. Now you can start swimming.
There are three basic stances on a SUP board: right foot forward, left foot forward, and both feet in line. To avoid getting tired while standing in one position, you can change poses. Take a pose, pick up the oar (which should have been lying on the surface of the board all this time) and try to row. The arms should be bent at the elbows at an angle of 90 degrees, when the oar is immersed in the water, you need to swing the oar under water. It is recommended to change your position and hands, and take turns rowing from different sides. As you know, the shortest path is a straight line, so try not to make unnecessary turns.
Important.
When you fall off the board, which will happen with enviable consistency, especially at first, the main thing is not to panic. The first thing you need to do is climb on the board, and only then, in a lying position, swim for the oar.
GASOLINE VS ELECTRIC
This is the central topic of the article and this choice should be made primarily by those who decide to purchase a jet board for personal use. Let's look at the pros, cons and features of gasoline and electric boards.
As mentioned above, if your goal is professional sports, then we recommend choosing only gasoline boards. And in any case, if you are closer to sports, extreme sports and drive, an internal combustion engine is more suitable for you. But this is motorsport. Be prepared for your hands to smell like oil. All gasoline engines are noisy. If you want to ride on a small lake surrounded by private houses, keep in mind that you will not be welcome. Not all bodies of water allow the use of an internal combustion engine.
Equipment rental centers
Today, motorsurf rental centers are opening all over the world, novelty fuels interest, and people happily decide to experience new sensations. Therefore, renting out equipment on the beach or lakeside is a great business idea.
Sport or Ultra Sport from JetSurf are popular in the rental business. But you need to understand that not everyone will be able to ride a jet surf and not right away. Therefore, it is worth creating not just a rental, but rather a training center. It is advisable to have a room near the water where you can immediately give lessons to anyone who decides to rent a motor surf. Typically, training takes from 30 minutes to several hours, after which a person can already ride independently. However, the technique requires attention, for example, the board cannot be heated. The situation is much simpler with electric surfboards; they can be drowned and turned over. They require virtually no training other than basic safety rules.
The Motosurfing team recommends the Mogrel from the Torque manufacturer for rental centers. Contact us and we will provide you with a detailed plan for opening a rental business based on Torque jet boards. All Onean models are great for rental, given that the batteries are easy to change and charge independently. Also very popular are SUP boards, which were already discussed above (SupJet and eSurf).
Choosing a motosurf
Cost always matters, so you should immediately navigate the prices.
If you are on a limited budget and are looking for the most affordable motorsurf, then keep in mind that there is practically no choice for less than 300,000 rubles and you should not expect a price reduction in the near future. No matter how hard they tried, Chinese manufacturers were unable to create a single noteworthy motorsurf at a similar price. We managed to find only one Chinese manufacturer that produces a product worthy of attention, and its cost in Russia is 450,000 rubles.
There are several reasons why prices continue to be high. First of all, this is a one-piece production, the technologies are very complex (it takes several days to create one body), expensive materials are used (carbon), the original engines are assembled by hand. Each board is tested on the water (in a special pool). Thus, the high prices are justified by the extremely sophisticated technology and quality of the products.
When to buy?
This is actually a more serious question than it might seem at first glance. Most manufacturers are still tiny enterprises that cannot cope with the volume of orders around the world. The queue for the most popular models can reach a year. This situation is not uncommon in the yachting industry. You have to wait for expensive, sought-after yachts, sometimes for years; it is almost impossible to get them “tomorrow” only if you buy a place in the queue, which is not always possible. And as the Russian proverb says, “prepare your sled in the summer,” so buying a motosurf at the height of the season or at the beginning of the season is a bad option, because you most likely won’t be able to get it quickly. By ordering your jet board in winter, you are guaranteed to receive it by the beginning of the season, when manufacturers are least busy. It is also worth understanding that in addition to the queue at production, logistics also takes time. All boards are supplied to order; in Moscow, as a rule, it is rarely possible to find motorsurfs in stock.
Source
Professional sports
As mentioned above, the only official competition in this sport is the World Motorsurf Championship: Motosurf World Cup
It takes place in several stages around the world. You can follow the schedule on the website: https://motosurfworldcup.com/