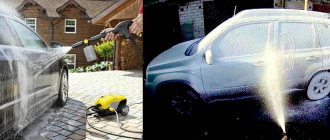
Electromagnetic valves for water are devices with which you can remotely shut off or open the flow of water, gas and any other medium located in the pipeline. These devices are called electromagnetic because they use an electromagnetic coil (solenoid) to operate. There are several types of such devices and each has its own characteristics and differences in operating principles.
An electromagnetic valve is a type of shut-off valve installed on various pipelines, including domestic ones
Advantages of automatic watering
The main elements of the irrigation system are as follows:
- Watering heads - from small fan heads to powerful pulse and rotary heads.
- Solenoid valves for automatic watering.
- Pipeline for flow distribution.
- Pumping station providing the necessary pressure in the system.
- Storage tank for constant supply of water to the system.
- Hydrants for connecting to the system for different purposes.
The advantage of automatic watering is expressed in the following:
- water flow dosing;
- uniformity of application;
- efficiency (watering at night reduces moisture evaporation);
- the system is underground;
- saves labor and time for the gardener.
Application area
The solenoid valve is a fairly useful device and is used in various fields. Basically, the scope of application is determined based on the material from which the valve is made. Such products are used in washing machines, sewer systems, irrigation structures, for controlling hydraulic systems, heating systems, etc.
The solenoid valve can be installed on the water supply or heating mains in your home
In addition, solenoid models are used to control and regulate the transportation of various aggressive media in production. Manufacturing devices can have enormous diameters. It is strictly forbidden to use brass products in aggressive environments, such as acid, diesel fuel.
Purpose of the solenoid valve
An electromagnetic valve for irrigation is always needed, even if there is no irrigation system. It is used in conjunction with a timer that turns it on at the right time. It is especially needed to fill the storage tank. When water is supplied according to the schedule, the timer opens the valve and the tank is filled. It is advisable to water the area at the same time. All this is done in the absence of the owner. All he has to do is water hard-to-reach places.
The main purpose of the valve is to supply water to the irrigation system at a given time. A 1-inch device is suitable for this, flowing 50-100 l/min at a pressure of up to 10 atm. It can also be used for short irrigation areas, since the built-in regulator allows you to adjust the required local flow. It is suitable for spray and drip irrigation when the pressure in the system is low.
One or more valves are installed on a drainage pad made of crushed stone and closed with a box. This can be done in any convenient place.
Solenoid valve design
The valve is very simple. It contains the following details.
- Housing with a metal or polymer cover.
- Valve with rods and plungers.
- Solenoid in a sealed housing.
The external thread of the inlet and outlet pipes is 1/4″ or more depending on the fluid flow. The least amount of water passes through the solenoid valve for drip irrigation. Small-sized devices are built into a water pipeline and operate on a timer that sets different irrigation modes.
Recently, models combined with a switch have appeared. Available for purchase through the online store: the solenoid valve for irrigation C 1060 plus GARDENA, which has become popular. It automatically switches the water supply to irrigate the garden.
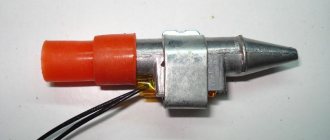
Fine tuning throttle type NDV needle
A valve or throttle (valve or hydraulic throttle) of the NDV type is designed for precise adjustment of the flow of working fluid or for completely shutting off the flow.
If you require a product made of stainless steel, alloy steel or aluminum, please indicate this in your request.
If you do not know the material of the product, indicate the necessary parameters: pressure, temperature and application environment.
- Description
Description
Fine-tuning needle throttle
DIN ISO 228 internal thread
| Parker part number BSPP thread | Parker part number NPT thread | Article number MHA Zentgraf | Article number LSQ | i | d | Weight , kg) | PN (bar) | 1A order code: |
| — | — | NDV-DN6-G1/8 | — | 9 | G1/8 | 0,12 | 350 | 26866 |
| 9N400S | N400S | NDV-DN8-G1/4 | L-G8-G1/4 | 12 | G1/4 | 0,25 | 350 | 23791 |
| 9N600S | N600S | NDV-DN10-G3/8 | L-G10-G3/8 | 13,5 | G3/8 | 0,4 | 350 | 18259 |
| 9N800S | N800S | NDV-DN12-G1/2 | L-G12-G1/2 | 14,5 | G1/2 | 0,6 | 350 | 22827 |
| 9N1600S | N1600S | NDV-DN16-G3/4 | L-G16-G3/4 | 17,5 | G3/4 | 1,1 | 350 | 28849 |
| 9N1800S | N1800S | NDV-DN20-G1 | L-G20-G1 | 19,5 | G1 | 2,4 | 350 | 30726 |
| — | — | NDV-DN25-G1 1/4 | — | 21,5 | G1 1/4 | 2,8 | 350 | 30726 |
| — | — | NDV-DN30-G1 1/2 | — | 23,5 | G1 1/2 | 3,5 | 350 | 30726 |
| — | — | NDV-DN40-G2 | — | 25,5 | G2 | 6,24 | 350 | 30726 |
High pressure needle throttle body and seal material:
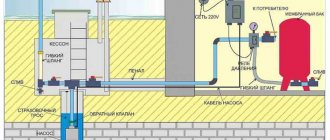
Solenoid valve for irrigation: operation diagram
The water valve is convenient to use because it can serve as a regular water tap during a power outage. To open it, the control solenoid is turned a quarter turn.
When the coil is turned off, the water passage is blocked. When triggered, when the core retracts, the valve passage opens. Through it, water flows for irrigation or into the tank. To shut off the fluid supply, the coil is turned off and the spring returns the electromagnet core to its original position.
Solenoid valves operate at different supply voltages (12 V, 24 V, ~220 V). Devices are also normally open and pulsed (switching is carried out by a control pulse from one position to another).
The valve is installed in a water supply rupture. A control cable is laid to it. A timer is connected to the outlet and set to the desired time. If there are power failures in the power supply, the time setting must be checked periodically or an autonomous power source, such as a battery, must be used.
Price overview
You can buy a solenoid air, deluge or gas valve with a power of up to 380 volts in Russia, Ukraine, Belarus at any specialized store. You will find devices of this type: freon, Honda, SVM, CEME, SKN for a variety of installations.
All companies provide a one-year warranty on their products; sales are carried out in official dealer stores.
When developing my heating system, along with natural circulation, I planned to make myself a forced one so that I could attach an automatic regulator to it. After all, what does natural mean: you manually open the desired tap (or taps), and the heated water itself rises to the radiators, giving off heat there and then falling down to the heater (or to the storage tank, thermal accumulator).
Well, it's inconvenient! I didn’t open it on time - it got cold in the house. I didn’t close it - it was too warm, or even too hot. Not only is it uncomfortable, but there is also overspending when it’s hot. And overconsumption not only means that the stored heat is unnecessarily consumed into the house, but also the heat loss of the house increases, since as the temperature in the house increases, heat loss through the enclosing structures (walls, ceilings...) also increases.
This means we need automation. At first glance, there are no difficulties. A temperature sensor controls, say, a solenoid valve. The temperature in the house dropped - the sensor opened the valve. Increased - the valve closes.
I don't seem to have any problems with the temperature sensor. There is one. But the solenoid valve... I searched the Internet, looked at the price lists of online and non-online stores - expensive, damn it! And why would it cost that kind of money? I went to the metal market, talked to people, and got advice.
Taking something cheap for 2-3 thousand rubles means taking a disposable item. But I don’t have a water supply system, I have heating! If something broke on the water, turn off the water and patch it up, but in the winter, if something happens, there’s no fuss about the heating - you have to drain the water, and do it quickly so as not to freeze... In general, the cheap thing doesn’t suit me, but the expensive valve, for 6-7 thousand rubles... And my wife, to put it mildly, persistently objects to such an acquisition.
But I still want automation. In Rus' they say: the need for invention is cunning. And I also decided to dodge and make it automatic, but at the same time not to upset my beloved and do without an expensive valve. Instead, I installed, you won’t believe it, a check valve. It costs literally a penny, and at the same time perfectly performs the functions of an automatic solenoid valve, however, only in conjunction with a circulation pump.
You already guessed what it's all about, right? Yes, yes, that’s exactly the point: there is a spring in the check valve that presses the rubber gasket against the seat. This spring does not allow water to move in a forward direction during natural circulation, since the pressure is not so great as to press the elastic from the seat.
Hurray, hurray, and we throw our caps into the air. But there is one thing that should be taken into account. The strength of this spring was not calculated by the engineers for such an application, especially in my heating system. The trouble is that the pressure on it during natural circulation directly depends on the height of the water column, that is, on the distance at which the top point of the top battery is located in relation to this spring. To be fair, it is worth mentioning the dependence on the temperature difference above and below.
So, in my system this spring still lets through a little bit. That is, there is no complete closure when the pump is turned off. Therefore, I simply had to, without further ado, disassemble the valve and stretch the spring. The video shows this barbaric operation in detail.
I will answer any questions you may have about photography right away. The check valve in series with the upper pump is the valve we are talking about. The lower pump is another branch in the heating, which is still waiting for its modernization. But the upper pump with the valve, as can be seen in the photo, is bridged with a straight section of pipe with a tap. What is this for?
When using water supply and heating systems, no one is immune from emergencies. An electromagnetic (solenoid) water valve allows you to minimize risks and losses in the event of a breakthrough. This device allows you to quickly shut off or, conversely, open the flow of water in a few seconds, while at a distance. Let us examine in detail how the solenoid valve is designed, its types, principles of operation and installation.
A solenoid valve is a shut-off valve that closes the water flow and allows you to control the speed of fluid movement in the pipeline. These devices are called electromagnetic, since their operating principle is built around an electromagnetic coil (solenoid). There are several types of similar products and each has its own characteristics and differences in the principle of operation.
An automatic water valve includes the following components:
- frame;
- lid;
- membrane and seal;
- plunger;
- stock;
- electric coil.
The body of such units is usually made of materials such as brass, stainless steel (to increase resistance to corrosion) and cast iron. Plumbing solenoid valves made of plastic are quite popular.
Plungers and rods are made from materials that have magnetic properties. The electromagnetic coils are placed in a special protective housing, which has fairly high tightness parameters. The winding for the coils is usually made of copper wire or enameled wire. Such devices begin to work after voltage is applied to the coil.
An electromagnetic or in other words induction coil converts electricity into forward motion. The most common are coils with copper winding on a cylinder. The cylinder includes a magnetic plunger. As soon as a pulse is applied to the coil, a magnetic field appears. As a result of the magnetic field, the core is drawn into the coil.
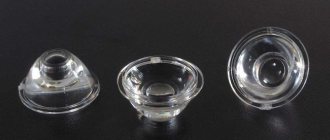
Product membranes are made of polymer materials that have a high level of elasticity. Such materials include the following:
- membranes EPDM, NBR, FKM.
- PTFE or TEFLON seals.
Valves can be made from a variety of materials, with the body made from plastic, brass or cast iron.
If there is a need to shut off the supply of the transported medium, a pulse is sent from the control unit to the induction coil. Thanks to this signal, the core of the device rises or falls (it all depends on the configuration of the device) and blocks the flow of liquid. Immediately after the tension disappears, the core returns to its original position and fluid movement resumes.
Solenoid water valve
Many people know the convenient and inexpensive solenoid valve for irrigation NT8048DC12V with the following characteristics:
- D.C;
- pressure - 0.8 MPa;
- pipe diameter - 1/2″;
- throughput - 25 l/min;
- water temperature - no more than 500C.
The advantage of the valve is that it is kept open by the flow of liquid rather than by an electromagnet. During operation, the mesh filter should be cleaned periodically. The valve is the basis of irrigation and is completely electrically safe due to its low voltage. Electric shock is completely excluded. Power is provided from a battery or from the mains through galvanic isolation.
Types and principles of operation
There is the concept of perpetual motion machines of the first order and the second.
The first order is devices that produce energy on their own, from the air, the second type is engines that need to receive energy, it can be wind, sun rays, water, etc., and they convert it into electricity.
According to the first law of thermodynamics, both of these theories are impossible, but many scientists do not agree with this statement, who began the development of second-order perpetual motion machines operating on the energy of a magnetic field.
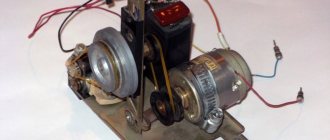
Photo - Dudyshev magnetic engine
A huge number of scientists at all times worked on the development of a “perpetual motion machine”; the greatest contribution to the development of the theory of a magnetic engine was made by Nikola Tesla, Nikolai Lazarev, Vasily Shkondin, and the variants of Lorenz, Howard Johnson, Minato and Perendeva are also well known.
Photo - Magnetic Lorentz motor
Each of them has its own technology, but they are all based on a magnetic field that is formed around the source. It is worth mentioning that engines do not exist in principle, because... magnets lose their abilities after approximately 300-400 years.
The simplest is considered to be a homemade anti-gravity magnetic Lorentz engine. It works by using two differently charged disks that are connected to a power source. The disks are half placed in a hemispherical magnetic screen, the field of which begins to gently rotate them. Such a superconductor very easily pushes the MP out of itself.
The simplest Tesla asynchronous electromagnetic motor is based on the principle of a rotating magnetic field, and is capable of producing electricity from its energy. An insulated metal plate is placed as high above ground level as possible.
Another metal plate is placed in the ground. A wire is passed through a metal plate on one side of the capacitor and the next conductor goes from the base of the plate to the other side of the capacitor.
The opposite pole of the capacitor, being connected to ground, is used as a reservoir for storing negative energy charges.
Photo - Tesla Magnetic Motor
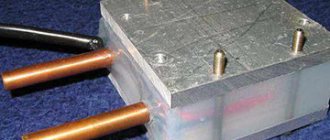
Lazarev's rotary ring is so far considered the only working VD2, in addition, it is easy to reproduce, you can assemble it with your own hands at home, using available tools. The photo shows a diagram of a simple Lazarev ring engine:
Photo - Koltsar Lazareva
The diagram shows that the container is divided into two parts by a special porous partition; Lazarev himself used a ceramic disk for this. A tube is installed in this disk, and the container is filled with liquid. For the experiment, you can even pour plain water, but it is advisable to use a volatile solution, for example, gasoline.
The work is carried out as follows: using a partition, the solution enters the lower part of the container, and due to pressure, it moves upward through the tube. So far this is only perpetual motion, independent of external factors. In order to build a perpetual motion machine, you need to place a wheel under the dripping liquid.
Based on this technology, the simplest self-rotating magnetic electric motor of constant motion was created; the patent was registered to one Russian company. You need to install a wheel with blades under the dropper, and place magnets directly on them.
Due to the resulting magnetic field, the wheel will begin to rotate faster, water will be pumped faster and a constant magnetic field will be formed.
The Shkondin linear motor produced a kind of revolution in progress. This device is very simple in design, but at the same time incredibly powerful and productive. Its motor is called a wheel-in-wheel and is mainly used in the modern transportation industry.
Connecting a solenoid valve to a garden watering system
For a small garden, a -12 volt solenoid valve for irrigation (NT8048) is better suited. It is safe because if water gets on the contacts or if you touch it with wet hands, there will be no electric shock. The ability to connect it to a 15 Ah battery allows you to work without recharging for a week. It will also be easy to supply power from the shield via an AC adapter.
The water supply is provided from a storage tank installed at a height of at least 2 m. The water in it is drawn from a centralized system. Filling is controlled by a float sensor connected to a plug valve. The absence of a pump eliminates many problems. Watering the garden by gravity occurs within a few hours and does not need to be controlled. All irrigation control will be taken over by an electronic timer connected to the outlet.
The valve is installed in the pressure line of the irrigation system. The electromagnet coil is connected to the output of the adapter via a cable using terminals. They can be sealed on top with sealant to protect them from water.
The entire device can be conveniently placed in a utility room where you can install an outlet. A timer, adapter and electromagnet coil are connected in series to it. All that remains is to configure the watering mode. The time is chosen in the morning and evening so that there is a minimum of evaporation and the plants do not get sunburned. The duration of watering is set, which is then selected experimentally.
Watering should be different for different types of plants. The system can be gradually improved by adding new valves. You can connect your own timer to each of them or install a common microcontroller, setting the irrigation program.
Valves from old washing machines can be installed on the outlet pipelines, which will allow you to save a lot on the cost of the irrigation system.
Instructions for self-construction of the valve
As you already understand, to create a ventilation system with backdraft protection, it is not at all necessary to buy a ready-made structure. Of course, you won’t be able to do it completely without cost, since you will have to buy an exhaust fan. This will be the basis for the check valve.
Before starting work, you should prepare all the necessary tools and materials. So, to build a diaphragm valve you will need a piece of plastic and thick plastic film. It is also important to immediately prepare a drill, screws, rubber gaskets and glue.
To understand how to properly make a check valve for ventilation with your own hands, it is important to read the following instructions.
All exhaust fans are manufactured according to already established standards, corresponding to the ventilation duct openings in private and apartment buildings
We cut out a plate from thick plastic strictly according to the shape of the hole in the ventilation duct. Actually, this will be the basis of the future valve.
Next, we drill several holes along the edges to attach the panel to the wall and fix the fan. The number of holes can be adjusted independently.
We also drill several holes in the center of the plate through which exhaust air will be discharged. You will also have to determine their number yourself, based on your personal needs. The more holes in the center of the plate, the greater the valve's capacity.
Next, we attach the hood to the finished base. First, you will need to install a rubber gasket at the connection point, and only then can you fix the fan. This will ensure the necessary tightness, and therefore improve the quality of the valve.
To avoid annoying noise coming from the fan during operation, it is recommended to place small pieces of rubber under the fasteners of the device.
The thickness of the plastic for the construction of the membrane valve must be at least 4-5 mm, so that under the pressure of even a small air flow, flexible membranes can easily bend
We make flaps for the valve from thick polyethylene film. First of all, you will need to cut the film to the size of the base, and only then glue it to the base of the valve. Please note that the flaps must completely cover the ventilation openings.
The next stage is to cut the sash into two equal parts, and it is important that the cut is as even as possible. In this case, it is recommended to use a stationery knife with a sharp blade.
We install the finished valve in the ventilation duct, securing it to the wall with several self-tapping screws. Since there are gaps between the wall and the valve, it is advisable to immediately get rid of them using sealant.
This completes the process of creating and installing a diaphragm valve. By sequentially performing all of the above steps, you should end up with a reliable device that protects the room from backdraft.
Do-it-yourself solenoid valve for watering
Electric valves are expensive, but cheaper solutions can be found. The most accessible one here is a valve from a broken washing machine. Its structure is as follows:
- plastic case;
- rubber membrane;
- electromagnet with core;
- spring;
- mesh filter;
- pad.
The mechanism is highly sensitive to dirt and can easily fail. It is protected by a mesh filter, but for a garden system it is advisable to install another one at the valve inlet, since your own will quickly become clogged.
The solenoid valve is normally closed, i.e. when turned off, it shuts off the water. When turned on, the core retracts, raising the rubber membrane, and allows water to pass through.
To remove contaminated washing liquid, a drain valve is used, which is designed in a similar way. Its operating principle is the same and it can be successfully used for irrigation.
Solenoid valves of washing machines have the following characteristics:
- supply voltage - 220 V;
- power - 8 W;
- water pressure - up to 10 atm;
- inlet hose diameter - 3/4″;
- fluid flow - 10 l/min.
Ball with electric drive,
The motorized valve can find its application in modern “smart” water supply, heating and air conditioning systems created by home DIYers with minimal use of purchased components. In addition to testing your strength, there will also be a significant monetary benefit - a purchased device with an electric drive costs from 2 to 10 thousand rubles.
For a do-it-yourself ball valve with an installed electric drive, you will need the following materials and components:
Figure 1: 3/4 valve
- window lift drive for Lada 1117, 2123 left LSA;
Figure 2: Power window
- five-pin automobile relays – 2 pcs.;
- limit microswitches - 2 pcs.;
- sheet metal 1 mm thick (for the frame and clamps);
- steel tube 10 mm - trimmings (for bushings);
- square profile 10*10 mm - 10 cm;
- metal strip 4 mm thick - 10*1 cm;
- spring with a diameter of 12 mm;
- M8*45 bolt with nut and washers - 2 pcs.
All electrical equipment is 12 volt. Tools needed:
- drill;
- metal scissors;
- workbench with a vice;
- welding machine;
- hand tools (hammer, screwdriver, wrenches, pliers, etc.)
The mechanism being created should allow the electric crane to be controlled both using a drive and manually. The manufacturing sequence is as follows:
- Bend a U-shaped frame from a sheet of metal.
- Make bushings from pieces of tube for attaching the window lift drive to the frame.
- Secure the drive.
- Secure the frame to the pipes coming out of the ball valve using clamps.
- Cut out an attachment for the gearbox axle from a square profile.
- Weld a strip to it.
- Assemble the lever mechanism of the drive from the strip and the handle, spring-loading it. The spring presses the levers together; if necessary, they can be quickly separated without the use of tools and the crane can be operated manually.
- The strip is hinged to the handle using a bolt and nut. Lock the nut.
- Attach the square profile to the window regulator shaft.
Next, you should test the kinematics by applying voltage to the electric motor. You can use a car battery or a power supply with a power of at least 50 W. The lever transmission should move smoothly, without jerking or distortion. If necessary, correct parts touching each other with a file.
Now comes the turn of the electrical part of the drive.
- Mount limit microswitches in the extreme positions of the handle.
- They should be connected in such a way that they open the control circuit of the relay through which the engine is turned on when the extreme position “Open” or “Closed” is reached.
Such a drive can be connected to the control circuits of a smart home system. A do-it-yourself electric water faucet will be cost-effective if the window lift drive is inexpensive. A new one costs up to 1 thousand rubles, and can eat up half the savings.
Instead of a window lifter drive, you can use any other electric drive,
Figure 3: Motorized crane
similar in power and torque.
Malfunctions and repairs
| No voltage on the coil | 1.Defective supply cable. 2. Coil malfunction. | 1. Eliminate the break. 2. Check the integrity of the wire with a tester. A burnt coil usually cannot be repaired. |
| Valve does not operate when voltage is applied | 1. The spring is broken. 2. Accumulation of dirt in the moving joint. | 1. Replace the solenoid. 2. Disassemble and wash the structure. |
| Large pressure drop | 1. The adjustable hole is clogged. 2. The coil parameters do not correspond to the applied voltage. | 1. Clean. 2. Replace the coil. |
| Valve does not close | 1. There is residual voltage on the coil. 2. Contamination of the hole. 3. Valve seat contaminated. 4. Spring breakage. | 1. Check relay contacts and electrical connections. 2. Clean. 3. Clean. 4. Replace. |