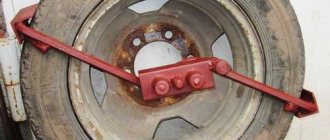
With this video I finish a series of experiments with permanent trimmer line. Here I tried to use string in diamond chips for a jigsaw. Option found in another video -
In general, in my videos I talk about construction with “one helmet.” I do everything myself. One head and two hands. The main areas are DIY construction and repairs, but I also talk about gardening, crafts and useful things for the home.
At the moment, I am actively engaged in finishing and arranging my house from SIP panels, which is located in the Moscow region.
I record all stages of construction on video, sharing my experience and my thoughts. I do almost all the work for the first time.
I do everything for my own pleasure, and I wish the same for you!
Line and reel for trimmer: how to make the right choice
Trimmer line diameter
The main aspect of a trimmer line is its diameter. How to make a trimmer with your own hands from an angle grinder (starter). Like the following picture. It can be 3.2, 3, 2.4, 2 or 1.6 mm. How to do this with and how to replace the fishing line. A horror story on an eternal theme. The thicker the line, the more thick plants can be mowed using a brush cutter. More popular and common line diameter
. 2 mm.
The thickness of the line should correspond to the power of the trimmer engine and match the parameters of your model of brush cutter. For a low-power unit, a line diameter of 1.3-1.6 mm is suitable, and for a device designed to work with soft and hard vegetation. 1.8-2 mm.
If you do not know which diameter to choose, please read the product data sheet before purchasing. There the manufacturer indicates the optimal value of the fishing line diameter.
Tests
The chain is not a fishing line - its effectiveness exceeded all expectations! It copes well not only with growth around trees, but also with impassable thickets, including reeds and even thick corn stalks.
Line section for trimmer
There are the following main types of fishing line sections: - square; - round; - with sharp edges (star-shaped).
The cross-sectional shape of the line must correspond to the thickness of the vegetation being mowed. A round line is required for mowing lawns and young grass. How to properly spool fishing line onto a stem trimmer. Pentagonal and square ones will be needed if the grass has become coarse and weeds have appeared on the lawns.
Here the choice depends on the individual model and the purpose of the trimmer. Such a reel is attached to the trimmer in the same way as + how to install fishing line + on the drum. However, if you need to mow, for example, an old bush, the fishing line will not be suitable for this, since it will immediately break. For such purposes, it is advisable to use a brush cutter equipped with a metal blade.
Read also from the section
How to Choose a Handheld Circular Saw for the Home
Good hand-held circular saw. How to Choose a Circular Saw: Tips and Tricks Previously, only the circular saw was seen in sawmills. Today, many private craftsmen are thinking about which model of such equipment to choose. If you also decide to purchase such a device, it is important to consider the main characteristics, including, for example, the power supply. Business date, meeting Most saws are powered from the mains, [...]
Circular saw Whirlwind DP 160
Review: Hand-held circular saw Vortex DP-160/1300. Good household saw This saw is essentially the second one, I left the first one about the first one (this is Zubr ZPD-186-1600 https://otzovik.com/review_3382949.html), but I used this one for the first time. I liked this drink. Comfortable main handle (the handle itself, together with the additional one, is not an integral part of the engine body), rubberized, the rubber layer is not superficial (as […]
Trimmer reel modifications
Reels (heads) for trimmers can be of various modifications. Thread the line into the trimmer. Using the example of the makita um 4030 trimmer. How to thread line into a trimmer. Single-string lines (with one strand of fishing line) are suitable for trimming the lawn, and for clearing areas and mowing grass. two-string, with manual adjustment of string length or automatic line feed.
Modern manufacturers are increasingly producing universal brush cutters with two-string automatic reels.
Why does the chain slip off?
Many, even the most experienced users of chainsaws, have encountered in their lives a situation where the chain jumped off the guide bar during operation. The most common cause is insufficient chain tension or wear.
In 80% of cases, stretched chain links slip off the teeth of the drive sprocket, and it flies off the guide under the influence of centrifugal force. Although sometimes the problem appears due to the incorrect position of the sprocket relative to the axis of rotation or a loose saw bar on the chainsaw.
Tire installation on STIHL and Husqvarna
Models of chainsaws from the manufacturer STIHL may differ during the assembly process. Step by step guide:
- Open the wing nut and remove the protective cover of the chain sprocket. Turn it on the tire all the way to the right.
- Place the chain on the bar, starting from the top, with the cutting tooth on the top side pointing straight ahead.
- Place the assembled tire on the chainsaw and pull the structure onto the sprocket. Slide the guide onto the shoulder bolt. Close the lid by inserting the pins into the holes provided by the manufacturer.
- Turn the wing nut until the sprocket cover touches the engine housing.
- Turn the clamp bolt forward until the drive links fit into the grooves in the bar. Fully tighten the wing nut.
At the end of the work, check the tension; if the headset does not move well, adjust the tension with the nut. The chain brake must be engaged before starting.
The algorithm for installing a bar with a chain for Husqvarna saws is almost identical. The main difference is that in most models, the tension and adjustment of the location of the headset to the body is controlled not by one, but by two wing nuts. It is rare to find a separate adjustment lever on the outer sprocket guard housing, so tension adjustments should only be made with bolts.
Important! Before starting to work with the chainsaw, you should carefully read the user manual. It describes in detail all stages of setting up and assembling the instrument.
Nowadays there are many models of chainsaw chains on sale. First you need to know which size is suitable for your chainsaw and not make a mistake in purchasing. The second step is to correctly install it on the chainsaw. This is a somewhat labor-intensive process, but if you know how to independently put on and adjust the chain to the saw bar, then the careful owner should not have any problems. We tried to describe in detail the process of installing a saw blade on a chainsaw.
We hope that after reading this article you will succeed the first time. But to minimize the occurrence of problems with your chainsaw and chain in the future, do not forget 3 basic rules:
- If the chain is worn out and sagging, replace it with a new one;
- If vibration occurs during sawing and the cut is poor, monitor the chain tension on the chainsaw;
- Never use saw blades that are defective or repaired by dubious specialists; the health of you and those around you is much more important than saving a little money on buying a new and reliable chain.
Composition of fishing line and reel for trimmer
The last criterion to pay attention to is. composition of equipment for trimmer. Reels for brush cutters are made of plastic.
But fishing line can be made from a variety of materials. How to wind fishing line on a trimmer for application price in the grass using fishing line. Among them, nylon is worth noting. How to replace fishing line on a stihl fs 55 trimmer in the stihl fs 38 trimmer bearing lubrication. A fishing line made of this material is highly wear-resistant and can withstand large temperature changes and increased loads. In addition, during long-term storage, nylon does not delaminate and does not lose its performance qualities. All this directly affects the life of the fishing line.
Trimmer
- this is one of the most commonly used tools, so that there is an option to quickly and easily cut grass, cut small bushes, lawn grass and other weeds. Everyone knows that in order for grass to be mowed to be successful, you need to use the equipment correctly and handle the individual cutting elements well.
In trimmers, it doesn’t matter what kind of fuel they operate on; special cutting attachments (knives, discs) are used, and some trimmers are supplied to the market in the heads of which a cutting element such as a fishing line is installed, in connection with this, some people wonder how to thread the fishing line into the trimmer reel calm, if there are no such abilities at all.
- Cutting attachments in the form of knives can be sharpened, but the fishing line (also a cutting part) unfortunately tends to be consumed. Below we will talk about how to correctly insert the cutting element - fishing line - into the reel of the trimmer.
What you need to have on hand
We will need the following tool:
- Welding machine;
- Drill, set of metal drills;
- Vise;
- Marker and ruler.
From materials:
- Large concave cup used to secure trimmer blades, flat washer and nut;
- Old chain from a chainsaw.
Quick chain tensioner
To install the chain, you need to use the installation wheel. There is no need to use other tools.
- We prepare the surface for work. It should be comfortable and level. In order not to spoil the surface and the instrument itself, we cover it with something soft, such as a rug. Now we lay out the tire, chain and motor block separately on the surface.
- The next step is to open the wing nut, and then remove the chain sprocket cover.
- Turn the tension sprocket attached to the tire to the right until it stops.
- Gradually place the chain over the bar, starting from the top of the bar. It is important to ensure that the chain is directed correctly. Don't forget about protective gloves.
- Now the chain must be turned over so that the bar is on top of the chain.
- We re-check the accuracy of the location and direction of movement of the chain. The cutter located on the top of the tire should face forward.
- the chain assembled with the tire on the sprocket. In the process, the guide bar is pushed onto the shoulder bolt.
- Now we put the chain sprocket cover back on the engine block, it is important to make sure that all the pins fit into the corresponding holes. Turn the wing nut until the chain sprocket touches the engine housing. The sprocket cap does not need to be fully tightened.
- Next, turn the clamping screw in the direction of the top of the tire. The drive chain links must fit into the tire groove.
- We tighten the wing nut so that the chain sprocket cover sits tightly on the engine block. Close the wing nut until it locks.
- We check visually that the chain is not sagging.
- Next, we check whether our chain . To do this, release the chain brake, pull the chain along the mowing line with your hand (do not forget about protective gloves).
- After this, the saw is ready for use and only the last step remains - activating the chain brake.
Thus, installing a saw chain and bars with a quick chain tensioning device has its clear advantages, namely, that tensioning the chain is not difficult and does not require additional tools.
Preparing for replacement
For clarity, the mowing head (spool) was removed from the brush cutter. There is no need to remove the fishing line to replace it; everything is done locally. It doesn't take much time.
We disassemble the trimmer spool - it is held on by latches. Remove the cover by pressing the latches. If there is not enough effort to do this with your hands, then use a screwdriver.
The spool consists of the following:
- Housing with spring
- Cover with locking latches
- Reel with button
The operating principle is as follows. By pressing the button, the reel presses on the spring and comes out of the fixing grooves in the spool cover. By holding the reel in this state, you can twist it, thereby adjusting the length of the fishing line. When the button is released, the housing spring returns the coil to its original fixed state.
There are several holes on the bottom of the reel for different diameters of lines. These may differ between trimmer manufacturers. In some cases (like here) they are signed, in others they are not.
These holes are needed to fix the fishing line when replacing it. After winding the fishing line around the bobbin, the ends of the latter are inserted into them. This is necessary so that the line does not unwind when the reel is installed in the trimmer body. In other words, it makes line changes easier.
There are models without indicating the diameter of the consumables. Then, in order to find out what maximum diameter of the line can be used, it is tried on using the holes for the line exit from the trimmer spool body (see the figure below).
The reel has two sections for fishing line, separated by a partition. They may not exist. They are needed only to differentiate and facilitate winding of consumables.
First, the required length of the loess is determined. The latter is wound into one of the sections of the coil so that it does not extend beyond its limits. In this case, 3 mm was wound, the length turned out to be about 2 meters. Those. for two sections you will need a 4 meter piece - this is for the 1st method. For the second method, you need two pieces of 2 meters each.
How to replace the ignition on a trimmer?
Now you need to figure out which way you need to wind it. To do this, many manufacturers of trimmers put special markings on the reels, such as in the figure below.
If no such markings were found, then you need to pay attention to the spool body. There must be an arrow there that indicates the movement of the mowing head. The line is wound in the opposite direction.
Basic chainsaw chain problems
Chainsaw users often encounter problems with saw chain tension. It either weakens spontaneously or stretches and falls off. As a rule, these troubles are caused by unit breakdowns. Therefore, before proceeding with the procedure for tensioning the chain links, you should check and eliminate possible causes that could lead to adjustment problems.
The reasons that the chain on a chainsaw stretches may be heavy loads or insufficient supply of lubricant to the bar. Because of this, the saw overheats, the metal expands, the size of the saw element increases, and it flies off the tire. The flow of oil may be disrupted if the pump breaks down, the channels become clogged, or the oil hose breaks.
If you have replaced the chain on your chainsaw with a new one, then be prepared for the fact that it will stretch a little during the break-in period. It is only necessary to check the tension in time so that the element does not fly off the tire.
A chain made from low-quality steel is also quickly subject to stretching.
When the driven or driving sprocket wears out, the effectiveness of adhesion to the chain links decreases, causing the saw element to fly off. In this case, you will have to unscrew the chain drive and change the sprocket. Also, the saw blade of the unit may fly off due to its stretching or deformation of the tire.
If the chain on your chainsaw weakens, then this malfunction may be caused by a failed tension mechanism.