DIY handicraft suitcase, master class No. 1 “simple and tasteful”:
Craftswoman Vanessa offers an easy way to transform even the oldest and most boring suitcase. To do this you will need inexpensive materials and a minimum of skills.
before:
Even if a suitcase is attractive in appearance, its lining is rarely as beautiful. Feel free to remove it and paint the inside of the suitcase some nice color - for example, green. Then cut out two blanks from cardboard (according to the shape of the bottom and the inside of the lid) and cover them with paper (or cotton fabric) in a flower pattern. In the cardboard for the top, make holes for the elastic bands, thread the elastic bands and tie them on the back side, then glue the cardboard to the inside of the lid and frame it with a beautiful braid.
Now the lid of the suitcase will help you always keep scissors, spools, needles and other necessary little things at hand. And in the main compartment you can store leftover fabrics, braid, needles, pins and buttons.
__________________________
Cost of materials
At the end of the work, I calculated the costs of materials to make folding furniture:
- sheet of plywood 140 x 70 x 0.9 cm = 150 rubles;
- timber 800 x 4 x 4 cm = 8 m x 110 rub. = 880 rub.;
- plastic handle – 1 pc. = 15 rub.;
- suitcase locks – 2 pcs. = 20 rub.;
- fastening screw-screw 100 x 8 mm with wrench grip – 4 pcs. = 20 rub.;
- wing nut ø 8 mm – 4 pcs. x 2 rub. = 8 rub.;
- furniture hinges – 2 pcs. – 10 rub.;
- screws 30 mm – 30 pcs. in stock.
Total: 1103 rub.
do-it-yourself craft suitcase, master class No. 2 “a journey to the land of creativity”:
One Swiss needlewoman loves retro, handmade things and cannot imagine her life without traveling. All these hobbies came together in a cute little craft case that she made with her own hands.
The basis for the “magic chest” was an old boring suitcase. Its sides were painted white, and the standard upholstery was replaced with floral fabric. And the thing, battered by life, turned into a nice vintage hand-made item.
The suitcase has also been transformed inside. The dark bottom was covered with brightly checkered fabric. The inside of the lid was decorated with multi-colored fabric pockets - not only beautiful, but also functional. You can store large items in them. Small baskets and containers are suitable for skeins of braid and pieces of fabric. And elastic bands and small pockets on the sides will help organize the smallest items (needles, pins, spools).
__________________________
Domestic varieties
Open or closed stands and spacious chests of drawers are suitable for stationary storage of tools. In these options, everything depends on their location - a garage or an apartment. In the first case, it is more convenient to organize a stand of the required size on the wall so that everything is open and freely accessible.
Designs with shelves or retractable plywood drawers, cabinets and even a suitcase are suitable for apartments. They can accommodate organizers and cases for power tools and hardware. Small stands can be built on the doors and side walls. The more correctly the filling is organized, the longer the order will be maintained.
To accommodate the main set of tools
, wrenches, heads, bolts and nuts, a small container with a handle can serve as mobile options. If the dimensions are large, you can attach wheels to it. Then you should choose the material, calculate the acceptable dimensions, choose the model and type of fasteners, draw up a drawing of the tool box with your own hands or use ready-made proposals. After this, you can begin manufacturing.
In addition to safety, a DIY tool box helps when performing work. Its sorted content, when each item is in its place, allows you to find everything you need over time, without even looking inside.
The standard placement of a hammer, keys and pliers occupies one large compartment. Screwdrivers are inserted into holes on horizontal strips.
do-it-yourself craft suitcase, master class No. 3 “sweet life”:
Just look at this suitcase! Bright prints on the outside, old pages on the inside. This kind of thing is usually expensive, but you can do it yourself. The basis is the same old suitcase. We will decorate it not only inside, but also outside.
before:
To decorate the exterior, Amy chose fabric with delicious candy prints. If you don’t find exactly the same one, you can choose any other one, but be sure to be bright and with an interesting pattern.
The interior looks especially luxurious. All thanks to the unusual decor from... pages of an old dictionary, which are pasted over the bottom and walls.
Amy made the lid of the suitcase not only beautiful, but also functional, by attaching small plastic jars for small items. They can be placed on superglue or attached using double-sided tape.
__________________________
Homemade designs
It is impossible to unequivocally answer the question: how to make a tool box with your own hands, since there are a huge number of options, unlimited by anything except your imagination. I would like to note that you can use old paper cases, bags, or make a complete box yourself. The material used is metal or wood.
Internal partitions are also made of wood or plastic. The lids are hung on hinges; it is necessary to provide a lock that will protect against accidental opening.
The finished box is painted or sheathed with available and suitable material, both outside and inside.
master class No. 4 “like mom’s” - do-it-yourself suitcase for children’s handicrafts:
Does your daughter like to sew, knit or draw? Give your little fairy a magical craft chest like Megan did. All you need is a small suitcase (not necessarily an old one!), a sheet of colored cardboard and a little imagination.
Attach the cardboard to the inside of the suitcase lid and cut out the blank according to its shape. If you don’t have multi-colored cardboard, take regular one and cover it with fabric. Then make holes to secure holders for bobbins and needles (these can be made from regular elastic). Glue the cardboard to the inside of the lid and your cute craft bag is ready!
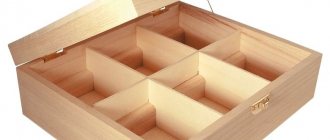
It can be difficult for children to maintain order, especially in small things. Help them in this difficult task by equipping their suitcase with a container with dividers. Now buttons, beads, pins and other necessary little things will be in one place and will no longer scatter throughout the suitcase.
Did you get inspired and want to do something else? Don't limit your creative impulses! Sew a pincushion, a bag for small items, a pencil case for pencils and felt-tip pens into the suitcase set - yourself or involve your daughter in this. Now your child will be able to boast of original handmade things.
Making a suitcase with your own hands, as it turns out, is very simple. Much easier than restoring an old suitcase. This does not require any “preserved” elements and devices, and all the necessary materials are available and sold in stores at fairly low prices.
Background
As often happens in creative practice, the necessary things are usually found in the trash, like our Soviet-era suitcase, slightly larger than a briefcase. Its dimensions were suitable for storing a bunch of jewelry and trinkets, woven, but lying around idle. The very shabby, dirty and unaesthetic appearance of a useful household item left no doubt: restoration of the old suitcase was necessary.
First, the fittings were carefully removed and placed to soak in a jar of gasoline. Then the linings and ancient torn dermantine were removed. Then it turned out that the side boards making up the frame were rotten, and the walls of the lids were generally made of thick cardboard, punched to huge holes in several places.
The cardboard was torn off and thrown away. Instead, boards of the required size were cut from hardboard. The wooden frame was sanded down to white wood, a couple of walls were replaced with new ones and reinforced with glue and screws. The hardboard covers are glued on and nailed down.
So, we can say that we started constructing a suitcase with our own hands almost from scratch.
Exterior finishing
Dark brown dermantin was used for finishing. The dermantine is marked strictly according to the dimensions of each flap of the suitcase, taking into account the folding on the walls of the inner sides.
Carefully cover the surface of the dermantine with PVA glue, and, accordingly, one of the lids of the suitcase. We glue the material, carefully expelling all air bubbles and excess adhesive liquid, smoothing out any irregularities. We have a felt squeegee for this purpose.
We especially conscientiously roll the material along the perimeter of the edges so that the suitcase made by hand looks aesthetically pleasing, as if it came out of a factory assembly line yesterday.
The hardest part is gluing the corners. We deliberately do not provide patterns, because we assume that every home craftsman has his own vision of the technology for high-quality finishing of corners when restoring an old suitcase. The main thing here is precision, a lot of glue and diligence.
We will show a number of photographs that, we hope, will help clarify the technological process of gluing corners.
When the dermantine is stretched onto the frame, it is recommended to walk over the set glue with a warm iron to secure (bake) the gluing. Be sure to iron with a cloth, otherwise your synthetic material will melt.
At this point, we consider the first stage of making a suitcase with our own hands, or restoring an old one, complete. Therefore, we will put back his fittings.
Internal upholstery
For the interior upholstery, we will make pads on padding polyester, covered with synthetic velvet, or any other suitable textile. The illustration shows the components of “velvet” pillows and part of the procedure for their layer-by-layer formation.
When the pillows are ready, coat the inner walls of the product with glue and glue it inside the pillow.
This is what our “new” handmade suitcase looks like.
We did not attach the handle. The project is to make our suitcase worn on a shoulder strap, like a sketchbook, but there is no time yet to look for suitable fittings and options for attaching them.
So, we have created a functional item, the practical applicability of which is not limited to storing jewelry or tools. The master class not only clearly shows how to make a suitcase with your own hands, but also comes in handy as instructions on how to restore an old suitcase.
Materials and tools used in the master class:
- skeleton of a suitcase with accessories;
- sandpaper, hammer, screwdriver, brush, scissors, mounting knife;
- hardboard and wooden slats (optional);
- PVA glue;
- shoe nails 10 mm long;
- dermantin, cardboard, padding polyester, synthetic velvet.
Time spent on restoration:
- giving the product a look suitable for finishing, including sanding and puttying - 2-3 days;
- finishing - 2-3 hours.
Sometimes, in order to decorate your apartment, it is not necessary to buy a wardrobe or chest of drawers. With the help of your imagination, skillful hands and time, you can make various interior elements that will not only serve as decoration, but will also be useful for the household. For example, if you make a suitcase, it will look beautiful and original, and at the same time, having some tools at hand, you can make compartments in it with your own hands, which can be used to sort things.
First of all, a homemade suitcase can help in allocating space, so you need to create it in the style of your apartment or the room where it will be located. In order to create a suitcase, you do not need to have any special skills; you can make it simply using a suitable master class.
Now let's move on to the internal arrangement of the organizer.
Before starting work, carefully consider again what tools the case will be intended for. The shape, size and number of storage cells will depend on this.
Most often, such organizers are used to store hand tools.
Screwdrivers, a hammer, a hacksaw, pliers, and chisels can be conveniently placed on the inside of the lid. Secure them with a strip of rubber.
To store small parts such as nails, bolts, nuts, washers, make cells from the remaining plywood, cutting it into parts of the required size and fastening them with glue and self-tapping screws. For large power tools, make larger sections
Thus, we can make a case for storing tools of any shape and size that meets all our requirements. The main advantage of such an organizer is its accessibility and ease of assembly.
All connections are made using glue and self-tapping screws, which makes the work accessible even to a novice craftsman. And the plywood from which the case is made can be purchased at any hardware store.
Before starting work
If you don’t have enough imagination to design your suitcase, you can look at photos of existing options or come up with your own combination of different styles. First, you need to think about the size of the future suitcase, its shape and approximate design; for convenience, all this can be depicted on paper and some sketches made. At the same time, you can even draw in detail all the compartments in the suitcase and decorations.
When creating a suitcase, you need to remember that it can serve as a small cabinet for clothes, for children's things or as a storage place for kitchen items. Therefore, having decided on its dimensions, we move on to the technique of execution, the choice of the material from which it will be made.
Modern tool box
If we use an organizer to store business papers and documents in everyday life, then the tool needs its own case - a special tool box. You can divide tool boxes into professional and universal, which are most often used in the household.
Our grandfathers generally made a toolbox with their own hands, but today there is no need for this - you can always find what you need on sale at a very reasonable price. Naturally, those who like to do everything with their own hands still have the right to express themselves here and assemble an original case that meets all individual requirements.
DIY reconstruction of an old suitcase
The simplest option for creating a suitcase would be to reconstruct an existing old suitcase. Typically, for this procedure you need to take an old suitcase in the shape of a rectangle and make a new wardrobe out of it for your things. An old suitcase doesn’t even need to be decorated with anything; it will look beautiful in any interior style.
You can, of course, remake a new suitcase, but it will still be useful on trips, and if the wrong things are placed in it, it may get dirty or the inside of it may deteriorate, and then the suitcase will not be suitable for use.
Purpose of the case
The cost of cheap and expensive suitcases varies greatly. It depends not only on the brand, but also on the materials used and functionality. The cheapest option can be purchased for a couple of thousand rubles, while an expensive option, with a well-thought-out system of pockets and sections, will cost a hundred thousand rubles. One nuance is important: when loading luggage, it doesn’t matter whether the suitcase is expensive or cheap, they are all subject to the same checks and may suffer during transportation: dents, scratches, and so on will appear. That is why you need an accessory such as a case.
Homemade denim case
Important! People whose suitcases cost dozens of rubles simply cannot do without such an attribute.
The cover will also come in handy in cases where the lining material of the luggage is already dirty or scratched. This will help hide all its flaws and defects. Thus, the cover complements or emphasizes the style of the owner of the luggage.
There are several other reasons to buy this product:
- bypassing the rule of additional packing of a suitcase, which does not protect it from damage, but costs money;
- additional protection for things in case of failure of the suitcase lock;
- reducing the chance of theft of personal belongings;
- ease of care for a stylish attribute.
Accessory from an old T-shirt
How to make a suitcase with your own hands from cardboard
If the size, design and purpose of the new item are chosen, you must choose the method by which this suitcase will be made. The first easy way involves creating it from cardboard. As you might guess, upon completion of the process you will have a neat cardboard suitcase in your hands. In this case, the cardboard must be very dense, and the creator must choose the shape of the suitcase himself. The suitcase can be round, square, triangular or diamond-shaped. It all depends on the desires and imagination of the person.
In order to make a cardboard suitcase, you need a large piece of cardboard; for convenience, it is better to cut out all its parts on the box at once, then simply fold them and glue them together. You can make a suitcase with a handle or create the illusion of wheels.
But the most important step will be decorating the suitcase. To do this, you will need fabric that can be used to cover the craft from the inside and outside. In this case, any fabric will do, and you can also choose the color to your taste. The resulting suitcase can even be taken on the road as a cosmetic bag or a small accessory for hygiene products.
Using exactly the same technology you can make a suitcase out of a box. A shoebox or any other box is suitable for this, and the suitcase can have a removable lid or a glued one. The box can be painted, covered with colored cardboard or covered with fabric.
Practical homemade tool case
Every master sooner or later faces the question of how and where to store his tool.
After all, the final result of your work depends on the condition of your tool. There is now a huge selection of different drawer organizers and bags for storing and carrying tools on sale. But the main disadvantage is their price. Good quality specimens are very expensive, and there is no reason to spend money, even small ones, on some puny box.
Therefore, we suggest you make a homemade tool case.
Plywood suitcase
The strongest and most durable suitcase is made from plywood. To do this, you will need wooden boards from which you can cut out all the parts for the suitcase. As for decorations: sometimes they are not needed, since the type of plywood can be very original and fit the style of any room. Such a suitcase can be used as a toolbox; usually, men make such an item themselves for their convenience. Girls can decorate the inside of such a suitcase with fabric, and leave the top in its original form. Just such a suitcase can be made with shelves inside so that you can sort your things according to shelves.
If you need a suitcase as a gift, it can be made of paper. At the same time, you can place a small gift inside the suitcase, and decorate the paper itself beautifully using different ribbons, paints and bows. A suitcase can be made for a ring if a young man wants to make an original proposal to his girlfriend. Such a gift will not leave anyone indifferent.
The exact same suitcase can be made from sweets. In this case, the entire suitcase can be candy or simply decorated with candy flowers. A girl will like such a suitcase, because you can eat sweets and use the suitcase for your things, for example, jewelry.
Using video tutorials, you can learn how to make a suitcase from mastic if you need to decorate a cake. Also, with the help of a training video, you can learn how to make a real suitcase in the shabby chic style, especially suitable for a gift or to highlight the style of the bedroom. For a more serious interior, a suitcase in the steampunk style is suitable; it is easy to make, and the appearance will resemble a pirate suitcase.
see also
Comments 75
it turned out great! where did you buy the corner covers and carrying handles?
Good. I also started making it for myself, but I haven’t found all the accessories yet.
But it was impossible to describe what, how and where? As a person who is far from muses of equipment, it will be difficult for me to assemble something similar from something I don’t know and where it was taken...
What, did you use a regular corner? There is a special profile for this, it is more convenient for them to work and the bars inside the place will not be stolen. And so to work +++!
Why did you decide that it’s an ordinary corner, if there’s a Christmas tree there, and the bars don’t steal anything, it’s physically impossible to make a smaller case there.
I just saw the bars and thought it was a corner, sorry. Why did you put up the bars then? The tree holds it up just fine. I also made a lot of boxes like this, with the same fittings, but I didn’t reinforce them with bars anywhere.
Damn, how old is this equipment?))) The test cases are out))
like store bought) well done)
I'm far from professional music, but the boxes are good.
Great! Is this really a self-propelled gun? :-):-)
Yes, the rivers are worth so much money that you can go crazy! Well, it seems like nothing in dollars, but in hryvnias it’s a complete blast! We also suffer from this.
where do you get spare parts?
I order in England through suppliers...
First I wanted to ask - where do you buy all this? then I was smart enough to look at the place of residence)))) Now I can’t see branded things from Europe like a hare’s ears (((
No, you shouldn’t be doing that. Everything is Chinese except the plywood. She's most likely Russian
Yes, it doesn’t matter - they are UNDERrace of the third type.
No, you shouldn’t be doing that. Everything is Chinese except the plywood. She's most likely Russian
Do you know where they will come? there - where all the whites will live on separate best continents and just get high, and the Chinese and other sub-races will produce everything for the whites and the world will be divided into two continents - the mainland - slaves (China and others like it) and the mainland - the owners (us - whites) for whom these slaves will plow and produce all the goods. They will have the means of production, and we will have the entire nuclear stockpile of the planet and weapons. Just a slave revolt - the response is a targeted nuclear strike. That's all.
It’s normal that you inflated the topic of Cases... It’s good that you are not in politics...)
Do you know where they will come? there - where all the whites will live on separate best continents and just get high, and the Chinese and other sub-races will produce everything for the whites and the world will be divided into two continents - the mainland - slaves (China and others like it) and the mainland - the owners (us - whites) for whom these slaves will plow and produce all the goods. They will have the means of production, and we will have the entire nuclear stockpile of the planet and weapons. Just a slave revolt - the response is a targeted nuclear strike. That's all.
such nonsense! I’m sitting reading about how people have done something, i.e. are busy with something useful... and here it is in the comments.
Do you know where they will come? there - where all the whites will live on separate best continents and just get high, and the Chinese and other sub-races will produce everything for the whites and the world will be divided into two continents - the mainland - slaves (China and others like it) and the mainland - the owners (us - whites) for whom these slaves will plow and produce all the goods. They will have the means of production, and we will have the entire nuclear stockpile of the planet and weapons. Just a slave revolt - the response is a targeted nuclear strike. That's all.
The Chinese also have nuclear weapons, if that happens...
No, you shouldn’t be doing that. Everything is Chinese except the plywood. She's most likely Russian
no, the plywood is ours, and everything except the wheels is from England, only the wheels are Chinese...
The moderators will demolish the post, no size, no materials, no prices. It turned out beautifully, I would like more details.
I agree, the post is about nothing. So other people's photos from the Internet...
I wonder if the post is about nothing why 317 *likes overnight*? and so many grateful comments? If anyone is interested in a drawing or cutting of a case for exactly the same gun or head, please PM me for free, I’m not being cheap, but why do people who are not involved in rentals need such data?
People who have nothing to do with this simply perceive them as boxes... And their use is not important, and these are just photos from the Internet... Those who need it and use it will ask for drawings and technology. The rest will just gawk.)
The moderators will demolish the post, no size, no materials, no prices. It turned out beautifully, I would like more details.
material bakelite (deck) plywood 9mm, corner profile *Herringbone* joining (universal) handle corners, PennElcom locks were assembled on 4.8mm rivets using a pneumatic riveter, profile cut with a miter saw, plywood on a circular saw...
The moderators will demolish the post, no size, no materials, no prices. It turned out beautifully, I would like more details.
why sizes? cases for special equipment were made without gaps and inserts, I wrote the prices that it turns out to be about 2 times cheaper than if told at the factory. the case costs me about $150 (with Chinese wheels)
Handles and clasp.
I sew on one of the fastener straps, retreating about 75mm from the top of the suitcase. I didn't take many photos at this stage as I was in a rush to finish. But I hope that what we have should be enough to understand how to sew on the clasp and handles. Don't forget to glue everything and then sew it on.
Translation: LeatherThoughts