Summer is in full swing! For those who are already fed up with barbecues and sunbeds on the beach, we offer a cool idea for outdoor entertainment: a water rocket. The children will squeal with delight, the girls will be amazed, and the neighbors in the dacha will be furious and extremely surprised. The idea is not new; water rockets are very popular in foreign countries; there are even special championships for launching these things. You can buy them in the store, or you can make them yourself. Let's talk about this.
The principle of operation of a water rocket is extremely simple. You need a plastic bottle, one-third filled with water, a bicycle or car pump, a nipple and a launch pad (launcher) on which the rocket is fixed. The pump pumps air - the bottle flies high and far, splashing water around. All the “fuel” is squeezed out in the first moments after launch, and then the rocket flies along a ballistic trajectory (therefore, the center of gravity is moved as far forward as possible). But the technical variations in the manufacture of this design can be very different. Some amateurs create real masterpieces:
Let's consider one of the simplest options.
Rocket pump
Just recently I realized that blowing up balloons is not my thing.
I climbed onto the Internet and saw that everything had been invented a long time ago! Namely, a “pump” was invented (in our case, a launch pad for spacecraft that helps send and even slightly coordinate the flight). As they grow older, all children understand that saving money is great. Therefore, I want to offer you an idea on how to make a piggy bank from a plastic bottle. This is a very fun and exciting activity. Let's make a rocket piggy bank!
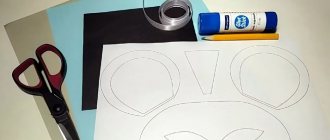
We will need:
- plastic bottle;
- stationery knife;
- blue cardboard;
- permanent marker;
- glue.
Cut out four circles from cardboard: three identical small ones, and the fourth one is twice as large. Three - glue the bottles onto the body - these will be portholes. Cut the fourth in half, then in half again. Make wings from the quarters.
Circle the portholes with a marker. Draw some details on the rocket body. Using a scalpel or a utility knife, cut a hole - a coin acceptor.
That's all! The piggy bank rocket is ready!
A real rocket made from a plastic bottle at the cosmodrome
Is it difficult to make a rocket? Not if there are plastic bottles and silver paint. But let's talk about everything in more detail.
We will need:
- 2 identical plastic bottles;
- Silver paint;
- Styrofoam;
- A bag (cone) made of thick paper;
- Adhesive tape;
- Marker.
How to assemble a spaceship:
Cut off the neck of the first bottle. We attach this neck to the bottom of the second bottle. And we insert this structure into the remaining lower part of the bottle that we cut.
Can be fixed with glue. We paint the structure.
We cut out 3 identical “fins” from foam plastic, cardboard or a backing for equipment. They are needed for flight stability and for the rocket to “land” on them. It is convenient to cut with a simple plastic card.
We paint the fins. We also apply paint to the cone.
We fix the cone on top of the bottle with tape.
We attach the fins to the sides with tape.
Using a marker we apply a “pattern”: portholes, rivets, the name of the space module.
Now it's time to hit the road, real adventures await us!
Flying rocket using soda and vinegar
This model is fun to play with, but can be taken to a school
. But first, let's do it.
We will need:
- Liter bottle;
- Vinegar;
- Soda;
- Wine cork with self-tapping screw;
- Insulating tape;
- Threads;
- Paper towel;
- Sticks.
How to design:
- Make a container with baking soda from a paper towel. Wrap the soda in paper and tie the container with thread. We check whether it goes into the neck.
- We wrap the bottle with tape, substituting sticks. We should get a structure that stands confidently (neck down) on four “legs”.
- We tie a paper container to the screw in the cork.
- Pour vinegar into the bottle. It should be level below the container.
When you turn the bottle upside down and the vinegar sinks and dissolves the soda, an explosion will occur inside the “rocket!” Your spaceship will take off!!!
By the way, a simple bottle was used here. But you can do all this with a craft and a finished space module!
It turns out that such a rocket exists and is purchased, you need to add vinegar before launching. Of course, this toy is not for children; play with it only under adult supervision.
Step-by-step master class on rockets using origami technique?
Origami allows you to create independent paper objects without the use of scissors and glue. Often one sheet of A4 format is enough for them. And there are a lot of rocket options, there are those that stand on their tails, and there are those that are used for volumetric applications.
The simplest version of the rocket is made in three minutes.
After you find the middle of the sheet along the length, you need to fold both upper corners towards it.
Then we form the body.
And side elements. Turning the edge out.
We repeat the same for the second side.
I will also provide a step-by-step diagram, which is supported by the upper master class.
The origami base can be supplemented with paper tubes.
There is a technique of modular origami, when a picture or figure is assembled from many small parts of the same size. Here is an example of this technique.
Of course, you won’t be able to do it quickly, but your hand skills will develop.
And, of course, you need to see how a complex craft is made.
Be patient and repeat all the steps shown with your child. Perhaps he is your future engineer or designer!
What can you do with saltpeter?
Use of saltpeter Saltpeter is used as nitrogen fertilizers, while potassium nitrate is also a source of potassium necessary for plants. Potassium nitrate is also one of the ingredients in black powder. Ammonium nitrate is used to prepare explosives such as ammonal and ammotol.
Interesting materials:
Which physical quantities are called vector and which are scalar? What nouns are called Indeclinable, how can their gender be determined? What light sources are called coherent? What chemical elements are called D elements? What chemical elements are called transition elements? What chemical compounds are called hydrocarbons? What classes are called equivalent? Which peasants were called Chernososhny in Russia? What lenses are called diverging lenses? What are the names of red fish?
How to make a model rocket from matches and foil - an entertaining video master class
Many adults and teenagers are interested in how to make a rocket from matches and foil. The work takes minimal time but brings maximum fun. True, it must be carried out either with adults or under their supervision.
Do you want to make a real three-dimensional rocket with your child or for him? Then a plastic bottle will come in handy; with it you can make an original craft with your own hands, which will be very relevant for Cosmonautics Day. In addition, children really love to play with toys that they made with their own hands, and since in any case your role is that of an assistant, all the honors from the craft will go to the children.
How to make a model of a space rocket with your own hands - an interesting master class with photos
Many fans of space research would like to have a real model of the original rocket at home. Using a few materials and following assembly rules, you can make a copy of the Proton-M. How to make a model of a rocket and how to paint it correctly is described in the next master class.
Materials for making a model of a space rocket with your own hands
- round timber blanks;
- plastic tubes;
- acrylic paint;
- glue.
Stabilizers
In order for a water rocket to soar into the air smoothly, it is necessary to fix it on the launch pad. The simplest solution is to make stabilizers from another plastic bottle. The work is performed in the following sequence:
- To start, take a plastic bottle with a volume of at least 2 liters. The cylindrical part of the container must be smooth and free of corrugations and textured inscriptions, since their presence may negatively affect the aerodynamics of the product during launch.
- The bottom and neck of the bottle are cut off. The resulting cylinder is divided into three strips of identical size. Each of them is folded in half in the shape of a triangle. Actually, folded strips cut from the cylindrical part of the bottle will play the role of stabilizers.
- At the final stage, strips are cut off from the folded edges of the stabilizers at a distance of about 1-2 cm. The protruding petals formed in the central part of the stabilizer are turned in opposite directions.
- At the base of the future rocket, corresponding slots are made into which the stabilizer petals will be inserted.
Top articles: Hair coloring only with basma without henna
An alternative to plastic stabilizers can be pieces of plywood in the shape of a triangle. In addition, the rocket can do without them. However, in this case, it will be necessary to provide solutions that will allow the product to be fixed on the launch pad in a vertical position.
Parachute
So that the water rocket can be used several times, in order to ensure its successful landing, it is worthwhile to provide a self-expanding parachute in the design. You can sew its dome from a small piece of dense fabric. The slings will be strong thread.
The folded parachute is carefully rolled up and placed in a tin can. When the rocket flies into the air, the lid of the container remains closed. After launching a homemade rocket, a mechanical device is triggered, which opens the door of the can, and the parachute opens under the influence of the air flow.
To implement the above plan, it is enough to use a small gearbox, which can be removed from an old or wall clock. In fact, any battery-powered electric motor will do here. After the rocket takes off, the shafts of the mechanism begin to rotate, winding a thread connected to the lid of the parachute container. As soon as the latter is released, the dome will fly out, open and the rocket will smoothly descend.
Ideas for the competition for April 12
Of course, every educational institution organizes all kinds of competitions and children are required to participate in them. But not all works are then taken to the exhibition. Let's look at options that deserve close attention.
For younger grades, choose a cardboard rocket.
For older adults, suggest making a whole composition with elements of Space.
It is made from a cardboard box, which is painted blue or black on the inside. And all the prepared elements are attracted to the top of the line.
I specially selected a lot of photographs made in one idea to make it clearer for you.
You can hang any content in the style of Space: planets, stars, comets, rockets, astronauts, etc.
I also really liked the voluminous idea of a planetary parade.
It is glued together in layers, in which a smaller circle is cut out.
This is what the workpiece looks like.
The sheet with the cut out circle of the largest diameter is placed first, the rest go in order of decreasing diameter.
I would also take a plasticine idea to the exhibition, which is very carefully executed and quite labor-intensive.
An option on how to make craters on the surface of the moon.
Well, remember about the growth rocket, which can also be submitted for the competition. After all, big crafts are very popular at such events.
Take a regular plastic bottle of lemonade or other liquid. It must be undamaged. Sometimes the bottle has a special coating on which you can paint with regular paint. It is necessary that the body looks like a rocket. Ask your child to come up with the name of the spaceship and write it down.
The top of the rocket should rest on the bottom of the bottle. Take a piece of colored paper and roll it into a cone. Wrap the cone in tape to keep it from falling apart. You can use special adhesive tape or colored tape. Attach the cone to the bottom of the bottle. If the cone sticks weakly to the glue, use additional tape.
In order for the rocket to stand, it is necessary to make a base. To do this, cut out 4 triangles from thick colored paper. It is desirable that the color of the paper be the same as that of the cone. Attach the triangles to the bottom of the rocket so that it rests on them and stands firmly. For security, use tape. To make the structure even, place the rocket on the neck and only then attach the triangles.
Giant rocket
Do you know how to make a HUGE rocket from 6 bottles and one small one, as well as from cups?
It’s good if real professionals who understand everything about the art of making interplanetary spacecraft get down to business. Of course, these pros are our children! Let's entrust them with such a responsible task!
Step-by-step instruction
for the space module:
- We paint all our “details”. The bottles should turn white. The cups are gray on the outside, red or orange on the inside.
- Glue 5 bottles together (four around one). On top – glue the sixth one. And glue a small bottle onto it. Place half a Kinder egg on the neck of the top; fix this detail.
- Between all the main parts we place and glue the ear sticks.
- We glue glasses to the four bottles at the base.
More details in the video:
This design can be supplemented with decoration, fins and, of course, game. It is in the game that our crafts come to life!
Another option.
Making a rocket from plastic bottles and waste material
They are gaining more and more popularity. Summer residents use them to decorate their plots and use them to make homework for school.
For example, using different volumes you can make such an instance.
Or you still have disposable tableware at home, then you can use it almost for its intended purpose. Replace the plastic plate with a flying one for the alien.
Or transform a bottle of mouthwash into a flying machine, and even with a photograph of an astronaut.
You can also make a cool plate out of ice cream sticks, a plastic container and a box of processed cheese.
And make radars out of wire.
Another idea from disposable tableware.
And when you have a whole bottle of Fanta and some cardboard, assemble a very realistic model.
Aliens can be made from wire and kinder eggs.
Old disks will also come in handy.
This option generally deserves all praise. So people tried and captured the name of the Mir rocket and elevated our country.
I think you've been inspired by these simple crafts, so let's look at how to make them step by step.
You need to cut off the bottom of the bottle and cut out the porthole.
A cone can be made using this method, when one cut is made in the circle to the middle and the edge is placed on the adjacent side.
Top articles: How to make a TV from an old LCD monitor with your own hands
We paint all the cardboard parts and the bottle body itself.
For gluing, it is better to use hot glue, so all the parts will be better fixed.
How to make a rocket from a plastic bottle?
First, let's take a bottle. Then, unscrew the lid. Instead of the lid, you need to insert a rubber stopper, which should have a fitting (nipple) for the pump.
This fitting can be glued into the cork. At the same time, the rubber stopper itself should not be secured too tightly in the neck of the bottle.
Then, you should fill your shell one third with water and insert the plug with the fitting. Next, you should put the pump on the fitting and turn the structure over.
Anything can be used as a launch platform. The simplest option is an old plastic bucket with a hole in the middle.
Place the rocket on the platform (with the plug facing down). Start pumping air into the bottle. When the pressure is high, the rubber stopper will be squeezed out of the bottle and a stream of water will lift the rocket into the air.
This is the simplest rocket projectile. It is on this principle that real rockets take off.
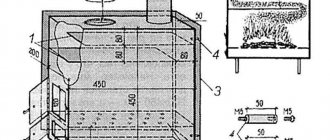
Dynamics of a pneumohydraulic rocket
Diagram of a pneumatic-hydraulic rocket Compressed air, when flowing from a rocket nozzle, is capable of creating thrust without an intermediary fluid. However, the air mass in the rocket body is limited. It seems more advantageous to use liquid as a working fluid. Due to the fact that liquid flows through the nozzle of a pneumatic-hydraulic rocket, it is not made in the form of a Laval nozzle, but has a smoothly contoured tapering shape.
The maximum speed of liquid outflow from the nozzle of a pneumatic-hydraulic rocket can be determined based on Bernoulli’s law:
ρ v 2 2 = Δ p {\displaystyle {\frac {\rho v^{2}}{2}}=\Delta p} ,
Where
ρ {\displaystyle \rho }—fluid density; v {\displaystyle v}—fluid outflow velocity; Δ p {\displaystyle \Delta p} is the excess gas pressure in the rocket.
The nozzle of a pneumatic-hydraulic rocket is most often a tapering profiled nozzle with a small jet separation. The actual volumetric flow rate of liquid through the nozzle will be:
Q = μ S 0 2 Δ p ρ {\displaystyle Q=\mu S_{0}{\sqrt {\frac {2\Delta p}{\rho }}}} μ = 0 , 6..0 , 8 { \displaystyle \mu =0.6..0.8} - flow coefficient S 0 {\displaystyle S_{0}} - area of the narrow part of the nozzle
The mass flow rate of liquid will be:
G = Q ρ = μ S 0 2 ρ Δ p {\displaystyle G=Q\rho =\mu S_{0}{\sqrt {2\rho \Delta p))}
The traction force will be:
F = Q v = 2 μ S 0 Δ p {\displaystyle F=Qv=2\mu S_{0}\Delta p}
The operating time of the pneumohydraulic engine, provided that the liquid is consumed before the compressed gas reaches:
T = m G {\displaystyle T={\frac {m}{G}}} m {\displaystyle m} - mass of liquid at rocket launch
Cutting out the stabilizers
In order for the rocket to fly smoothly, it must be installed correctly. The easiest way is to make a stabilizer (legs) from another plastic bottle. To do this, the bottle is cut in half and straightened. Then, on this flat surface, draw the contour of the stabilizer, provide a backlog for attaching to the rocket body. Now cut out the stabilizer along the contour and glue it to the rocket with tape.
The picture also shows a weighted rocket body; this author used a cut-off part of another bottle with a weight-bolt in the cap. In fact, there is complete scope for imagination and experimentation; you can accurately determine the optimal load in the head of your rocket only after several launches. The shape of the legs can also be different, for example, you can use the top of a plastic bottle, attach plastic legs to it, and place the rocket itself inside:
As for the launch pad, you can get creative here too. Some prepare complex structures with a guide axis, others cut special devices out of wood, and others simply fix the rocket on a flat surface using improvised means. In principle, the simplest water rocket after the described steps is already ready. You just need to take with you more water, a pump and an assistant: he will hold the rocket with the plug down and press the valve with his hands while you pump the air with the pump. It is recommended to pump 3-6 atmospheres into a 1.5 liter bottle (in this sense, a car pump is more convenient), then disconnect the hose and release the cap on the count of “three or four”. The rocket has been launched! It flies quite high and impressively, and most importantly, the whole process is not life-threatening. True, the assistant usually has to take a forced shower of “fuel”