Looking at the world through a perfectly clean and transparent glass window is a pleasure! But when it comes to scratches on car glass, the problem ceases to be purely aesthetic. Scratches on the windshield will impair visibility and distract from the situation on the road, so whether you are a perfectionist or not, you need to get rid of them, and quickly. But here’s the question: is it possible to fix these surface defects yourself without contacting a car service? The editors of Miss Clean decided to figure out what you can count on by relying solely on your own strengths and available means.
Features of the material and scope of application
Organic glass is produced from acrylic acid through various chemical reactions. This material is similar in various parameters to ordinary glass, but its nature is organic (hence the name of the material). There are several synonymous words - plexiglass, acryplast, carboglass, etc.
Among the main characteristics of plexiglass we can highlight:
- ease;
- softness;
- ability to easily transform;
- flexibility during processing;
- high throughput;
- When exposed to certain chemicals, plexiglass decomposes.
The impact resistance of many types of plexiglass is 5 times greater than that of ordinary glass
Polymer transparent material is used in various areas of human activity, so the use of organic glass can lead to a change in its appearance - deterioration of transparency, reduced gloss, the appearance of scratches, roughness and other unfavorable aspects. When severely damaged, carbon glass turns from glass into ordinary plastic. In this regard, the question often arises about the need to polish plexiglass at home.
Minuses
With all the advantages, there are also disadvantages. The main disadvantage is that the effect is short-term, and the process itself must be repeated with sufficient regularity. In addition, if due care is not taken during the process, the glass can easily be damaged.
But in general, despite the shortcomings, home polishing of headlights is the best option when you need to quickly and inexpensively return your optics to their excellent appearance and performance characteristics. Owner reviews say that for greater effect you should purchase a special polish.
Methods for polishing plexiglass at home
You can give plexiglass products their original appearance without resorting to complex tools or expensive materials.
There are several effective methods of dealing with the “non-commercial” type of plexiglass:
- Felt + GOI paste.
- Use of dichloroethane.
- Using polishes.
- Homemade recipes (wine vinegar, toothpaste, etc.)
Using GOI paste, sandpaper and felt (with detailed video)
This method is the most common and has proven itself to be the best among craftsmen restoring plexiglass surfaces.
You should know that there are coarse, medium and fine types of GOI paste
- Isolation of plexiglass from other structures and elements. If possible, separate the plexiglass from other structures (seal adjacent areas with tape, disconnect the plexiglass parts, etc.)
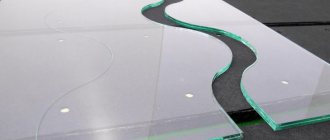
- Using sandpaper with a grain of 2000, process the organic glass, periodically wetting the surface with water (under running water or using a spray bottle). Uniformity and slowness are the main characteristics when performing this work. A matte, uniform surface should be the result of this labor-intensive step.
- The part, wiped dry, is polished using felt with GOI paste applied to it. This should be done slowly, achieving the highest quality result.
This method of restoring plexiglass is suitable for plexiglass if there are large scratches on it.
By following the step-by-step instructions in the video, you can easily cope with the task of eliminating plexiglass defects.
Restoring headlight glass from the outside - algorithm of actions
To polish the surface of the headlights yourself, you need to prepare the following materials:
- toothpaste (you can use the most inexpensive, domestically produced one);
- an electric drill with a polishing pad; if you polish with your own hands, you will need microfiber or a piece of felt;
- masking tape;
- glass varnish of the “Delta Kits” type.
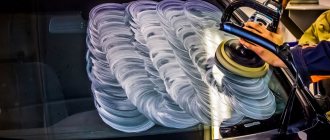
You can polish the outside of the headlights without removing them. It is enough just to seal the seals and all surfaces adjacent to the glass with masking tape so as not to damage them during the polishing process. Also, be sure to wash your headlights first with detergent so that not a single grain of sand remains on the surface. Otherwise, the surface of the headlights will simply deteriorate completely, and it is unlikely to be restored.
When all the preparatory steps have been completed, you can begin polishing. It is done quite simply: a small amount of toothpaste is applied to the surface of the headlight or felt, after which the glass is polished with an electric drill or an angle grinder. The polishing pad should be used in circular and crosswise movements. At the same time, it is extremely important to ensure that the surface of the headlights does not overheat; to do this, periodically turn off the tool and check the temperature of the glass with your hand.
We recommend: Polishing a car after painting is easy: the nuances of doing it yourself
You can use regular toothpaste as the main polishing material.
If you don't have a power tool, you can sand the glass by hand using fairly fast and vigorous movements. Of course, the procedure in this case will take you much more time and effort. Polishing should be done until the surface of the headlights begins to shine. Then the surface is cleaned from residual paste, after which the glass is polished for some time with clean felt or a polishing pad, i.e. without paste.
Polishing headlights using toothpaste makes sense if you do not have the opportunity to use a special polish; for example, you decide to do this work in the country where there are no car shops nearby. Otherwise, there is no point in saving, since special means will give better results and with less loss of time.
Then the surface needs to be coated with varnish, which will improve the light transmittance of the headlights, i.e. will make them more transparent, and also create a film that protects the glass from scratches and other mechanical damage. Before applying varnish, the headlights must be thoroughly washed and treated with a degreaser. You can even use dishwashing detergent as the latter.
Since the varnish is two-component, it must be mixed in a 1:1 ratio. Then dip a clean, lint-free cloth into the container with the varnish and use it to apply the composition to the surface of the glass. You have 10 minutes to complete this procedure, after which the varnish will begin to set.
Try to apply the coating evenly, moving the napkin from top to bottom. After this, the varnish should be allowed to dry for an hour. Please note that complete curing occurs only after a day, so during this time the headlights should not be washed or subjected to other mechanical stress.
Tips for working safely
Any effort to improve the appearance of acrylic glass will be in vain if it causes harm to your health. Therefore, when working, you must remember safety precautions:
- When working with sandpaper or sanding machine, wear safety glasses to prevent possible dust particles from getting into your eyes.
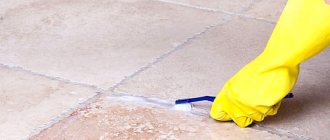
- Do not neglect the use of gloves; they are required for safe work (when sanding surfaces, when using chemicals). Select them according to the size of your hand to avoid excess fabric getting into the buffing wheel.
- When using chemicals, do not forget to supply fresh air to the room in which the work is being carried out.
- When working with special devices, be sure to check their serviceability and reliability of electrical wiring and sockets.
- When spraying dichloroethane, use a respirator or a personal medical mask.
The process of polishing plexiglass at home is labor-intensive and time-consuming, especially if you work manually. But the result will definitely reward you for your efforts. The surface of the plexiglass will become smooth, even, without nicks or scratches and will delight you for a long time.
Plastic objects surround us everywhere: car parts, household products and even sunglasses. Plastic is a popular, inexpensive, but rather fragile material, so due to frequent use it becomes subject to minor damage. There are several simple and inexpensive ways to remove scratches from plastic that will help restore the product to its original appearance.
Why is it better to contact a specialist?
And yet, GOI paste and a piece of felt cannot be compared with the equipment in the workshops and the experience of the craftsmen in terms of efficiency and feasibility.
Polishing does not cost exorbitant amounts of money, and the advantages of doing it in a salon are obvious.
- You won’t ruin the glass by mixing strong polish on the advice of an expert on the Internet or by choosing the wrong machine speed.
- The polisher at its optimal speed works more than 100 times faster than your hand with a cloth.
- The service workers have been doing this for several days and know the nuances that are not included in the instructions along with the grinding machine.
We often create scratches on the windshield ourselves by improperly washing the windows. Do not wipe them dry with rags containing grains of sand or hard fabrics - and the problem of polishing can be slightly delayed.
Polishing just seems like a simple process! To do everything correctly and beautifully, grandmother's advice may not be enough. And risking the integrity of glass worth several thousand rubles out of savings of several hundred is a dubious financial tactic.
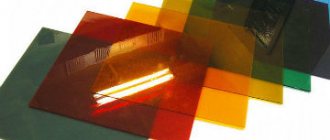
Special means
To save yourself the hassle, use special products to restore plastic items:
- scratch removal pencils;
- abrasive gels;
- polishing pastes for filling;
- restorative towels and napkins.
When choosing these products, you must act strictly according to the instructions. Some compositions are coloring. Colored substances are suitable for filling deep scratches.
Advice! Choose pastes only for soft plastic; this should be indicated on the packaging. Products cannot be used on paint surfaces.
Restoring headlight glass from the inside
In some cases, headlight polishing may be required not only on the outside, but also on the inside. For example, a similar situation often arises when using a depressurized headlight, or if xenon lamps are used as lighting elements. The principle of polishing is absolutely the same as on the outside, the only thing is that in this case you cannot do without removing the headlight.
Since the glass is glued with a sealant, you will need a hair dryer to dismantle it. With this device you need to heat the glass surface to 70-80 degrees. Heating should be done very carefully so as not to overheat the glass, as it may crack or “float”. After heating, the sealant will soften and the glass can be easily removed, the only thing is that you need to have time to disassemble the headlight before the glass cools down. At the same time, you should not pry it with a screwdriver so as not to damage it.
When polishing internal headlights, be extremely careful not to damage the lighting fixture.
After polishing the glass, it needs to be installed in place. To do this, use a special sealant for headlights, for example, Abro WS-904.
According to the described scheme, any car headlights are polished, regardless of whether they are plastic or glass.
Dealing with minor damage
Small cracks can be easily polished with a special paste. Polishing agents are divided into two groups:
- coarse abrasive compounds;
- finishing light consistency.
For household plastic products, only finishing polishing pastes are used. Abrasives can further damage items.
How to work with polish:
- Clean the surface.
- Apply a small amount of product to a piece of fabric (flannel or any soft material will do).
- Rub lightly, rinse and dry.
Causes of the problem
During normal engine operation, the car starts and warms up easily. The tachometer needle shows 2000 rpm and drops to 900 rpm as it warms up. It is not always so. The engine starts, it begins to heat up, but becomes noticeable when the speed of the VAZ
starts to swim. And absolutely nothing depends on the driver. The engine runs independently. The speed can vary over a wide range. The minimum speed drop is close to 500, and the maximum reaches 1500 rpm. Usually after 5 minutes the engine starts working stably and the problem disappears. However, she periodically reminds herself. Floating speed needs to be fought. First you need to establish the reason why the VAZ 2110 is not gaining momentum. Possible reasons
- The DMRV sensor, which measures air flow, is not working.
- IAC failure responsible for idle stability.
- The speed sensor has burned out. The wiring may have burned out.
- Malfunction of the sensor that controls the position of the crankshaft, DPKV. This usually rarely fails and is most often caused by the wiring and connection.
- The throttle valve assembly is clogged.
- Threaded high-voltage wires.
- The ignition module is not working well.
- Bad spark at the spark plugs.
- The solenoid valve is not working.
To test the solenoid valve with the ignition on, connect the power source to an outlet. A strong click should occur after touching. If there is no click, you need to connect the contact directly to the “plus” of the battery. If there is no click again, the valve has failed and needs to be replaced. Sometimes a click is heard, but the speed continues to float
Most likely the valve nozzle is clogged. Floating speed may be caused by a dirty air filter. In addition, the engine speed is also affected by the ignition system and the absence of air leaks. And if VAZ 2110
is this an injector? In modern cars, which have an injector instead of a carburetor, where the fuel supply is regulated by a special sensor, the appearance of floating speeds is often associated with the failure of one of the sensors.
What is this? The electronic control unit tries to read the information, but does not receive it. Why is this happening? The electronic control should constantly receive information about the engine, but this does not happen as a result. unstable, floating speed.
What if the electronic control unit breaks? Quite often this “brain center” becomes the main reason for the drop in speed. When one of the sensors that regulate normal engine operation fails or comes out, the system does not receive accurate commands from the on-board computer. This is how floating revolutions appear.
Restoring plastic in a car
Car owners are familiar with the situation when car parts become damaged due to frequent use. A large number of scratches will sooner or later lead to destruction of the material. To avoid complete replacement of plastic parts in the car, timely measures should be taken. How to restore integrity to plastic in this case:
- Heat treatment using a hair dryer or lighter. Before removing scratches in this way, the surface is washed, degreased with alcohol and dried. The hair dryer is turned on at maximum power. When processing with hot air, you must carefully monitor the reaction of the plastic. Defects will be smoothed out by heating. If it is not possible to achieve the desired evenness, the procedure is completed by polishing.
- Method with a lighter: the switched on device is brought to the damaged surface no closer than 5-8 mm. The fire will melt the area of the plastic, returning it to its smoothness. Important: after treatment, do not touch the hot surface; it must cool for at least half an hour.
- How to work with abrasive paste: apply the product to cleaned and dry plastic, wait according to the instructions until the paste turns white. Then the plastic is polished using a foam sponge or thick cloth.
- Express method with machine oil: drip a couple of drops of the substance and polish the surface with a thick flannel cloth. Works only on unpainted plastic, suitable for gloss.
- If the surface is embossed, only a special putty in the form of a pencil will help restore it. A masking pen is expensive, but it is the easiest way to repair deep damage. The result lasts for a long time. The product must be applied to a clean surface. Pencil residues are easily removed after drying by polishing.
Advice! The pencil is selected by color. Darker material will be noticeable after repair, which will not improve the appearance of the product.
Steam treatment
Do-it-yourself polishing of headlights with acetone vapor works like this. Solvent vapor melts the thin top layer of the headlight block, after which the headlights look like new, that’s the whole point of such polishing. The procedure is as follows:
- Don’t forget about safety precautions: there should be no cigarettes or sources of open flame (even sparks) in the room where you will be sanding with hot acetone with your own hands. Acetone and its vapors are flammable and will flare up instantly and can cause serious injury;
- Remove the inner flattened tube from the device;
- Pour solvent into the shock absorber piece;
- After which the tube is inserted back;
- Connect the heating element to the power supply (outlet);
- If the heating element is a water bath for hot acetone vapors to polish the headlights, then we begin to heat the water in which the device is located so that it does not get inside;
- Acetone boils at only 56 degrees;
- You can start treating the headlamp block with acetone vapor when steam starts coming out of the slit of the tube;
- Smoothly move the hovering tube as close to the treatment surface as possible;
- No matter how fabulous it may look, the cloudy plastic surface becomes transparent and smooth, treated with acetone fumes, right before your eyes, and no tricks;
- After completely treating the entire surface, you need to wait at least ten minutes without touching the surface or touching it with anything. Otherwise, a cloudy spot will appear at the point of contact, due to which everything will have to be redone;
- At the same time, it is more convenient to work with hot acetone steam when the headlight unit is removed from the car, because the nose is not rounded, so it will be easier to control the flow of steam when nothing is in the way;
- The main condition is smooth and consistent processing without leaving gaps;
- To ensure that the transparency effect remains for a long time, and there is no need to repeat this treatment again after one or two months, after polishing, the headlight is coated with ceramic varnish, or covered with armor film;
- After completing the process, the room should be ventilated;
Folk wisdom: life hacks using improvised means
Using the following methods to remove plastic is quite risky, especially if it is a valuable household appliance or mobile phone. However, many products are much cheaper than specialized ones and can be found in every home.
6 proven methods for restoring plastic items:
- Toothpaste and powder. The substances can be used on a plastic phone cover or sunglasses. It’s best not to experiment with the display of a phone or tablet, but some argue that small scratches can be easily removed from such fragile surfaces. How to act: apply a little paste or paste of water and tooth powder to the plastic, rub in circular motions into the damaged areas, wait until it dries, and then rinse with a cotton pad.
- Baking soda is used according to the same principle: dilute to a paste, rub into the cracked surface, rinse.
- A few drops of vegetable oil will help restore the plastic not only smoothness, but also shine. You need to apply the product to small cracks and rub until the greasy stain disappears and a pleasant shine appears.
- Furniture or car polish Jewelry polish is also suitable: it will help if transparent plastic is damaged.
- Scratches on glasses can be treated with wax . Apply the product with a cloth and rub in a circle.
- Minor damage is treated with a piece of natural suede . It is safe, unlike sandpaper and other harsh abrasives.
Which pasta is better to choose?
There is no clear answer to this question, since large-scale studies of the abrasive properties of toothpastes have not been carried out. The product is selected based on cost. Theoretically, bleaching compounds should have a good effect.
The polishing properties of the paste should be enhanced by tooth powder. It is mixed with toothpaste or used in its pure form for primary polishing.
Coca Cola
The specific properties of Coca-Cola have been known for a long time. You can use it to scrub away stains on clothes, wash bathroom fixtures, or polish boots. It is also used by motorists. For example, since the middle of the last century, American technicians preparing new cars for exhibitions at auto shows rubbed rubber tires with this drink. After Coca-Cola, the wheels became a pure matte black color. Coca-Cola dissolves fat, perfectly washes away external chemical deposits and oil films and gives black rubber a rich shine.
Question answer
Should I wax my car after washing it?
The method of application is simple. First, you need to wash the tires with water and remove coarse dirt from their surface, after which you need to let the tires dry. Well, then you can soak a rag in Coca-Cola and rub the rubber until it shines.
In addition, Coca-Cola is good for scrubbing away stains from insects that have broken on the hood and windshield.
Medicines
Drug therapy is prescribed to everyone. The course includes the following drugs:
- analgesics;
- local anesthetics;
- NSAIDs;
- muscle relaxants;
- diuretics;
- chondroprotectors;
- steroids;
- external agents.
Analgesics (Ketorol, Analgin and similar drugs) relieve pain faster if administered intramuscularly. In the future, oral administration of medications is indicated.
Pinching is often treated with a block using local anesthetics. Lidocaine injections are prescribed, which do not last long, but are enough to relieve acute pain. The same method is used for diseases such as sciatica.
NSAIDs – non-steroidal anti-inflammatory drugs. They eliminate inflammation and reduce pain. In the first days of an exacerbation, injections are indicated, after which internal (oral) administration is indicated. The group of such drugs includes Nimesulide, Diclofenac, Ibuprofen, Ketoprofen and so on.
Muscle relaxants - this group of drugs relieves muscle spasm, which helps release the pudendal nerve. Such drugs include Tizanidine, Tolperisone, Gamma-aminobutyric acid (GABA).
Diuretics - they are prescribed in a short course to relieve internal swelling in the thigh. Swelling always accompanies injury and also provokes discomfort.
Chondroprotectors - this group of drugs is indicated for degenerative processes in the joint, which caused the infringement, since drugs in this group stimulate the restoration of cartilage. The most common: Teraflex, Chondroitin, Glucosamine, Structum.
Steroids (Prednisolone, Dexamethasone) – these drugs effectively relieve swelling and inflammation. Prescribed by injection in a short course under strict medical supervision. They are used only in cases where NSAIDs do not give the desired result. Both dexamethasone and prednisolone are potent hormonal drugs that should not be abused.
External products - ointments, gels - contain NSAIDs. They can have a warming effect, which relieves muscle spasms and improves blood circulation in the back, buttocks, and thigh.
Alternative Cleaners
Having mastered the above unpretentious recipe, you can try more complex cleaning methods - using specialized cleaners. Here you can’t do without a special device - a thickness gauge
, – which will prevent damage to the paint or enamel layer during operation.
3M polishing kits as cleaning agents.
and the like, including kits for polishing headlights and bodywork; GOI paste of varying degrees of impact (from fine to coarse), abrasive special polishes.
The latter are intended for the most advanced cases; the active chemicals they contain corrode almost any extraneous deposits. But here you need to take special care - aggressive action on the surface poses a serious danger to the enamel. It should be used only after consultation with specialists!
Let's return to the main idea of the article:
The most acceptable way to clean headlights is to treat them with toothpaste - this option is absolutely safe and extremely economical, and the achieved result is more than acceptable. A review of polishing headlights with toothpaste is a guide to action for caring motorists who are seriously concerned about the appearance of their car.