What can you take as the basis for a homemade unit?
Many people are interested in how to make a vacuum cleaner with their own hands.
You can take as a basis:
- Hood motor with centrifugal fan. The axial model is not suitable, since it is used in models in the cheap segment and does not have the required power.
- The engine of a disused vacuum cleaner.
- Washing machine motor.
- Refrigeration compressor motor.
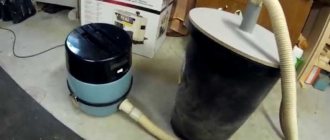
Cyclone vacuum cleaner for workshop
Another option for a construction vacuum cleaner, but with a more complicated design. This replacement for the commercial model is made from an old vacuum cleaner, a plastic container, and a cyclone filter.
The peculiarity lies inside the design - it is a metal casing to protect the filter.
The cost of homemade products is determined by spending on individual parts. An old, but working, household vacuum cleaner was found in the pantry, a plastic tank was purchased for 500 rubles, a filter for a Gazelle car - 180 rubles. It's easy to calculate the total cost.
You will learn how to make a cyclone for a vacuum cleaner from our article. It describes the assembly process in detail.
Receive one of the most read articles by email once a day. Join us on Facebook and VKontakte.
Making a vacuum cleaner with your own hands is not at all difficult. Moreover, its creation will take even less than one hour. You will have to work hard, but the result is definitely worth the effort. Those who nevertheless decide to take on an engineering adventure must have with them an electric motor, an empty bottle, glue, wires and some other small items. How exactly the technological process of creating a handicraft vacuum cleaner looks like, see in the video below.
Refrigerator Engine Application
How to make a vacuum cleaner from a refrigeration compressor? It will be difficult to select a part, since the shaft rotation speed varies among different models of refrigerators. If you are assembling a vacuum cleaner, then a strict 6000 rpm will be required. Old rocker type compressors are designed for 3000 rpm.
Crank modifications have half the speed, and linear inverter units are not at all suitable for assembly.
There is an electric motor inside a piston compressor. If you cut the housing and remove the motor, it will be suitable for any purpose. It has high power and silent operation.
Asynchronous motors are rarely used. For example, a manifold configuration operates from a wall outlet if speed control is not required.
Recommendations for choosing the optimal model
Before purchasing, be sure to check the technical data sheet and characteristics of the device . First of all, look at the type depending on the power source: buy combined models. The second important sign is the power indicator (the amount of suction force). The low-power sample is suitable for quick and easy cleaning. More powerful vacuum cleaners are suitable for effective and long-lasting interior cleaning.
The number of carpet cleaning attachments (brushes, turbo brushes and many other items) closes our rating of mandatory signs of a quality product.
Now you know how to choose a vacuum cleaner for your car; sales assistants in stores or online assistants on websites will provide you with additional information. Don’t chase cheap prices and fill the trunk of your iron horse only with quality items.
Source
How to make the unit suck in dust?
In commercials they often talk about the vacuum created in the vacuum cleaner. The engine supposedly contributes to the vacuum, into which the drawn air flow rushes. But is this really so? Most likely not, because with negative pressure a bypass valve is connected to ensure equilibrium. But this is not the essence of the work. To suck in dust, a hermetically sealed housing is used, thanks to which the flow of nitrogen and oxygen molecules rushes in the desired direction. The container does not play any role in this case.
If you stick to the factory configuration, you need a bucket made of steel or plastic, the bottom of which has a hole for air intake. The motor is mounted on the axle, and something similar to a squirrel cage is installed on the shaft. The air flow is captured by the blades and thrown out to the perimeter. This ensures traction. A hose is sealed to the bottom. We will assume that assembling the vacuum cleaner with your own hands is completed.
DIY car vacuum cleaner 12 volt
Good day everyone!
I’ve had a Chinese vacuum cleaner lying around for a long time (almost a year), donated by I don’t remember who, but why is it lying around idle? Yes, because it seems to be buzzing quite well, but it refuses to suck up dust and debris, the suction power is negligible! Well, I think it’s still lying around, so you can dig around, try to repair it, it won’t work, I’ll throw it out) said done! this is our test subject
the reason for the weak suction, a small fan, the height of the blades at the edges is slightly less than 4 mm
I take a soldering iron and start sawing it mercilessly)
then I solder the sawed off parts onto the fan blades, now they are 12 mm!
I'm putting everything back in place!
now it’s no longer a Chinese vacuum cleaner, but just a monster))) it only vacuums dirt, just give it time)) after this modernization, another problem appeared, a weak filtration system, stupidly dust began to fly through the dust bag, but there will most likely be a post about this problem and its solution Later. smooth roads everyone!
“He has golden hands” - this is what they say about craftsmen who are able to assemble a miracle of modern technology from scrap materials. Despite the abundance of inexpensive ready-made equipment in stores, self-taught craftsmen successfully design and create household appliances, units for the garden plot and very effective devices for the workshop.
It turns out that you can also assemble a vacuum cleaner with your own hands. The main thing is to understand the design, find the necessary parts and allocate some free time. We offer three interesting models for independent experiments.
How does a mini vacuum cleaner work?
How to make a mini vacuum cleaner? The speed of the unit is controlled using a thyristor circuit. Any electronic part from an old vacuum cleaner, washing machine or food processor will come in handy.
The main thing is the cutting method, not the engine power. But the key also overheats. It is easy to understand whether it corresponds if you compare the power of the device from which the circuit was removed with the power of the engine. If the thyristor indicator is low, then it is recommended to attach a radiator to it, and forced cooling is already available.
Classification of vacuum cleaners: choosing the best
To understand which vacuum cleaner is best to choose, you need to familiarize yourself with all the types of devices. The assortment of electrical stores is replete with an abundance of options for all types of cleaning (wet, dry, mixed). A handheld interior vacuum cleaner removes dust, dirt, sand, as well as traces of water and snow.
All products are divided into groups. Depending on the material, paper and cyclone filters are distinguished. The first option is made of fabric. Disadvantages: quick clogging, difficult cleaning. The cyclone filter contains a special container, thanks to which dust and debris settle along the walls. Dirt is removed by shaking out; no replacement bags are needed. The downside is the high price and poor dust removal.
A new product on the modern market is a manual vacuum cleaner for cars with an aqua filter. Such models are better at cleaning the air from harmful particles, but the additional presence of liquid makes the device heavier and makes maneuvering more difficult.
Depending on the power supply scheme, products are divided into:
- working from the cigarette lighter;
- cordless vacuum cleaner – does not allow cleaning for a long period of time (the built-in batteries are discharged and require recharging);
- combined type - having its own battery and cord for connecting to the cigarette lighter. You can recharge both from the home network and from the on-board generator.
Which device is better to choose ultimately depends on the planned duration of use and the size of the cabin. The most popular today are vacuum cleaners with cyclone (air) filtration, which are supplied with power from the cigarette lighter.
How to make a container for a homemade vacuum cleaner?
The vacuum cleaner is designed in such a way that it will not work without a container.
Suitable for a homemade unit:
- ordinary bag;
- container filled with water;
- cyclone chamber.
Filtering the bag is problematic. If you will be vacuuming crumbs from the table, this design will work. The type of container is selected according to the type of waste. For example, it is better to collect dust using a filter with water or a cyclone chamber. Both types of containers are easy to construct. The unit itself turns out to be stationary. If a gardener uses such a device, it can be placed on a cart and moved throughout the garden.
The cost of stationary models of vacuum cleaners is high, so a homemade design will come in handy.
The simplest container model is a large tank filled with water. It plays the role of an aqua filter. In this case, the dust will sink. The inlet hole of the hose is made taking into account that the flow collides with a water barrier. An ordinary flat-bottomed box is filled two-thirds with water. In addition, a partition hangs from the ceiling above the surface of the filter. All the dust settles in the water and drowns. This device requires periodic cleaning. This design will not be suitable for working in the garden, since the weight of water is large. Therefore, it is replaced with air.
When assembling garden vacuum cleaners with your own hands, adhere to the following rules:
- The air enters tangentially into a tall barrel.
- Along the axis of the container, up to approximately two-thirds of the height, there is a pipe that provides an outlet.
- The garbage settles to the bottom due to the fact that it is carried to the periphery by centrifugal force.
- The air flow exits in the center.
- The smallest particles penetrate the engine in any case. Therefore, it is recommended to equip the container with a HEPA filter at the outlet. It's not worth saving on this. Otherwise, you will have to constantly lubricate the engine. If the vacuum cleaner sucks in water, it will end up in the barrel.
This homemade vacuum cleaner is great for a gardener. The unit can also be made universal. For example, cut a barrel to the diameter of a tank with standard dimensions and equip the device with a van for transportation. This way it would be possible to clean up an entire park.
FakeHeader
Comments 110
I didn’t post the full drawing, the principle is not completely clear
The cyclone principle, there are variations on YouTube
You made my dream come true, the house was worth it, I really wanted to make such a cleaning system for myself, the system cost about 100t to buy, ... I moved into the house, and we carry a vacuum cleaner around the rooms to spray dust...
in dust, the HEPA filter traps small particles, so the dust in the bag... is something you throw out of a vacuum cleaner in the trash
It is a myth that a HEPA filter traps all dust. Yes, it more or less delays the visible. But the most dangerous for a person - the smallest - passes. Well, the air itself coming out from behind the vacuum cleaner lifts dust from the floor.
You made my dream come true, the house was worth it, I really wanted to make such a cleaning system for myself, the system cost about 100t to buy, ... I moved into the house, and we carry a vacuum cleaner around the rooms to spray dust...
Dreams Come True ! I have the same story. I really hope that my experience will help you realize your dream! This is why I tried. Good luck!
Cool solution. I took note. Just a question or an improvement proposal: what if the pipes (even ordinary sewer pipes) were cut in half lengthwise, treated with an antistatic agent, and then glued together, making a blank wall in the middle? This way we have cable routing throughout the house in one half, while the functionality of the vacuum cleaner remains in the second. All that remains is to create protection against the sock getting into a narrower channel, which in principle can be solved with a wide # at the end of the flexible hose.
Why reduce the cross-section of pipes? The main task when laying any pipes is to preserve the existing 50 mm diameter and make the most flexible turns (by the way, for sewer pipes they are steeper and more angular) so as not to lose productivity and flow speed. The wires are laid side by side in a cable channel. And the sock can only be tightened specially (the nozzle already has a narrow gap). Only women's stockings! )))
Perhaps you are right, but is the suction power in remote places (on the top floor in the back room) sufficient or are there turbines that enhance the suction?
There is only one turbine. The power of my turbine is approximately enough to remove the outlet from the vacuum cleaner up to 15-20 m. For a house, 250-300 m is enough. I didn’t notice any loss of power - either directly into the vacuum cleaner or into a distant outlet. Apparently, these losses are insignificant compared to the reduction in diameter on the “mop”. But I'll try to measure it later.
I've heard about this. that you just connect the hose in any room and off you go. Cool
It is necessary to make not a storage facility/bunker, but immediately so that it is thrown out (to the neighbor). =)))))
This is inhumane and non-ecological. And then where to look for socks? )))
How is this where? At the neighbor's! 
Very good! Both execution and description, all without water and snot! With great RESPECT, thank you for showing me! Added it to my wishlist!
Thank you! Cheers!
Cool)) Bookmarked)
Interesting text description with calculation of time, cost and various nuances
Added to favorites
Author. A very decent design. Don’t listen to armchair experts, they would criticize and crap the creation of any person, but it’s not destiny to do it yourself. The main thing is that you like it and there is benefit. Impressed by your abilities. Carry on further.
Sometimes the sofas suggest a smart idea, let them discuss it, and maybe they’ll come up with something else.
Well it's called brainstorming
What if a sock gets stuck in the air duct? How can you tell which one it is in and how to get it out? Something often gets stuck in my hose
How to make a mini vacuum cleaner from a plastic bottle?
Today, almost everyone has a computer at home. As you know, its body periodically becomes clogged with dust, which interferes with the cooling of many parts. The circuits should be vacuumed from time to time. To make the process easier, you can use a homemade mini vacuum cleaner.
How to make a vacuum cleaner from a bottle?
To manufacture the unit you need:
- computer fan;
- plastic bottle;
- hose;
- polystyrene;
- power supply 220 V/14 V;
- insulating tape;
- paralon
Preparation
At the very beginning, you should clearly define the goals that your homemade vacuum cleaner will need to accomplish. Some features of its design will depend on this. If we need a small vacuum cleaner to clean our computer, then a battery-powered motor from a children's toy will do just fine. If we are going to make something more serious (for example, a household version), then the parts and materials used must be, accordingly, larger and stronger.
You need to be more careful when choosing a motor and a power source for it. Their electrical characteristics must completely match, otherwise problems may arise: one of the two will either burn out or simply not work.
Progress
- A plastic bottle is cut in half. Take the part that remains with the cork. A filter is cut out of foam rubber. It is inserted into the neck. The material should fit tightly.
- A hole is threaded through the plug into which the hose is inserted.
- The cork is screwed onto the bottle.
- Take a fan from a computer (its corners are smoothed). It is inserted into the bottle in such a way that during operation the air flow flows towards the wide side of the bottle.
- The place where the cooler is located is wrapped with insulating tape. Wire is used for strong fixation.
- The power supply is connected to the fan. The red wire is connected to the positive side, and the black wire to the negative side.
Advantages and disadvantages of filters
Here we will look at the advantages and disadvantages of each type of vacuum cleaner filter. There are three main types of vacuum cleaners:
Bagless vacuum cleaners are cyclonic or, as they are also called, container vacuum cleaners.
Detergents that work with water contain an aquafilter.
And the most common type of device is one containing a classic bag. Suitable for both dry and wet cleaning. Instead of a bag there may be a dust collector.
These types have a huge range of different models, among them there are those that leave satisfied customers, but also that leave only disappointment.
Cyclonic
Vacuum cleaners do not contain dust collectors or bags. Thanks to modern technology, you no longer need to use Dyson's invention. European manufacturers for a very long time did not want to produce this type of vacuum cleaner, knowing that they had many disadvantages, but consumer desire turned out to be higher. They appeared on trading floors and store shelves quite recently, about 5 years ago. At that time, they had a high cost, and not everyone could afford to buy one.
Today, many users of cyclone filters are disappointed with their purchase. It remains to understand why, and for this we need to consider the pros and cons:
- It has very good advertising, thanks to which the vacuum cleaner has become very popular
- No need to spend extra money on bags. In European countries, you save a couple of dollars per month.
- They do a good job of cleaning the air from dust, which is well removed using a rotating vortex, that is, a cyclone.
- If the container is almost full, this does not affect the suction of the vacuum cleaner; there is no need to increase it.
There are advantages, but they are minor. Now let's look at the disadvantages:
- According to customer reviews, it was found that it absorbs long particles very poorly, for example, feathers, threads, hair, path. Because of this, protective or additional filters become clogged very quickly. They can take the form of an accordion, a flask, a cup, a flat foam rectangle, and so on.
Article on the topic: How a pool vacuum cleaner is rechargeable handheld vacuum reviews
With aqua filter
As soon as these models were released, they were very popular for cleaning in hospitals, special industries or laboratories. Both before and now, vacuum cleaners with an aqua filter are expensive, since they carry out dry and wet cleaning at the same time. Now let's look at why they became famous:
- For work, water is used, not a bag, which must be purchased separately. This is one of the fine filtration systems.
- The aquafilter absorbs dust and debris, but water-repellent substances, such as oily wool or waterfowl feathers, plastic shavings or synthetic materials, remain on the floor.
- This type of vacuum cleaner has a fast air flow, which can lead to evaporation of water. Because of this, the fluid equation decreases, dirty air does not clean the carpet, and can also cause the vacuum cleaner to break down.
- When the vacuum cleaner operates, the air in the aquafilter heats up. This can lead to the proliferation and formation of many bacteria and microbes, since a warm environment is excellent for their habitat.
- After each cleaning, all parts require thorough cleaning. This takes a lot of time, patience and such cleaning is very unhygienic
Stages of work
- First of all, the Ural garbage collector should be modified. For this purpose, use a screwdriver to unscrew the wheels from the very bottom. The holes are sealed with tape.
- Then you will need a grinder, with which you can remove the latches and fasteners. A plug is installed, rewound with insulating tape.
- A hole with a diameter of 43 mm is drilled in the bottom.
- Gaskets with a thickness of 4 mm are cut from the seal.
- A gasket, a bucket lid and a centering pipe are placed in the garbage container.
- Using a drill, a hole with a diameter of 2 mm is made.
- The cover is fixed with 4.2x10 mm self-tapping screws.
- An external hole is made for the suction pipe. It is marked at an angle of 15º. The hole is cut with metal scissors.
- The pipe is secured with self-tapping screws. To seal, use an ordinary medical bandage, which is impregnated with Titan glue. The bandage is wound around the pipe.
Recommendations from professionals
The reliability of homemade structures greatly depends on the craftsmanship. During operation, this technique requires constant attention.
Recommendations for creating and using homemade vacuum cleaners:
- A constantly running engine will heat up, so it is necessary to take regular breaks from operation. If a self-assembled device uses only a motor from a household appliance (without a housing), you can additionally install fans to cool the motor.
- Static electricity can accumulate on the body of the vacuum cleaner. It is advisable to ground the device during operation.
- Don't wait until the dust container is full. Emptying bags or containers more often can reduce the load on the engine.
- If you plan to use a powerful motor, plastic buckets may become deformed when you turn on the vacuum cleaner. In this case, metal containers are better suited.
Sometimes modifications lead to loss of initial power or reduce the reliability of the device. Only the accumulated experience of the master will help you avoid mistakes.
Rate this post
Assembling the device
- First, take the lid of the bucket. A hole is cut in it at an angle of 90º. Then a corner of the same size is inserted.
- When the corner is inserted into the lid, all the cracks are covered with glue using a construction gun.
- A slot is made in the side of the bucket into which a 45º angle is inserted. All cracks are also covered with glue.
- To connect the corrugation to the corner, you need to cut a piece of pipe with a diameter of 40 mm. The corrugation should fit tightly. If it does not fit on the inlet pipe, then you can resort to using a siphon model on the kitchen sink.
- The narrow end of the corrugation is adjusted to a forty-millimeter pipe. The other end is connected to the opening of the vacuum cleaner.
- To extend the service life of the filter, a nylon stocking should be placed over it.
Why does the vacuum cleaner still fail?
With this method, all the fine dust will enter the vacuum cleaner bag, and more or less large fractions will simply settle and remain in the bucket. As do-it-yourselfers assure, more than 95% of construction waste settles in the separator and only 5% goes directly into the dust collector of a household vacuum cleaner.
However, the thing is that even this 5% can gradually kill the vacuum cleaner. In addition, even for industrial cyclones, the declared efficiency is rarely more than 90%, but what about home-made products, in which the aerodynamics are far from perfect.
For 100% collection of the fine fraction, an electric precipitator or bubble column is needed.
By the way, some types of dust cause very strong static voltage. Be careful when working.
The longer you work with the unit without unplugging it, the higher the charge may be. Here, read the instructive commentary of one real user of such a homemade product.
Therefore, on many cyclones, even factory-assembled ones, the flange is grounded.
Five percent of fine wood chips is certainly not dangerous for a household vacuum cleaner. What if it is fine cement dust during gating?
When such particles get inside, they clog the filter tightly.
And this happens very quickly. The entire efficiency of the “cyclone” drops by at least 2/3 within a matter of minutes.
The main problem is the dust bag. It is dense and the filtration area is small. Therefore, it is not suitable for waste from plaster and concrete walls.
What to do? Is it really impossible to do without a real construction project? During intensive work, only an expensive and professional tool really saves you.
Can an old vacuum cleaner come in handy?
There is an old vacuum cleaner at home. What can be made from an unnecessary unit?
If the device works, then it can be used for another purpose. Some methods require technical training, since alteration of equipment is dangerous. In particular, you should understand the principle of operation of motors.
This article will describe the safest methods.
Design principle
The most common device for these purposes is an industrial vacuum cleaner with a cyclone filter. In order to understand how to turn a regular vacuum cleaner into a construction one, it is necessary to make a number of changes in its design.
A regular household vacuum cleaner is not suitable for cleaning construction waste for a number of reasons:
- low power;
- filtering features.
Due to heavy dust particles, a household vacuum cleaner does not have enough traction and suction power to cope with it. Due to the design feature of the filter, its small cells become clogged with these particles. As a result, the motor receives additional load with a subsequent decrease in traction.
What can you do with a Typhoon vacuum cleaner?
What to make from an old Typhoon vacuum cleaner? The operating principle of the unit is characterized by a high level of performance.
The body of a Soviet-made vacuum cleaner is ideal for creating a device for chopping grass. It has a top hole of suitable diameter. Typhoon is an excellent option, but not the only one.
Homemade
I received an assignment from my wife to make an ice ax-scraper, not too heavy, for thin ice on the steps near work. You know how it happens: “I should knock some piece of ice at work, otherwise I’m beating it with a shovel.” After some thought, the idea was born to make the striking part in the form of a blade from a razor. It was done in a hurry in a cold garage, so painting was difficult, but “we are not used to backing down. "
Materials: 3 mm steel, M16 × 80 bolt, M16 extended nut, thin-walled chrome-plated pipe, mop handle, heat-shrinkable tube. Tools: angle grinder, drill, welding, files, gas burner and of course a fan heater.
My wife was delighted with this “exclusive”)))
What else can be used?
- The body of the device can be replaced with a cylinder-shaped container. For example, a pan, a bucket or a piece of pipe is used.
- The 180 Watt motor is taken from an old washing machine.
- A hacksaw blade is used as knives. For the stand you will need a rectangular profile measuring 15x15 mm.
- The bushing for attaching the knives is turned on a lathe. Its height is 40 mm.
- The motor with the pulley removed is attached using pins from below to the container.
- To clamp the knives, water nuts with a diameter of 32 mm are used.
- A hole is cut for the motor shaft.
- For reliable fixation on the shaft, a pair of holes with a diameter of 7 mm and an M8 thread for locking bolts are made in the bushing.
- Pads are machined on the reverse side of the motor shaft to increase the level of reliability of fastening the bushing with locking bolts.
Homemade washing vacuum cleaner: the manufacturing process from a conventional apparatus
Before making a washing vacuum cleaner from a regular one, it is important to understand what tools are needed for the job and what needs to be taken into account.
Tools and Supplies
Materials required for self-construction:
- a container with a lid (for example, a three-liter jar);
- straight sewer pipe, diameter 32 mm;
- elbow (90°) with the same section;
- corrugation, suitable in diameter to the pipe, 1 m;
- a small piece of a bicycle tube with special holes;
- nozzle without bristles;
- liquid bottle with sprayer;
- insulating tape.
- glue gun,
- knife/scissors to cut round holes for pipes in the lid.
Assembly takes place in several steps.
- First, prepare the pipe: its length should be one third shorter than the height of the tank.
- Two holes are cut out on the lid, corresponding in diameter to the prepared pipe sections. To make cutting easier, the lid should be heated.
- Use sandpaper to sand the surface near the holes on the lid and pipe (to help the glue adhere better).
- A piece of a bicycle inner tube with holes is pulled over a piece of straight pipe so that the rubber restrains the speed of water flying into the tank, otherwise the liquid may get into the outlet of the tank and damage the vacuum cleaner.
- Insert the pipes into the lid and glue them together.
- Attach the filter to the pipe with electrical tape.
- The elbow (outlet) accommodates the bell of the vacuum cleaner hose; the straight pipe (inlet) is connected to a corrugated hose, on which there is a nozzle for collecting water. If its base is smaller in diameter than necessary, you can increase it with electrical tape.
Article on the topic: Plotter stickers, what are they?
To check how the equipment works, you need to select an object that requires cleaning. It could be a piece of upholstered furniture that needs dry cleaning.
- Pour clean water into the bottle, add detergent;
- apply the solution with a spray tip to the surface of the selected furniture;
- turn on the device;
- pressing, move the tip up and down repeatedly over the area of contamination;
- At the same time, monitor the condition of the tank, in which water flowing from a straight section of pipe should not enter the elbow.
In case of strong splashes, the holes in the bicycle tires must be made smaller or the power of the homemade equipment must be moderated. If there is insufficient pressure, there may be an air leak. To eliminate it, you need a tighter lid or a seal at the junction of the corrugation with the tip and with the straight pipe. You can seal it by wrapping electrical tape.
The method for cleaning the tank is simple:
- remove the cover,
- pour out the waste water,
- rinse.
Making a grain crusher
To make a grain crusher, a person must have experience working with equipment. Making a device yourself without the appropriate knowledge is not recommended.
- Take a square sheet of plywood. An electric motor is mounted on it so that the shaft goes down 40 mm.
- The steel plate is installed on a threaded tail. It is secured with nuts, bushings and washers.
- The leading edges are sharpened on both sides of the axle.
- The axial hole is made in the middle of the plate.
- To create the working chamber of the future unit, a ring-shaped housing is made. It is based on metal strips. The correct design of the part involves arching the ribs of the rings outward. They should form 10 mm flanges. It is with their help that the body is attached to the base. A sieve is screwed onto them.
Disassembly
The engine of an old vacuum cleaner will be useful for building household appliances. But before creating a new item, you need to remove and disassemble the heart of the dust collector.
Sometimes during disassembly it becomes difficult to remove the nut that holds all the parts of the unit together. The nut holder is firmly seated in the middle of the motor using sealant.
Motor from Samsung dust collector - 11ME83
Attention! You cannot turn the rotor of electric motors with metal tools like a screwdriver while trying to remove the nut. The nut will be removed and the winding will be damaged. It is unlikely that you will be able to restore the outline with your own hands.
The following is information on how to easily disassemble the motor of an old vacuum cleaner using common tools.
List of required materials
For disassembly you will need:
- pliers;
- screwdrivers;
- a wrench for unscrewing a nut with a diameter of 1.2 cm;
- vice;
- 2 wooden blocks 10x40 mm;
- round file;
- hacksaw designed for metal surfaces.
The dust collector motor is always assembled in the same way. The difference lies in the volume and weight of the parts. Tools must be appropriate for their size.
Procedure
Before disassembling the motor of an old unnecessary vacuum cleaner, preparation of the tool and the unit itself is required. First, the brush is unscrewed from the rear surface, then the casing is removed, the role of which in the engine is to cover the impeller from the front side.
Broken impeller in the motor
Often the casing is firmly attached to the body. In this case, pliers are used: the edges are bent on the sides and the casing is pressed out using a screwdriver.
Procedure for unscrewing the nut:
- The rotor is carefully locked by tightly clamping it through the recesses that are intended for brushes. To do this, you will need bars, the size of which is indicated above. Wooden blocks are inserted into the recesses for the brushes. The entire structure is pressed tightly against the anchor using a vice. If the bars do not fit into the brush holes, they can be filed with a round file.
- The nut is unscrewed using a wrench. The wrench attachment is selected according to the size of the nut.
- Removing the rest of the structure. Suitable screwdrivers are taken from the tool kit to unscrew the remaining parts on the engine.
They disassemble the motor in order to determine the breakdown or modernize it to create other useful household items.
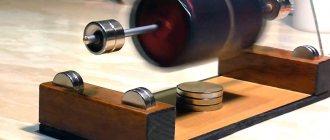
Making an attraction for children
What can you make from an old vacuum cleaner for children? If the unit's motor is running, it can be used for an attraction.
For this purpose, the tennis ball is pierced through with a pin, so that the ends of the pin are on both sides of the ball.
After this, the propeller is manufactured. A polystyrene jar is used. The propeller is attached on top of the ball. One strip is enough for it. It is cut using scissors.
The propeller is pierced in the middle and placed on the axis of the pin. For speed and ease of rotation, it is recommended to make bearings from beads. They are attached to both sides of the strip.
The upper edge of the pin is bent so that there is no large play on the axis.
Such a ball can be launched into the air through an exit hole. If desired, the ball is decorated with sparkles.
A simple modification to a cheap car vacuum cleaner
The car equipment market presents a wide selection of car vacuum cleaners. However, the cost of many of them is quite high, and cheap Chinese analogues cannot satisfy users with their power level. If you only have a low-quality car vacuum cleaner, you can upgrade it yourself, at home.
To do this, the first step is to figure out what exactly negatively affects the suction level of the device. After disassembling such a vacuum cleaner, you can easily notice that the main disadvantage is the large number of gaps between its elements, which allow air to pass through, thereby reducing the overall power. This indicator can also be affected by a deteriorated mesh that acts as a filter.
The main materials you will need are FUM tape about 1.5 cm wide for sealing, as well as a piece of non-woven fabric that can replace a leaky filter.
The modification process is extremely simple:
- The filter is covered on top with a prepared piece of material (cut according to preliminary measurements), after which it is secured with a part installed on top.
- All spare parts that have gaps during assembly are wrapped with a layer of fume tape. The car vacuum cleaner is put back together.
What should a separator vacuum cleaner be like?
The separator with which the device is equipped separates substances by density and specific gravity. When such equipment operates, maximum spin-up of the flows in the water tank occurs. The best models of separator devices are distinguished by a powerful device, an aqua filter and a stand on wheels. The absence of a conventional filter allows for constant suction power.
Separating equipment is designed to remove dried dirt and wool. It can be used to clean carpets, furniture, blankets, pillows, curtains and toys. A vacuum cleaner with a built-in separator is designed to operate in dry or wet cleaning mode. The first of them makes it possible to clean surfaces that do not like moisture. These include laminate or parquet. The washing mode allows you to clean and moisten the microclimate of the room. At the same time, you can get rid of bacteria, germs and allergens. Ionization of the room makes being in the room pleasant and comfortable.